
Modern Dojo applications often use declarative programming, annotating HTML elements with custom attributes containing module identifiers, to declare widgets and use client-side rendering with HTML templates to convert web pages into JavaScript applications.
Client-side rendering often comes with a major complaint, the dreaded “pop-up effect”.
This happens because the HTML initially displayed does not contain widget templates until after client-side rendering has finished. Essentially, the application has to load twice, once to download all the JS, CSS and HTML resources, then again, to render widgets client-side.
Usually this is hidden behind an overlay screen, which becomes especially annoying in multi-page applications.
So, what can we do?
Templated widgets provide a good pattern for building re-usable application modules but client-side rendering can provide a less ideal user experience.
Reading an article about the technology stack behind Google+, Google were using page widgets with templates supported by the Closure framework. However, they had an interesting idea to overcome the client-side rendering issue…
We often render our Closure templates server-side so the page renders before any JavaScript is loaded, then the JavaScript finds the right DOM nodes and hooks up event handlers, etc. to make it responsive. Joseph Smarr http://anyasq.com/79-im-a-technical-lead-on-the-google+-team
Could we use the same server-side rendering technique in Dojo applications?
Doing a little investigation, Dojo’s abstractions around widget rendering made it perfect for server-side rendering.
Tl;DR? Project source code is available on Github here.
Dijit Widget Lifecycle
Dojo widgets inherit from the following base class, dijit/_WidgetBase, which provides the widget lifecycle, which can be extended with custom implementations.
- constructor
- parameters are mixed into the widget instance
- postMixInProperties - Invoked before rendering occurs, and before any DOM nodes are created.
- buildRendering - Used to define the widget’s DOM nodes
- setters are called - Custom attribute setters are called
- postCreate - Widget has been rendered.
- startup - Parsing and creation of any child widgets completed.
All lifecycle methods are executed in linear order for each new widget instance. Having clear abstractions around where and when the widget rendering occurs in the lifecycle (buildRendering) makes extending simple.
Rendering widget templates is provided by an additional mixin, dijit/_TemplatedMixin.
There’s also a further extension, dijit/_WidgetsInTemplateMixin, for ensuring child widgets within the template are instantiated correctly during rendering.
If we provide a pre-rendered template within the page, the client-side renderer will hook up that DOM node as the widget’s DOM node, using a custom lifecycle extension, rather than attempting to construct the HTML template client-side.
We only need to modify the buildRendering phase, every other lifecycle phase will run normally.
Rendering Templates Server-Side
Now we know where to hook up a pre-rendered template, how would we render the templates server-side?
We want to support server-side rendering with only minimal changes to an application.
### Running Dojo on NodeJS
With the recent popularity of NodeJS, we have an excellent server-side JavaScript environment. If we configure Dojo to run within this platform, we should be able to construct page widgets server-side, delegating template rendering to the same lifecycle used client-side.
This code below shows how to configure Dojo on NodeJS.
    dojoConfig = {
        packages: [
            {name: "dojo", location: "./lib/dojo"},
            {name: "dijit", location: "./lib/dijit"}
        ],
    };

    require("./lib/dojo/dojo.js");
Once we’ve evaluated the dojo.js file within NodeJS, the AMD loader (require/define) is available through properties on the global object. We can use these functions to load additional DTK or custom AMD modules. Accessing page widgets using the AMD loader, we can execute the lifecycle methods to trigger template rendering, read the rendered template and include the output within the application’s HTML pages.
Unfortunately, there’s one thing missing… access to the DOM!
Simulating a Browser
Dojo widgets need access to the DOM when rendering the static HTML template into live DOM nodes. Running inside a NodeJS instance, rather than a browser, this API is missing.
Luckily, there’s a pure-JavaScript implementation of a DOM, which can be executed within NodeJS, called JSDOM.
Importing this package within our application simulates those APIs, allowing page widgets to render normally and, more importantly, letting us access the live DOM nodes which result from widget rendering.
Finally, creating Dojo widgets within our fake browser environment triggered a few issues, due to the configuration used with the NodeJS loader.
The code snippet below shows how we initialise a server-side DOM and fix those configuration issues.
var jsdom = require("jsdom").jsdom,
    document = jsdom("<html></html>"),
    window = document.createWindow();

var has = global.require("dojo/has"),
    win = global.require("dojo/_base/window"),

// Manually add event listener test as this was only included in
// the "host-browser" profile.
has.add("dom-addeventlistener", !!document.addEventListener);
has.add("dom-attributes-explicit", true);

// Fix global property to point to "window"
win.global = window;
Now we can successfully create widgets on the server-side, how do we know which widgets to create for an application?
Declarative Dojo Applications
Dojo provides a mechanism to convert HTML elements, annotated with module identifiers, into page widgets at runtime.
Using the dojo/parser module, once the page has loaded, it will automatically instantiate the widgets, passing in parameters and other attributes defined in the markup.
An example of declarative widget declaration is shown below.
<select name="state" data-dojo-type="dijit/form/Select">
    <option value="TN">Tennessee</option>
    <option value="VA" selected="selected">Virginia</option>
    <option value="WA">Washington</option>
    <option value="FL">Florida</option>
    <option value="CA">California</option>
</select>
Application pages using declarative markup can easily be scanned to find application widgets that are needed. As we’re able to run AMD modules server-side, we can simply use the existing Dojo parser with our server-side DOM to do the hard work for us!
Server-side Parsing
For a sample page we want to pre-render, we inject the HTML source into our DOM and run the parser over the current instance. Once the parser has finished, the server-side DOM will contain the rendered templates for each widget.
var parser = global.require("dojo/parser"),
    source = "... page html goes here ...";

// Overwrite finished document contents
// with new source and run parser over the DOM.
document.write(source);
parser.parse(document);

source = document.innerHTML;
Using JSDOM like this, script tags within the page aren’t evaluated, letting us handle the module loading and parsing externally in NodeJS.
However, this presented a challenge as module dependencies declared in these script tags were ignored, leaving the parser to instantiate declarative widgets from modules which hadn’t been loaded.
Luckily, in the Dojo 1.8 release, the parser was enhanced to automatically load any missing module dependencies during the parsing phase. Phew…
Finally, once a widget’s template has been rendered, any other operations performed by the parser are unnecessary. Creating a “lite” parser which removed these code paths, which also provided a place for the extensions described later, was started from a copy of the existing parser.
Using the AMD “aliases” configuration, this module transparently replaced the existing parser during server-side rendering.
Mixins For Pre-Rendering
Rendering widgets server-side, using NodeJS and JSDOM, works for simple widgets but what happens when you use layout widgets, which rely on accessing the browser’s layout properties? What if you have separate code paths for different browsers which affect the template string?
There are numerous scenarios where we rely on data that’s impractical to simulate within our fake browser.
So, how do we pre-render these widgets? We don’t!
Ignoring these widgets, which leaves them to render normally client-side.
Identifying widgets to render server-side takes advantage of a new declarative parameter used by the parser since 1.8, data-dojo-mixins. This parameter allows additional modules to be mixed into the declarative class instance by the parser.
Using this parameter with a custom module, server_side/_TemplatedMixin, on widgets to be pre-rendered, as shown below, make identification easy. Additionally, this class will contain the lifecycle extensions that modifies client-side rendering.
<div data-dojo-type="dijit/CalendarLite" data-dojo-mixins="server_side/_TemplatedMixin"></div>
Automating Rendering
Now we’ve identified the mechanism for server-side rendering, how can we automate this process for all application pages?
Connect is “an extensible HTTP server framework for node, providing high performance plugins known as middleware”.
Using this framework as our HTTP server means we can write a custom middleware plugin that will automatically parse, pre-render and serve all our application pages.
Connect plugins are functions that accept three parameters, the request and response objects, along with a callback to signal this plugin’s work has finished. Each registered plugin will be executed for each request.
We’ve decomposed the library into two files, server_side.js, which exposes a valid express plugin, and render.js, which provides a simple interface for the server-side rendering, described above. The complete version of the code for both modules is included below.
var render = require('./render.js');

module.exports = function (config) {
    // Create AMD packages from module configuration.
    var page = render({
        dojo: config.dojo + "/dojo",
        dijit: config.dojo + "/dijit",
        server_side: __dirname + "/../public/js/server_side"
    });

    return function (req, res, next) {
        var ignore = function (accept) {
            return accept.indexOf("text/html") === -1;
        };

        // Only hook into text/html requests....
        if (ignore(req.headers.accept)) {
            return next();
        }

        var write = res.write,
            end = res.end,
            buffer = "";

        // We need entire page contents, not just the chunks.
        // Proxy original methods while we're buffering.
        res.write = function (chunk, encoding) {
            buffer = buffer.concat(chunk);
            return true;
        };

        res.end = function (chunk, encoding) {
            if (chunk) {
                res.write(chunk);
            }

            // Fix content-length, we now have more data to send.
            var rendered = page(buffer);
            res.setHeader("Content-Length", rendered.length);

            return end.call(res, rendered, encoding);
        };

        next();
    };
};
var jsdom = require("jsdom").jsdom,
    document = jsdom("<html></html>"),
    window = document.createWindow();

module.exports = function (packages) {
    // Fix window objects in global scope.
    global.document = document;
    global.navigator = window.navigator;
    global.window = window;

    var amd_packages = Object.keys(packages).map(function (key) {
        return { name: key, location: packages[key] };
    });

    // Deliberately create global "dojoConfig" variable.
    dojoConfig = {
        packages: amd_packages,
        // _WidgetsInTemplateMixin call parser directly to instantiate children.
        // We need it to use our custom parser so use AMD-remapping magic!
        aliases: [["dojo/parser", "server_side/parser"]],
        deps: ["server_side/parser", "dojo/has", "dojo/_base/window", "server_side/registry"]
    };

    require(packages.dojo + "/dojo.js");

    // Once Dojo has been evalulated, require & define methods
    // from AMD API as exposed as properties on "global" object.

    var has = global.require("dojo/has"),
        win = global.require("dojo/_base/window"),
        registry = global.require("server_side/registry"),
        parser = global.require("server_side/parser");

    // Now we need to manually fix a few things to make Dojo
    // simulate running in a browser.

    // Manually add event listener test as this was only included in
    // the "host-browser" profile.
    has.add("dom-addeventlistener", !!document.addEventListener);
    has.add("dom-attributes-explicit", true);

    // Fix global property to point to "window"
    win.global = window;

    return function (source) {
        // Clear any previously rendered widgets from registry,
        // simulate fresh page load.
        registry.reset();

        // Overwrite finished document contents
        // with new source and run parser over the DOM.
        document.write(source);
        parser.parse(document);

        return document.innerHTML;
    };
};
Using this new plugin in an application is demonstrated in the code below, which serves the “public” directory as the application’s source root.
var connect = require('connect'),
    server_side = require('../lib/server_side');

var app = connect()
  .use(connect.directory(__dirname + '/public', { icons: true }))
  .use(server_side({dojo: process.env.DOJO_SOURCE}))
  .use("/dojo", connect.static(process.env.DOJO_SOURCE))
  .use("/server_side", connect.static(__dirname + '/../public/js/server_side'))
  .use(connect.static(__dirname + '/public'))
  .listen(3000);
Using Server-Side Rendered Templates
Once the pre-rendered page has been returned to the browser, the normal client-side parsing will take place to instantiate the page widgets. For widgets whose templates are included within the page, we need to ensure the normal client-side rendering is bypassed.
In this scenario, we connect the widget’s domNode property to the DOM node that the declarative widget was instantiated from.
Extending buildRendering
Adding a HTML template to your widget is achieved by inheriting from dijit/_TemplatedMixin, which provides the “buildRendering” implementation to convert a HTML string stored under “templateString” into live DOM nodes.
Although we want to skip creating DOM nodes from the template, there are other steps, e.g. attaching event handlers, which must be ran normally. Using a custom mixin to identify declarative widgets for server-side rendering, server_side/_TemplatedMixin, also provides the extension point to modify the rendering process.
Overwriting the default implementation of “buildRendering” through this mixin led to unresolvable issues.
We’re forced to call any super-class “buildRendering” implementations, through “this.inherited(arguments)”, to ensure any custom code paths that also extend this method are executed. However, this will reach the original dijit/_TemplatedMixin module, which we need to skip.
Monkey-patching the _TemplatedMixin prototype became the easiest solution.
Once our custom mixin is loaded, we overwrite “buildRendering” which a new implementation. Using a custom flag, provided by our mixin, we check whether to continue with the normal code path for client-side rendering, otherwise we run our stripped down version.
    var br = _TemplatedMixin.prototype.buildRendering,
        fc = _TemplatedMixin.prototype._fillContent;

    // Stripped down of the original function source below.
    _TemplatedMixin.prototype.buildRendering = function () {
        if (!this.serverSide) {
            return br.call(this);
        }

        // Source DOM node already the pre-rendered template nodes.
        var node = this.srcNodeRef;

        node.removeAttribute("data-dojo-type");

        // Call down to _Widget.buildRendering() to get base classes assigned
        _WidgetBase.prototype.buildRendering.call(this);

        this._attachTemplateNodes(node, function(n,p){ return n.getAttribute(p); });

        this._beforeFillContent();		// hook for _WidgetsInTemplateMixin

        // Don't pass srcRefNode reference as it doesn't exist.
	    this._fillContent();
    };

    // Override to turn into a no-op, we don't want to attach source
    // ref nodes client side as it's been done on the server.
    _TemplatedMixin.prototype._fillContent = function () {
        if (!this.serverSide) {
            return fc.apply(this, arguments);
        }
    };
We performed the same trick for the fillContent method due to similar issues, along with a new implementation of attachTemplateNodes in the mixin.
With this minimal change to the client-side rendering process, widgets pick up their templates from the existing page and are instantiated normally. Hooking up template nodes as properties on the parent, attaching event handlers and setting data bindings behaves as expected.
Putting It Together
Using our custom middleware for server-side rendering, along with our client-side rendering modifications, users accessing pages will see the templated widgets straight away, removing the “double-rendering” effect and the need for loading screens.
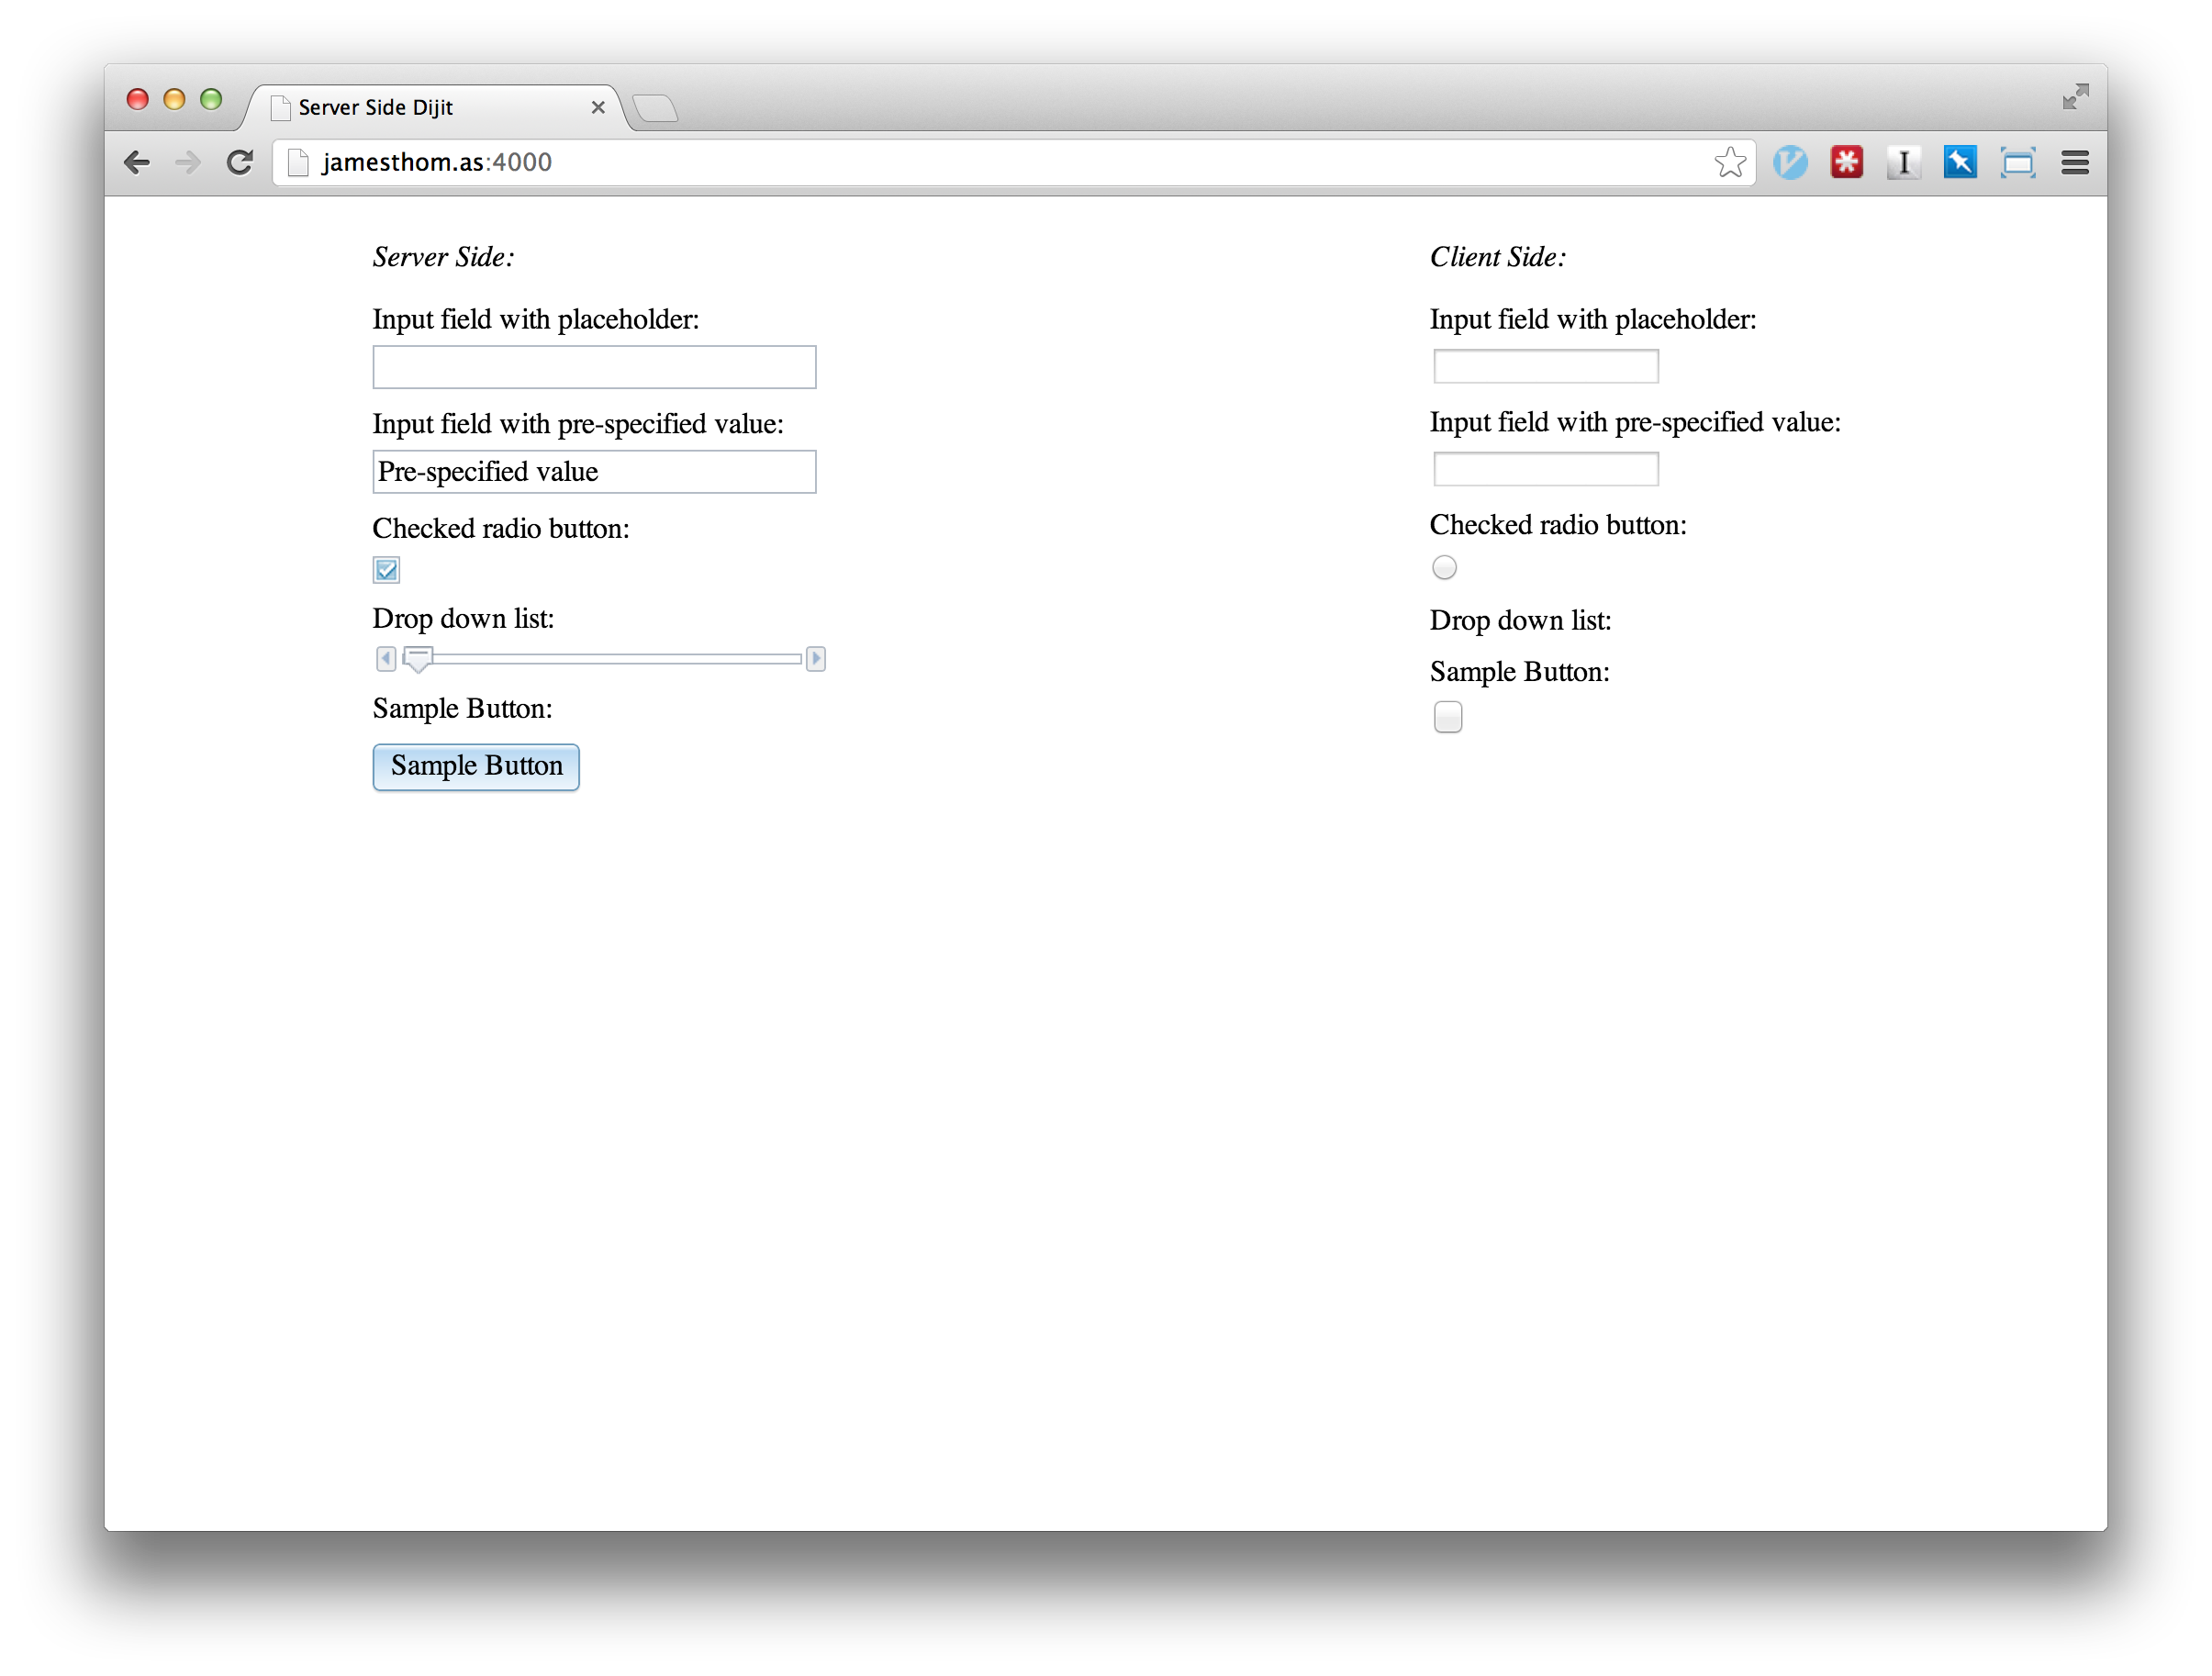
This image above the same widgets rendered client-side and server-side when the page loads, but before client-side rendering has finished.
Server-side rendering also comes with client-side performance benefits, reducing the number of costly DOM operations performed during application loading. This may be especially useful for low-power devices with mobile browsers.
Extending, rather than replacing, the normal Dojo rendering lifecycle allows us to transparently delegate rendering to the client-side for unsupported widgets. Excellent abstractions already provided for the lifecycle in the toolkit make the extension conceptually simple.
There are restrictions that come with this implementation, discussed below, but working within these constraints it is possible for the majority of templated widgets to be rendered server-side.
Source Code
All source code for the project lives on Github here. Feel free to file issues, patches and comments at the project home page.
Once you have checked out the project code, run the following command to start a test application comparing client-side and server-side rendering side by side.
$ export DOJO_SOURCE=/path/to/dojo-release-1.8.0-src
$ npm start
Once the server has started, visit http://localhost:3000.
You can also install the module as an NPM package, server_side_dijit, and use the plugin within your existing Connect application.
Issues
We’ve already mentioned potential pitfalls which restrict server-side rendering. These include widgets that use browser dimensions to dynamically calculate sizing e.g. layout managers, use client-side resources to construct templates e.g. reading cookie data, expect access to remote resources e.g XHR’ing session details, and many, many more.
Letting those widgets default to client-side template rendering provides a safe fallback.
Discovering which existing Dojo widgets can support server-side rendering requires manual testing. Within the project directory, under the “/test/public” location, we’ve started collecting test pages which demonstrate those widgets which are known to work. Looking at those pages should provide a good indication of the current level of support.