
Since creating Phonebot last month, I’ve been working on setting up a fully-automated build and deploy for the project. Using IBM DevOps Services, Phonebot now has “Continuous Delivery” enabled.
When new code is commited to the external Github repository, the build service will perform the following tasks.
- Run Unit Tests and Code Lint Tools
- Deploy To Test Server
- Run Integration Tests Against Test Server
- Deploy To Production
Each stage will only be executed if the following stage passes.
In the following post, I’ll explain how to set up each stage and share tips making it easy to replicate this setup for your projects…
Writing Tests for Phonebot
Phonebot comes with a comprehensive test suite. I’ve used the Mocha test framework for creating unit and integration tests. Test assertions use NodeJS’ built-in library. The mockery library is used to replace module dependencies with mock objects.
Setting up the scripts field in package.json allows us to use NPM to run our tests.
NPM will look into the “node_modules/.bin” directory for binaries when running scripts. This means we don’t need Mocha installed on the deployment host to run tests. The “devDependencies” field includes modules we rely on during development but not production.
"devDependencies": {
    "mocha": "^2.2.5",
    "mocha-eslint": "^0.1.7",
    "mockery": "^1.4.0"
},
"scripts": {
    "test": "mocha test/unit",
    "integration-test": "mocha test/integration",
    "start": "node app.js"
  },
Running the following commands will run the unit and integration tests.
$ npm test  // defaults to 'run test'
$ npm run integration-test
Running Code Linters
Along with unit tests, we want to run ‘code linters’ to catch any errors in our JavaScript code. We’re using the eslint tool with the following configuration. Using this module, we’re setting up the eslint tool as a test case.
This test will be automatically run in the unit test phase and errors incorporated into the test report.
Mocking Services In Integration Tests
When the unit tests have passed, we’re going to deploy a test instance of the application. Integration tests will make HTTP requests to simulate user activity, capture the responses and then verify the application is behaving as expected.
Phonebot uses external services, provisioned through IBM Bluemix, to make phone calls, translate speech to text and communicate with Slack channels. Services configuration parameters, e.g. username, password, host, are passed into the application using environment variables.
During integration tests, we want to capture all requests to external services and provide hardcoded HTTP responses to be returned. With service parameters coming from environment properties, rather than hardcoded in the application, we can simply replace the bound services configuration with our own values. This application will pick up these new values, pointing to our stub server, at runtime without any changes needed to the code.
This stub server has been created to capture all incoming HTTP requests and make them available at a custom HTTP endpoint. We’re also configured HTTP routes to simulate each of the external services and return hardcoded responses.
Deploying our test server in a different space to production means we can have custom credentials set up without having to modify the service configuration in the production environment.
The following commands will show the existing configuration values that we can replicate in the test environment.
$ cf env phonebot
$ cf create-space test
$ cf target -s test
$ cf cups twilio -p "accountSID, authToken, url"
$ cf cups speech_to_text -p "username, password, url"
$ cf cups slack_webhooks -p "slackbot-testing"
With the test credentials created, we can deploy the application to the “test” space without modifications.
Setting up Build and Deploy Pipeline
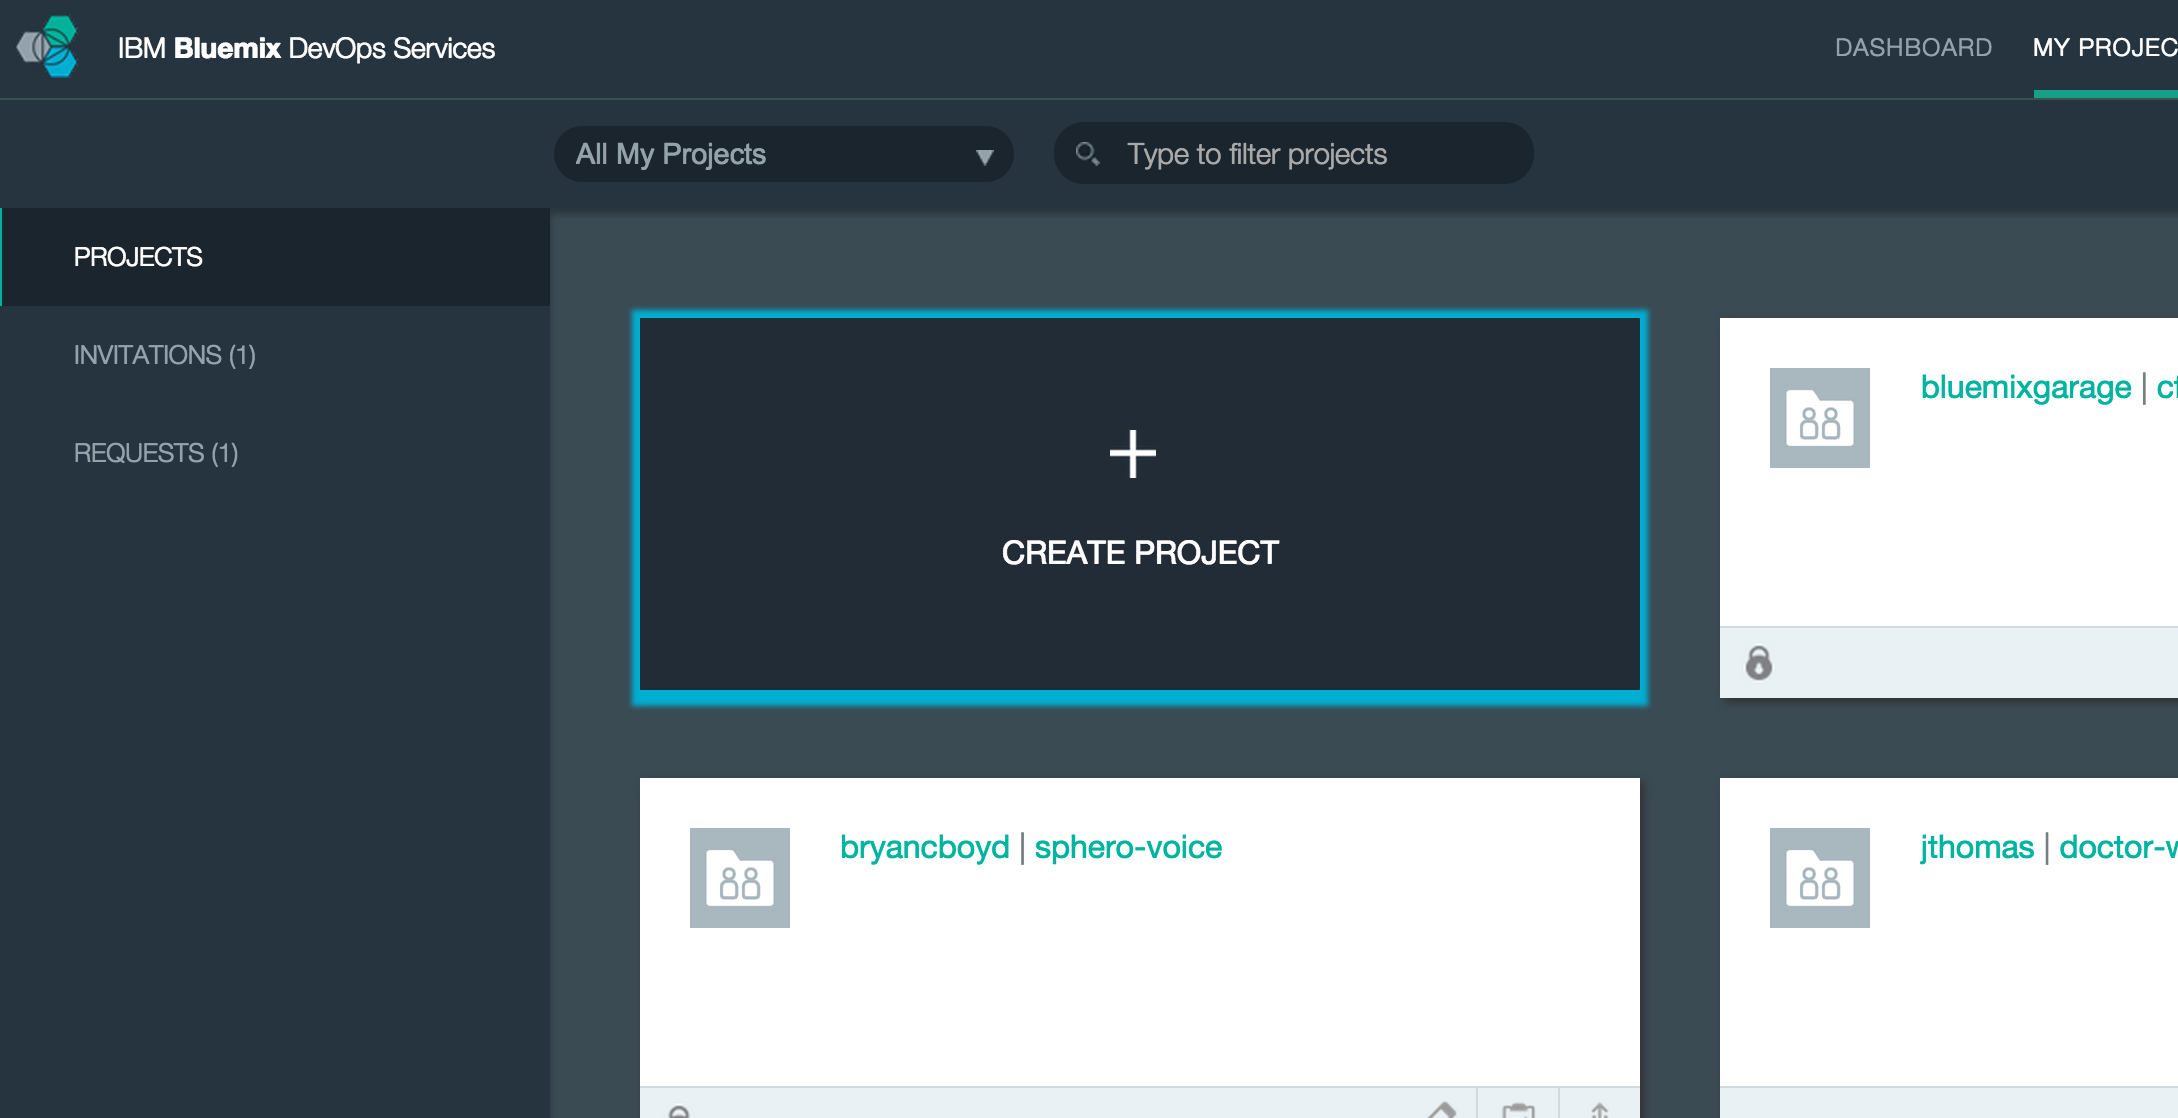
We’re going to use IBM DevOps Services to build and manage the “Continuous Delivery” pipeline. From the home page, click the “Create Project” button to import our existing Github project into the workspace.
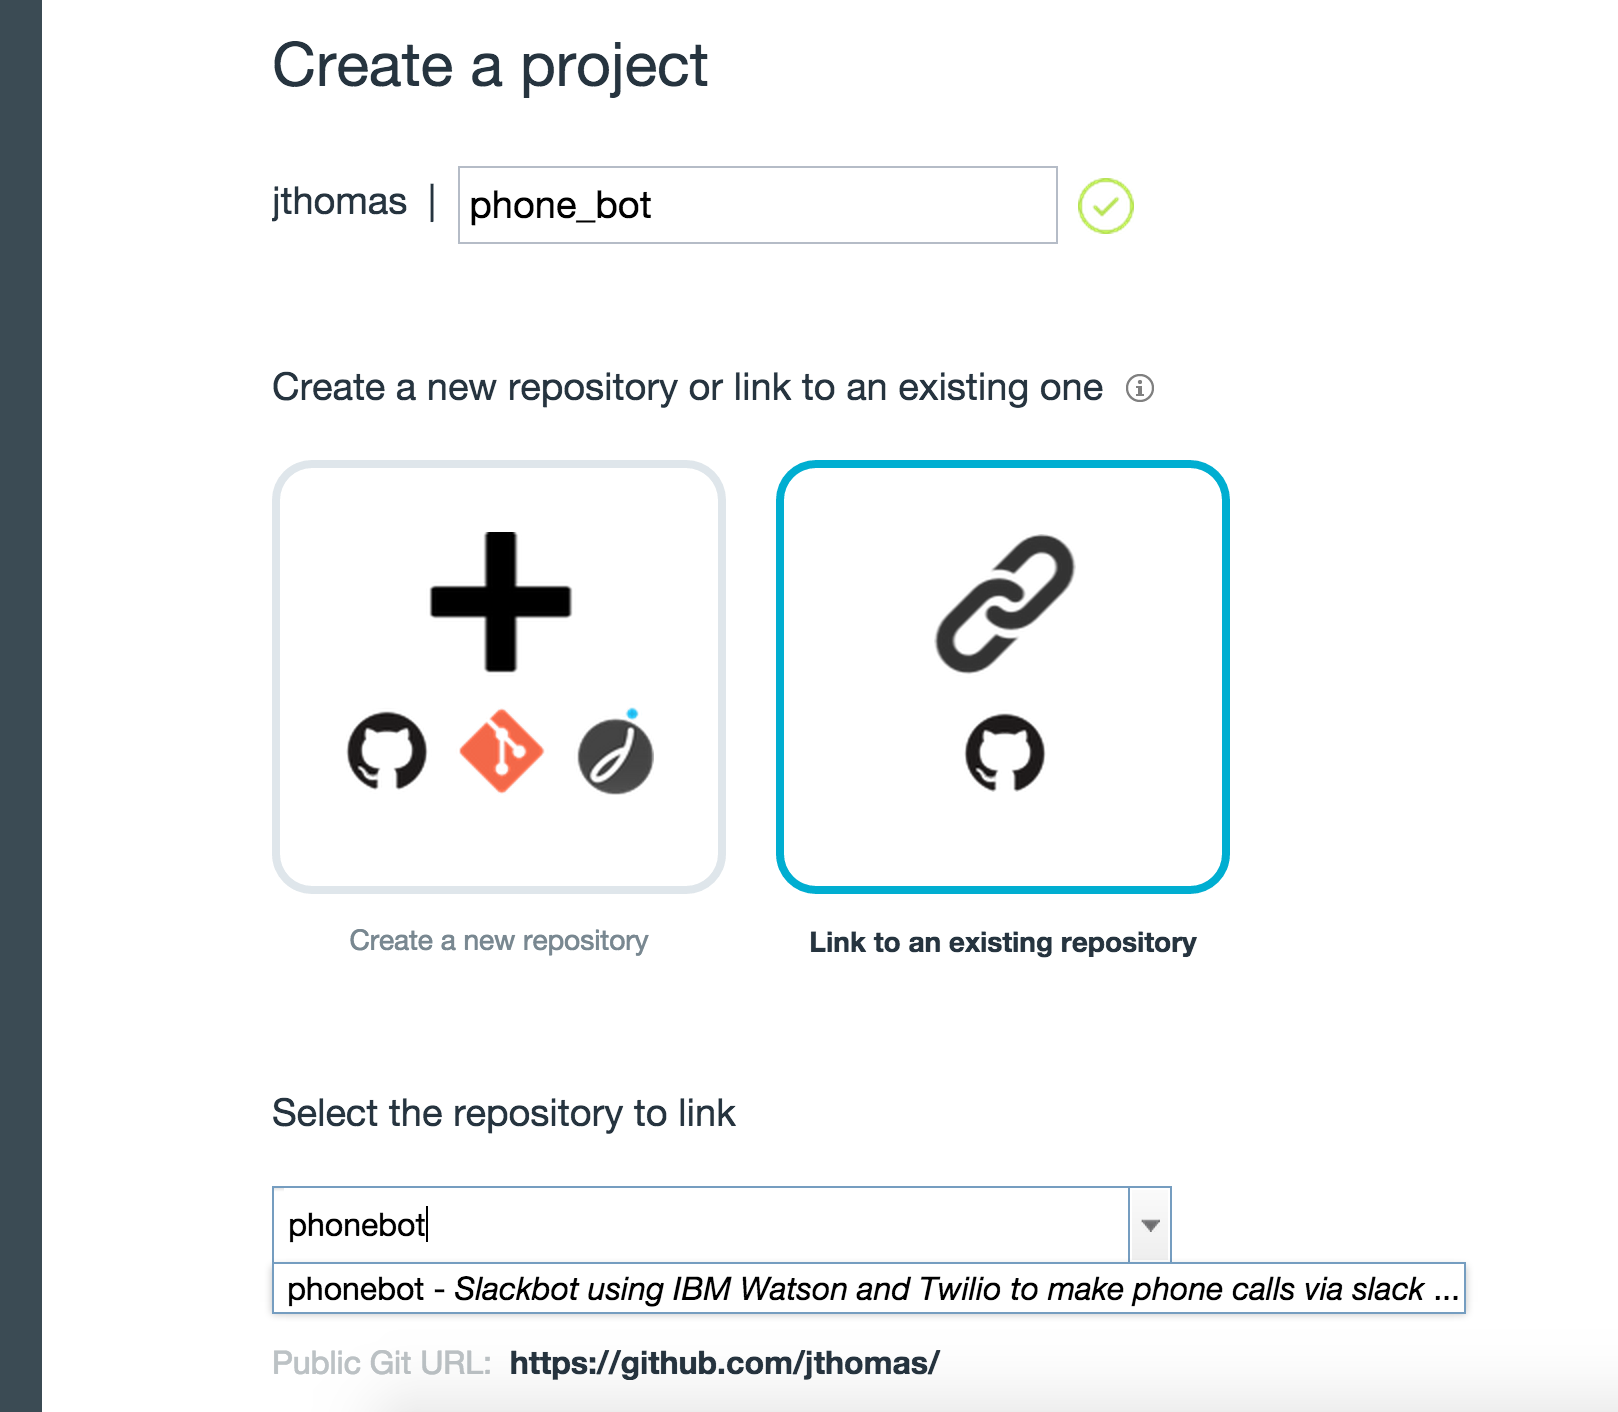
The “Create Project” page allows us to link an existing project from Github to the new project. Changes to the external repository will be automatically pushed through to our project.
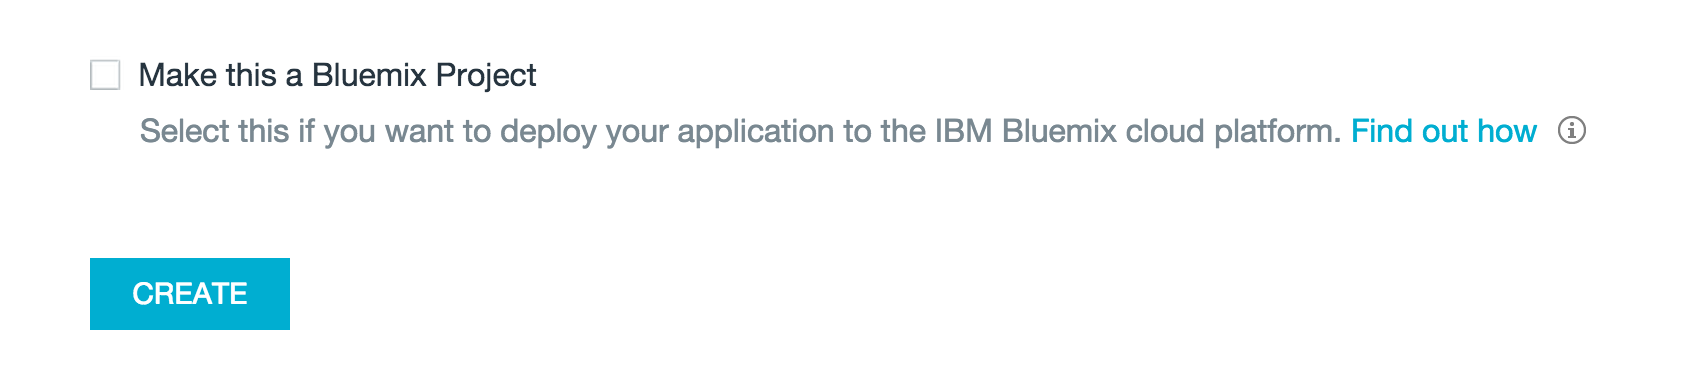
Selecting the “Make a Bluemix project” option will automatically configure deploying to the Bluemix platform.
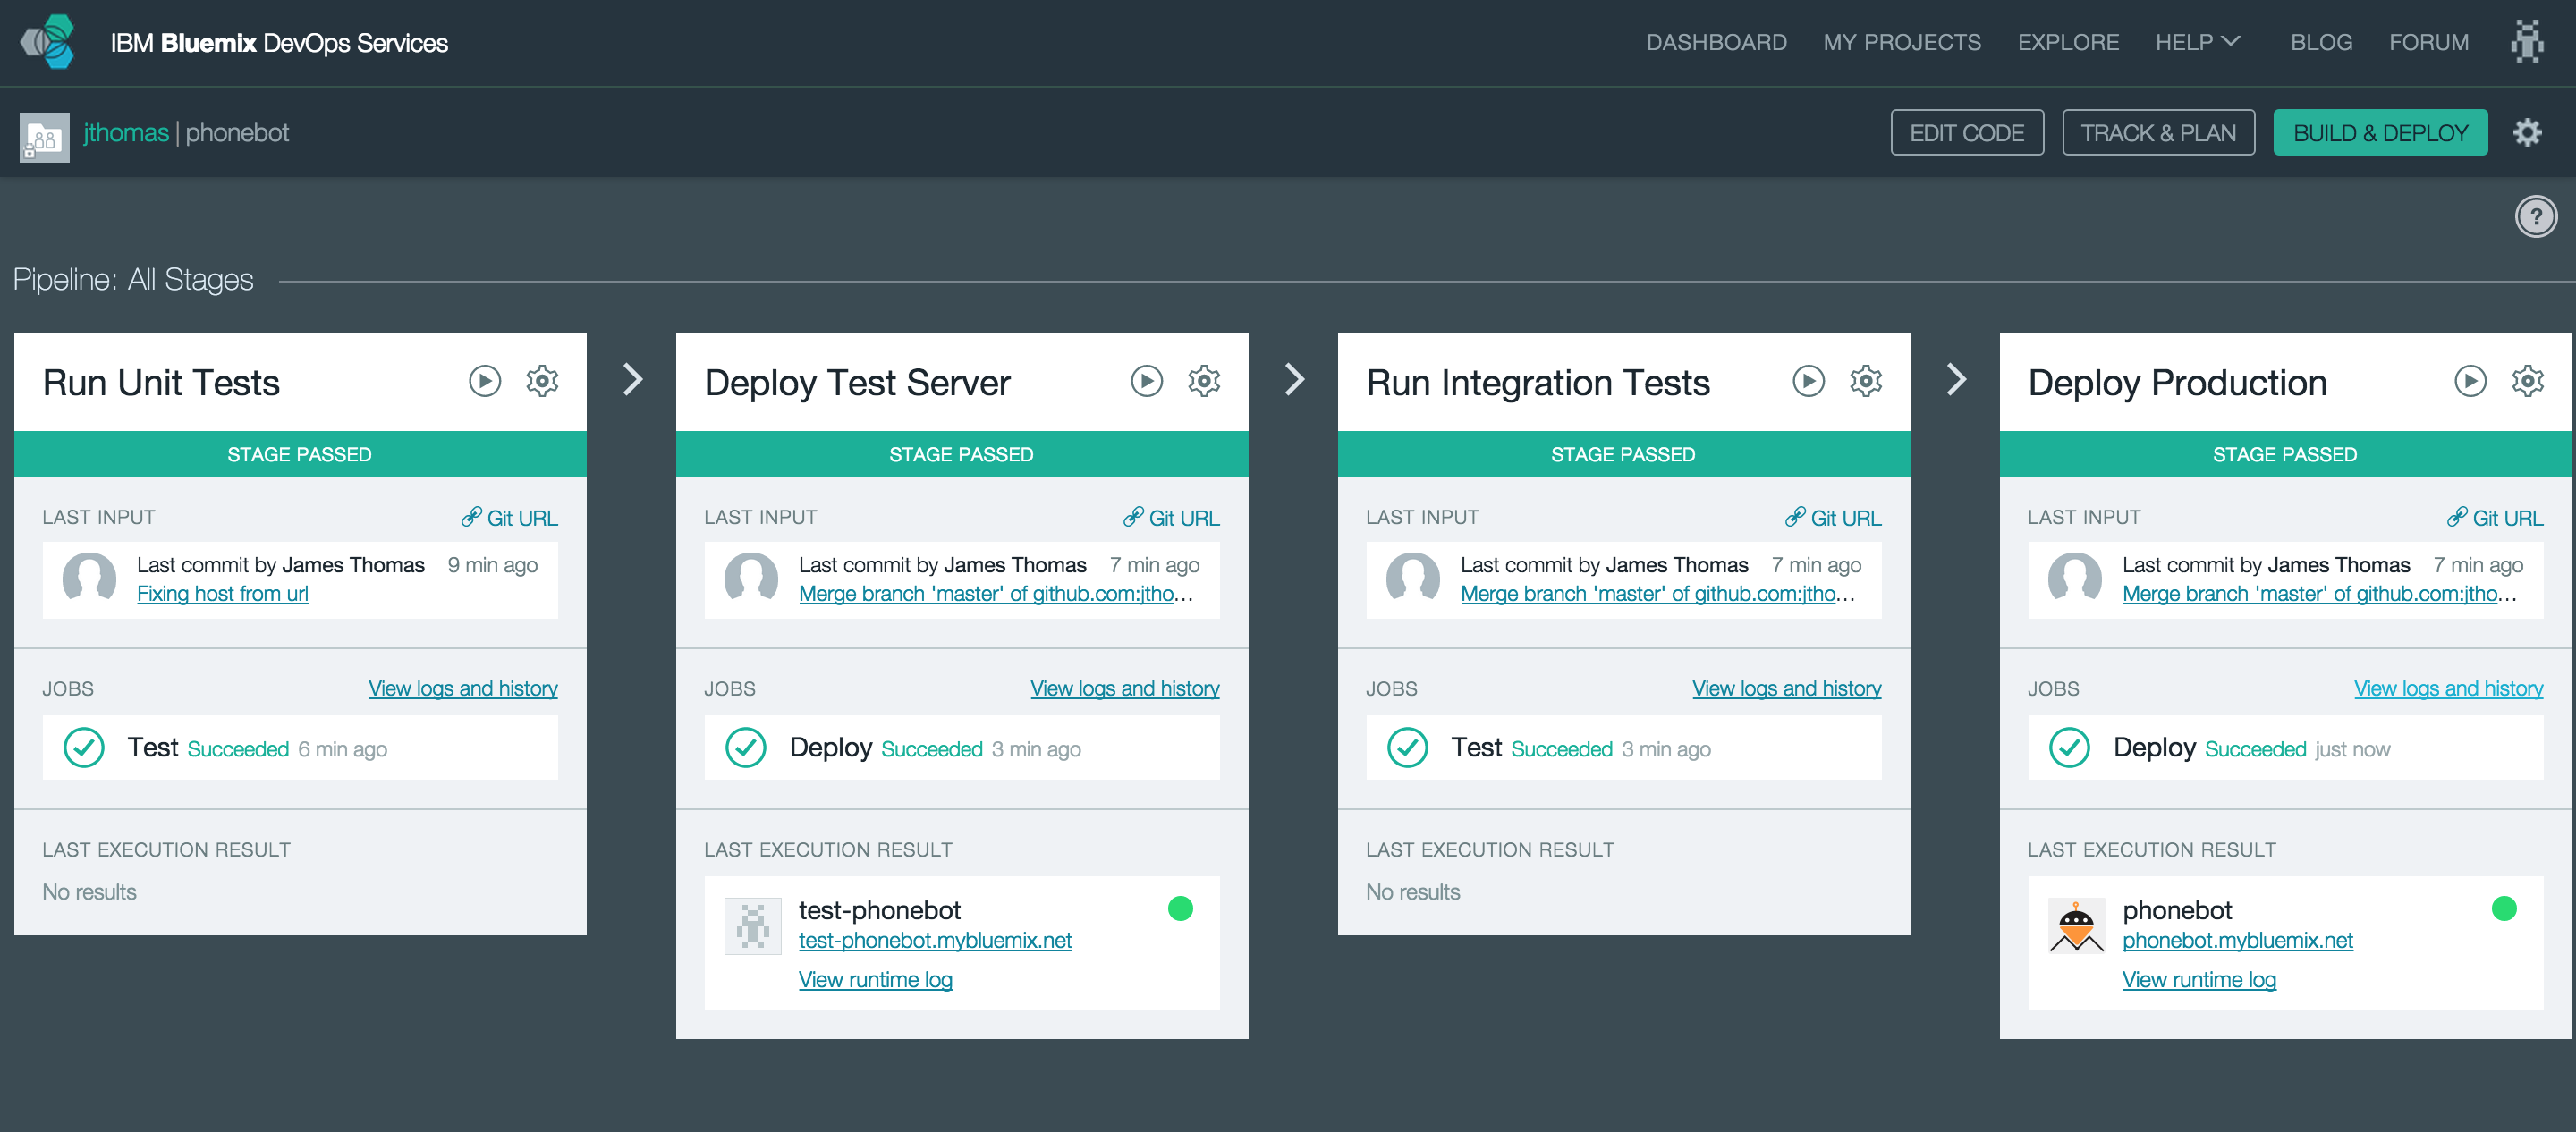
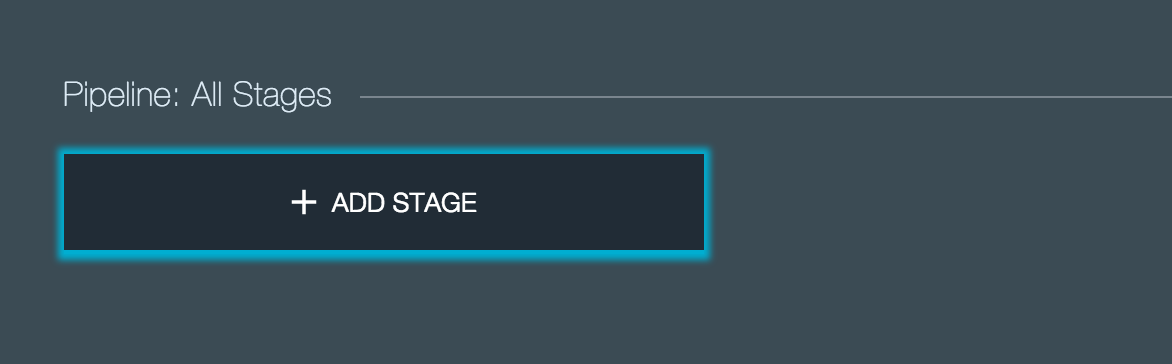
When the project has finished importing, we can access the “Build and Deploy” pipeline…

… which will currently be empty. Clicking the “Add Stage” button will allow us to start configuring the build, test and deploy jobs for our pipeline.
Running Unit Tests and Code Lint Tools
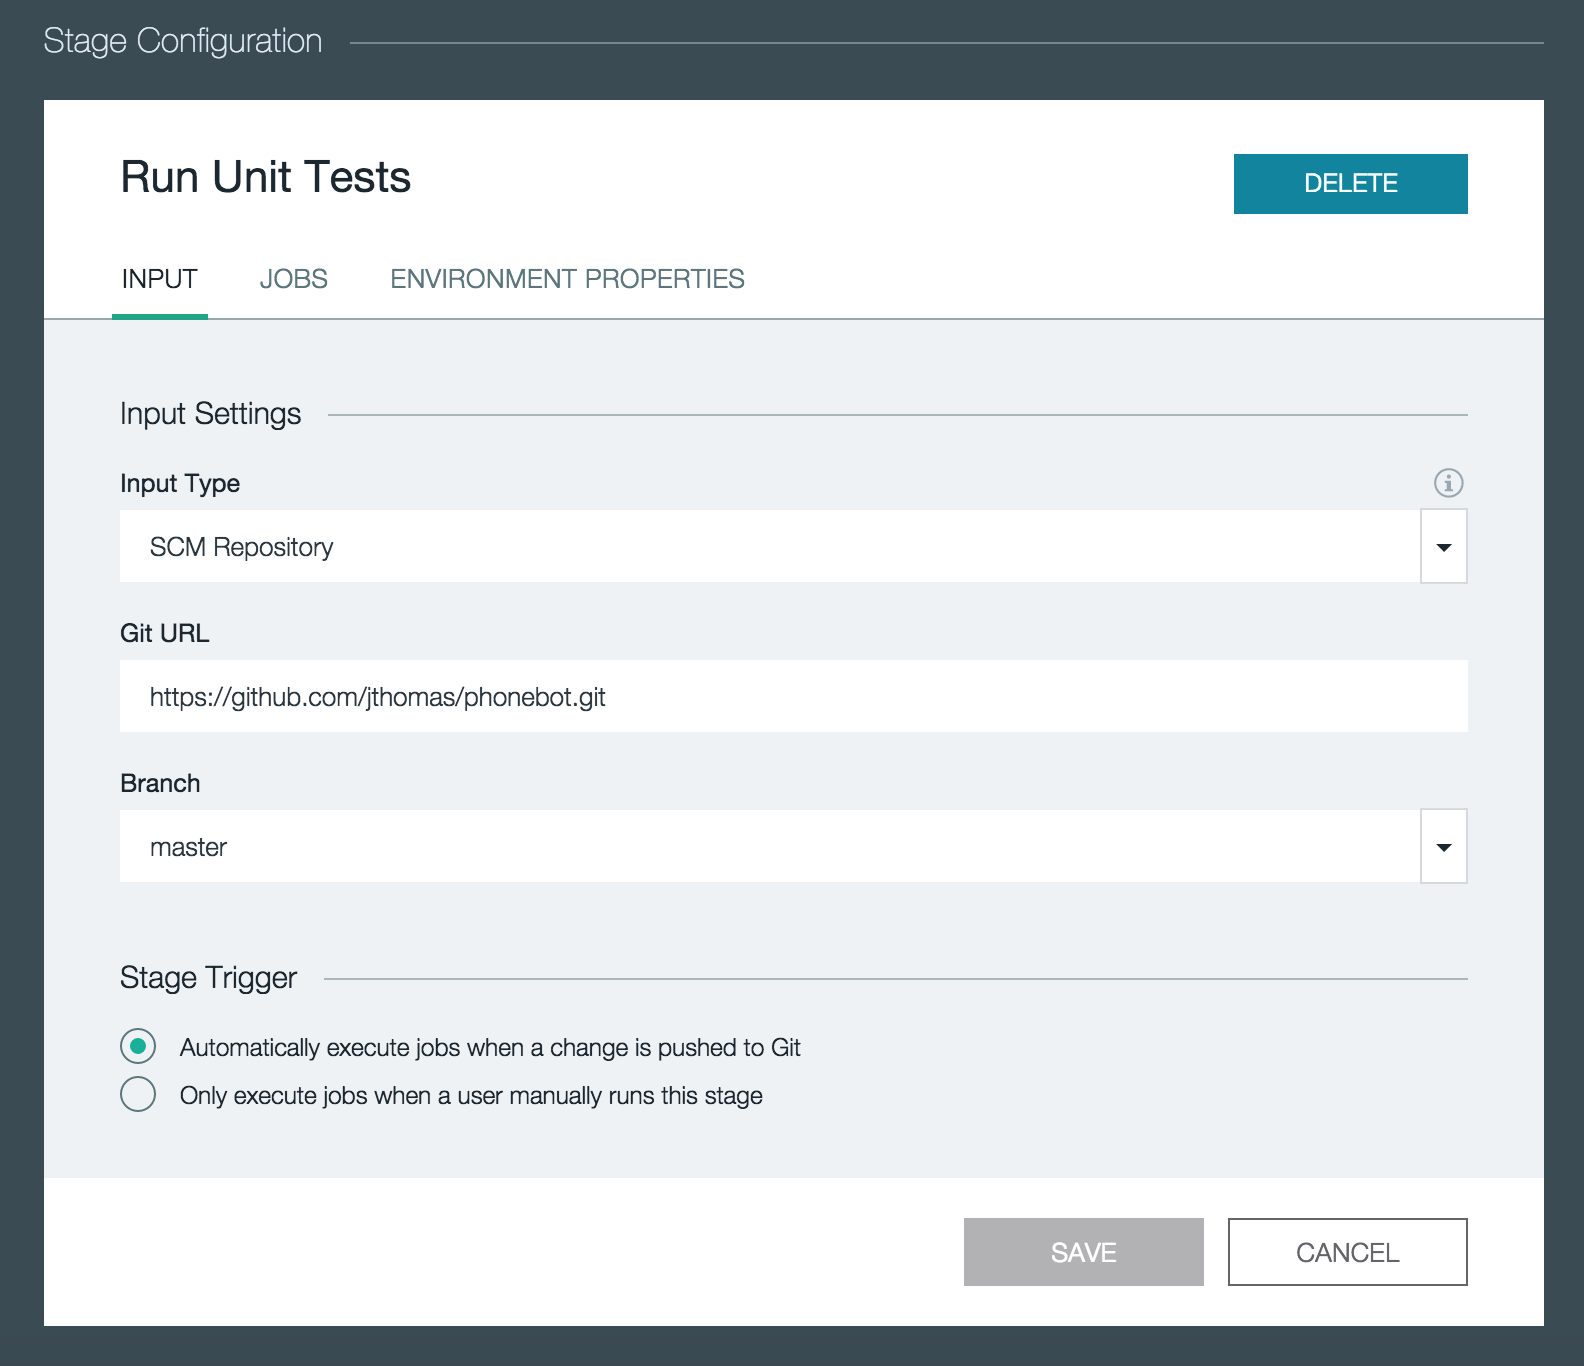
The first stage in our pipeline will run the unit tests when a new commit is published to the Phonebot repository on Github.
Using the “Input” tab, we’re configuring the stage to pick up all changes in the “master” branch of the https://github.com/jthomas/phonebot.git repository. The input for a stage can also be the build artifacts from a previous stage.
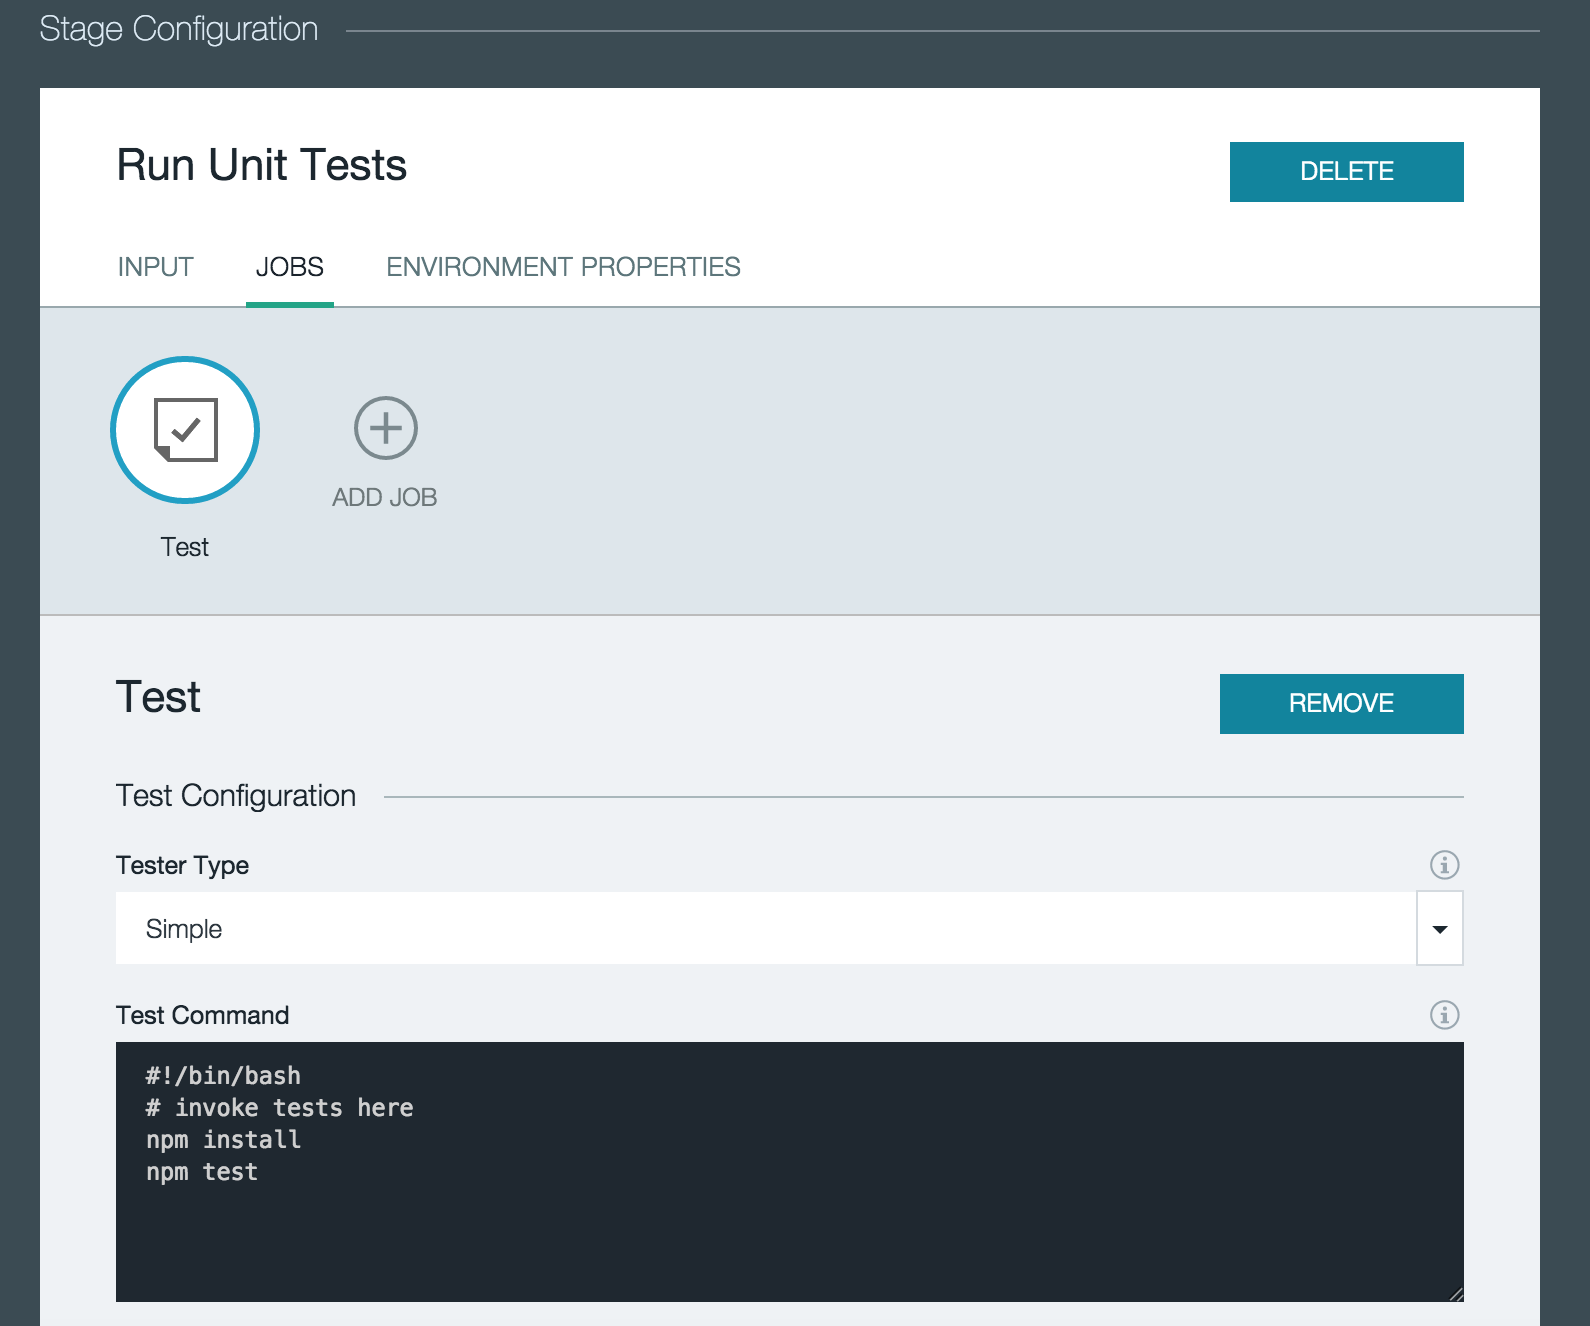
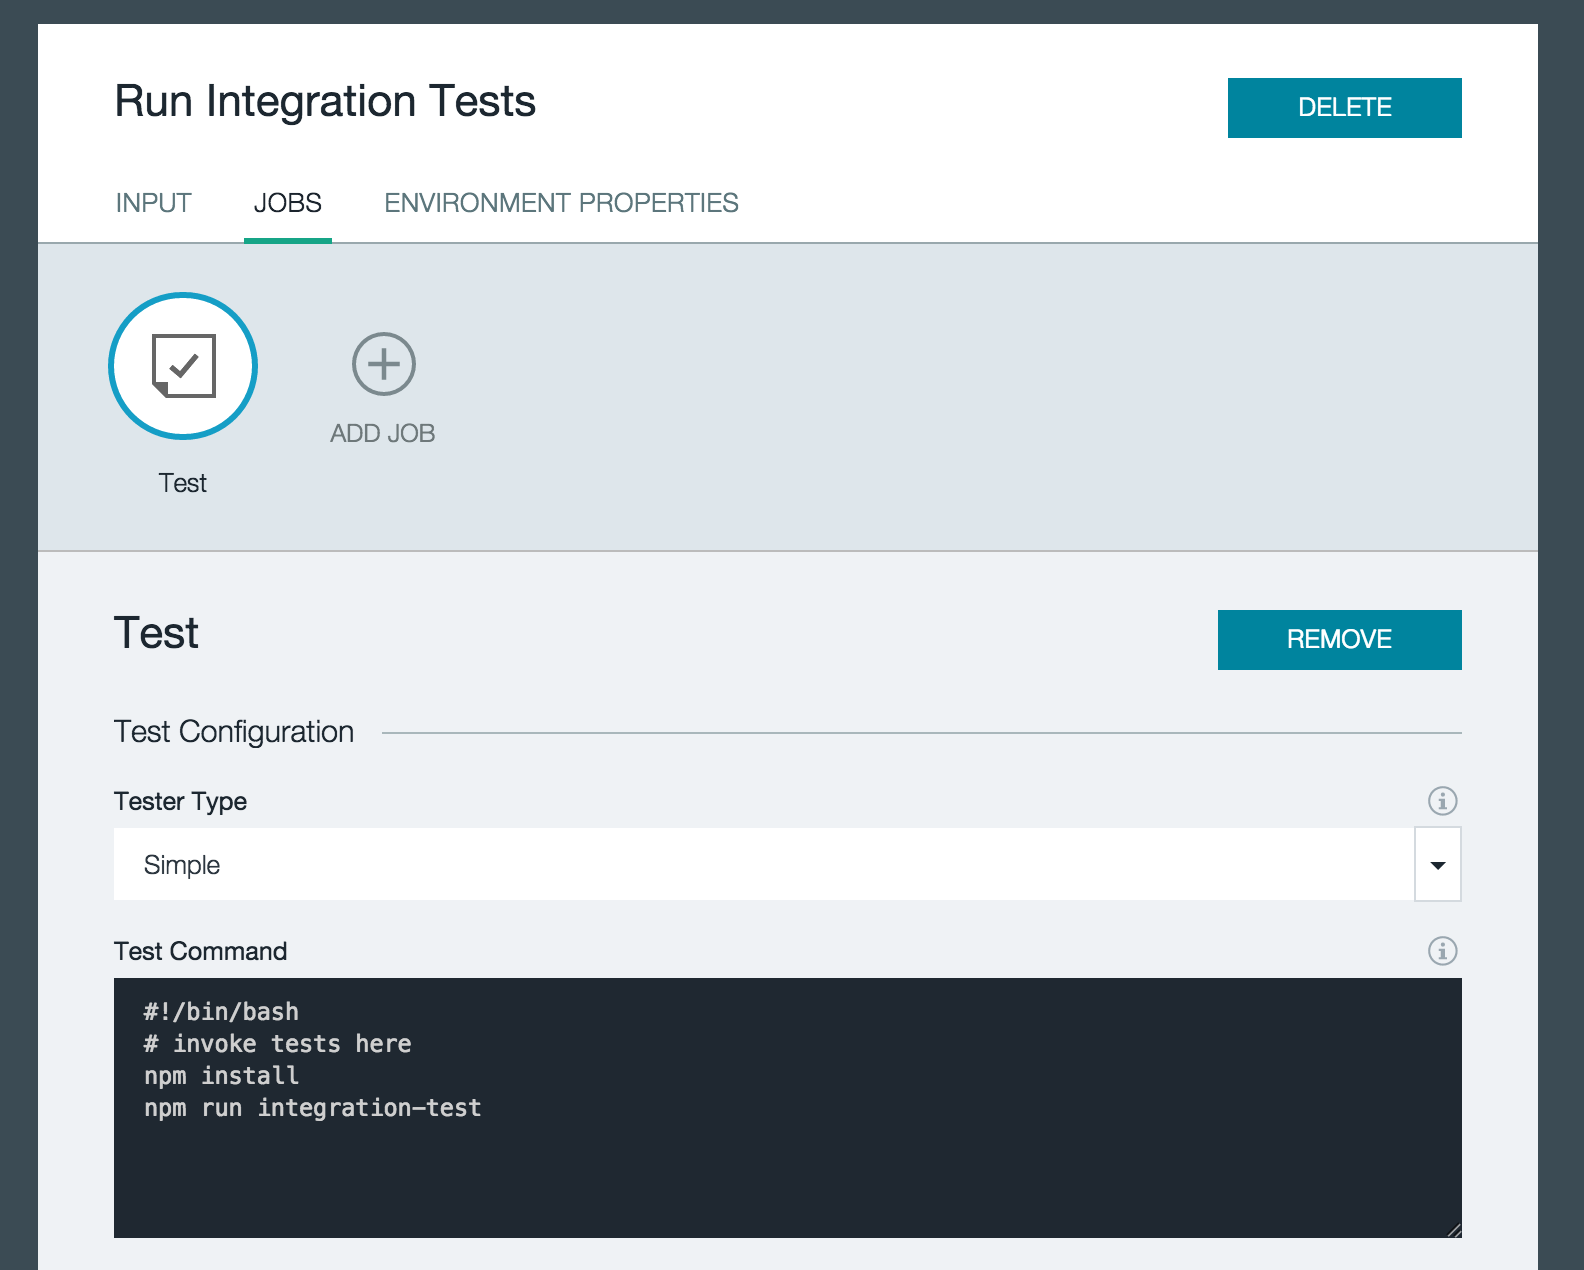
On the “Jobs” tab, we can configure multiple tasks to be executed when triggered by the stage input. For the unit tests, we’re using a simple shell script to install the project dependencies and run the NPM task.
Deploy Test Server
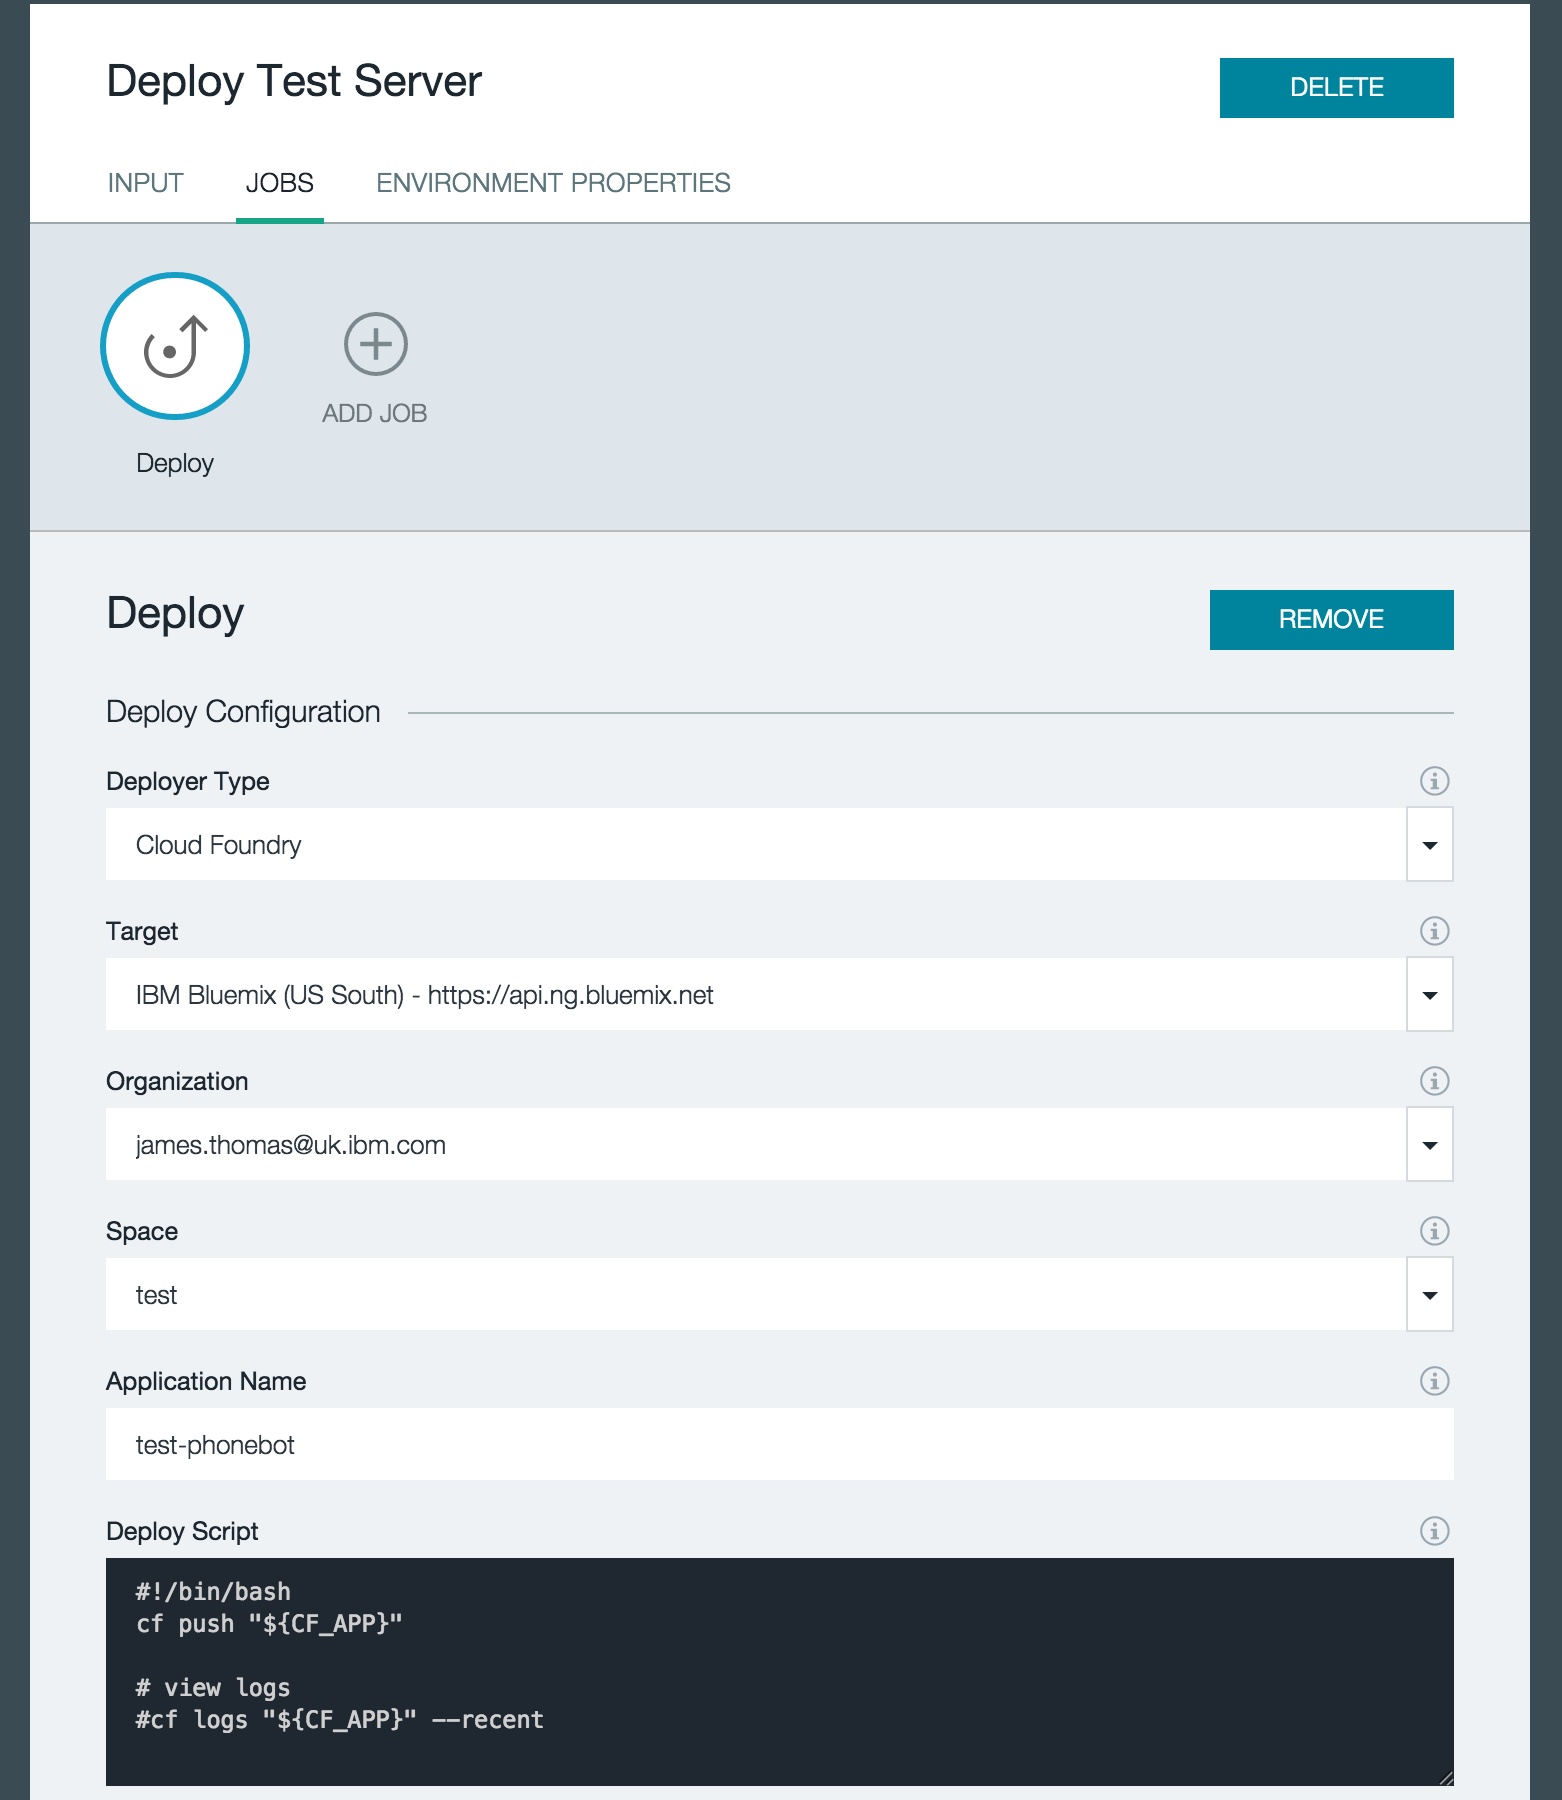
Adding a second stage to the pipeline after the unit tests, we will use it to deploy our test server. This stage will only be executed if the first stage completes successfully.
Using the “Deploy” rather than “Test” job, presents us with a configuration panel to set up the deployment parameters. The “test” space which contains our test configuration for our mock services. Choosing a different application name means our test server won’t clash with the existing production host already deployed.
Running Integration Tests Against Test Server
Once the test server has been deployed, we can trigger the pipeline stage to run integration tests against this host.
Using Mocha to run out integration tests means we can follow the setup as the unit test stage. Defining a “test” job, we install the project dependencies and then run the test harness.
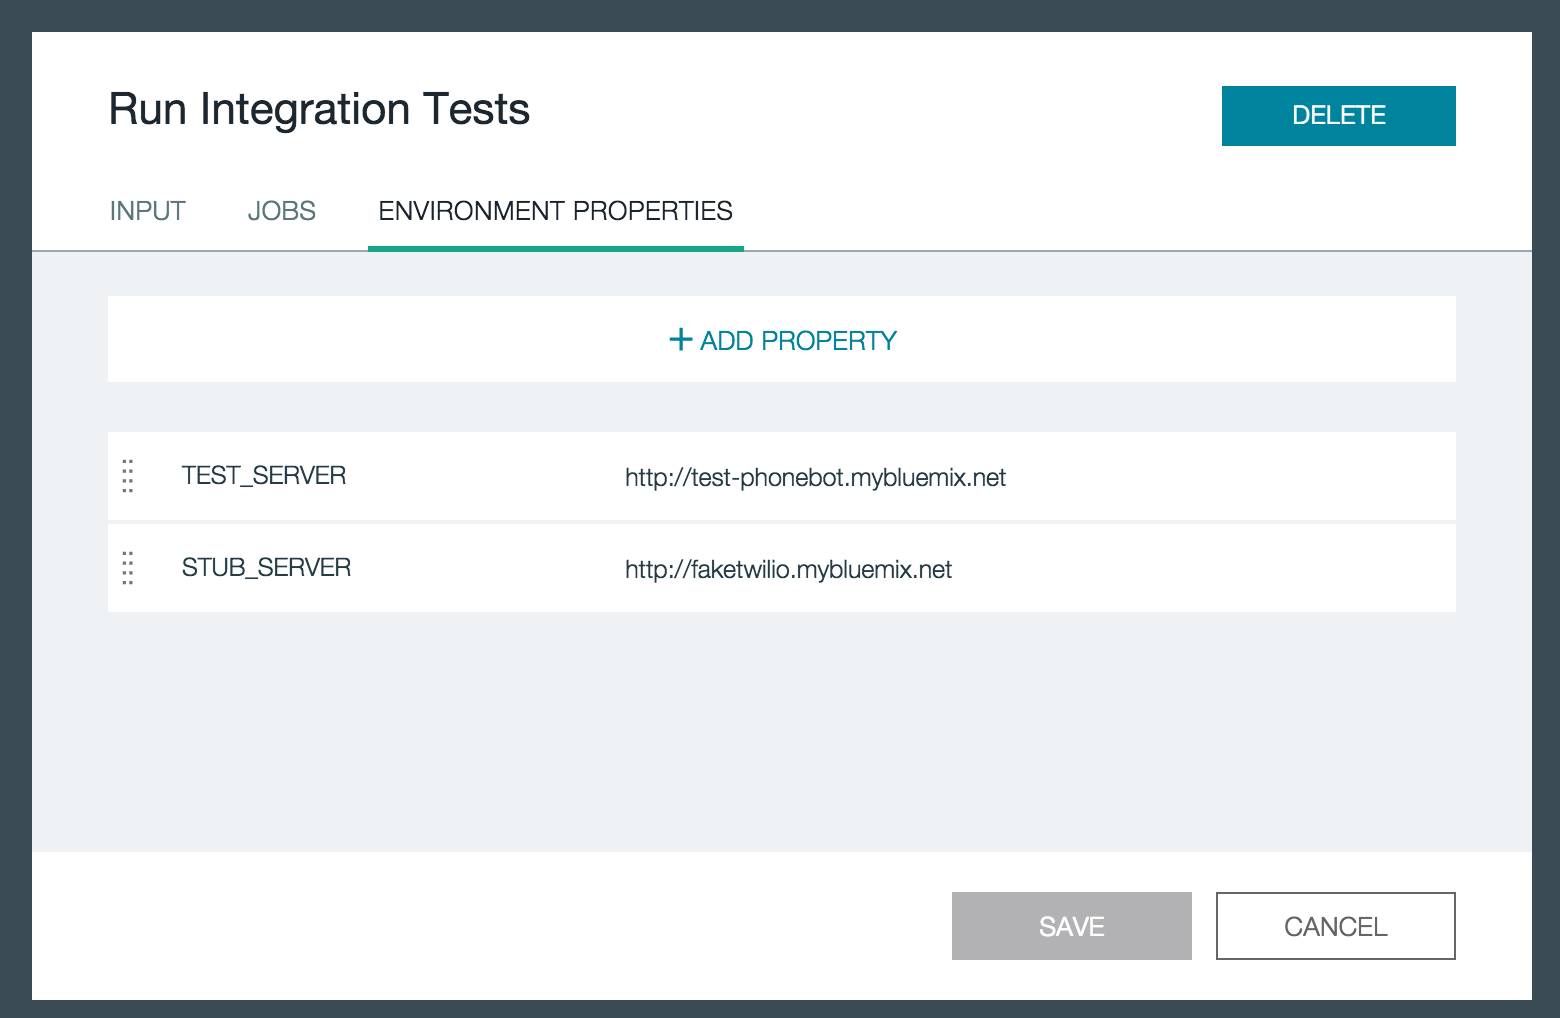
Phonebot’s integration tests use environment variables to define the test and stub server locations. We can define these through the stage setup page, as shown below.
Deploy To Production
Finally, provided all the previous stages were successfully, the last stage will deploy our application into production.
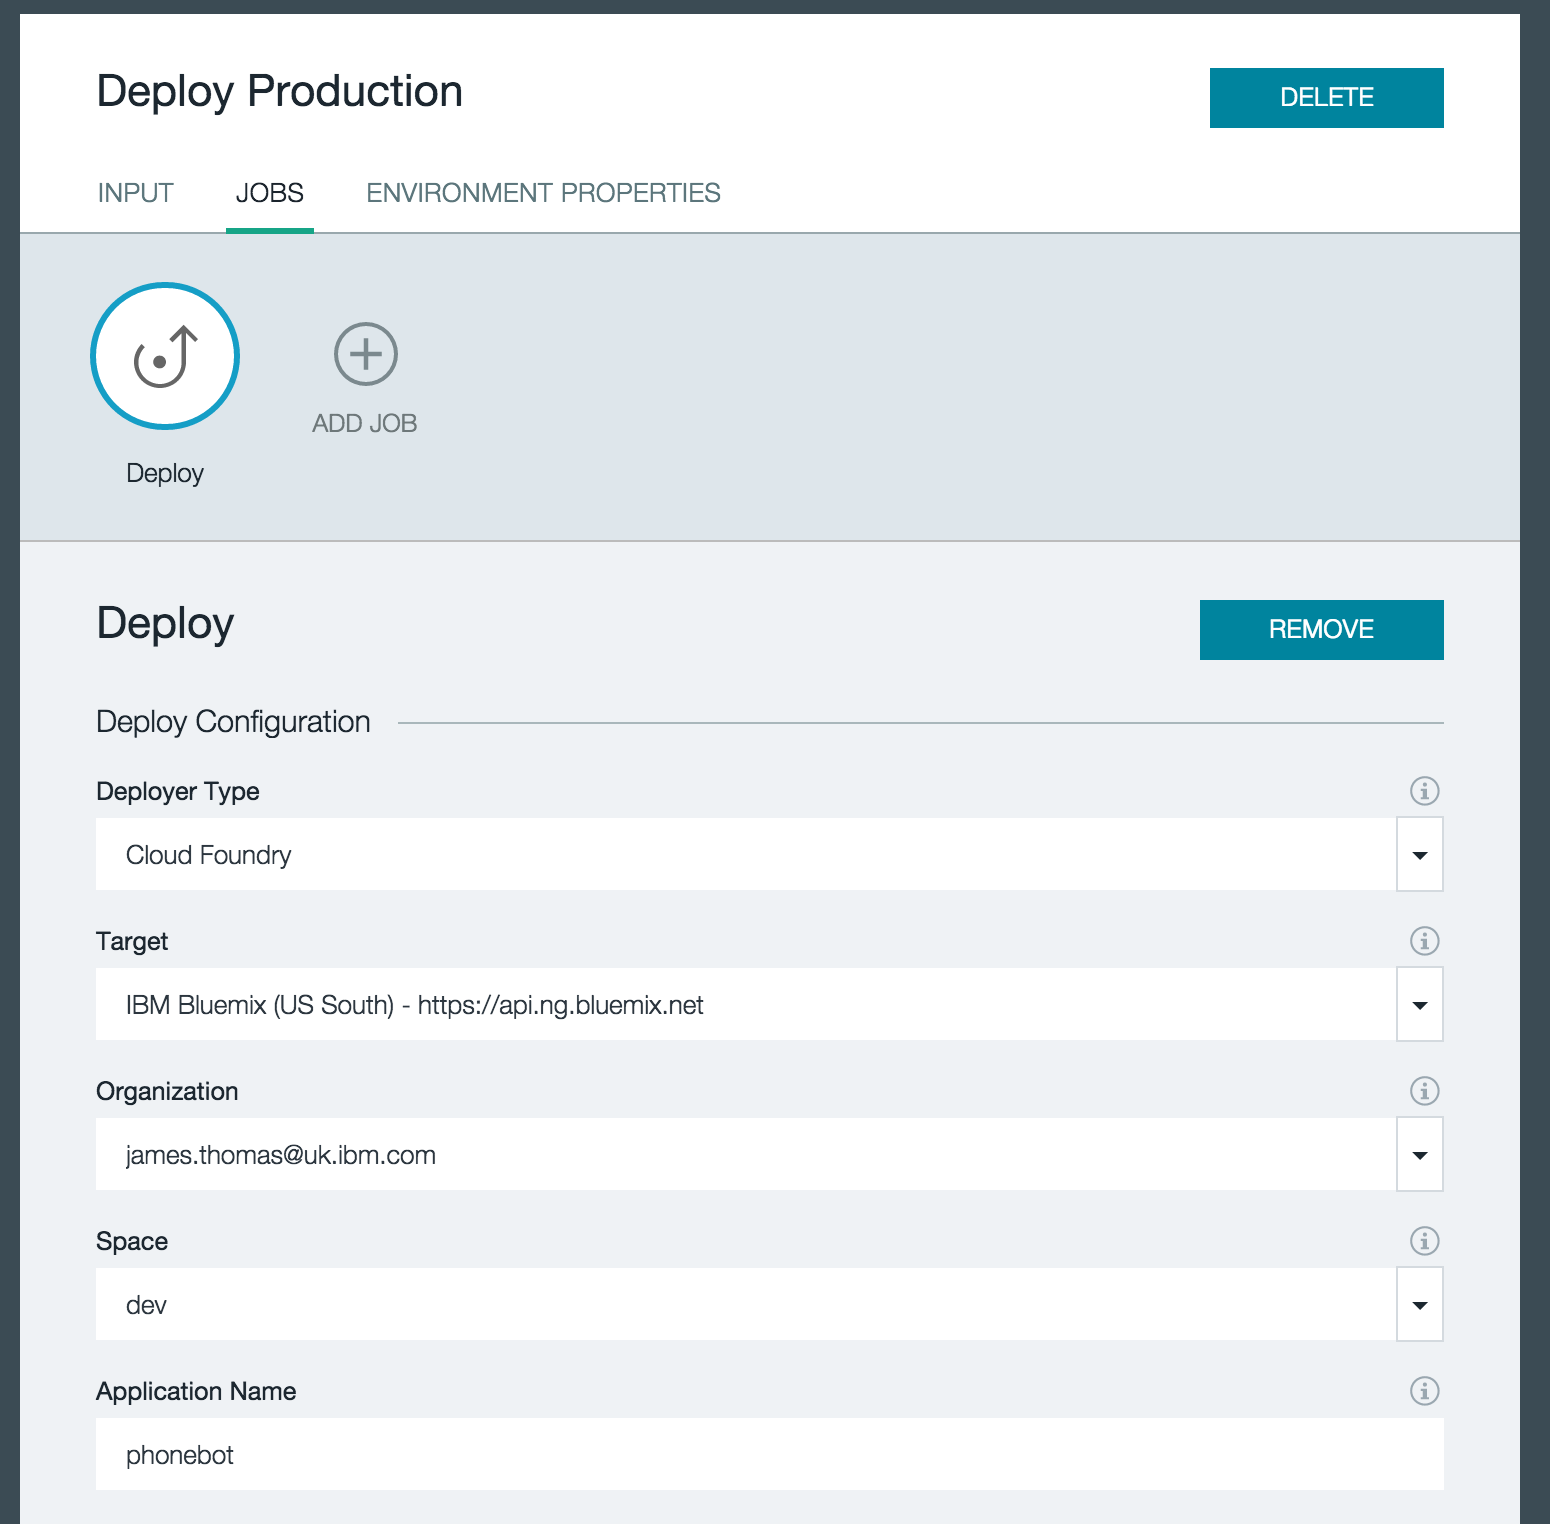
Configuring a “Deploy” task, this time we use the production space “dev” and use the proper application name.
…and that’s it!
With our “Continuous Delivery” pipeline now configured, new versions of Phonebot will be automatically deployed to production without any manual work.
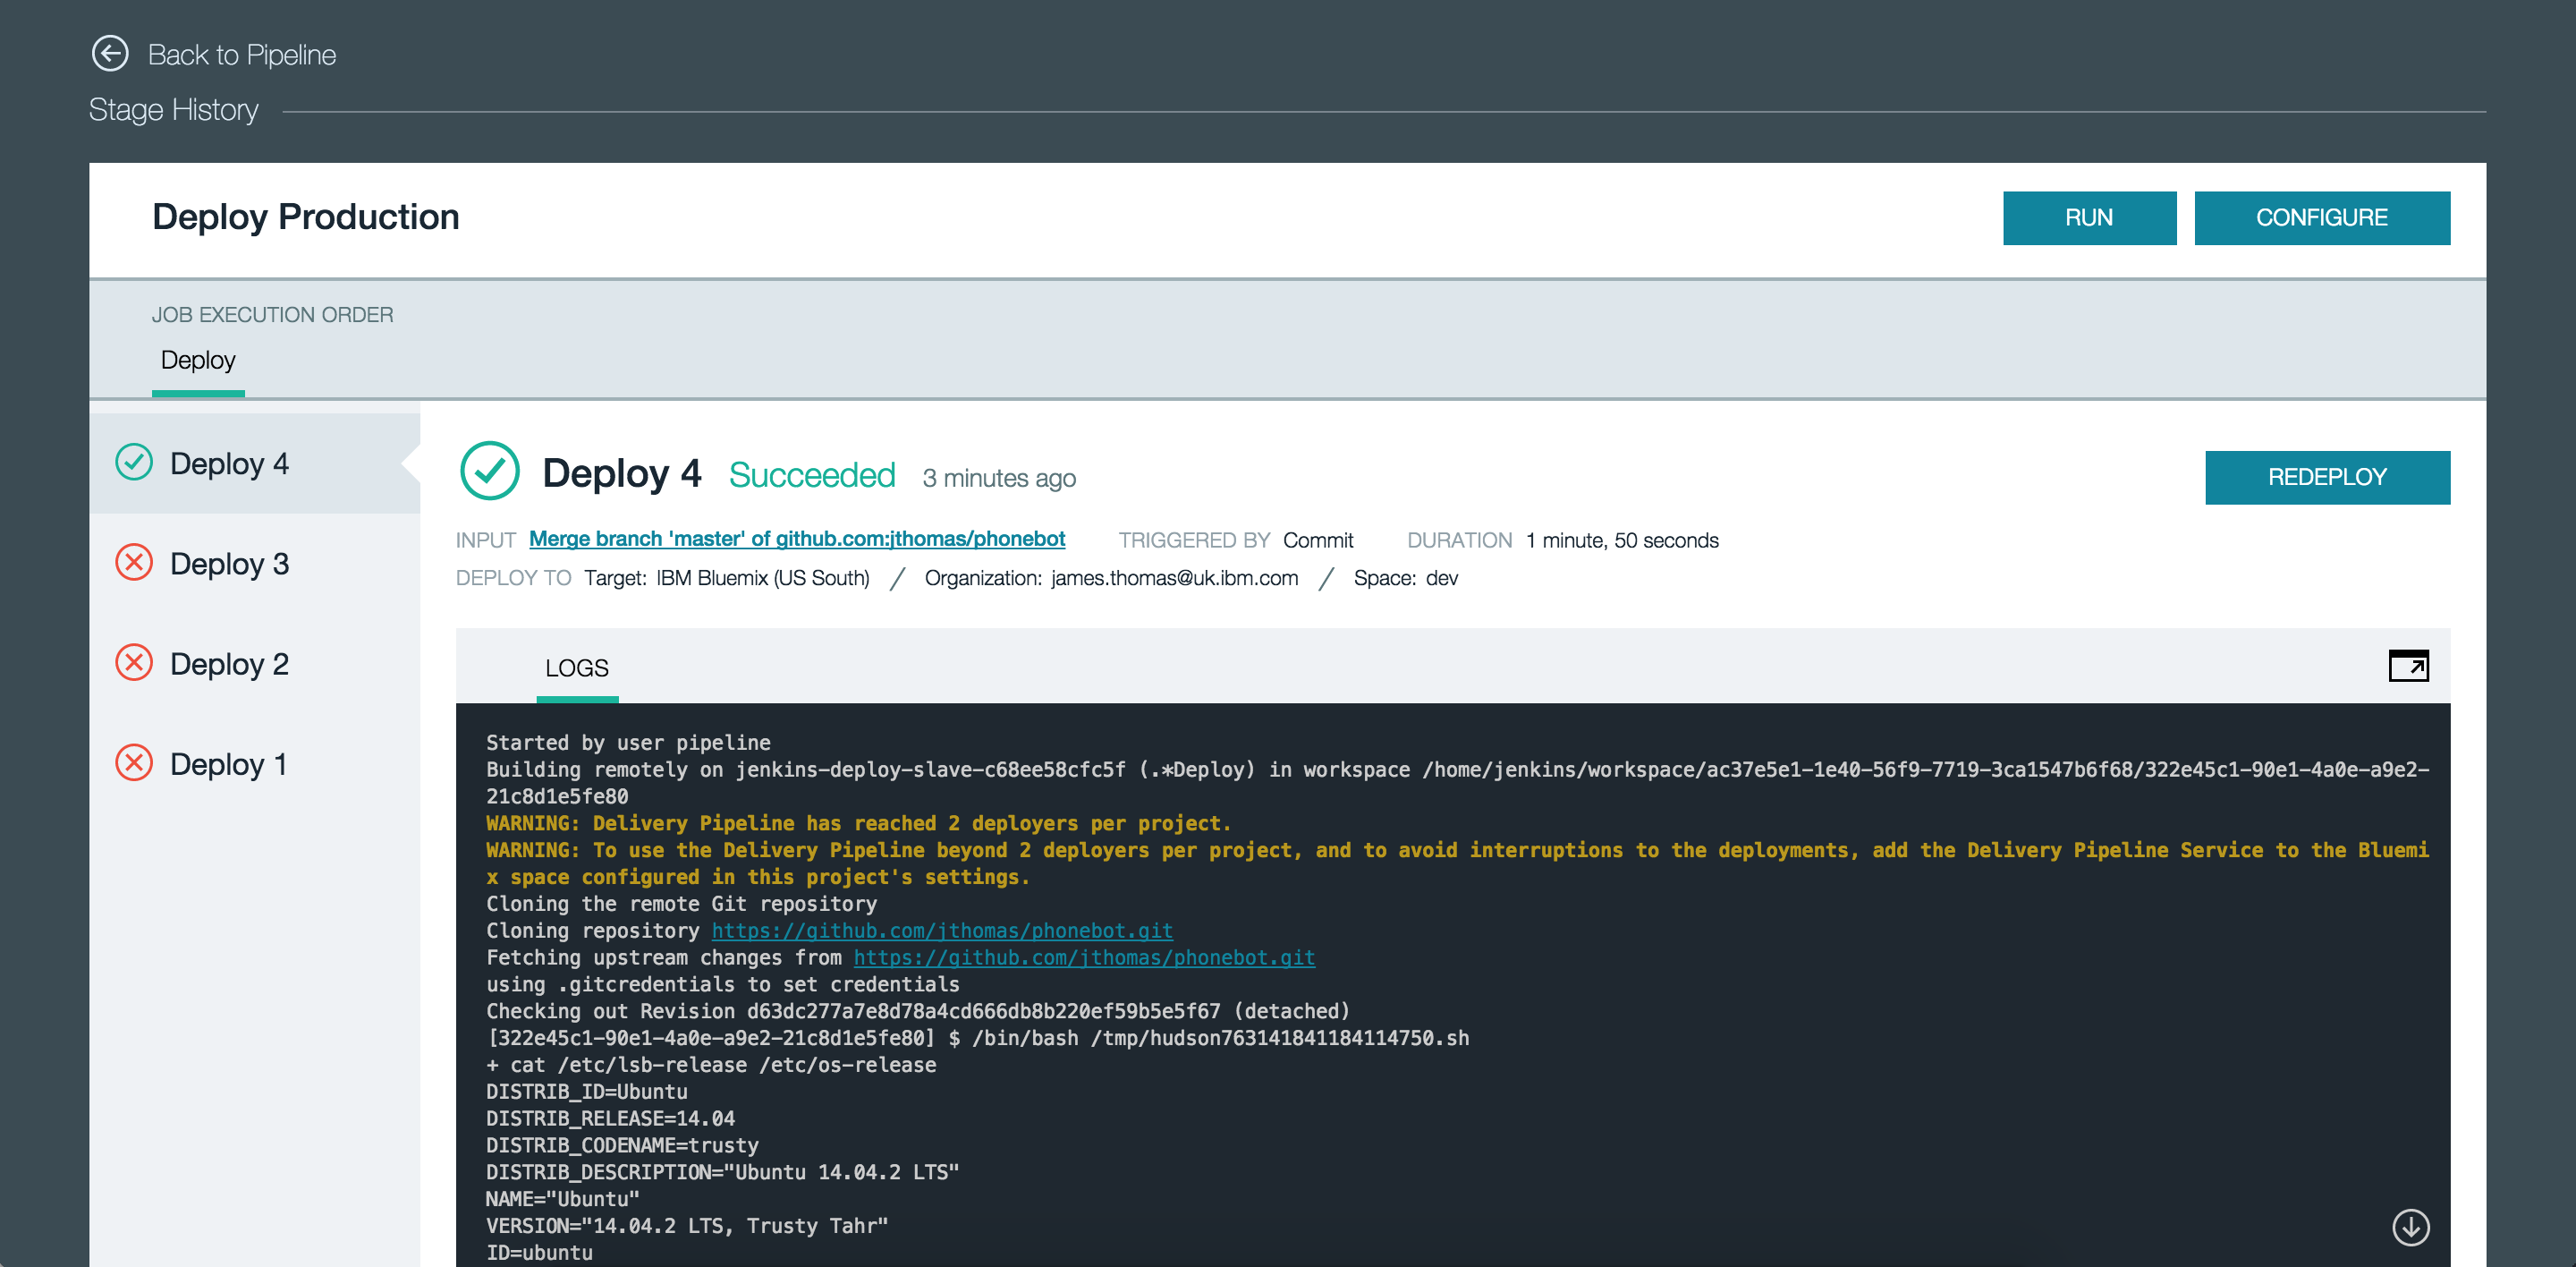
For testing, each stage can be triggered manually. Logs are available in to diagnose any issues that may occur.
Using IBM DevOps Services, we rapidly created a build and deploy pipeline linked to a project on Github without having to manually configure build systems, test servers or anything else you would expect.
Our example was relatively simple, the service can be configured for far more complicated build and deploy tasks. The documentation gives full details on the capabilities of that platform. If you have any issues, please use the IBM Answers support forum to post questions and get answers from the development team.