Doctor Watson is an IBM Bluemix application to answer medical questions over the phone, using IBM Watson and Twilio.
Ringing an external phone number, the application will answer and ask for a medical question to help with. Translating your speech into text and using IBM Watson’s Question and Answer service, Doctor Watson will query the medical corpus.
Top rated answers will be converted to speech and used as a response over the phone. Users can continue to ask more questions for further information.
Putting together this complex application, with voice recognition, telephony handling and a medical knowledge base, was incredibly simple using the IBM Bluemix platform.
Fork and deploy the repository to have your own version of Doctor Watson!
Want to know how the project was built? Read on…
Overview
Doctor Watson is a NodeJS application using Express, a framework for building web applications, to handle serving static content and creating REST APIs.
The front page gives an overview of the application, served from static HTML files with templating to inject the phone number at runtime.
HTTP endpoints handle the incoming messages from Twilio as users make new phone calls. The application’s public URL will be bound to a phone number using Twilio’s account administration.
Services for IBM Watson are exposed for the application using the IBM Bluemix platform. Text to Speech and Question and Answer services are used during phone call handling.
The application can be deployed on IBM Bluemix, IBM’s public hosted Cloud Foundry platform.
Handling phone calls
Twilio provides “telephony-as-a-service”, making applications able to respond to telephone calls and text messages using a REST API.
Twilio has been made available on the IBM Bluemix platform. Binding this service to your application will provide the authentication credentials to use with the Twilio client library.
Users register external phone numbers through the service, which are bound to external web addresses controlled by the user. When a person dials that number, the service makes a HTTP call with the details to the application. HTTP responses dictates how to handle the phone call, allowing you to record audio from the user, redirect to another number, play an audio file and much more.
We’re using ExpressJS to expose the HTTP endpoints used to handle incoming Twilio messages. Twilio’s client libraries abstract the low-level network requests behind a JavaScript interface.
This code snippet shows the outline for message processing.
123456789
app.post('/some/path',twilio.webhook(twilio_auth_token),function(req,res){// req.body -> XML body parsed to JS object// do some processingvartwiml=newtwilio.TwimlResponse();twiml.command(...);// where command is a 'verb' from TwilMLres.send(twiml);});
TwilML is Twilio Markup Language, an XML message with instructions you can use to tell Twilio how to handle incoming phone calls and SMS messages.
TwimlResponse instances generate the XML message responses. Primary verbs from the TwilML specification are available as chainable function calls on the class instance.
Doctor Watson Call Flow
When the user first calls the phone number, Twilio sends a TwilML message over a HTTP POST request to http://doctor-watson.mybluemix.net/calls.
12345678910
router.post('/',twilio.webhook(twilio_auth_token),function(req,res){log.info(req.body.CallSid+"-> calls/");log.debug(req.body);vartwiml=newtwilio.TwimlResponse();twiml.say('Hello this is Doctor Watson, how can I help you? Press any key after you have finished speaking').record({timeout:60,action:"/calls/recording"});res.send(twiml);})
We’re using the TwilML response to give the user information on asking a question. Recording their response, the audio file with their question will be sent in another request to the ‘/calls/recording’ location.
12345678
router.post('/recording',twilio.webhook(twilio_auth_token),function(req,res){vartwiml=newtwilio.TwimlResponse();enqueue_question(req.body);twiml.say("Let me think about that.").redirect("/calls/holding");res.send(twiml);})
Using the audio file with the user’s question, available as the request body, we now schedule a call to the Watson services.
With the question answering request in-progress, we redirect the user into a holding loop.
12345678
router.post('/holding',twilio.webhook(twilio_auth_token),function(req,res){vartwiml=newtwilio.TwimlResponse();twiml.pause({length:5}).say("I'm still thinking").redirect("/calls/holding");res.send(twiml);});
Every five seconds, we relay a message over the phone call until the answer has been returned.
Within the callback for the Question and Answer service, we have the following code.
This uses the Twilio client to update the location for a live call, redirecting to the location which returns the answer.
123456789
router.post('/answer',twilio.webhook(twilio_auth_token),function(req,res){vartwiml=newtwilio.TwimlResponse();twiml.say(answers[req.body.CallSid]).say("Do you have another question?").record({timeout:60,action:"/calls/recording"});res.send(twiml);})
Now we’ve shown how to handle phone calls, let’s dig into the Watson services…
Using the Watson Services
IBM Bluemix continues to roll out more services to the Watson catalogue. There are now fifteen services to help you create cognitive applications.
All services come with great documentationn to get help get you started, with sample code, API definitions and client libraries for different languages.
When we have a new audio recording containing the user question, this needs converting into text to query the Watson Q&A service.
Twilio makes the recording available at any external URL as a WAV file with an 8Khz sample rate. Watson’s Speech to Text services has a minimum sample rate for audio input for 16Khz.
Before sending the file to the service, we need to up-sample the audio.
Searching for a Node package that might help, uncovered this library. Using the SOX audio processing library, we can easily convert audio files between sample rates.
This package relies on the SOX C library, which isn’t installed on the default host environment in IBM Bluemix. Overcoming this hurdle meant creating a custom NodeJS buildpack which installed the pre-built binaries into the application runtime. I’m saving the details of this for another blog post…
Using the Watson client library, we can send this audio to the external service for converting to text.
This triggers the callback we’ve registered with the first answer in the returned results. Answers are stored as values in a map, with the key as the call ssid, before triggering the redirect to the ‘/calls/answer’ location shown above.
Deploying to Bluemix
Hosting the application on IBM Bluemix uses the following manifest file to configure the application at runtime.
Here’s a video I’ve made showing you how to deploy new versions of an
application on IBM Bluemix without the end-user having to suffer any down time:
Utilising the Blue Green deployment pattern, we deploy the
new version to a separate host within the production environment, rather than
taking down and updating the existing application. The HTTP router in front of
the applications controls tunnelling application requests between the different
versions. Once we verified the new version is working correctly, we can turn
off the previous version and transfer all traffic to the new instance.
This complex deployment pattern is automatically supported by the Cloud Foundry
technology underpinning IBM Bluemix.
Staging multiple versions of an application, bound to the same external address, with automatic load balancing is handled transparently by the platform.
This works for any language or
runtime without any modifications to your application.
There are a few different ways
to achieve this deployment approach using the
platform. The example in the video only uses three commands
with the ‘cf’ tool.
12345678910
// Rename the existing application to allow staging a new instance without
// overwriting existing version.
$ cf rename app old_app

// Deploy the updated application, which will be bound to the same external
// address. HTTP traffic is load balanced between the two versions automatically.
$ cf push

// Verify the new application is working and then turn off the old instance.
$ cf stop old_app
Amazing!
Update (July 20th 2018): There is now a CLI plugin for Cloud Foundry that automates this approach. Check it out!
Last week was Monki Gras, the conference organised by
RedMonk, with this year’s theme being ”scaling craft”.
We plan to explore Craft that helps scale Technology, or Technology that helps scale Craft. What are the limits of a craft-based approach? Does quality have to suffer as businesses scale?
Talks were on a diverse range of topics, from best practices for scaling virtual teams to printing your own steam train. Here are my notes
on those I found most interesting (or, more likely, remembered to write something down…).
Rafe started his talk by defining characteristics associated with craft and
mass production, which are normally held up as polar opposites. Traditionally,
craft became a byword for quality, whereas mass production signalled
consistency and resilience. Combining aspects from both domains will often lead
to the best results.
Consider Apple’s tag line these days, designed in California, produced in
China, craft and mass production.
When running an engineering team at Etsy, Rafe detailed the best practices they
used to ensure they shipped high quality software.
Measure and monitor everything - This spans all areas of engineering from user
request metrics produced by the site, application errors generated and enormous A/B testing, etc.
Automate repeatable processes - New developer can be set-up straight away due to their use of VMs, allowing them to
start shipping straight away. Continuous integration and automated deployment were core principles of their engineering set-up.
Growing Craftmanship - Etsy encouraged “craftmanship” as a culture internally through activities such as regular
code reviews, annual bootcamps to shift developers between different teams, scheduled “bug rotations” to mix developers together to tackle
the bug queue and code reading clubs, where developers review open-source software together.
Finally, spend the time saved on the most important aspect of software development, your employees and keeping them happy.
IBM’s CEO, Ginni Rometty, recently announced a new division to lead design
across the entire company, cutting through the individual brands and products,
transforming IBM into a design-led company.
With close to 480,000 employees,
this is a herculean task and Phil Gilbert has been put in charge.
Phil previously led the effort to consolidate IBM’s BPM portfolio down from nearly
twenty products to only four.
His team has developed a new framework to deliver
“design-led thinking” throughout IBM, rather than a formulaic set of policies
and procedures to enforce design from top-down.
Using the military analogy of
Commander’s intent
, the goal was to empower product teams within IBM to embrace design-led thinking, rather than appearing
as “just another corporate diktat”.
Key building blocks in the framework were…
Lead Users - Continual and regular engagement with intended consumers straight from the design phase.
Release Hills - Used to split design and development effort into achievable iterations.
Metrics - Provide visibility around objective operational data.
Wiki-based Release BluePrint - Used as source of truth within project, peer-reviewed artifacts, shared between consumers.
Full details about this new initiative can be found on the IBM Design site.
Steve knows a thing or two about “ecosystems”, working as a developer advocate
for Red Hat and having a PhD in Ecology.
Drawing on his past experience from
academia, Steve talked about using lessons learned from real ecosystem
management, specifically Yellowstone Natural Park, to enable more effective
developer outreach programmes.
Ecosystems experiments come in different forms, natural (let’s observe the
effects of a natural disaster) and planned (let’s introduce a
new species), choosing the right experiment type can greatly improve the
results.
Add monitoring to your ecosystem experiments, e.g. A/B testing on click-through rates for
email marketing, allowing you to perform statistical analysis to quantatively
assess the outcomes.
Donnie Berkholz - “What Data Scientist Can Learn From DevOps”
Donnie Berkholz, analyst at Redmonk, was previous a biological researcher
working on drug discovery. His talk expanded from this
article
about how data scientists could benefit from applying “engineering culture”.
The main theme was that traditional statisticians come from a world
built with custom scripts using R, hand-written log books and manual analysis.
As “data scientists” merge this existing world with better technologies there
was an enormous amount of “best practices” from software engineering that could
be applied with great success.
Concrete suggestions included source control for artifacts, continuous testing for
code and data, online collaboration using wikis and engineering for scale.
Shanley compared Dante’s Inferno to
Product Management, using the nine circles of Hell as metaphors for common issues
and providing solutions from Paradiso and the spheres of Heaven.
Fraud - Roadmaps are arbitrary documents with timelines and feature. Premature
decision making that encourages death marches. Remove road maps and
collaborate on living “working what are working on” document.
Greed - You can’t do everything you want (within a fixed time period).
Shanley’s heuristic says, “take what you want to do, divide it by four, take
the original time you think you need and double it”.
Gluttony - Stop using “all the tools”. Perfect tools don’t exist, lower your expectations and standardise across teams.
Limbo - Technical debt hinder progress, grows over time. Stop hiding it away, acknowledge it and plan to resolve it.
Anger - Continually dismissing peoples’ opinions leads to distrust and resentment. Create culture of discussion, including trade-offs and whys. Include
other departments apart from engineering.
Tim Webb - “Tips & tricks, and tools from a company that’s never had a headquarters.”
Tim’s talked about scaling remote-working teams and how his company makes it
work.
Setting expectations was key to successful collaboration, how available
are people supposed to be during core working hours?
Remote working can be
successful but you can’t ignore physical distances, having a team with
employees in Latin America, United Kingdom and China makes it difficult to even
schedule a conference call.
Use tools a variety of tools, from Google Hangouts
to Skype, to encourage collaboration. Default to “over-sharing” to ensure
everybody stays in touch.
Github has now grown to over 140 employees but still hasn’t employed a formal manager.
Rather than having a hierarchical organisational, with managers dictating strategy and direction,
Github’s engineer’s work on what they find most interesting and progress happens through consensus and
discussion.
Ted spoke about “freedom perks”, calling out companies who use excessive benefits, e.g. free food,
rather than engaging work to hold onto employees.
Authenticity and autonomy are key to happiness for employees.
Github’s lack of a formal structure creates a culture which embraces disorder, tolerates mistakes and lets teams
form naturally. This culture eventually reinforces the original structure.
Finally, thanks to James Governor and the rest of the organisers for putting on a fantastic event.
It must have taken an enormous amount of effort to pull off a high-quality event on this scale.
Modern Dojo applications often use declarative programming, annotating HTML
elements with custom attributes containing module identifiers, to declare widgets
and use client-side rendering with HTML templates to convert web pages into
JavaScript applications.
Client-side rendering often comes with a major complaint, the dreaded
“pop-up effect”.
This happens because the HTML initially displayed
does not contain widget templates until after client-side rendering has
finished. Essentially, the application has to load twice, once to download all
the JS, CSS and HTML resources, then again, to render widgets client-side.
Usually this is hidden behind an overlay screen, which becomes especially
annoying in multi-page applications.
So, what can we do?
Templated widgets provide a good pattern for building re-usable application modules but client-side rendering can
provide a less ideal user experience.
Reading an article about the technology stack behind Google+, Google
were using page widgets with templates supported by the Closure framework. However, they had
an interesting idea to overcome the client-side rendering issue…
We often render our Closure templates server-side so the page renders before any JavaScript is loaded, then the JavaScript finds the right DOM nodes and hooks up event handlers, etc. to make it responsive.
Could we use the same server-side rendering technique in Dojo applications?
Doing a little investigation, Dojo’s abstractions around widget rendering made it perfect
for server-side rendering.
Tl;DR? Project source code is available on Github here.
Dijit Widget Lifecycle
Dojo widgets inherit from the following base class,
dijit/_WidgetBase,
which provides the widget lifecycle, which can be extended with custom implementations.
constructor
parameters are mixed into the widget instance
postMixInProperties - Invoked before rendering occurs, and before any DOM nodes are created.
buildRendering - Used to define the widget’s DOM nodes
setters are called - Custom attribute setters are called
postCreate - Widget has been rendered.
startup - Parsing and creation of any child widgets completed.
All lifecycle methods are executed in linear order for each new widget instance.
Having clear abstractions around where and when the widget rendering
occurs in the lifecycle (buildRendering) makes extending simple.
Rendering widget templates is provided by an additional mixin,
dijit/_TemplatedMixin.
There’s also a further extension, dijit/_WidgetsInTemplateMixin,
for ensuring child widgets within the template are instantiated correctly during rendering.
If we provide a pre-rendered template within the page, the client-side
renderer will hook up that DOM node as the widget’s DOM node, using a
custom lifecycle extension, rather than attempting to construct the HTML
template client-side.
We only need to modify the buildRendering phase, every
other lifecycle phase will run normally.
Rendering Templates Server-Side
Now we know where to hook up a pre-rendered template, how would we render the templates server-side?
We want to support server-side rendering with only minimal changes to an application.
Running Dojo on NodeJS
With the recent popularity of NodeJS, we have an excellent server-side
JavaScript environment. If we configure Dojo to run within this platform, we
should be able to construct page widgets server-side, delegating template
rendering to the same lifecycle used client-side.
This code below shows how to configure Dojo on NodeJS.
Once we’ve evaluated the dojo.js file within NodeJS, the AMD loader (require/define) is available through properties on the
global object. We can use these functions to load additional DTK or custom AMD modules. Accessing
page widgets using the AMD loader, we can execute the lifecycle methods to trigger template rendering, read the
rendered template and include the output within the application’s HTML pages.
Unfortunately, there’s one thing missing… access to the DOM!
Simulating a Browser
Dojo widgets need access to the DOM when rendering the static HTML template into live DOM nodes.
Running inside a NodeJS instance, rather than a browser, this API is missing.
Luckily, there’s a pure-JavaScript implementation of a DOM, which can be executed within NodeJS, called JSDOM.
Importing this package within our application simulates those APIs, allowing page widgets to render normally and, more importantly, letting
us access the live DOM nodes which result from widget rendering.
Finally, creating Dojo widgets within our fake browser environment triggered a
few issues, due to the configuration used with the NodeJS loader.
The code snippet below shows how we initialise a server-side DOM and fix those configuration issues.
Server-Side DOM with Dojo
1234567891011121314
varjsdom=require("jsdom").jsdom,document=jsdom("<html></html>"),window=document.createWindow();varhas=global.require("dojo/has"),win=global.require("dojo/_base/window"),// Manually add event listener test as this was only included in // the "host-browser" profile.has.add("dom-addeventlistener",!!document.addEventListener);has.add("dom-attributes-explicit",true);// Fix global property to point to "window" win.global=window;
Now we can successfully create widgets on the server-side, how do we know which
widgets to create for an application?
Declarative Dojo Applications
Dojo provides a mechanism to convert HTML elements, annotated with module identifiers, into page widgets at runtime.
Using the dojo/parser
module, once the page has loaded, it will automatically instantiate the widgets, passing in
parameters and other attributes defined in the markup.
An example of declarative widget declaration is shown below.
Application pages using declarative markup can easily be scanned to find application widgets that are needed. As we’re able to
run AMD modules server-side, we can simply use the existing Dojo parser with our server-side DOM to do the hard work for us!
Server-side Parsing
For a sample page we want to pre-render, we inject the HTML source into our DOM and run the parser over the current instance. Once the parser
has finished, the server-side DOM will contain the rendered templates for each widget.
Using dojo/parser with JSDOM
123456789
varparser=global.require("dojo/parser"),source="... page html goes here ...";// Overwrite finished document contents// with new source and run parser over the DOM.document.write(source);parser.parse(document);source=document.innerHTML;
Using JSDOM like this, script tags within the page aren’t evaluated, letting us handle the module loading
and parsing externally in NodeJS.
However, this presented a challenge as module dependencies declared in these
script tags were ignored, leaving the parser to instantiate declarative widgets from modules which hadn’t been loaded.
Luckily, in the Dojo 1.8 release, the parser was enhanced to automatically load any missing module dependencies during the parsing phase.
Phew…
Finally, once a widget’s template has been rendered, any other operations
performed by the parser are unnecessary. Creating a “lite” parser which
removed these code paths, which also provided a place for the extensions
described later, was started from a copy of the existing parser.
Using the AMD “aliases” configuration, this module transparently replaced the existing parser during server-side rendering.
Mixins For Pre-Rendering
Rendering widgets server-side, using NodeJS and JSDOM, works for simple widgets but what happens when you use
layout widgets, which rely on accessing the browser’s layout properties? What if you have separate code paths for different browsers
which affect the template string?
There are numerous scenarios where we rely on data that’s impractical to simulate
within our fake browser.
So, how do we pre-render these widgets? We don’t!
Ignoring these widgets, which leaves them to render normally client-side.
Identifying widgets to render server-side takes advantage of a new declarative
parameter used by the parser since 1.8, data-dojo-mixins. This parameter
allows additional modules to be mixed into the declarative class instance by
the parser.
Using this parameter with a custom module,
server_side/_TemplatedMixin, on widgets to be pre-rendered, as shown below,
make identification easy. Additionally, this class
will contain the lifecycle extensions that modifies client-side rendering.
Now we’ve identified the mechanism for server-side rendering, how can we automate this process
for all application pages?
Connect is “an extensible HTTP server framework for
node, providing high performance plugins known as middleware”.
Using this framework as our HTTP server means we can write a custom middleware plugin
that will automatically parse, pre-render and serve all our application pages.
Connect plugins are functions that accept three parameters, the request and
response objects, along with a callback to signal this plugin’s work has
finished. Each registered plugin will be executed for each request.
We’ve decomposed the library into two files, server_side.js, which exposes a
valid express plugin, and render.js, which provides a simple interface for the
server-side rendering, described above. The complete version of the code for both modules is included below.
varrender=require('./render.js');module.exports=function(config){// Create AMD packages from module configuration.varpage=render({dojo:config.dojo+"/dojo",dijit:config.dojo+"/dijit",server_side:__dirname+"/../public/js/server_side"});returnfunction(req,res,next){varignore=function(accept){returnaccept.indexOf("text/html")===-1;};// Only hook into text/html requests....if(ignore(req.headers.accept)){returnnext();}varwrite=res.write,end=res.end,buffer="";// We need entire page contents, not just the chunks.// Proxy original methods while we're buffering.res.write=function(chunk,encoding){buffer=buffer.concat(chunk);returntrue;};res.end=function(chunk,encoding){if(chunk){res.write(chunk);}// Fix content-length, we now have more data to send.varrendered=page(buffer);res.setHeader("Content-Length",rendered.length);returnend.call(res,rendered,encoding);};next();};};
varjsdom=require("jsdom").jsdom,document=jsdom("<html></html>"),window=document.createWindow();module.exports=function(packages){// Fix window objects in global scope.global.document=document;global.navigator=window.navigator;global.window=window;varamd_packages=Object.keys(packages).map(function(key){return{name:key,location:packages[key]};});// Deliberately create global "dojoConfig" variable.dojoConfig={packages:amd_packages,// _WidgetsInTemplateMixin call parser directly to instantiate children. // We need it to use our custom parser so use AMD-remapping magic!aliases:[["dojo/parser","server_side/parser"]],deps:["server_side/parser","dojo/has","dojo/_base/window","server_side/registry"]};require(packages.dojo+"/dojo.js");// Once Dojo has been evalulated, require & define methods // from AMD API as exposed as properties on "global" object.varhas=global.require("dojo/has"),win=global.require("dojo/_base/window"),registry=global.require("server_side/registry"),parser=global.require("server_side/parser");// Now we need to manually fix a few things to make Dojo // simulate running in a browser.// Manually add event listener test as this was only included in // the "host-browser" profile.has.add("dom-addeventlistener",!!document.addEventListener);has.add("dom-attributes-explicit",true);// Fix global property to point to "window" win.global=window;returnfunction(source){// Clear any previously rendered widgets from registry,// simulate fresh page load.registry.reset();// Overwrite finished document contents// with new source and run parser over the DOM.document.write(source);parser.parse(document);returndocument.innerHTML;};};
Using this new plugin in an application is demonstrated in the code below, which
serves the “public” directory as the application’s source root.
Once the pre-rendered page has been returned to the browser, the normal client-side
parsing will take place to instantiate the page widgets. For widgets whose templates are
included within the page, we need to ensure the normal client-side rendering is bypassed.
In this scenario, we connect the widget’s domNode property to the DOM node that the
declarative widget was instantiated from.
Extending buildRendering
Adding a HTML template to your widget is achieved by inheriting from
dijit/_TemplatedMixin, which provides the “buildRendering” implementation to
convert a HTML string stored under “templateString” into live DOM nodes.
Although we want to skip creating DOM nodes from the template, there are other steps, e.g. attaching event handlers, which must be ran normally.
Using a custom mixin to identify declarative widgets for server-side rendering, server_side/_TemplatedMixin, also provides
the extension point to modify the rendering process.
Overwriting the default implementation of “buildRendering” through this mixin led
to unresolvable issues.
We’re forced to call any super-class “buildRendering” implementations, through
“this.inherited(arguments)”, to ensure any custom code paths that also extend this method are executed.
However, this will reach the original dijit/_TemplatedMixin module, which we need to skip.
Monkey-patching the _TemplatedMixin prototype became the easiest solution.
Once our custom mixin is loaded,
we overwrite “buildRendering” which a new implementation. Using a custom flag, provided by our mixin, we check
whether to continue with the normal code path for client-side rendering, otherwise we run our stripped down version.
varbr=_TemplatedMixin.prototype.buildRendering,fc=_TemplatedMixin.prototype._fillContent;// Stripped down of the original function source below._TemplatedMixin.prototype.buildRendering=function(){if(!this.serverSide){returnbr.call(this);}// Source DOM node already the pre-rendered template nodes.varnode=this.srcNodeRef;node.removeAttribute("data-dojo-type");// Call down to _Widget.buildRendering() to get base classes assigned_WidgetBase.prototype.buildRendering.call(this);this._attachTemplateNodes(node,function(n,p){returnn.getAttribute(p);});this._beforeFillContent();// hook for _WidgetsInTemplateMixin// Don't pass srcRefNode reference as it doesn't exist.this._fillContent();};// Override to turn into a no-op, we don't want to attach source// ref nodes client side as it's been done on the server._TemplatedMixin.prototype._fillContent=function(){if(!this.serverSide){returnfc.apply(this,arguments);}};
We performed the same trick for the fillContent method due to similar issues, along with a new implementation
of attachTemplateNodes in the mixin.
With this minimal change to the client-side rendering process, widgets pick up their templates from the existing page and are
instantiated normally. Hooking up template nodes as properties on the parent, attaching event handlers and setting data bindings
behaves as expected.
Putting It Together
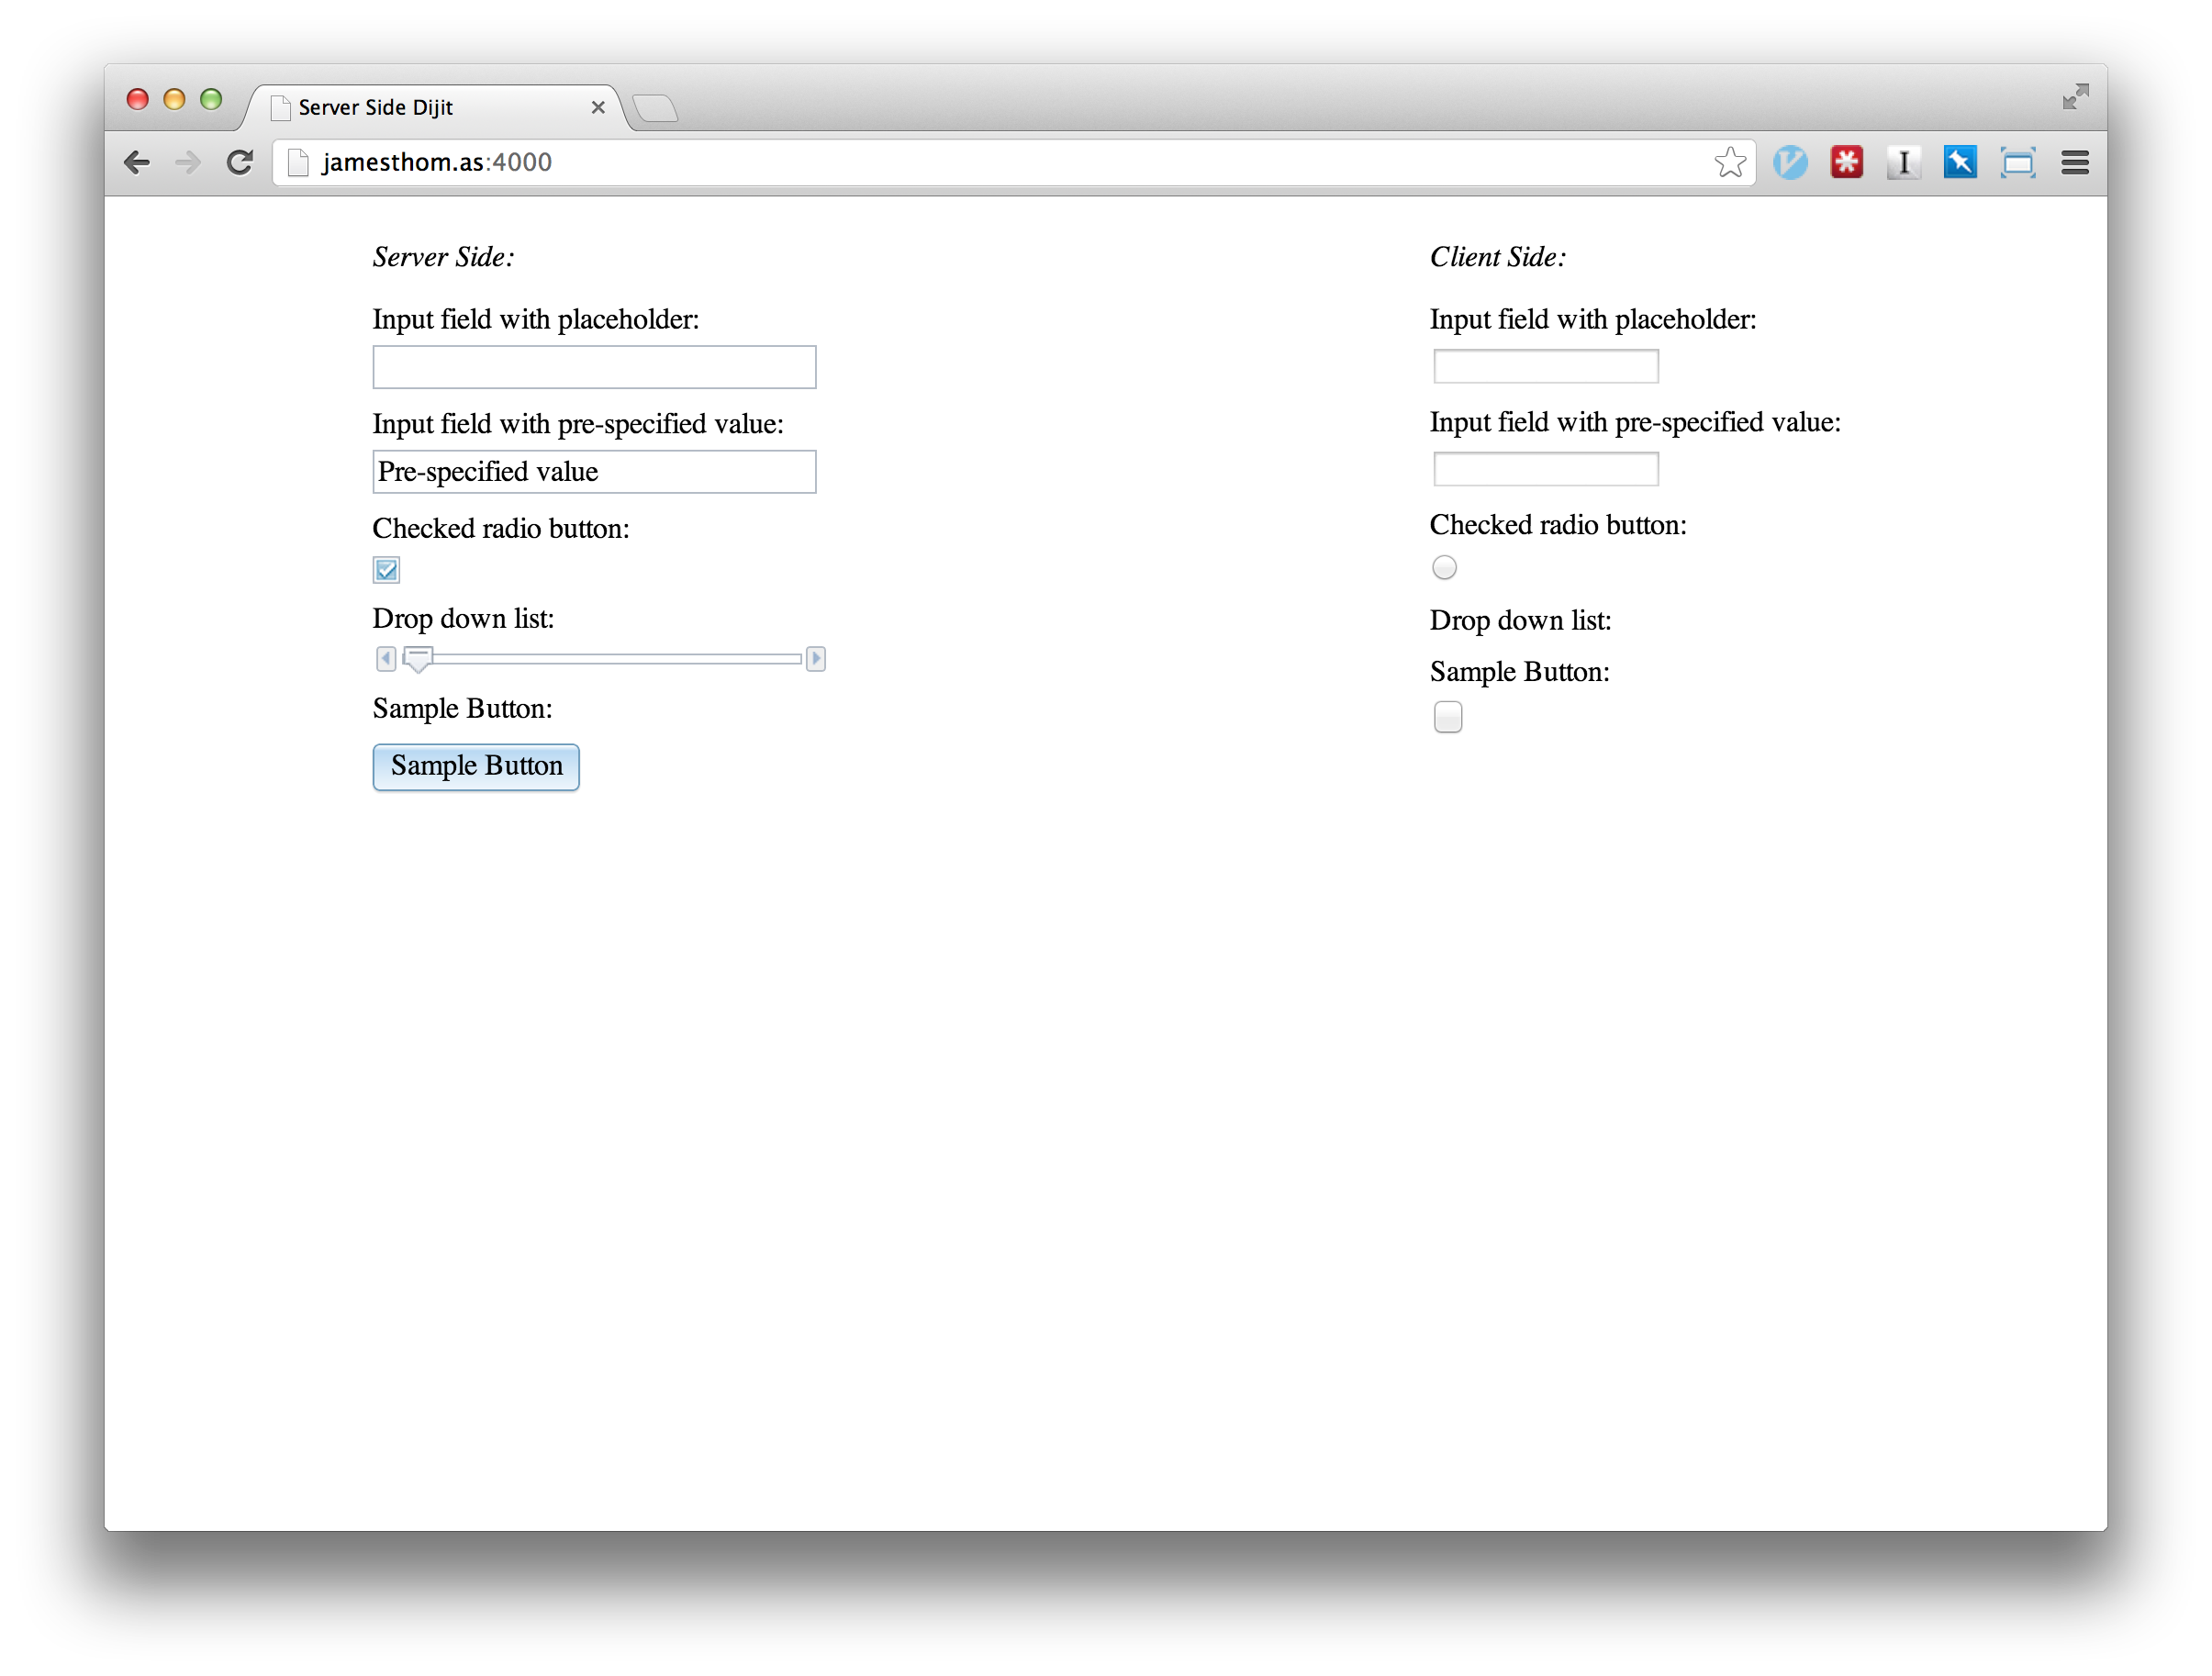
Using our custom middleware for server-side rendering, along with our client-side rendering modifications,
users accessing pages will see the templated widgets straight away, removing the “double-rendering” effect
and the need for loading screens.
This image above the same widgets rendered client-side and server-side when the page loads, but before
client-side rendering has finished.
Server-side rendering also comes with client-side performance benefits,
reducing the number of costly DOM operations performed during application loading.
This may be especially useful for low-power devices with mobile browsers.
Extending, rather than replacing, the normal Dojo rendering lifecycle allows us to transparently delegate rendering
to the client-side for unsupported widgets. Excellent abstractions already provided for the lifecycle in the toolkit make
the extension conceptually simple.
There are restrictions that come with this implementation, discussed below, but working within these
constraints it is possible for the majority of templated widgets to be rendered server-side.
Source Code
All source code for the project lives on Github here.
Feel free to file issues, patches and comments at the project home page.
Once you have checked out the project code, run the following command to
start a test application comparing client-side and server-side rendering side
by side.
You can also install the module as an NPM package, server_side_dijit,
and use the plugin within your existing Connect application.
Issues
We’ve already mentioned potential pitfalls which restrict server-side
rendering. These include widgets that use browser dimensions to dynamically
calculate sizing e.g. layout managers, use client-side resources to construct
templates e.g. reading cookie data, expect access to remote resources e.g
XHR’ing session details, and many, many more.
Letting those widgets default to client-side template rendering provides a safe fallback.
Discovering which existing Dojo widgets can support server-side rendering requires manual
testing. Within the project directory, under the “/test/public” location, we’ve started
collecting test pages which demonstrate those widgets which are known to work. Looking at those
pages should provide a good indication of the current level of support.
Last month, I was invited to speak at LondonJS on the machine learning and artificial intelligence behind IBM Watson.
I jokingly said the talk would win the prize for the “least amount of JavaScript-related content in a LondonJS talk”.
The idea was to introduce the audience to topics (machine learning) that might be relevant in the future and IBM Watson was a
great example that people love hearing about.
Slides for the event are now posted online, check them out here.
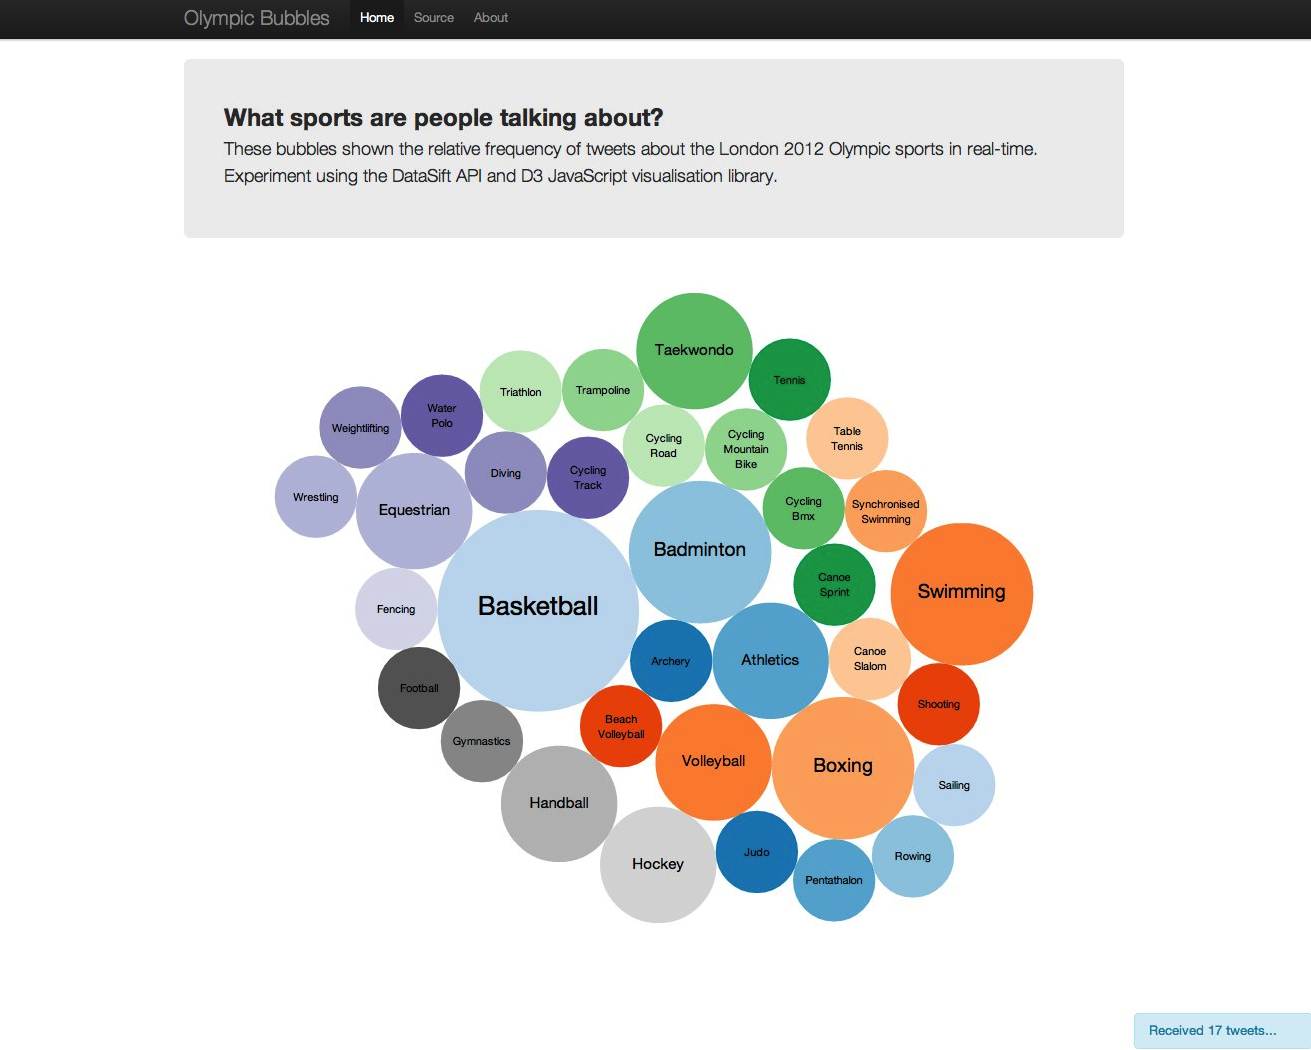
Introducing Olympic Bubbles, an experiment visualising mentions of the
London 2012 Olympics sports on Twitter in real-time.
With the London 2012 Olympics having multiple events running concurrently, Twitter’s become invaluable
for catching up on the day’s action, deciding what to watch and getting real-time insight into current events.
Having recently started to play with a JavaScript visualisation library (D3), this seemed like a great opportunity
to connect the two activities and automate the analysis of Twitter to visualise the most talked about Olympic sports.
Before we can visualise the data, we needed a way to filter the Twitter firehose for tweets mentioning the Olympic games…
Analysing tweets for Olympic sports
Twitter provides a public API for filtering their
stream, based on keyword matching, but there are two issues with this service:
No access to the firehose. Results don’t represent the full set of matches from the Twitter “firehose”, only a sample are returned.
Polling, not real-time. No support for receiving results in real-time, the client has to manually poll for new results over HTTP.
These problems made Twitter’s API unsuitable and an alternative was needed…
DataSift is a real-time media curation platform, allowing you to mine the Twitter Firehose for tweets matching the specific criteria of your choice. DataSift’s custom Curation Stream Definition Language allows you to filter based on any meta data within a tweet
DataSift are one of only two companies with unrestricted access to the Twitter “firehose”. They provide a free
trial account, with enough credit to mine 10,000 tweets.
Write a custom stream filter
DataSift provides a custom query language, CSDL (Curated Stream Definition Language),
for defining stream filters that can match messages based upon text, location, users and much more.
Defining a new filter, we’re interested in all messages that contain references to the London 2012 Olympics along with a sport.
Matching all tweets containing key words can be performed using the containsoperator
on the contentproperty of the interactioninstance.
Each interaction represents a single tweet from the Twitter Firehose.
The example below shows how to match any tweets which mention the word
olympic but ignore those without a valid sport, using the
conjunction and contains_any operator to make sure those matched messages
also contain one of the pre-defined keywords for the sports.
Olympic Sports Filter
1234567891011
interaction.contentcontains"olympic"ANDinteraction.contentcontains_any" Archery, Athletics, Badminton, ... Volleyball, Water Polo, Weightlifting, Wrestling"
Looking over the CSDL documentation, there was a feature that allowed user generated
tags to be appended to filtered messages.
Rather than having the client-side code manually
parse each message to determine which sports were referenced, we can append a tag during
the filtering process, as shown below.
Once the stream has been defined, making it public allows any user to access the
stream results. You can see the full stream definition and view a preview of the results
here.
Real-time results
Now we have a stream defined, we need to access the results in the browser in real-time.
Along with a traditional REST API, DataSift also provides a streaming API using WebSockets.
WebSockets provide a bi-directional channel for messages between a client and server, without having to poll for replies. Using their streaming endpoint,
we receive messages from our filtered firehose in real-time.
Setting up the connection and monitoring for new messages was extremely simple, as shown below. Each time a new message arrives,
we increment the frequency count for each of the pre-defined sports based on the interaction tag.
varws=newWebSocket('ws://websocket.datasift.com/<hash>?username=<username>&api_key=<api_key>');ws.onmessage=function(evt){varmsg=JSON.parse(evt.data),tags=stats.interaction.tags;tags.forEach(function(tag){// now publish notification of new tagged messages...});}
Visualising The Tweets
Now we have the data, how should we visualise the results?
There are hundreds of differentchartinglibraries
for JavaScript but
rather than drawing a static histogram of the sport frequencies, we want to incorporate
the real-time aspect into the visualisation. As new messages are received, the visualisation
should grow and morph, tied to the transitional nature of the data.
D3 is a JavaScript visualisation library which provides just that capability.
D3.js is a JavaScript library for manipulating documents based on data, allowing you to bind arbitrary data to a Document Object Model (DOM), and then apply data-driven transformations to the document.
Developed by Mike Bostock of the Stanford Visualisation Group, the library has fantastic
documentation along with an extensive examples gallery,
which provides a great starting point for developers.
Creating Bubbles
Reviewing the gallery, the Bubble example seemed like a good starting point.
Each bubble would represent a single sport and the size would be proportional to the frequency of tweets for that sport.
Given a list of sports and frequencies, how do we know where to render the nodes and what size they should be?
D3 provides a series of algorithms for converting data series into visual layouts, the Bubble example uses
Pack. This layout turns a hierarchical data structure into
“enclosure diagrams using containment (nesting) to represent the hierarchy”.
Running our data through this function, shown below, produces a series of
position values (coordinate location pairs with radius) to construct
our bubbles from.
Using the position information, we need to bind these values to appropriate
DOM elements. Following the example code, we’re going to render an SVG Group node
to contain the Circle element with a
Text node (displaying the sport’s label). The example
below shows the code needed for this.
Rendering Bubble Nodes
123456789101112131415161718
varvis=d3.select(this.node).append("svg").attr("width",width).attr("height",height);varchart=vis.selectAll("g.node").data(this.layout.nodes(data)).enter().append("g").attr("transform",function(d){return"translate("+d.x+","+d.y+")";});// Append circle with radius from layout and fill with arbitary colourchart.append("circle").attr("r",function(d){returnd.r;}).style("fill",function(d){returnfill(d.key)});// Add text label to bubble. chart.append("text").attr("text-anchor","middle").attr("dy",".3em");
Choosing an arbitrary colour for the bubble uses the d3.scale.category20c method,
referenced here by fill(), to produce a mapping between our category labels and a series of twenty colours.
The example above is a slightly condensed version of the actual code, ignoring the handling of multi-lined labels and that font-sizes are relative
to the bubble size, due to brevity.
Animating Bubbles
What happens when our data changes?
As we receive more messages, the relative frequencies of the sports will change and the bubble layout will need updating.
Using D3, we want to visually transition the bubbles to their new positions, watching them grow and shrink in real-time.
Re-calculating the layout simply needs us to re-run the pack algorithm with the updated values, binding the new data
to the existing chart.
Now, we just need to use the transition
method to translate the old properties
to the new values, over a three second period. As we move the parent group node for
each bubble, we need also update the bubble radius and label font size to make them
proportional to the parent.
Transitioning Bubbles
12345678910111213141516
// Move bubble node to new positionvartrans=this.chart.transition().duration(3000).attr("transform",function(d){return"translate("+d.x+","+d.y+")";}).attr("r",function(d){returnd.r;});// ... update circle radiustrans.select("circle").transition().attr("r",function(d){returnd.r;});// ... update text sizetrans.select("text").transition().attr("font-size",function(d){return((d.r/50))+"em";});
…and that’s it!
Each time new messages flow in from the backend, the data values
change, which triggers a new transition. With a real-time stream of new messages
constantly arriving, the visualisation is constantly morphing and changing.
Live Demo
If you want to see this demo in action, there’s a hosted version at
http://datasift.jamesthom.as. You’ll need to sign up
for a free DataSift account here
and use your authentication credentials to allow us to access the Twitter firehose.
Source code for the demo is available on Github here.
Finally…
Why Olympic Bubbles?
It’s a terrible name but as the quote goes…
“There are only two hard things in Computer Science: cache invalidation and naming things”.
…and writing this demo was easier than coming up with a sensible name!
There was a bold claim in the release notes for the 1.7 version of The Dojo Toolkit…
Dojo Nano: Less than 4KB gzipped!
With the move to the AMD module format, the new fully-compliant asynchronous module loader could be reduced to
less than four thousands bytes!
Loading unnecessary code was a common complaint against previous versions of The Dojo Toolkit but now we
could have complete control over loaded modules using this tiny AMD loader.
Was this true?
Running a standard build to generate a single dojo layer results in a minfied
and gzipped file over 45,000 bytes.
How can we generate this nano
loader in less than 10% of that size?
There already was an open ticket for the project to ship a complete nano-profile within the sample profiles.
Taking up the challenge, I started investigating how to produce a profile that would generate a fully-functional AMD loader in under 4,000 bytes.
Nano-Build Profile
After much experimenting, tweaking and reviewing the toolkit’s source (along
with help and advice from other contributors), the smallest usable AMD loader
can be produced by running the following build profile.
Once minified and gzipped, the entire loader is only 3652 bytes! Compared
to the full loader with base modules, which came in a 45705 bytes, this
represents more than a 92% reduction in file size.
So, how does the build profile above squeeze so much space out? Let’s take a
closer look at the parameters and explain how they contribute to the reduced
size…
Custom Base Layer
Unless specified otherwise, the Dojo build system will always generate a base layer containing
the dojo.js source file combined with all the base modules (those defined under the dojo/_base directory).
Generating just the AMD loader, without all those additional modules, needs the profile to
contain an explicit definition for the dojo base layer, allowing us to override configuration properties.
Manually defining the base dojo layer is achieved by adding
a new configuration object to the layers map, identified with the name dojo/dojo, as shown below.
Base-less loader configuration
123456
layers:{"dojo/dojo":{include:[],customBase:1}}
Setting the customBase property to true will ensure the build system won’t automatically roll up all the base modules
into the nano AMD loader. We’ve left the include property empty as we don’t want to add any extra modules.
This first step in producing a nano loader reduces the minified and gzipped layer by almost 30KB!
Using the Closure Compiler
Dojo’s build system supports the use of different JavaScript minifiers, which
perform tricks such as renaming variables and stripping whitespace in order to
reduce the size of a JavaScript file.
Shrinksafe is the default minifier, but in our profile we’ve chosen to use Google’s Closure compiler.
Using closure compiler
1
layerOptimize:"closure"
Experimenting with the different minifiers, it was apparent that Closure was
more effective at reducing the layer file sizes by the greatest amount.
Closure
produces a minified layer file in 35,770 bytes, nearly 10KB less than the
original version using Shrinksafe.
More importantly, the Closure compiler supports dead code elimination. Running static analysis
over the source files, those code branches which are unreachable will be stripped from the output.
This feature is crucial in allowing us to tune the produced loader’s features, squeezing even more space out.
Static Features Configuration
As the Dojo Toolkit moves towards the 2.0 release, one of the major
improvements within the code base is the use of dynamic detection for
determining which features an environment supports, rather than relying on
brittle user-agent sniffing.
Using feature tests, alternative code paths can be executed to provide shim-functionality for missing platform features, using native libraries otherwise.
Tests are executed only once, the cached result is returned for each subsequent test.
The build system allows a pre-specified list of feature test results to be provided in the build profile. These parameters will replace
the feature test calls within the generated layer files with the static boolean result values.
As this happens before minification, any feature test paths that can’t be
executed will be automatically stripped by the Closure compiler. This provides a huge benefit in hand-tuning
the loader size to be as compact as possible.
The sample below shows the static feature test results we provide to produce the minimal AMD loader.
Using static features configuration allows us to remove all non-essential
code needing for loading AMD modules. This includes the synchronous module
loader code used to load non-AMD modules (dojo-sync-loader), the debugging methods for module loading (dojo-timeout-api and dojo-log-api), backwards
compatibility for non-standard DOM event behaviours (ie-event-behaviour) and others.
Full details on each of the feature tests defined in the toolkit will be available in the 1.8 reference guide, see
here for
a sneak preview.
Hand tuning the static feature test results allowed the build to remove an extra 2,000 bytes from the nano loader.
Baking in Default Configuration
Making the smallest AMD loader possible relies on a series of assumptions about the environment we’ll be running in
and supported features. Rather than have the user set these values manually, we can hard code
this configuration into the loader, allowing us to remove the code for parsing configuration values from the
environment.
The following configuration is provided within the nano profile.
Along with configuration for the environment (modern-ish browser engine), we’ve set the async property to true, ensuring the
loader is running in AMD-mode as we’ve removed all code for handling the legacy Dojo module format.
Squeezing Out Those Final Bytes
So, what’s left?
How can we squeeze a few more bytes out?
Reviewing the source code for the build system, when the dojo layer is generated, the following boot sequence is appended to the source.
Dojo boot text
123456
// must use this.require to make this work in node.jsvarrequire=this.require;// consume the cached dojo layerrequire({cache:{}});!require.async&&require(["dojo"]);require.boot&&require.apply(null,require.boot);
This code ensures the loader will work on the NodeJS platform and ensures that all base modules are always
requested when running in legacy mode.
Our minimal loader doesn’t need to run outside the browser and we definitely won’t be running in legacy mode! Therefore,
we can overwrite the layer boot text with custom code to trim the last few bytes from the nano loader, shown below.
…and that’s it! Combining all of the options above results in a fully-functioning AMD loader in less than 4 kilobytes.
For further details on the exact size reductions achieved by each of the profile parameters,
see this link for the data.
Differences between nano-profile and profile included with toolkit
The profile defined above will produce the smallest functional AMD loader
possible, sacrificing support for certain common features to reduce the file size even
further. When producing the nano profile that will be shipped with the toolkit, there’s a
slightly less aggressive approach when balancing feature completeness against file size.
Reviewing the feature tests, we decided that two optional features should be
included, backwards compatibility for older Internet Explorer browsers (ie-event-behaviour) and the
ability for manual loader configuration (dojo-config-api). These changes only produce an additional
900 bytes and will make the minimal loader much more consumable.
The nano build profile shipped with the toolkit also contains all configurable feature values, rather
than just the minimal set needed to produce the smallest build, to demonstrate the full set of parameters
that can be modified.
More information about the investigations into producing this profile can be found in the contributors mailing list
thread here.
Finally…
This investigation was founded upon previous work by other dojo contributors.
Thanks to Ben Lowery, Kitson Kelly and Rawld Gill for their
initial efforts and helping me out with questions.
In the final article of this series, we’ll be looking at creating an MVC Controller for our sample todo
application.
We’ve already shown how to define our application model,
creating a domain-specific todo model
backed by localStorage, along with our view template,
using widget templating to render our tasks into the page.
The controller translates user input into operations on the model.
For our application, we need to handle the user actions to allow adding, removing and completing tasks. We already have a binding between a task’s completed state
and our View, using the todo.form.CheckBox, allowing changes to flow back to the model without explicitly needing logic in the controller.
Let’s look more closely at the remaining tasks…
Adding Tasks
The View template, discussed in the second article,
renders the HTML elements needed to allow the user to any new tasks. Once a user has finished
typing in their new task, signalled by pressing the enter key, we need to retrieve their text and add it to the model.
Using Dojo’s declarative programming model,
the View template includes the custom element attribute needed to connect the “onkeypress” DOM event to an event handler within our controller. When our
widget is rendered in the page, by the Dojo parser, those connections are created automatically.
Unless the user has pressed the enter key, we ignore the normal user input event. Once this happens, we extract the new
task text from the event argument and call the following convenience function to create the new task in the model.
This function creates a new Model node, containing the task text and its
completed state, adding the result to the list of tasks. When inserting new
entries into the DojoX MVC Model array, the insertion position must be
specified explicitly. By using the current length of the list as the position,
we always add new items at the end.
Once the model has been modified, the View will automatically update to display the new item. We don’t need to manually
update the rendered HTML template or even trigger re-loading of the View. By using widgets from the DojoX MVC package, changes to
the Model are always reflected in our View in real-time.
Removing Tasks
Removing tasks begins with the user clicking the destroy icon, displayed on the right-hand side of each task. Once this happens, the Controller
needs to trap the event, figure out which task to remove and update the Model. As the tasks’ list
can be updated during the application, having an individual event connection for each task would require handling the setting up and tearing down
every time the list changed.
Instead, we can use “Event Delegation”, introduced by the new Dojo event module, dojo/on,
to listen for any remove events with a single connection.
Once the widget has been rendered, signalled by the “postCreate”
function being called, we start listening for all click events on the destroy icons. Any events captured are passed through to our event hander, “onRemove”, to delete the associated task from the Model.
With one event handler for all the remove events, the Controller won’t directly know which task within the Model the user
has chosen to remove. To overcome this, the repeating View template for the task uses a HTML5 data attribute to store the unique task index
on the rendered DOM element for the remove icon.
During rendering of a DojoX MVC Repeat widget,
the “index” attribute on the instance refers to the current
position within the bound list. This index value can then easily be retrieved from the event generated and used to remove the correct task from the Model.
Once again, when the Model is changed, the View automatically updates. There’s no action needed from the Controller in modifying the rendering HTML template.
Clearing Completed Tasks
Once a user has completed a series of tasks, they will eventually want to remove them. Rather than having to
remove each task individually, the application provides the ability to clear all completed tasks from the list.
Again, we’ve used declarative programming in the View template to connect our event hander, removeCompletedItems, to the DOM event
triggered when the user clicks the “Clear Completed” button.
When our handler is fired, we need to iterate over the existing tasks’
list, removing any with the correct completed state. Removing items from the Model will left-shift the remaining items, so we need to
take care to iterate correctly over the remaining items.
When the event handler has finished executing, the View will be updated to clear out those completed tasks.
Conclusion
In the final part of this series, we’ve looked at how to define an MVC
Controller, responsible for mediating between user actions and model
operations. Using declarative Dojo programming in our View template, we set up
bindings between DOM events and event handlers in our Controller.
When user
actions triggered those events, our handlers were responsible for adding and
removing todo tasks from the MVC Model class, StatefulModel, we’ve been using
to store our application data. These changes then flowed back to the View,
which automatically re-renders when it detects an updated Model.
Dojo’s new MVC package, dojox.mvc, offers great capabilities for building dynamic
JavaScript applications using the MVC programming pattern. Although it’s still maturing, hopefully this series
has been able to demonstrate that for most applications it’s more than capable of providing the features
developers expect in a modern JavaScript MVC library.
If you have any further questions, feel free to leave comments below, send me an email or a tweet. The source
code for the application is available on Github, allowing you to run the examples above and compare it against other frameworks.
What’s Next?
This series of articles was based upon the version of DojoX MVC present in the 1.7.0 release of The Dojo Toolkit. My experiences, good and bad,
building this application were fed back into the community to
help improve the package in the future. With the upcoming 1.8 release of The Dojo Toolkit,
there has been some major improvements to the MVC package, resolving many of the issues I raised.
When that version of the toolkit is available, I’ll re-visit the application and show how those changes would make writing this application even simpler.
Last week was IBM IMPACT 2012, IBM’s premier conference for our customers in Las Vegas. I was fortunate enough to
be there for the duration, presentating four sessions on The Dojo Toolkit. The whole event was a fantastic showcase
for our company, the capabilities and unique values we provide. Session materials from my talks are now available
externally, see below for individual links.
What happens when you’ve got an error occurring only in the minified version of
your Dojo application?
No matter how fantastic your debugging tool, there’s
not much it can do with an optimised JavaScript source file with all the code
on a single line. Usually, you resort to the frustrating experience of “black
boxing” the issue, interrogating objects in the console and trying to reverse
engineer the meaning of their renamed variables.
Luckily, there’s a better way to debug minified JavaScript files… Source Maps.
Introducing Source Maps
Source maps provide a way to map a combined/minified file back to an unbuilt state. When you build for production, along with minifying and combining your JavaScript files, you generate a source map which holds information about your original files. When you query a certain line and column number in your generated JavaScript you can do a lookup in the source map which returns the original location. Developer tools can parse the source map automatically and make it appear as though you’re running unminified and uncombined files.
There’s an fantastic overview of the technology here,
showing you how to enable support in your browser and generate the necessary files using Google’s Closure compiler.
Generating Source Maps For Dojo
The Dojo Toolkit’s build system supports using the Closure compiler for
minification, making it an obvious next step to enable automatic generation of
source mappings. Working on this over the weekend, I’ve been able to enhance
the build system to generate source maps for each layer file when using the
following command line parameter.
1
$ sh build.sh bin=node action=release profile=my_profile layerOptimize=closure
For more details on the implementation, along with the patch, see the
associated ticket that’s been
opened to track adding this feature into Dojo.
When you’ve enabled source maps in your browser, switching to the scripts tab
in Chrome’s Developer Tools now displays the unminified versions of any built layer
files. This can be seen in action on the following
page.
Please note, this feature is only enabled when using NodeJS
as the build runtime and requires an upgrade of the Closure compiler
to the latest version.