
“Serverless” cloud platforms are a major trend in 2016. Following on from Amazon’s Lambda service, released eighteen months ago, this year has seen IBM, Microsoft and Google all launch their own solutions.
These platforms let you build stateless microservices, combining APIs with business logic, without servers. Microservices are executed on-demand, in milliseconds, rather than having to sit idle waiting for incoming requests. Users pay only for the raw computation time used.
Combining serverless APIs with static file hosting for site resources, e.g. HTML, JavaScript and CSS, means we can build entire serverless web applications.
Playing with OpenWhisk recently to build simple microservices, I began to investigate using the platform to build the APIs for serverless applications.
How can we use OpenWhisk to define a new microservice and then expose that service as an API with a HTTP interface?
Let’s start by looking at OpenWhisk…
OpenWhisk
Using the OpenWhisk platform, developers register small bits of code, known as Actions, that can be invoked on-demand. These functions can be written in Node.js, Swift or Docker images. Let’s look at a simple Node.js Action that takes a parameter and returns a message with that value.
function main(params) {
  return {
    payload: 'Hello ' + params.name
  };
}
Node.js actions must include a function named main. OpenWhisk executes this function for each invocation, passing request parameters as arguments. Return values from the function will be included in the response.
Using the OpenWhisk command-line utility, we turn this local JavaScript code into a remote action.
[~/code/serverless]$ ls
source.js
[~/code/serverless]$ wsk action create hello_action source.js
ok: created action hello_action
[~/code/serverless]$ wsk action list
actions
/james.thomas@uk.ibm.com_dev/hello_action                         private
With the action registered, we can test the service from the command-line.
[~/code/serverless]$ wsk action invoke -b hello_action -p name "Bernie Sanders"
ok: invoked hello_action with id 429b35c3e3ac494ea902390ca64afe32
response:
{
    "result": {
        "payload": "Hello Bernie Sanders"
    },
    "status": "success",
    "success": true
}
We can also update the action to use default parameter values.
[~/code/serverless]$ wsk action update hello_action -p name "Donald Trump"
ok: updated action hello_action
[~/code/serverless]$ wsk action invoke -b hello_action
ok: invoked hello_action with id 0299bf2baf9242b7a00a8095caaeb7a4
response:
{
    "result": {
        "payload": "Hello Donald Trump"
    },
    "status": "success",
    "success": true
}
[~/code/serverless]$
Registered actions can be executed manually, using an authenticated API request, or automatically, hooking actions to triggers and feeds using rules. For more details on triggers, feeds and rules, please see the OpenWhisk documentation.
The command-line utility translates commands into HTTP requests to the OpenWhisk API.
Pro-Tip: Adding the ‘-v’ flag when using command-line utility will show HTTP traffic sent to the OpenWhisk API.
Serverless APIs With OpenWhisk
Building backend services for serverless web applications, there were two challenges to resolve before invoking these APIs from client-side JavaScript code.
-
Authentication. OpenWhisk API requests require HTTP authentication, using the developer’s credentials. Embedding these credentials within client-side files is a terrible idea…
-
Cross-Domain Requests. CORS support is not enabled on the OpenWhisk platform. Calling services from a browser would mandate us having CNAME records configured with an external domain.
Authentication needs to be resolved, while cross-domain support is an inconvenience.
Using OpenWhisk on IBM Bluemix, we have access to a huge range of cloud services to help build applications. Reviewing the catalogue, there’s a new service API Connect which can help us resolve both issues with minimal effort.
API Connect
Announced in February, API Connect is IBM’s new “API Management-as-a-Service” solution. Developers can use the service for creating, running, managing and securing APIs in the cloud.
Using this service, we can construct new public APIs, with CORS support, that proxy the authenticated OpenWhisk APIs used to trigger our services. Using these APIs from our serverless frontends will be possible without leaking credentials or having to configure DNS records.
Once we’ve signed up for an account with API Connect, you need to install the developer toolbox locally. Using this tool will allow us to construct new APIs and publish them to the cloud.
TLDR: I’ve exported the sample flow configuration generated below here. Import this YAML file into the API Connect editor, replacing USERNAME, PASSWORD and NAMESPACE, before deploying this flow to IBM Bluemix.
API Editor
Install the API Connect Toolkit using NPM and run the following command to open the editor.
$ npm install -g apiconnect
$ apic edit
Using the APIs panel, select the Add button. Provide a title for your service.
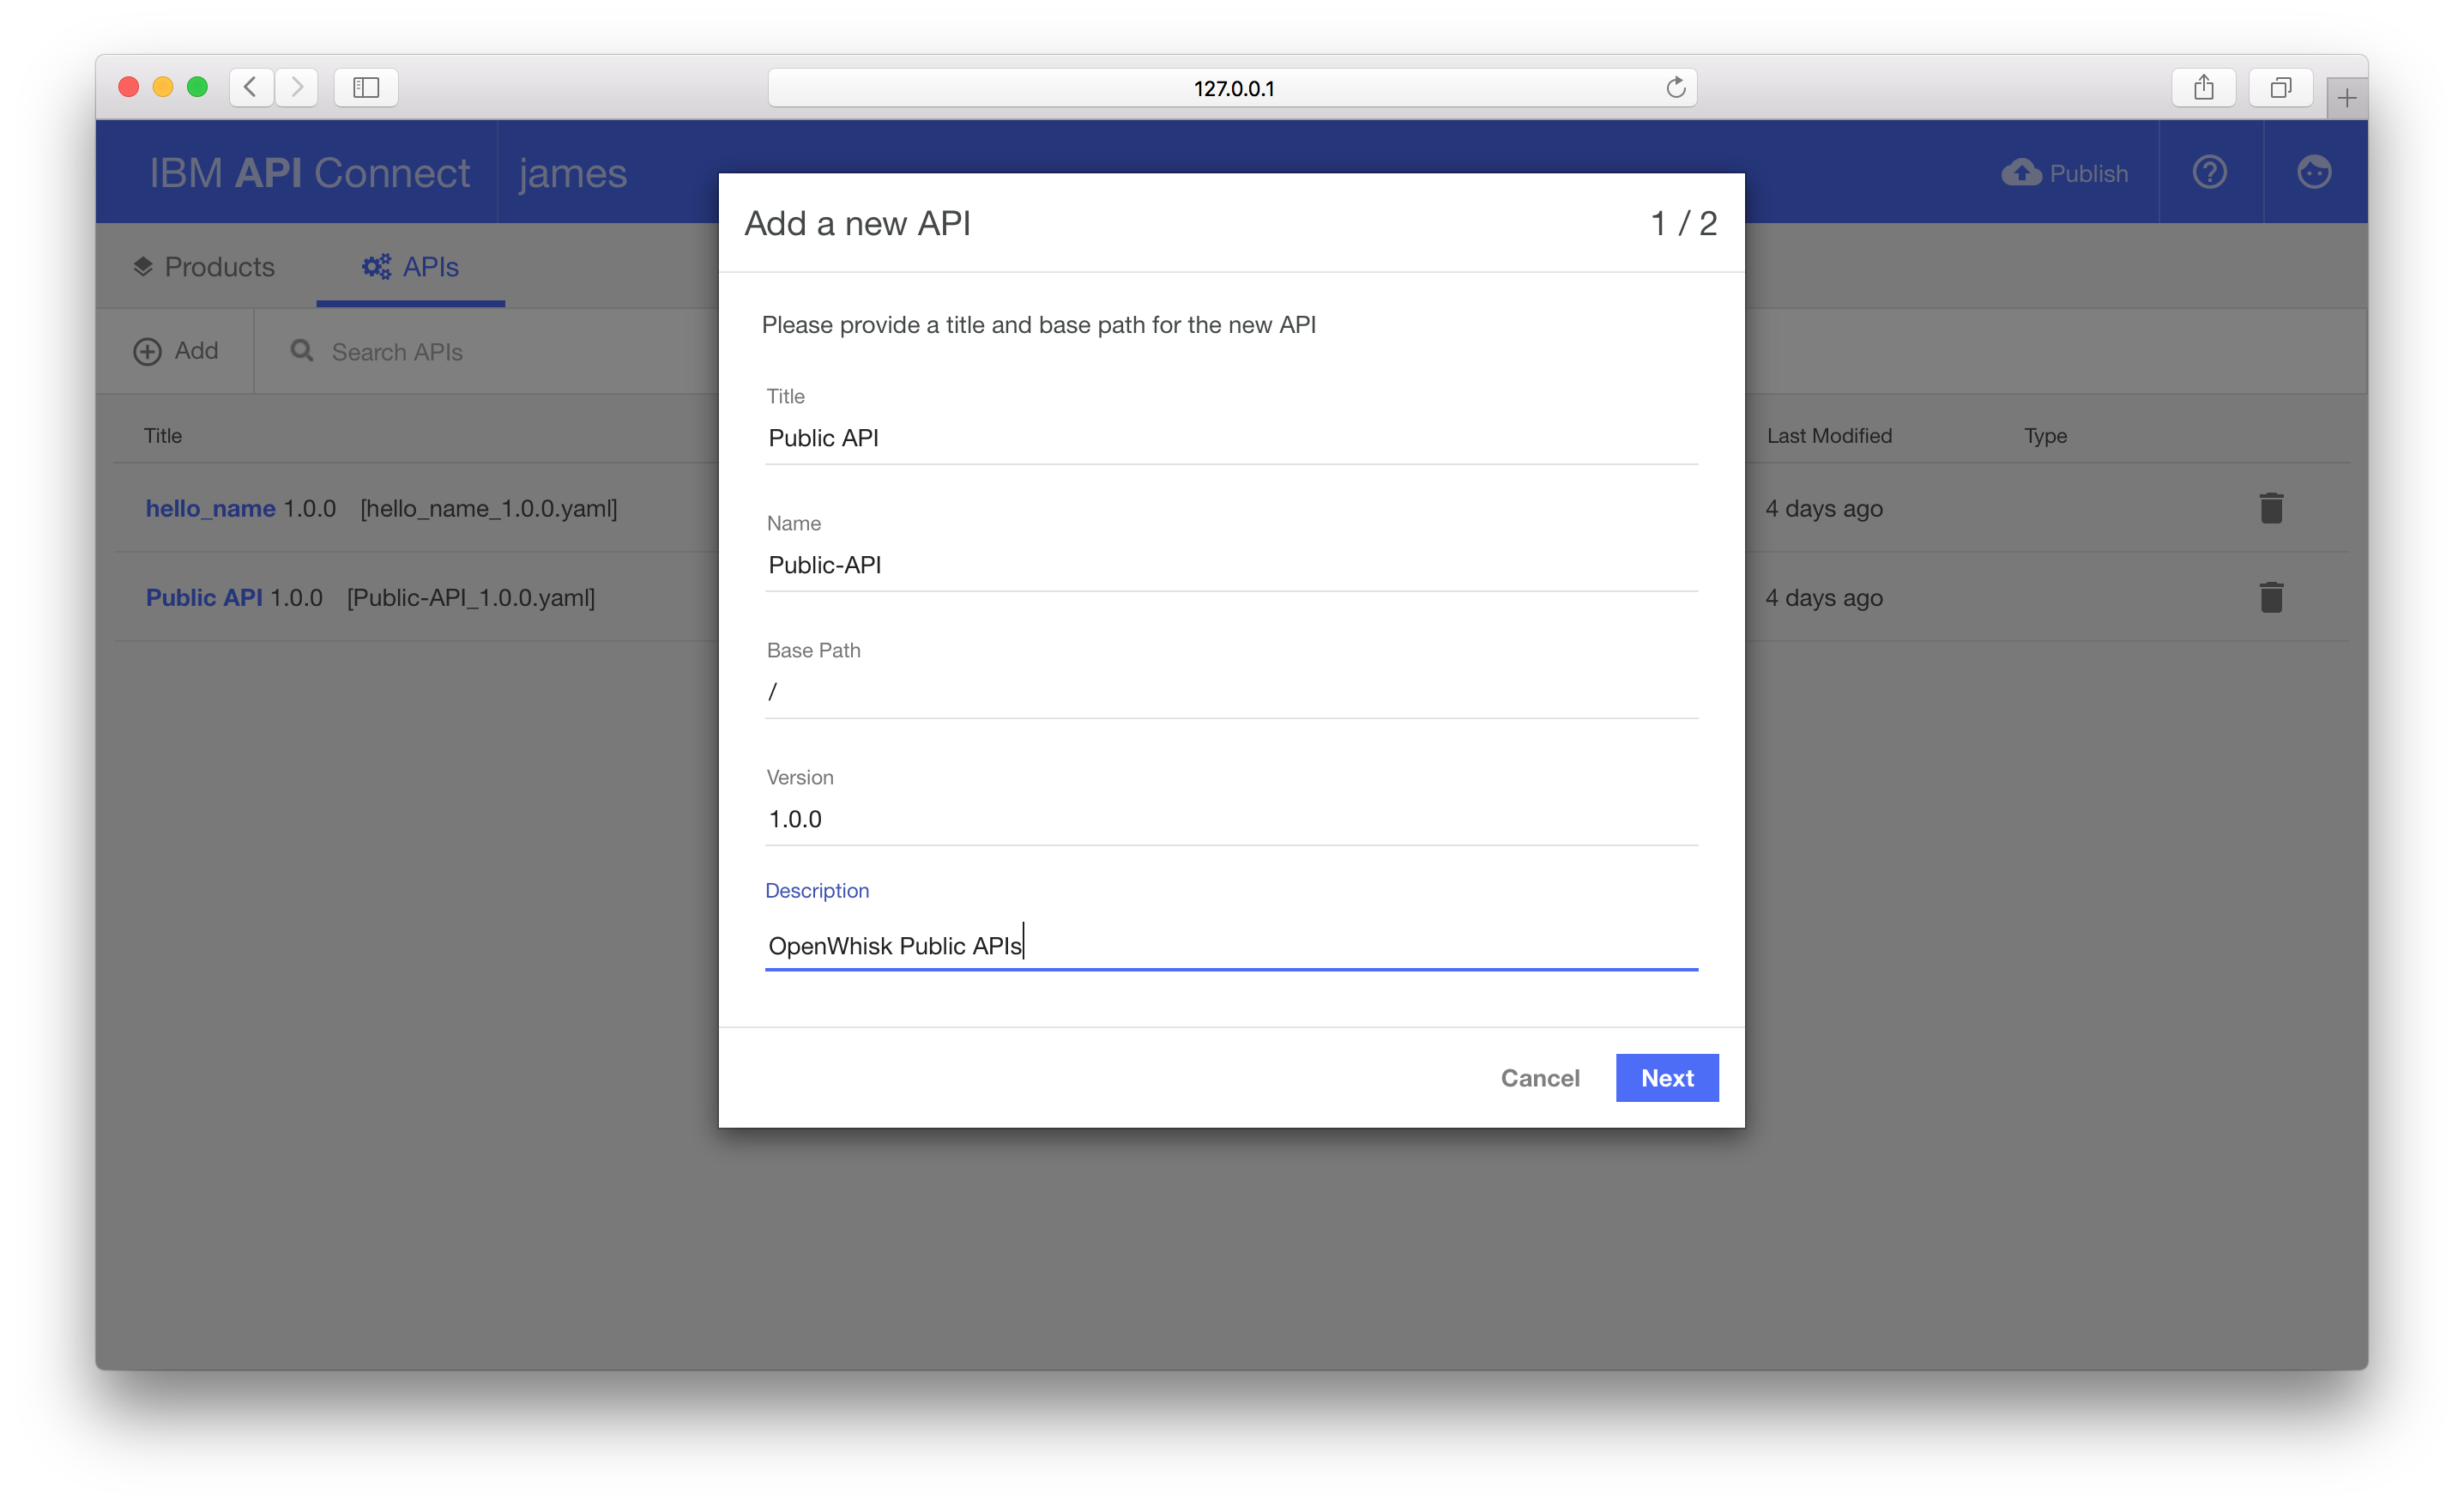
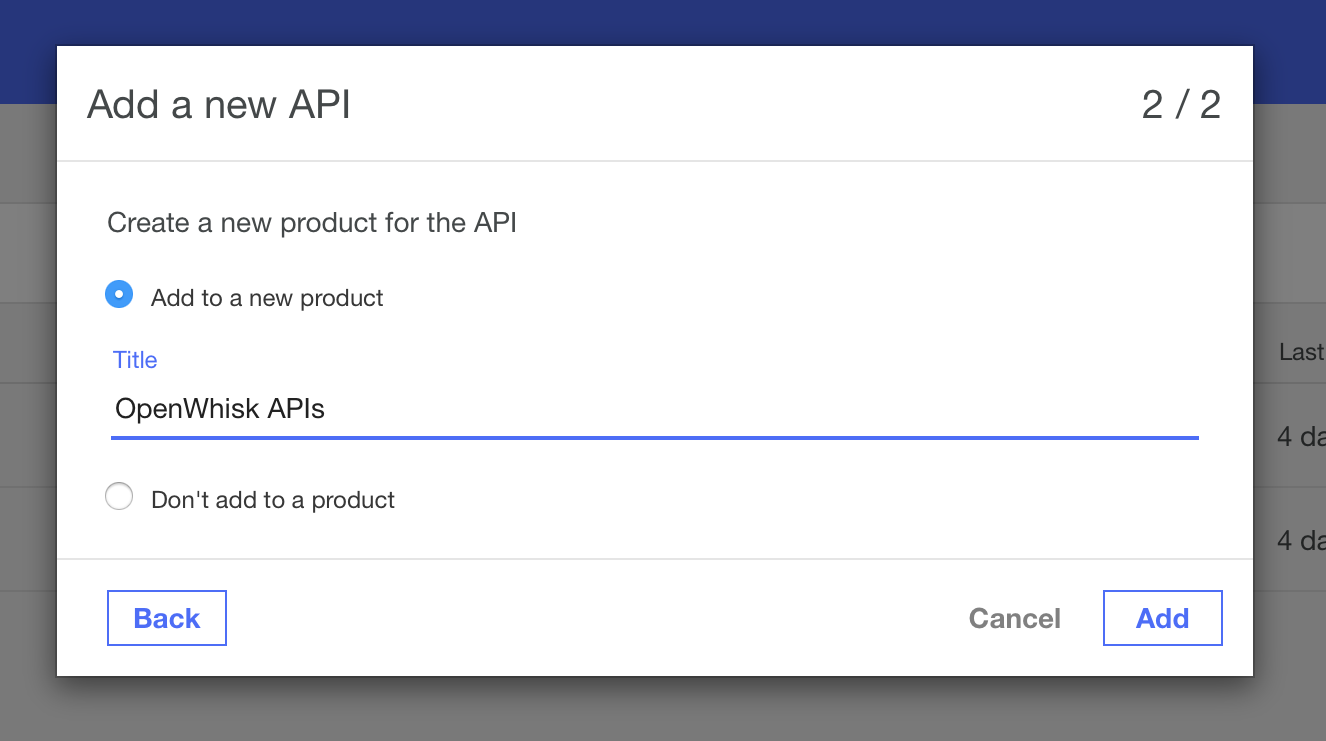
Leave the Add to a new product checkbox selected and provide a title for the product.
The editor now shows the Design panel, allowing you to define the external public API schema.
We’re going to define a single endpoint (/hello-name) which supports HTTP GET requests with a single query parameter.
Adding the endpoint
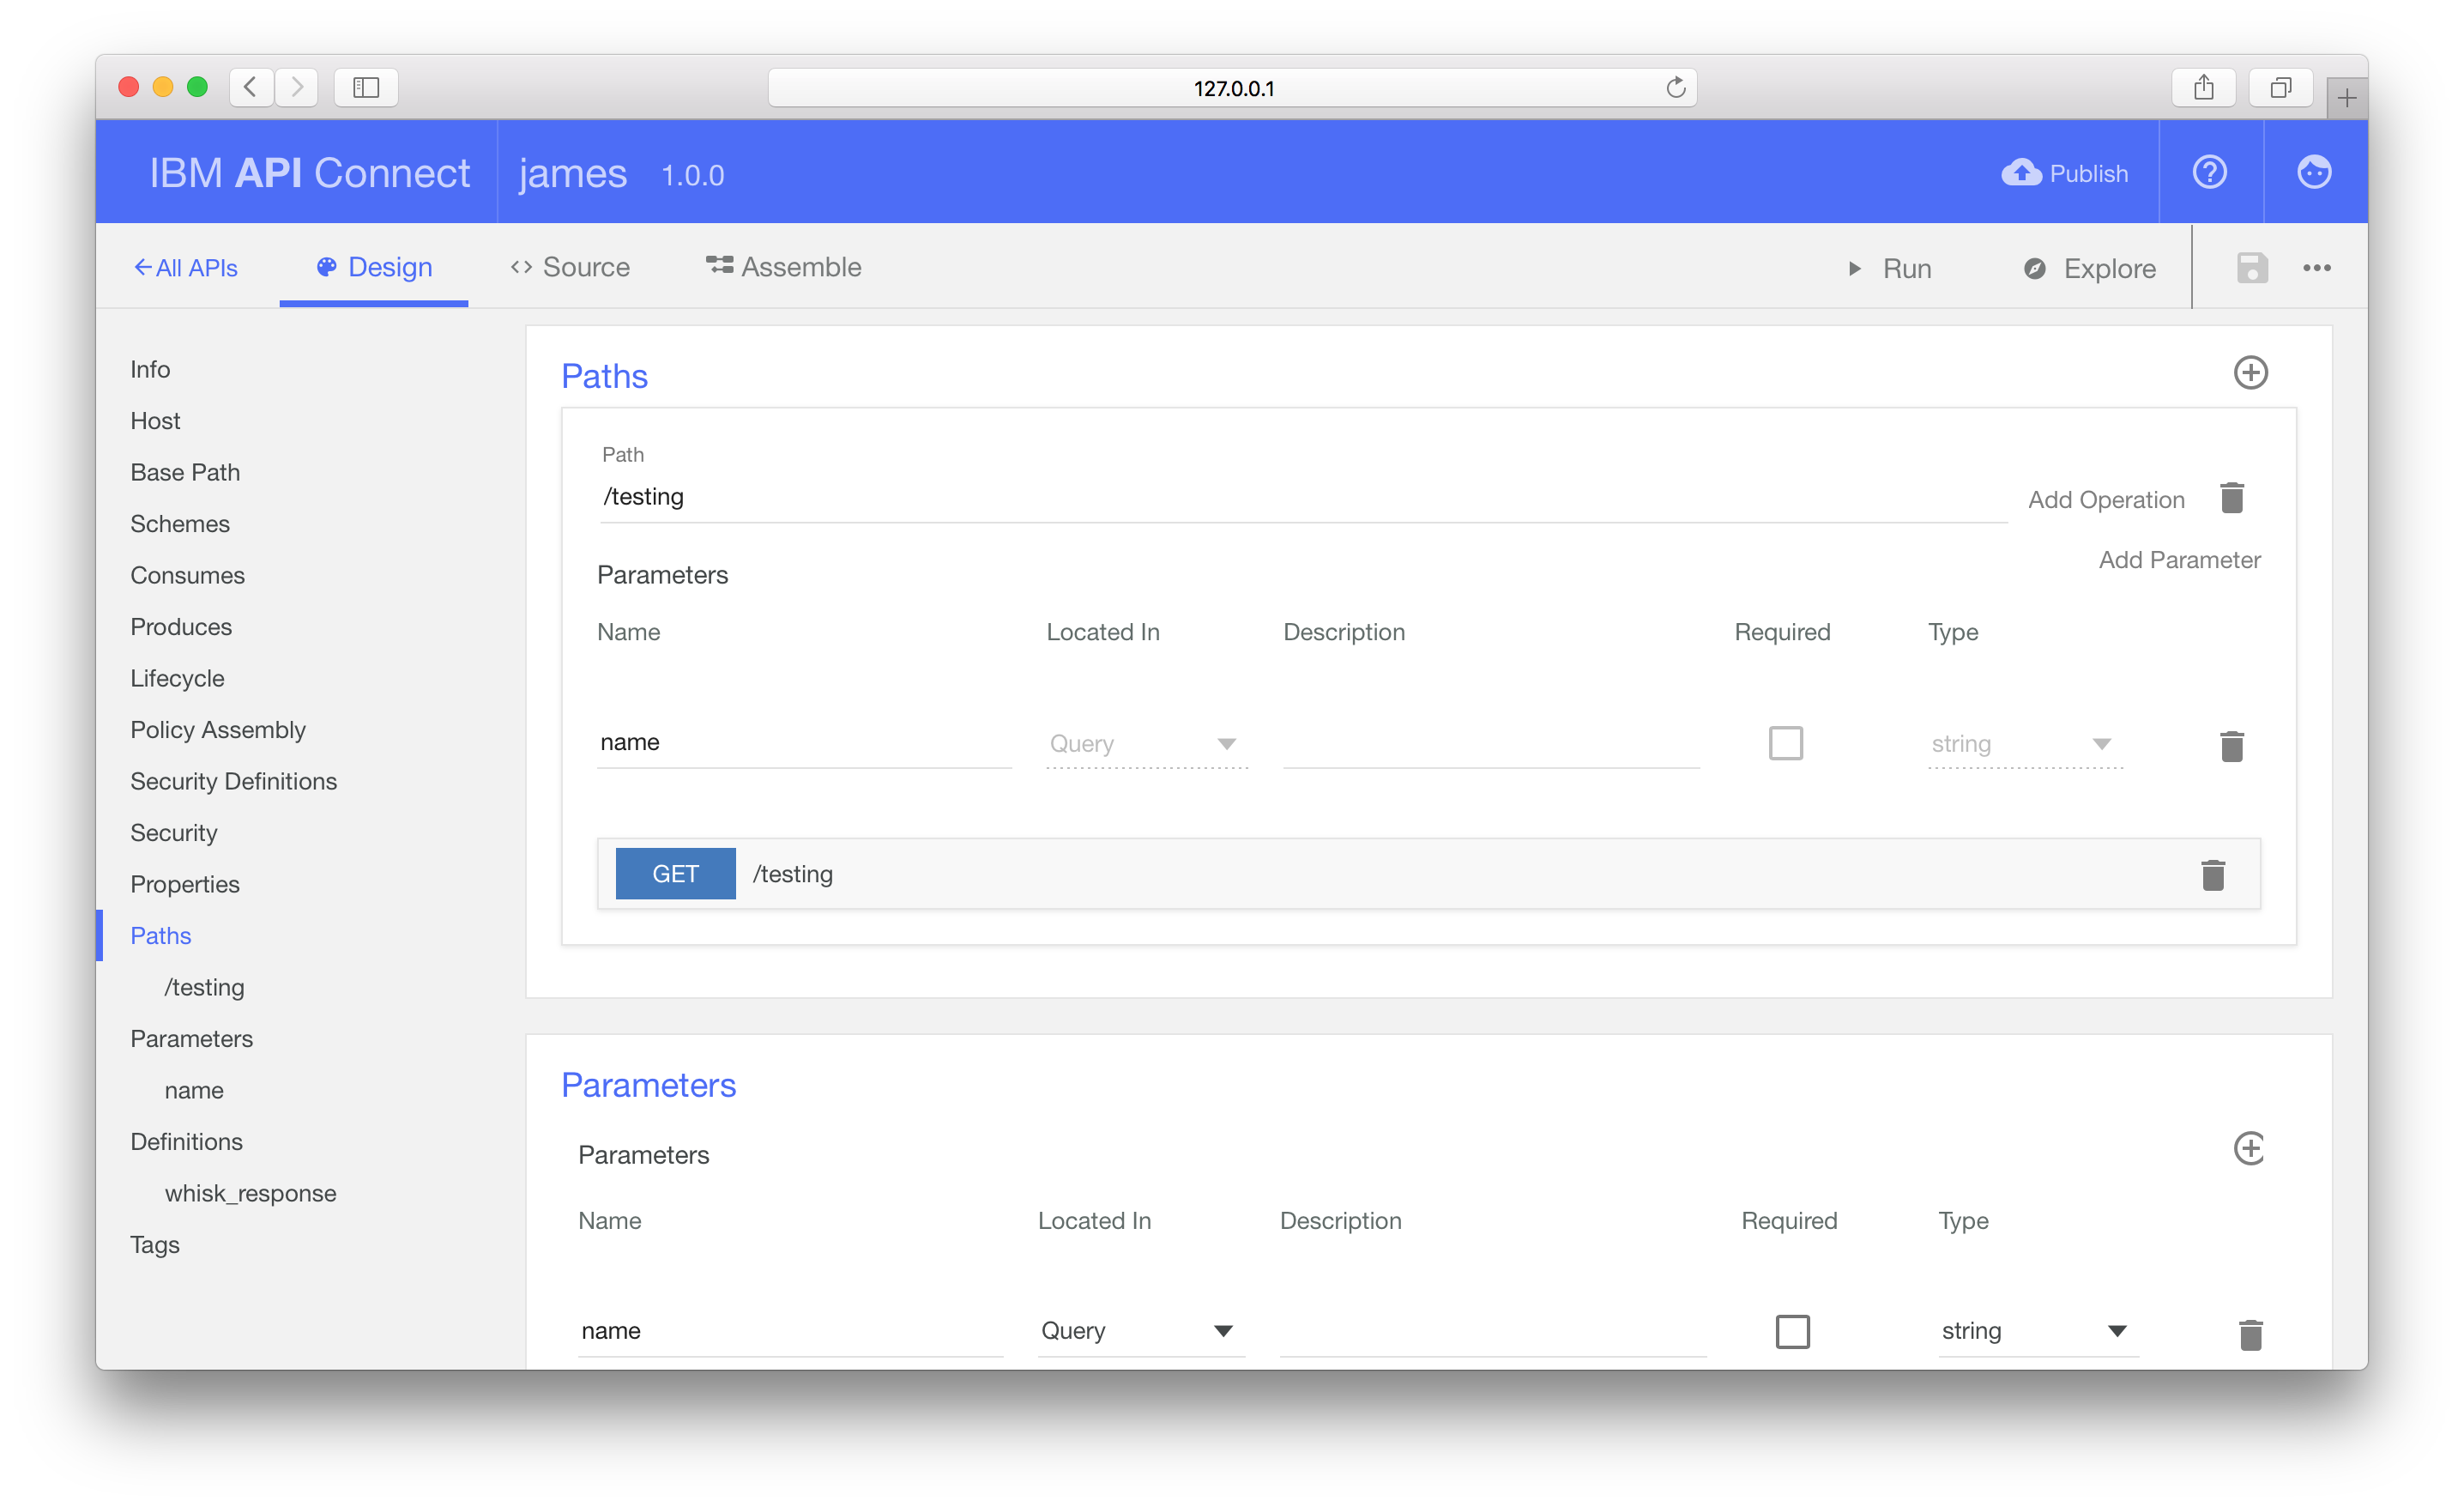
Disable the clientID definition under the “Security” panel and then scroll down to the Paths section.
Add a new path for the endpoint /hello-name. Set a parameter for this path, using the identifier name from location as query and type as string.
Move to the Definitions section to define the API response schema. We want to return a JSON object with a single property, result, that contains the JSON object returned from the Action response.
Add a new Definition, named whisk_response and type as object, with a single object property, result.
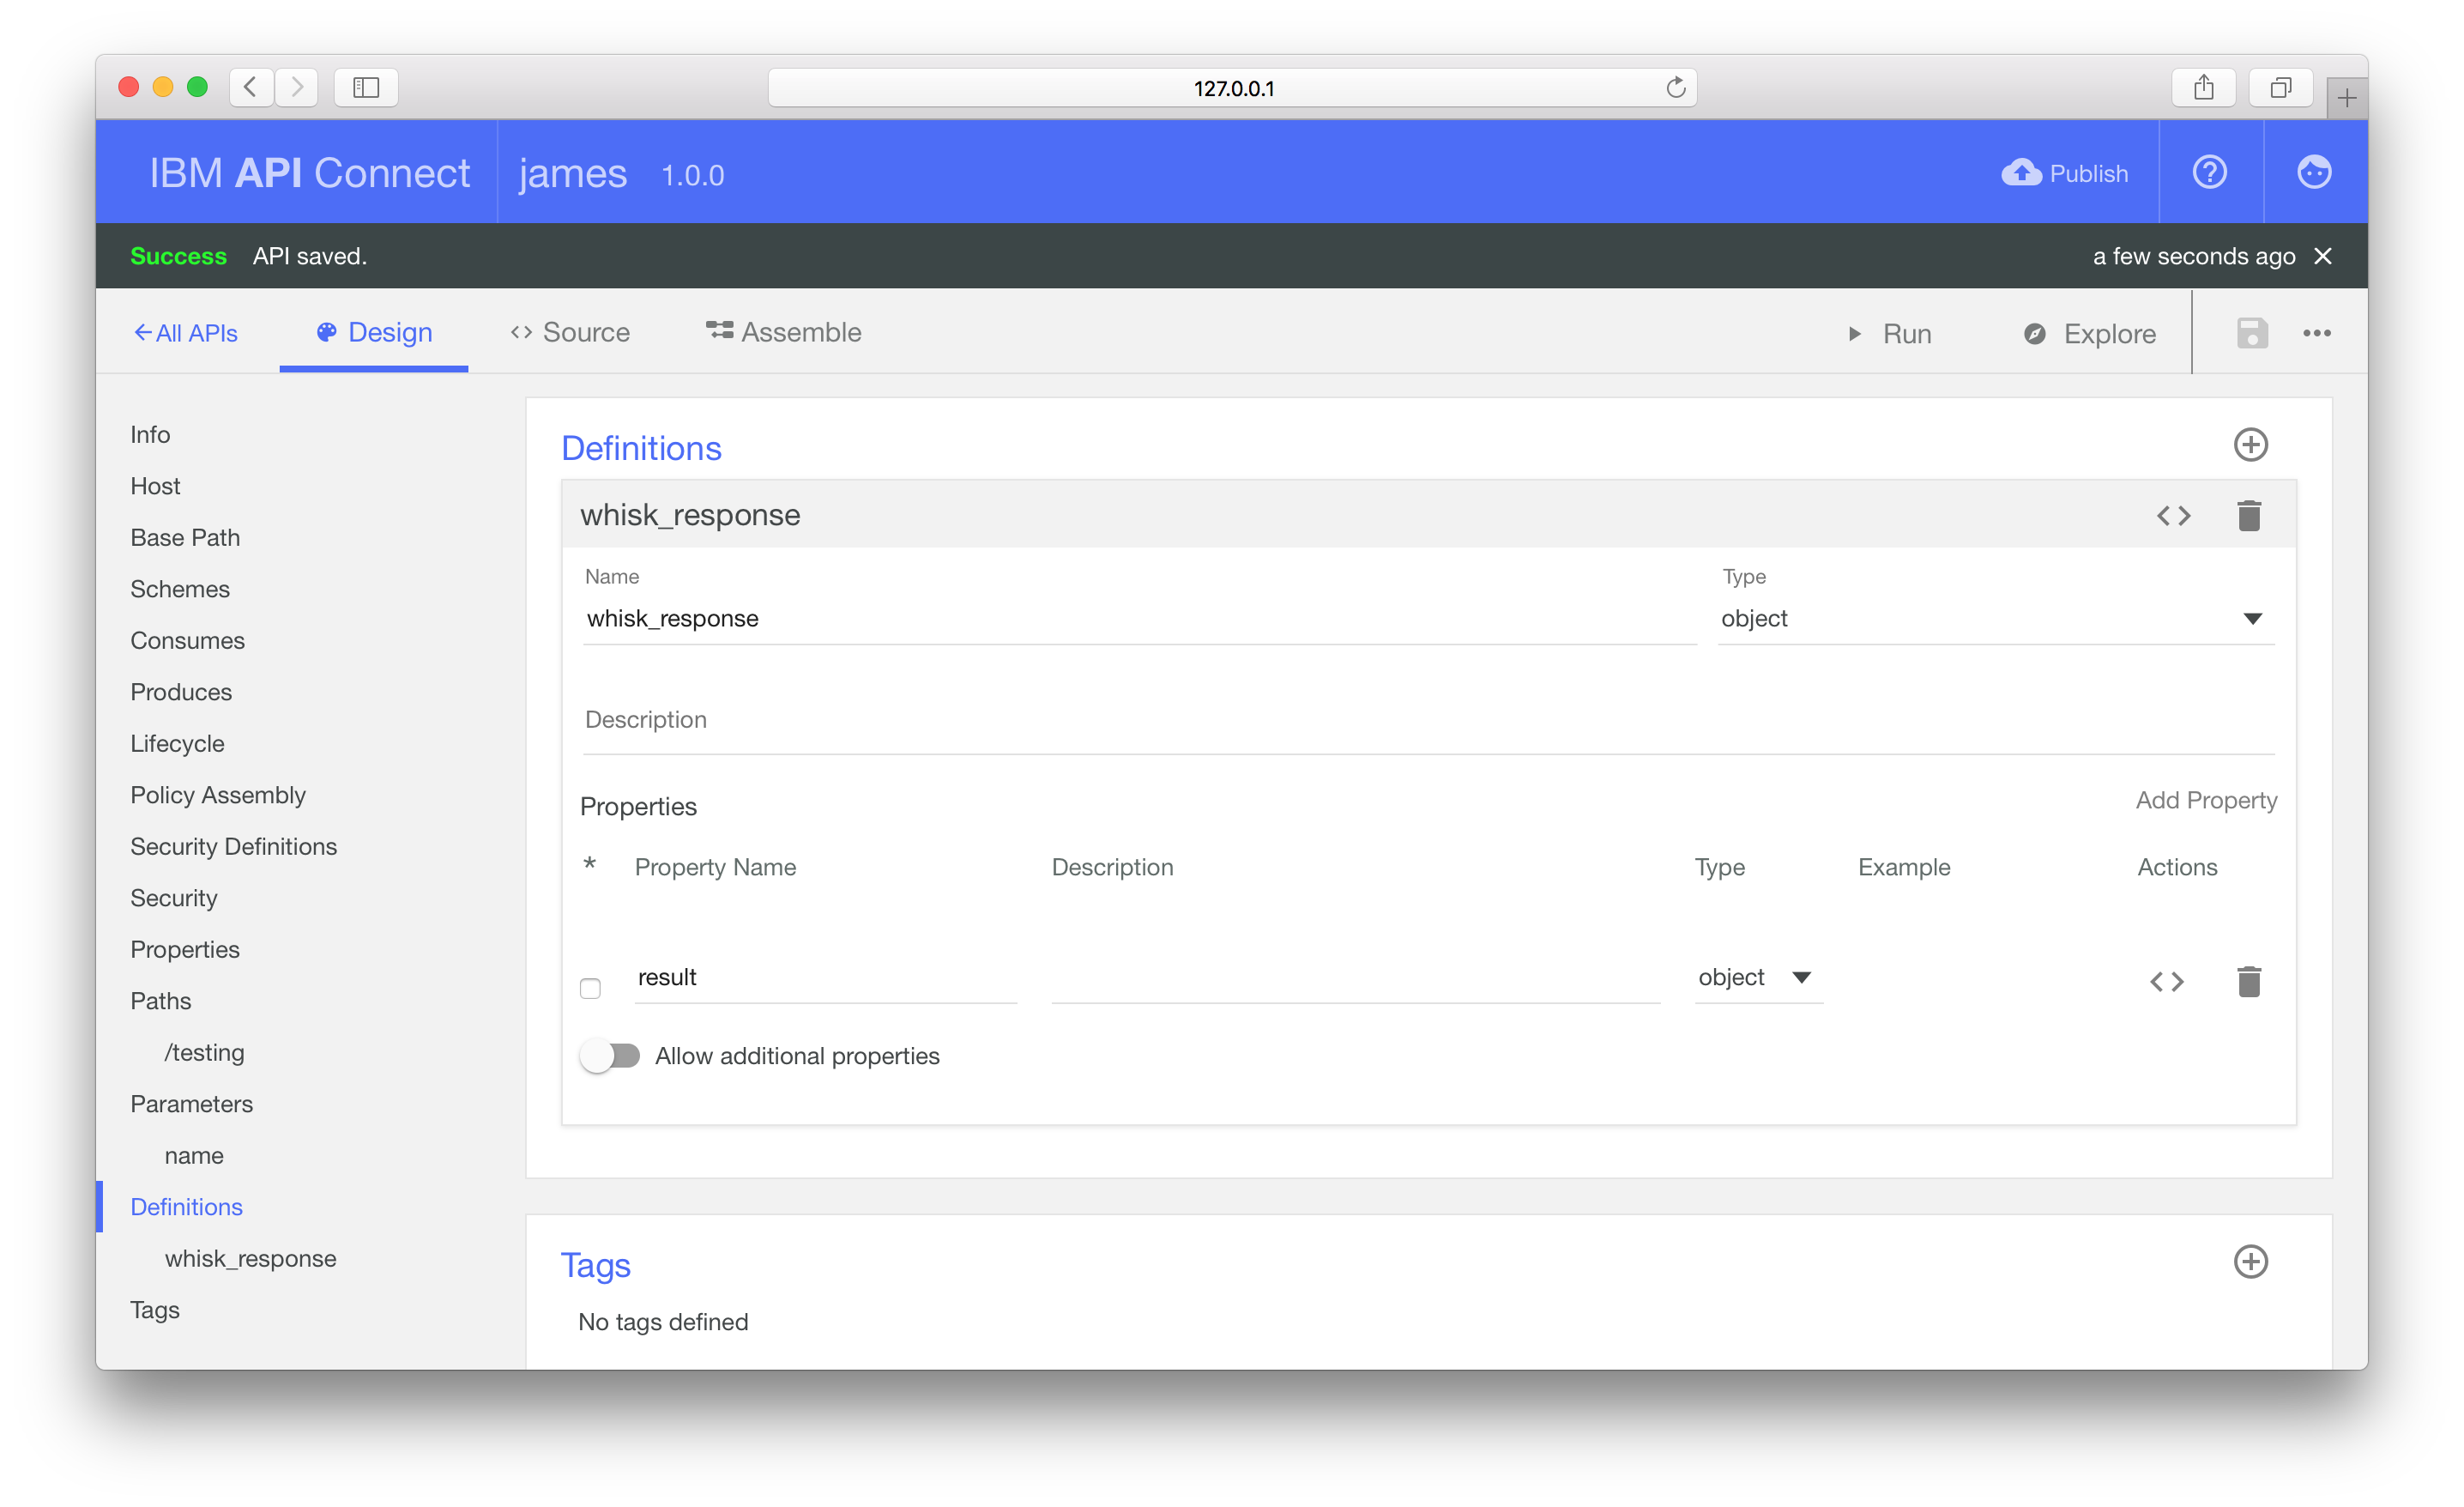
Under the Paths panel, expand the GET operation. Set the schema for the 200 response to whisk_response.
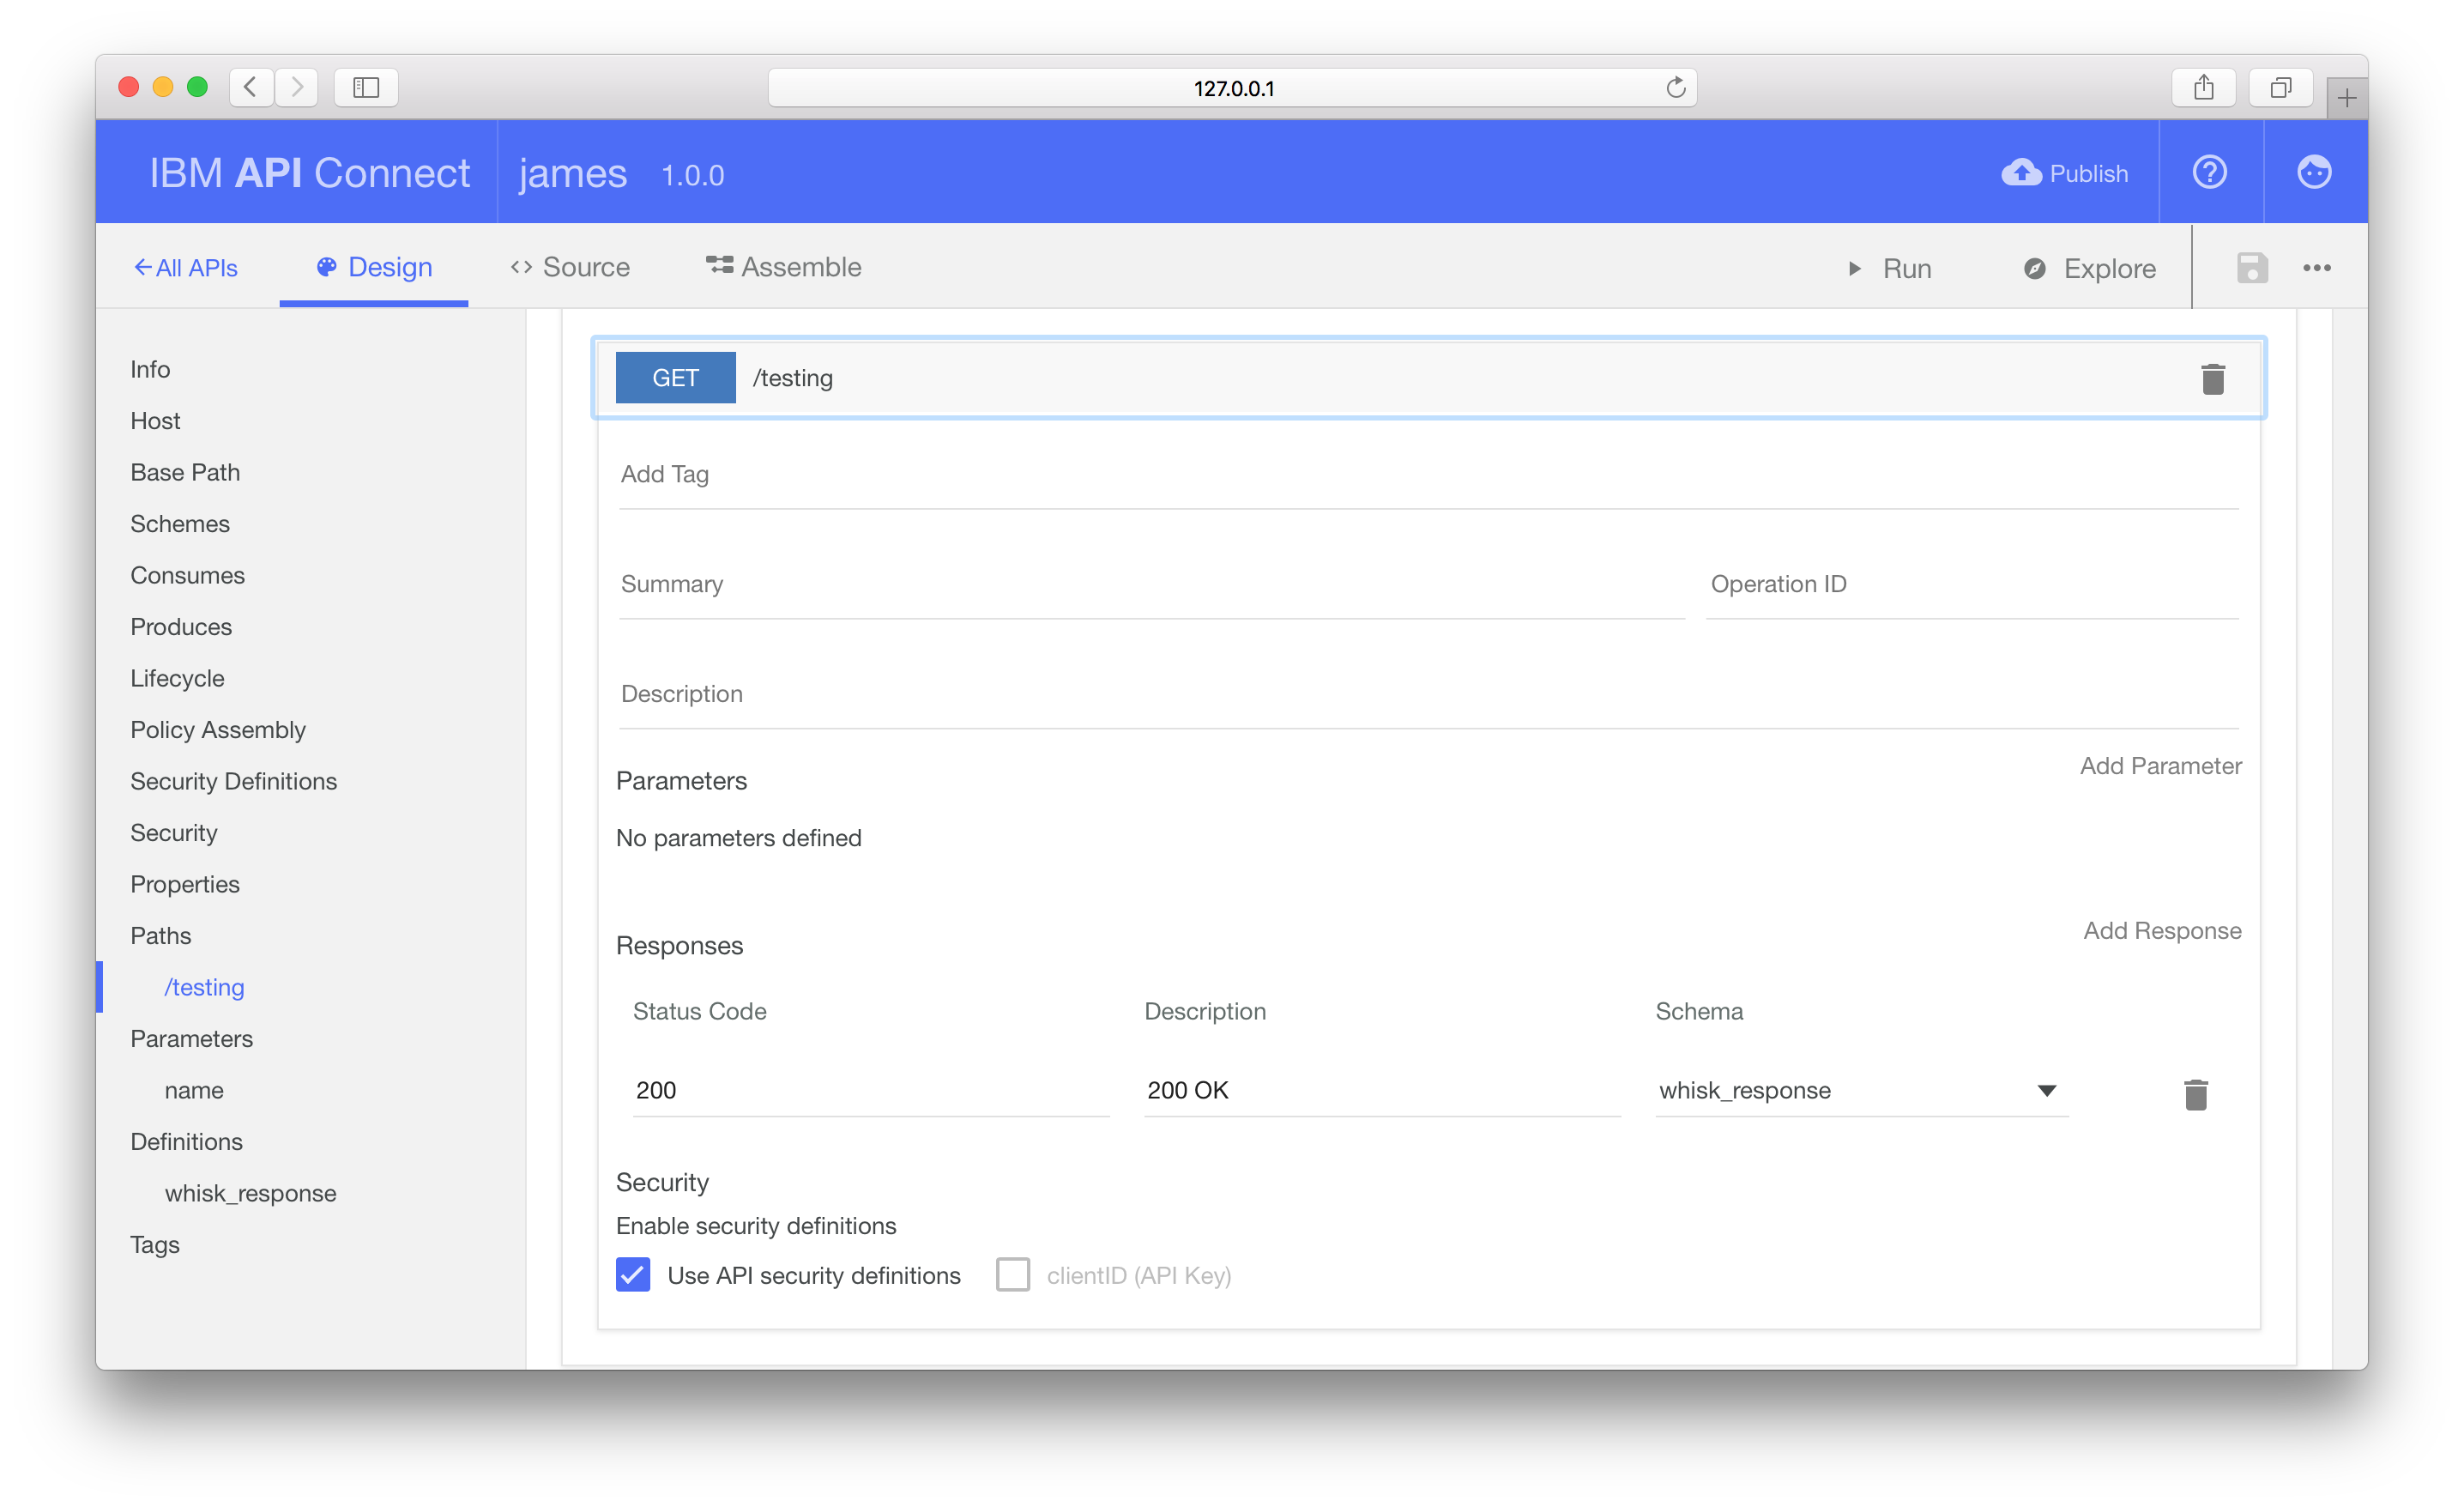
CORS supported is already enabled by default (under the Lifecycle section). Click the Save icon in toolbar and then move to the “Assemble” tab.
Defining API operations
Having defined the public API schema, we need to implement the API operations.
On the “Assemble” tab, the flow editor allows us to connect different backend operations to construct our service. IBM Bluemix only supports deploying flows constructed with the “DataPower Gateway policies” nodes. Microgateway nodes, e.g. Javascript, are not supported.
Invoking OpenWhisk Actions
The default flow contains a single invoke node. This node type makes HTTP requests, passing the result to the next node in the flow.
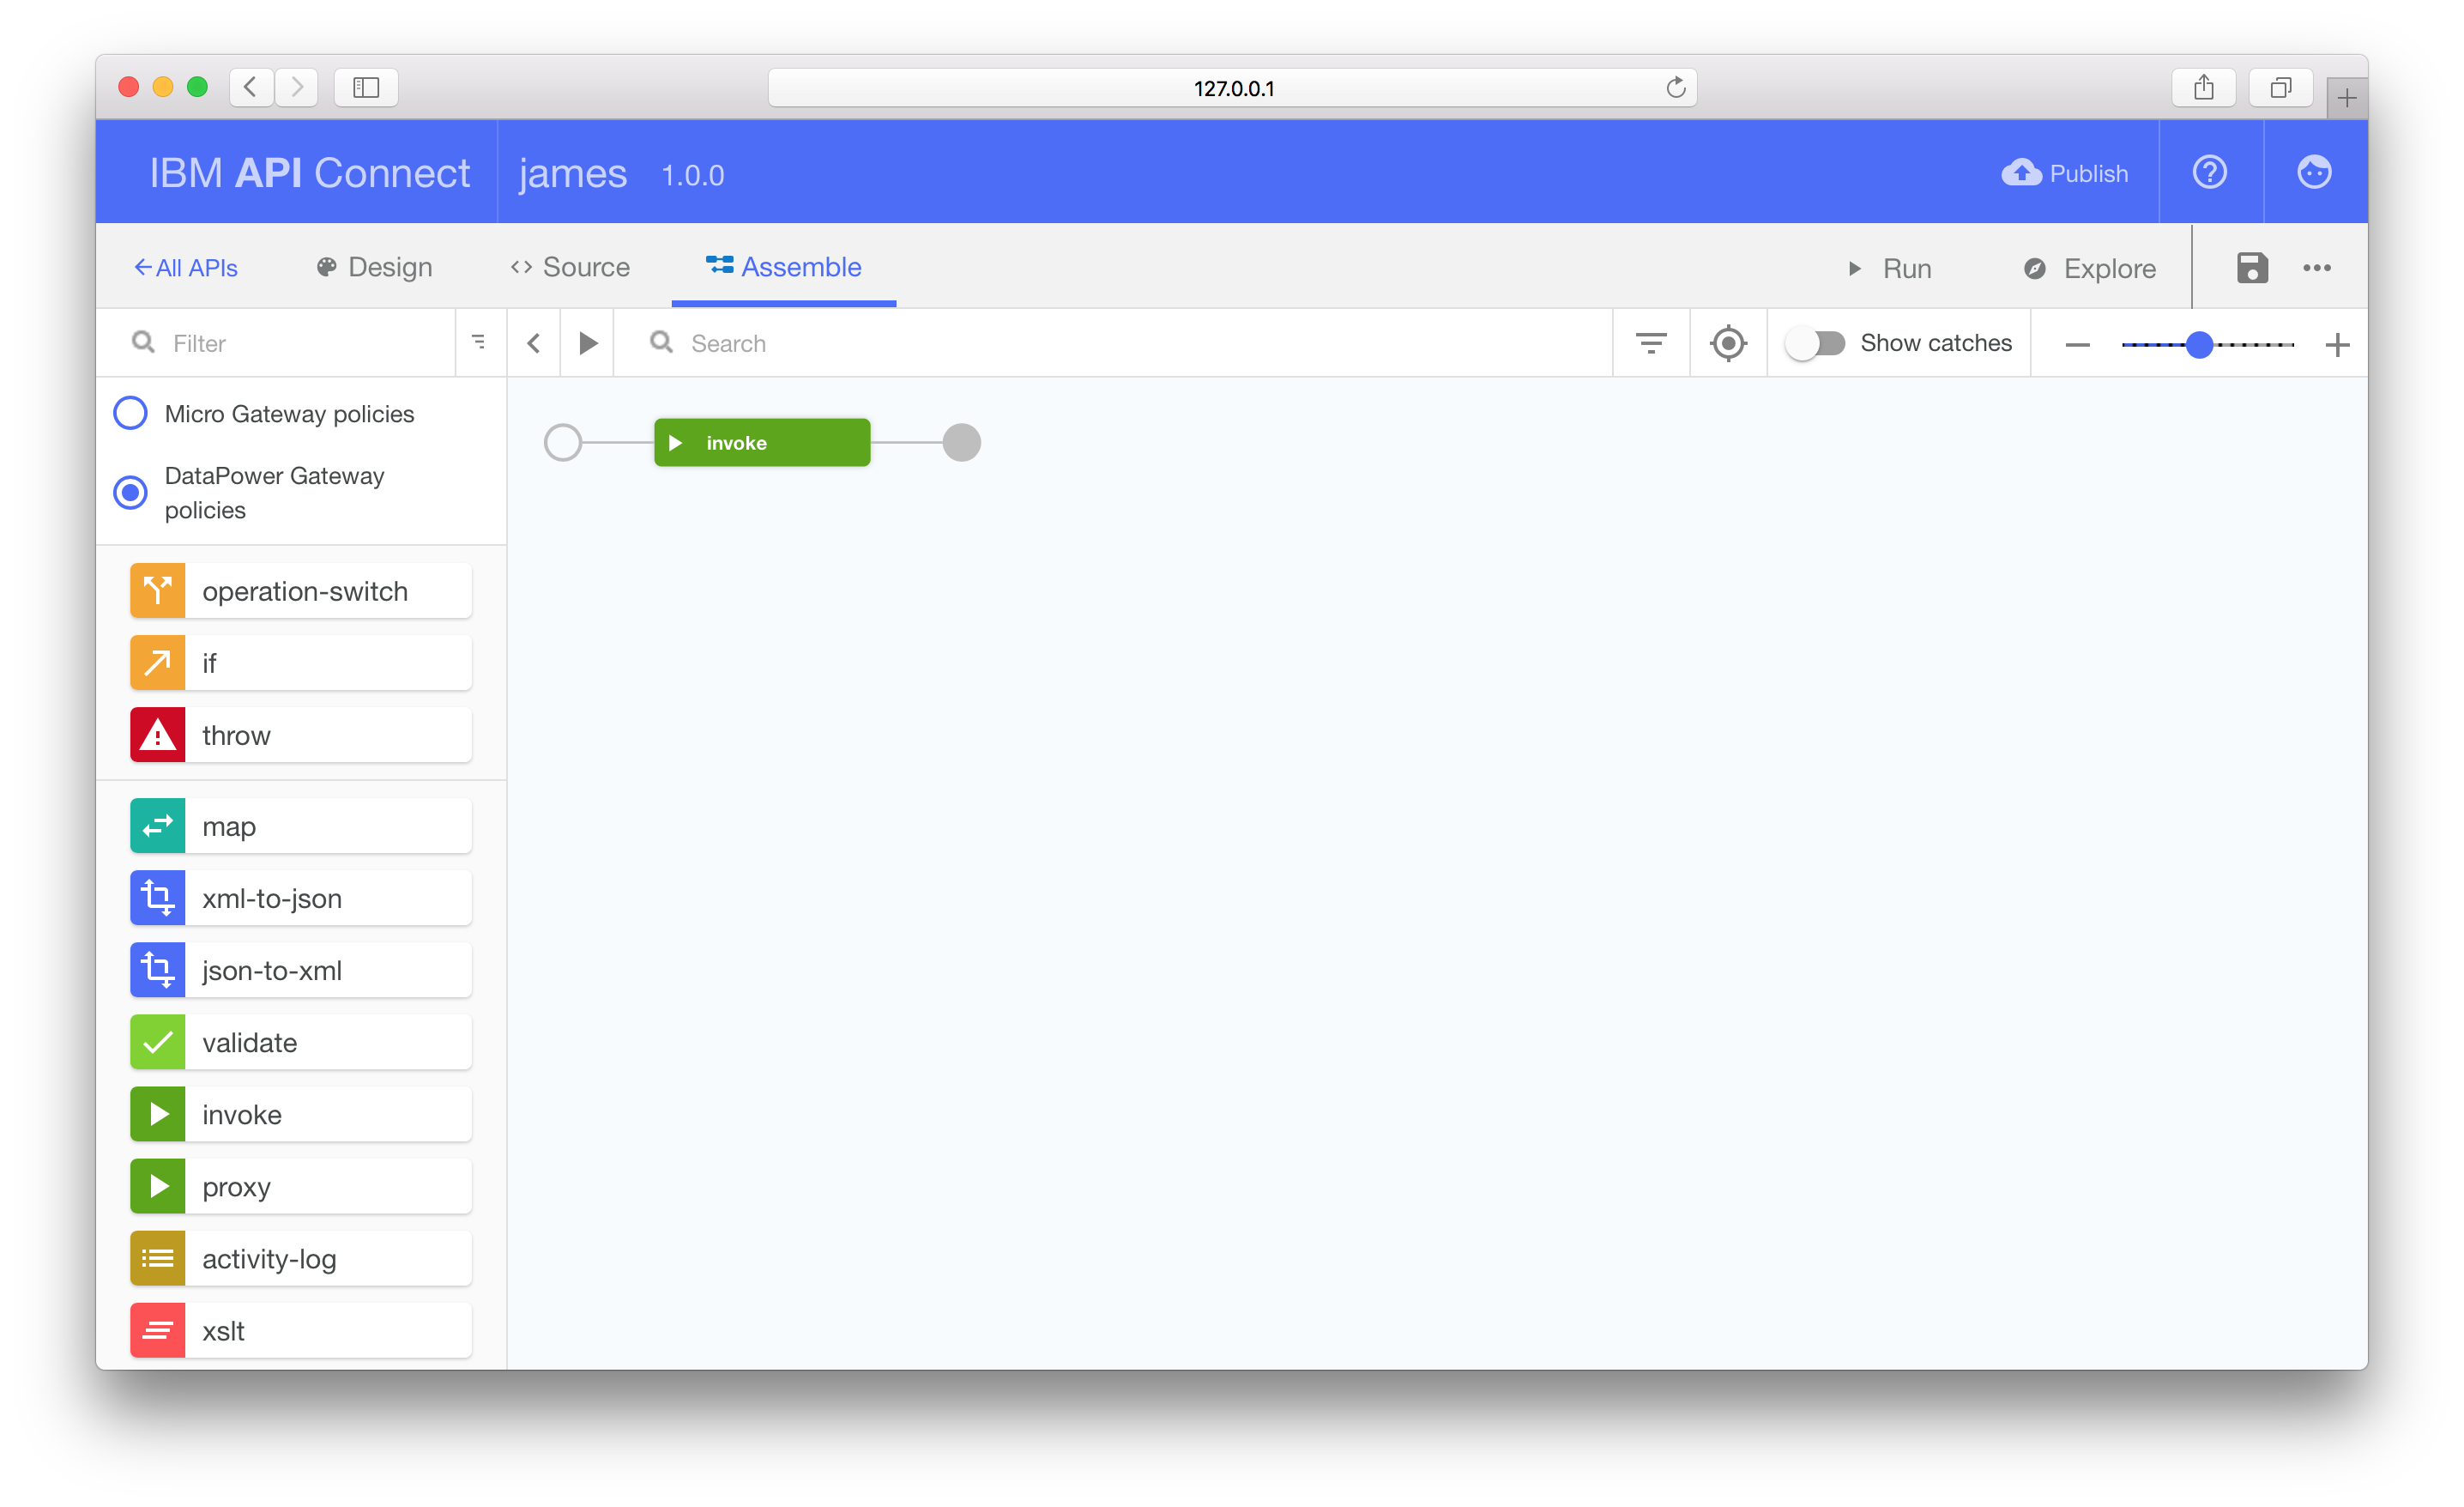
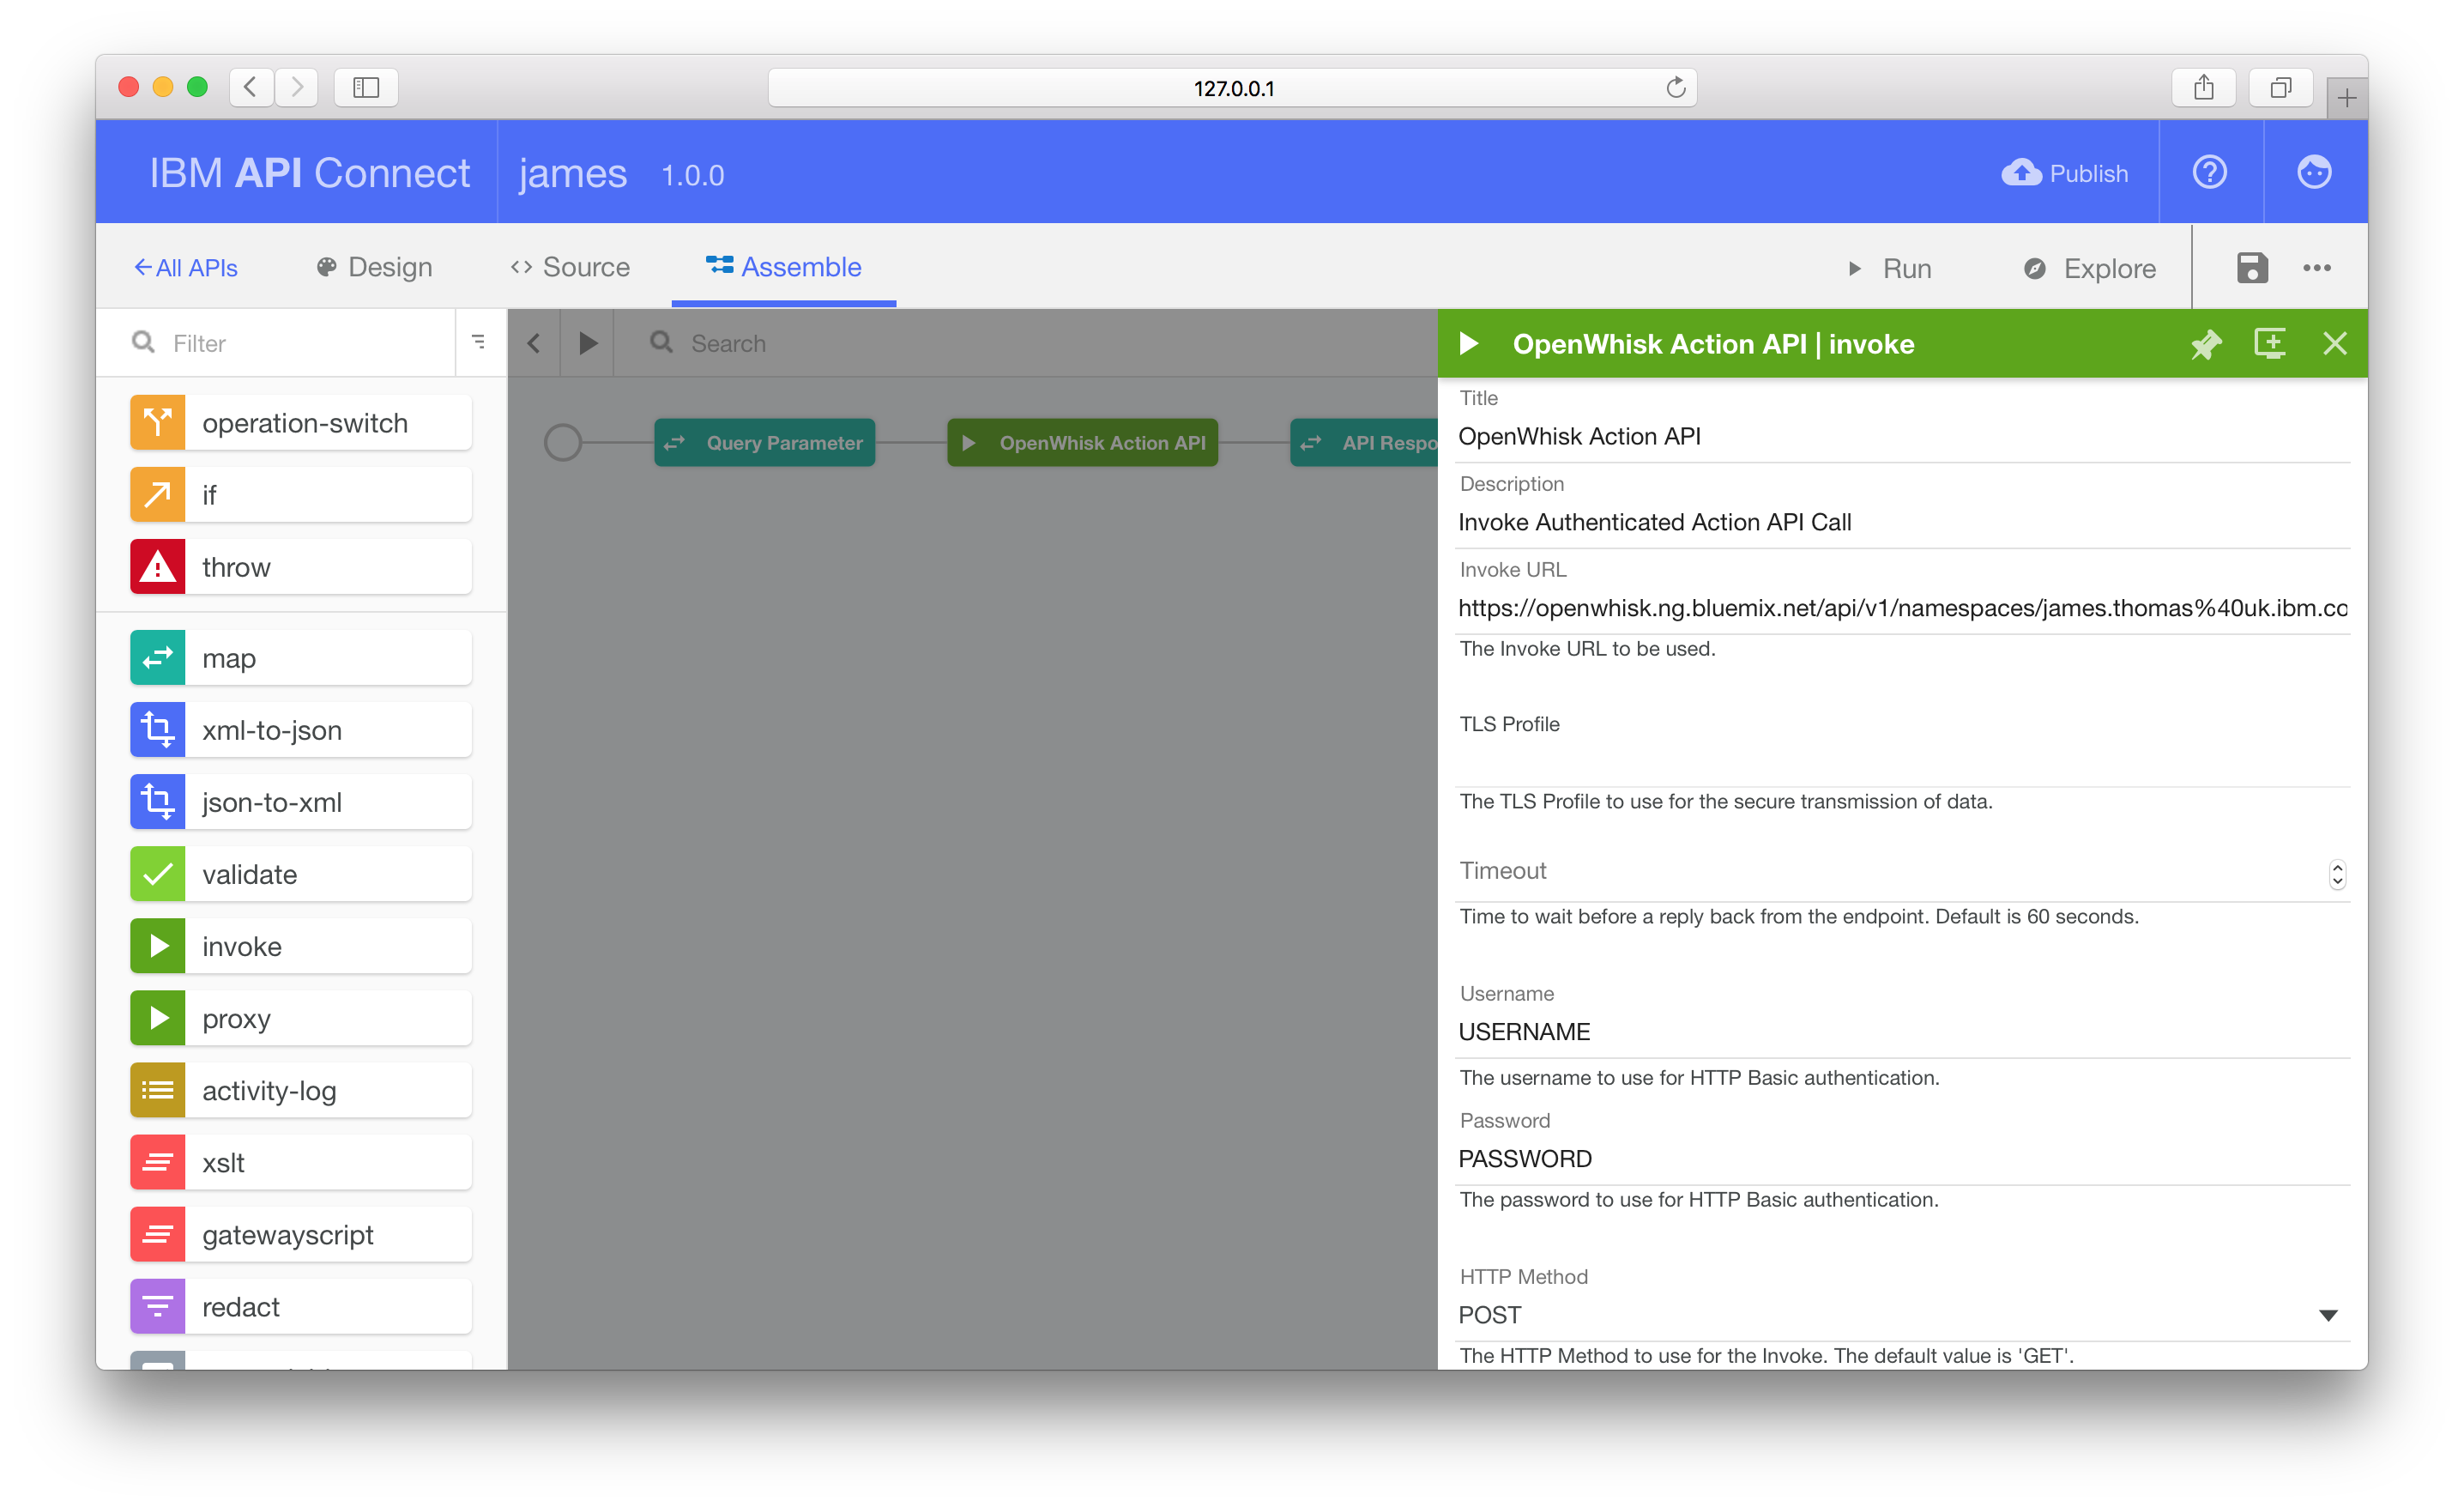
Use this node to execute your OpenWhisk Action by bringing up the editor and changing the URL to the correct endpoint, e.g. _https://openwhisk.ng.bluemix.net/api/v1/namespaces/YOUR_NAMESPACE/actions/ACTION_ID?blocking=true_
Make sure to include the query parameter, blocking=true. This makes OpenWhisk wait until the Action has completed execution before returning, rather than after invocation starts.
Change the HTTP method from GET to POST and fill in the username and passwords fields.
Add the value invoke_result to the Response Object Variable field. This will save the HTTP response into a context variable we can reference in the following map node definition.
Passing Query Parameters
Invoking OpenWhisk Actions through the API uses a HTTP POST request, passing parameters within the JSON body. Our external API supports HTTP GET operations, with parameters through query string values in the URL.
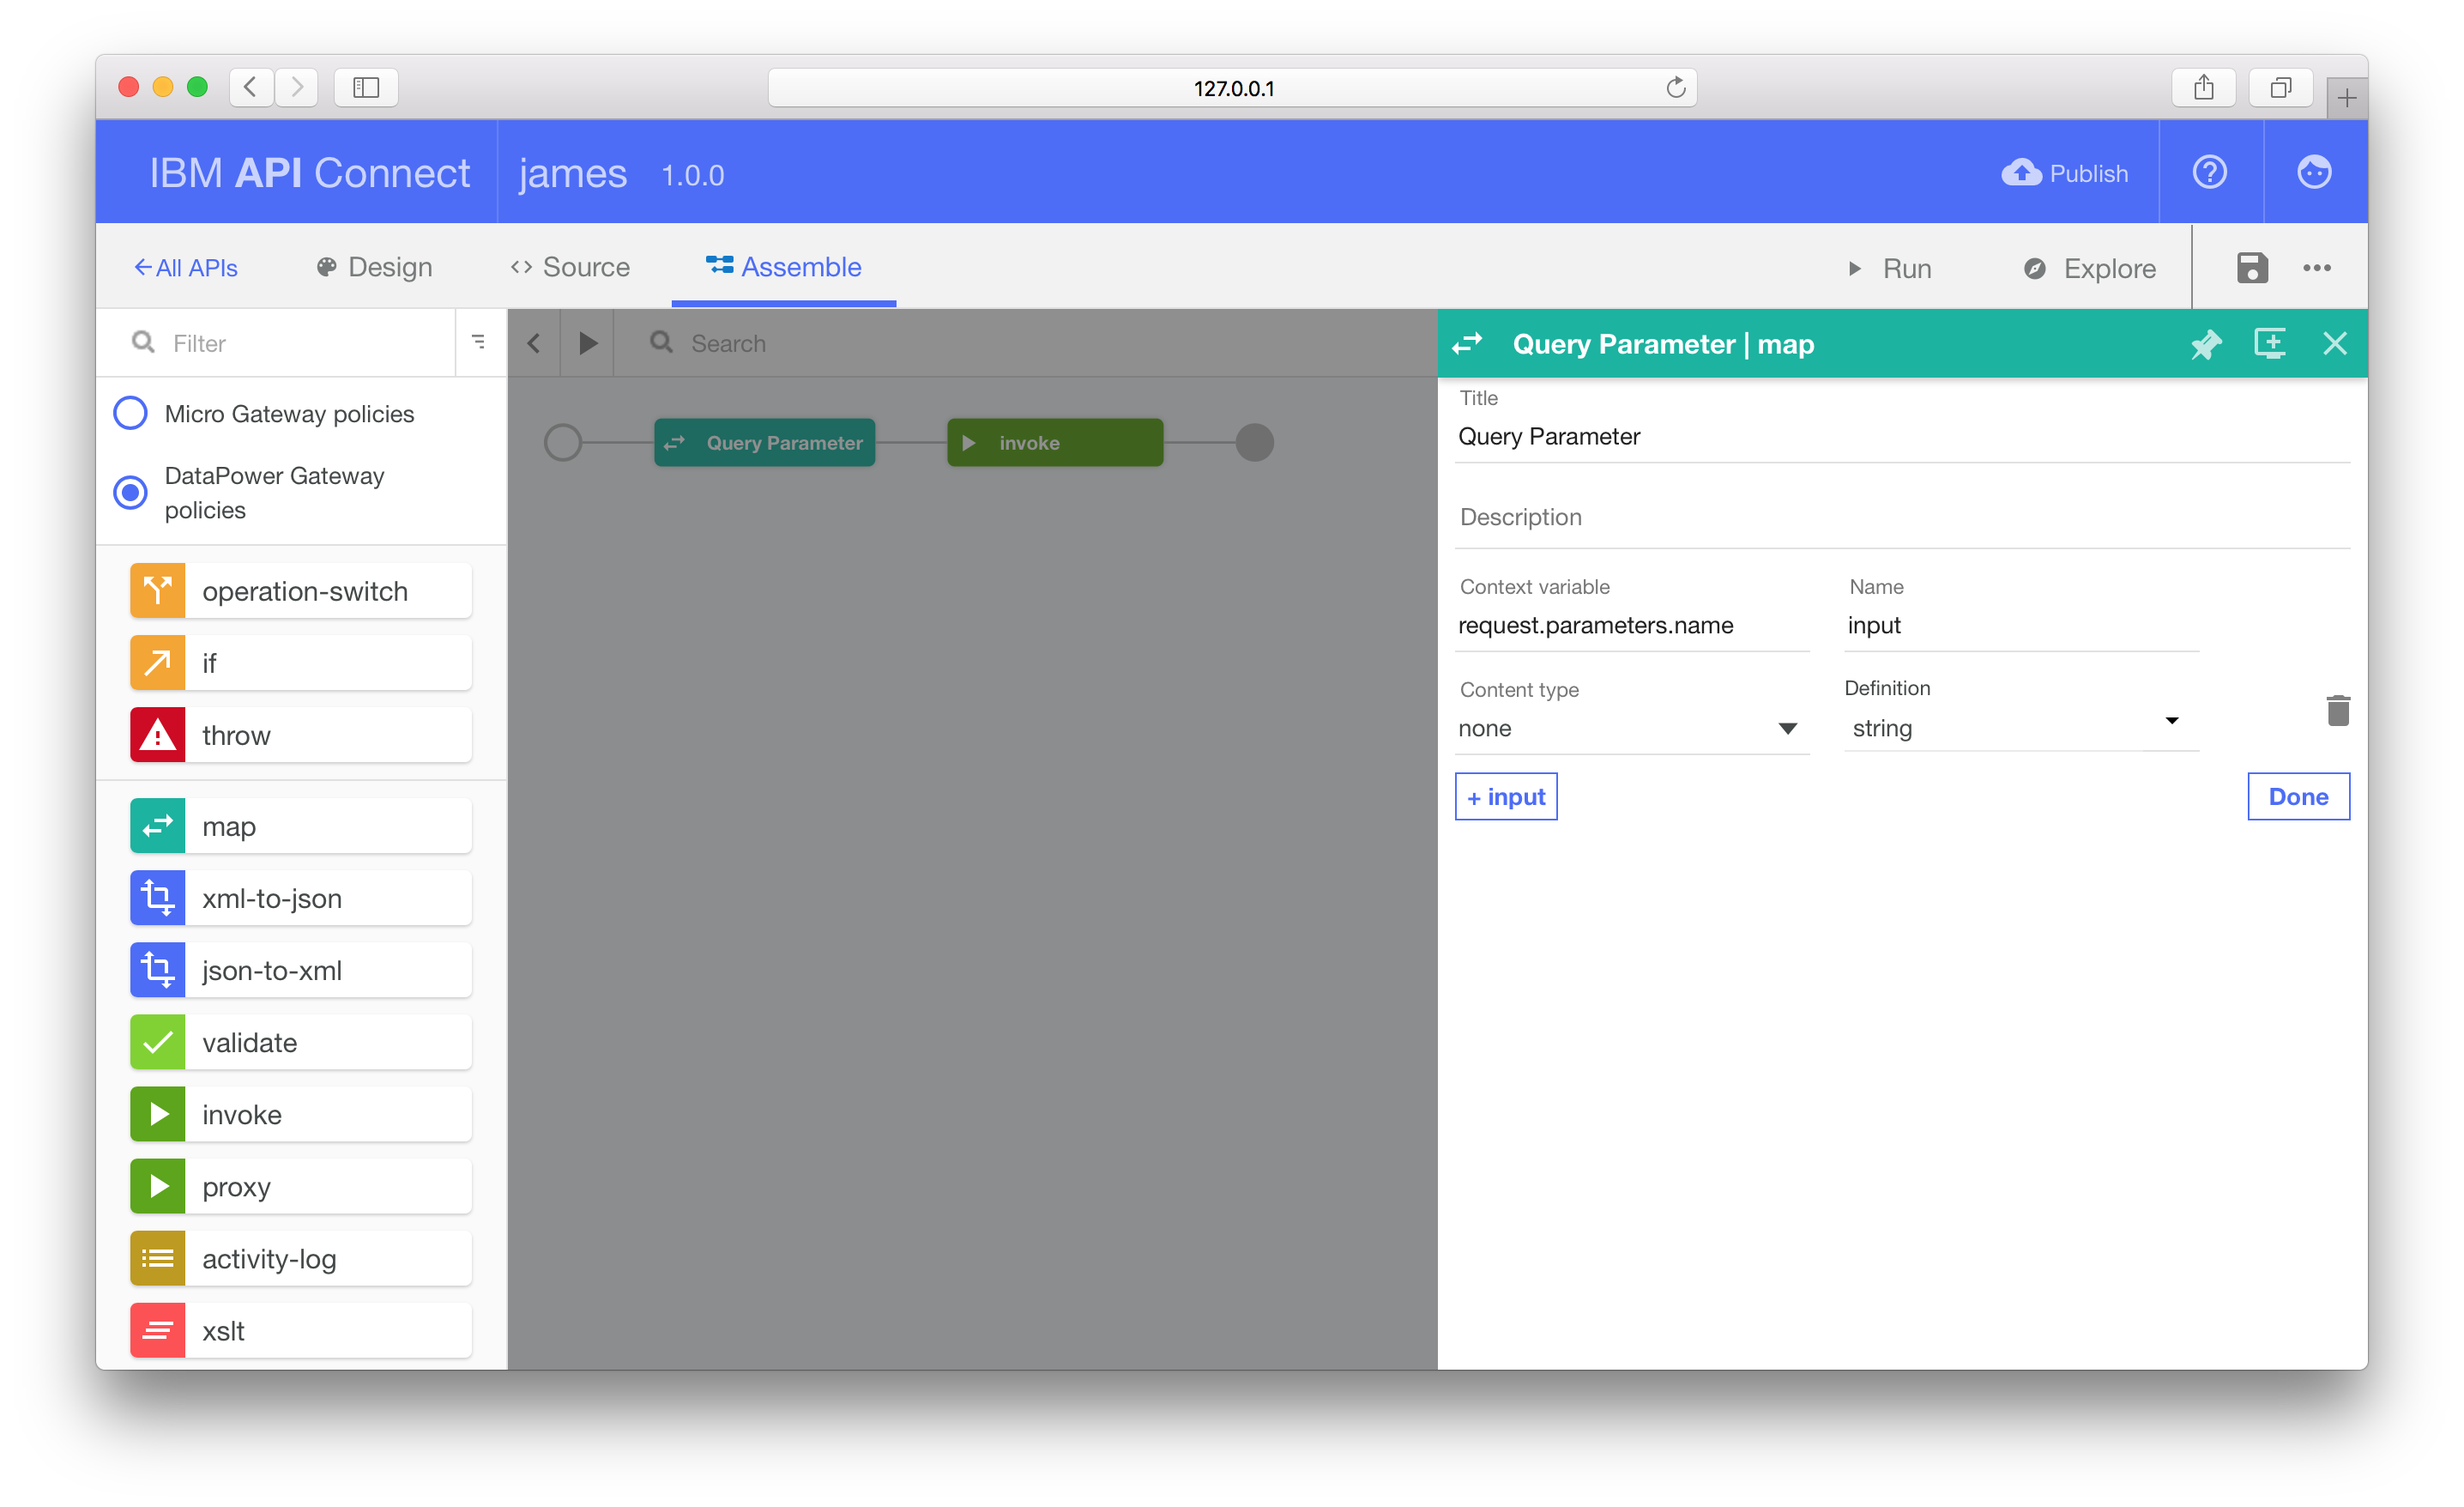
Using the map node in the flow will translate between these two methods.
Drag a map node from the left-hand panel and drop it on the wire between the circle and the invoke node.
Open the map node editor and add a new input parameter. Change the context variable to request.parameters.name with type string. This contains the query parameter value we’re using to pass in action arguments.
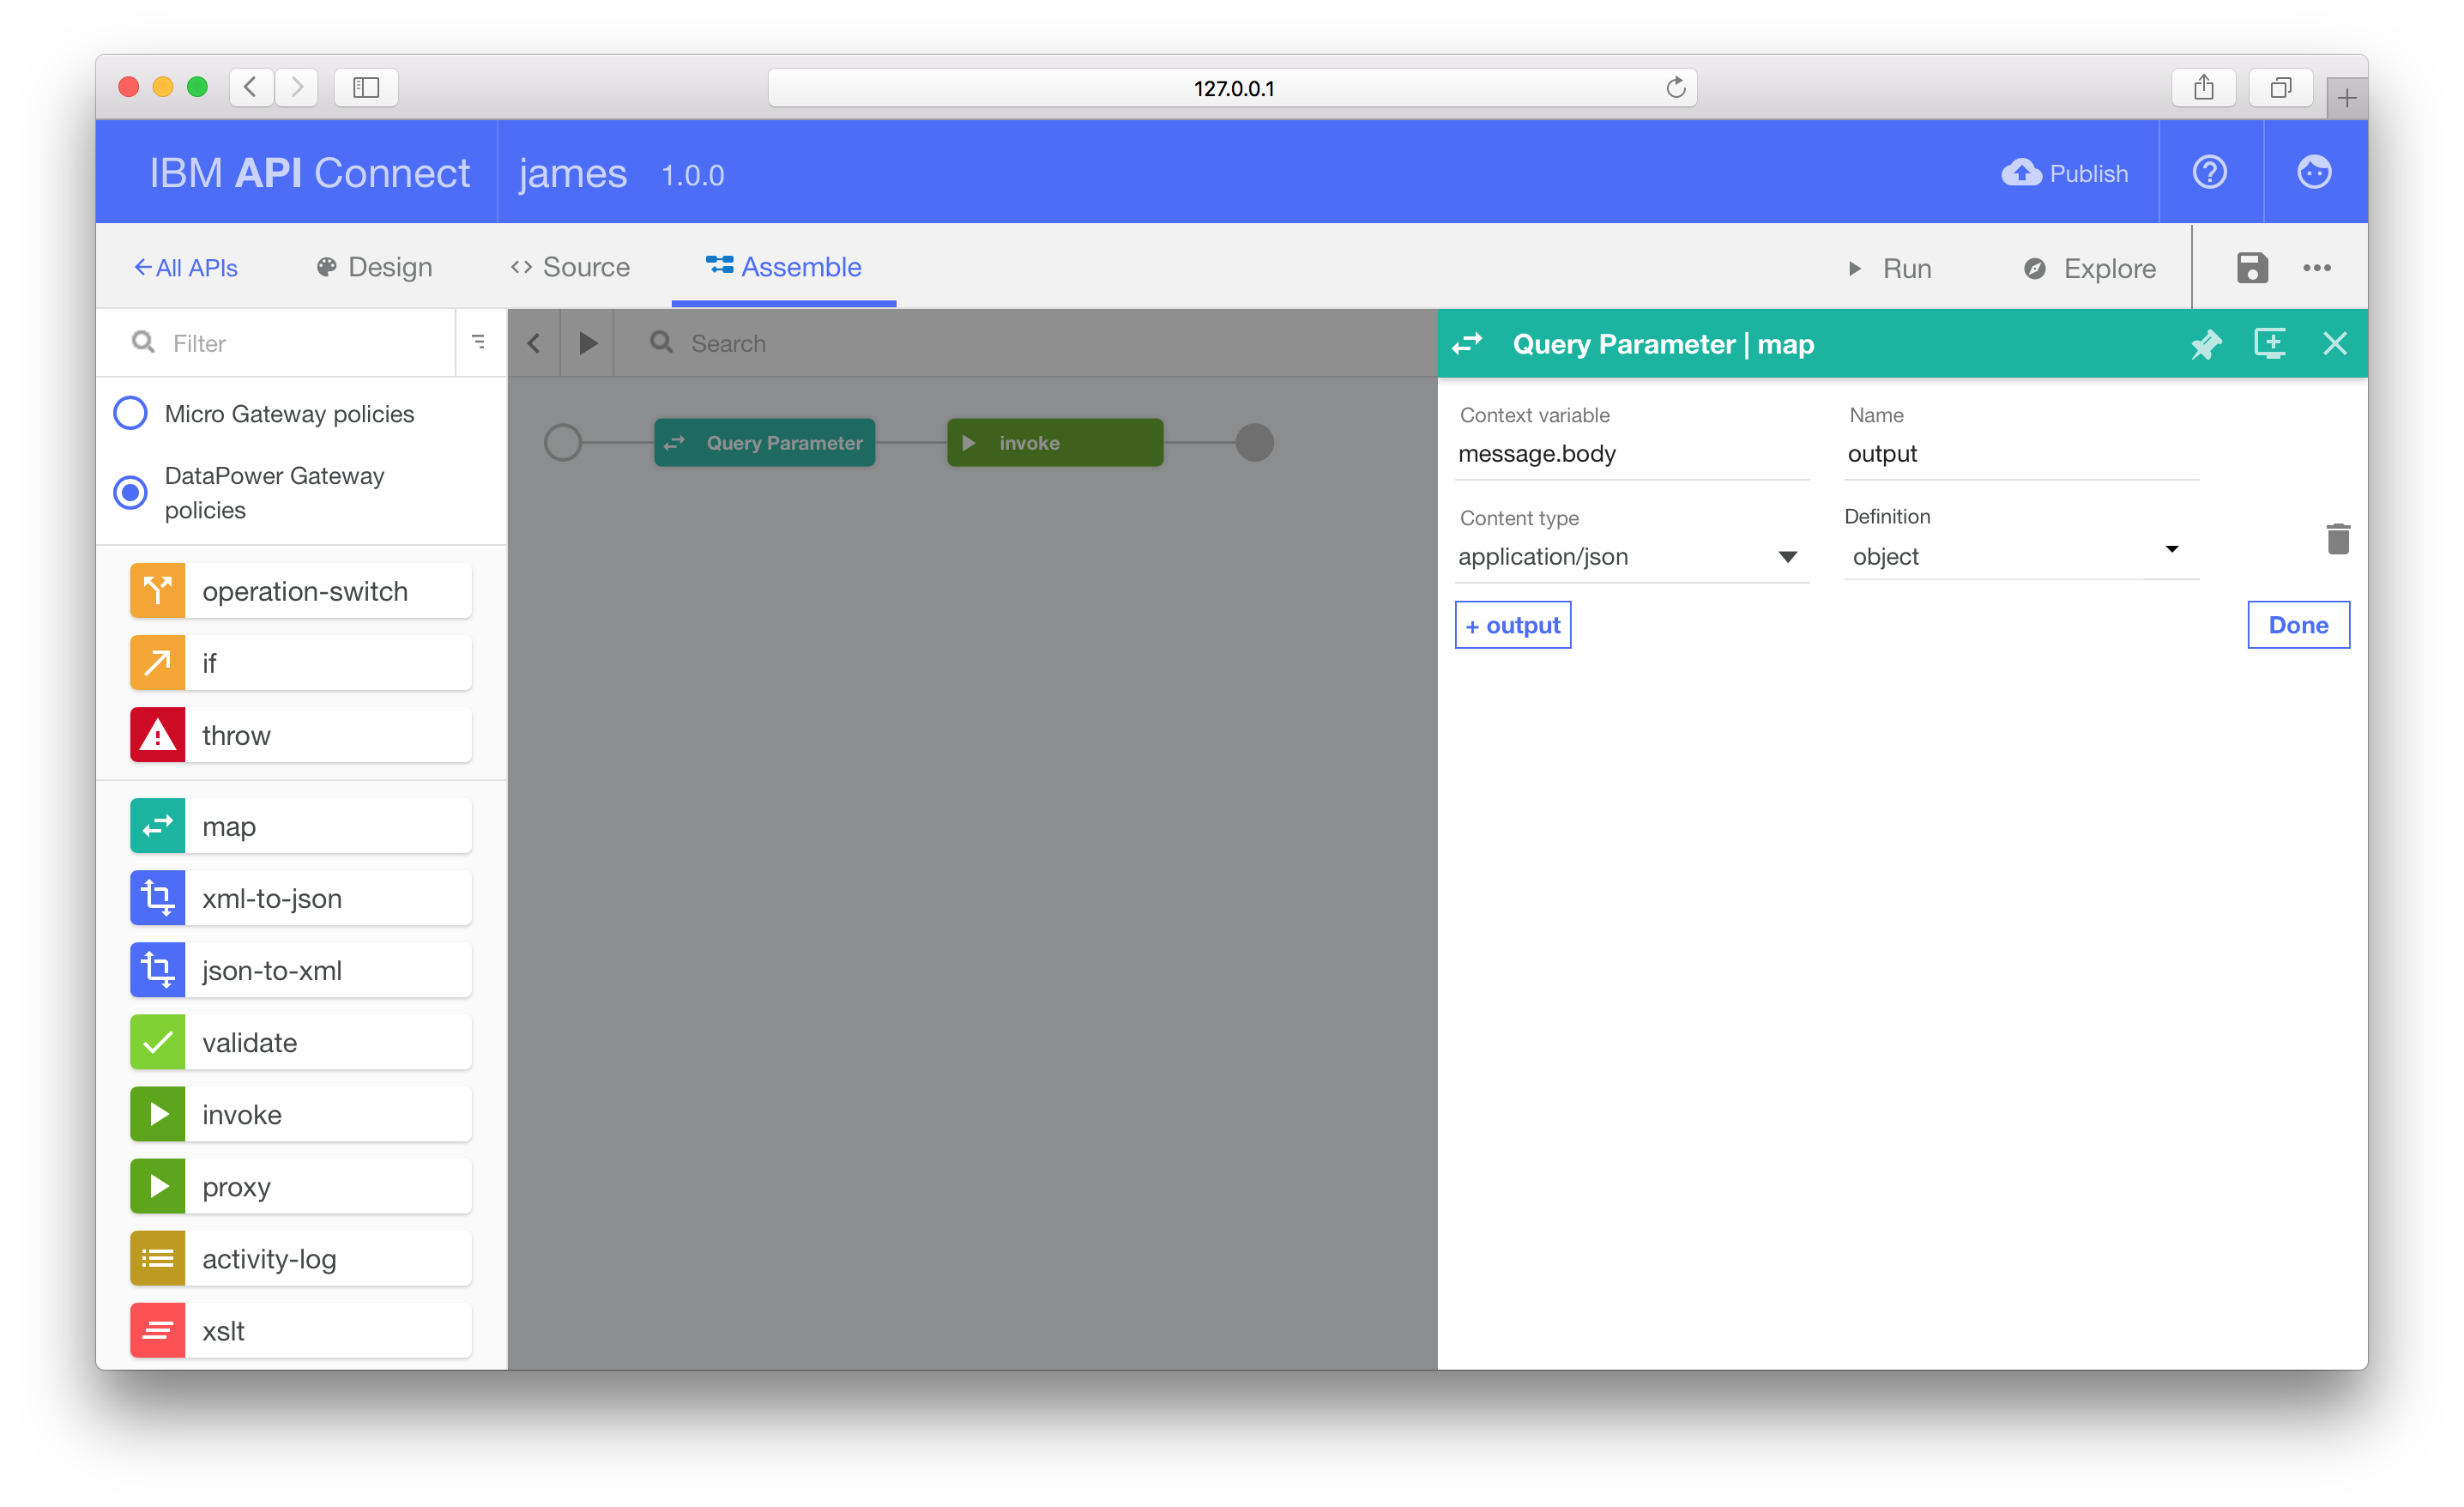
Returning to the map node editor, add a new output parameter. Leave the Context variable as message.body. This variable will be used by the invoke node to populate the request body.
Change the Content Type to application/json. Select the definition as inline schema to define the JSON schema for the HTTP POST body. Add the following JSON Schema definition to the editor form.
{
  "properties": {
    "name": {
      "type": "string"
    }
  },
  "type": "object"
}
With the input and output formats defined, we can wire the two parameters together. Under the Map panel, click the dot next to the input parameter and then click the second dot on the right, next to the name:string label.
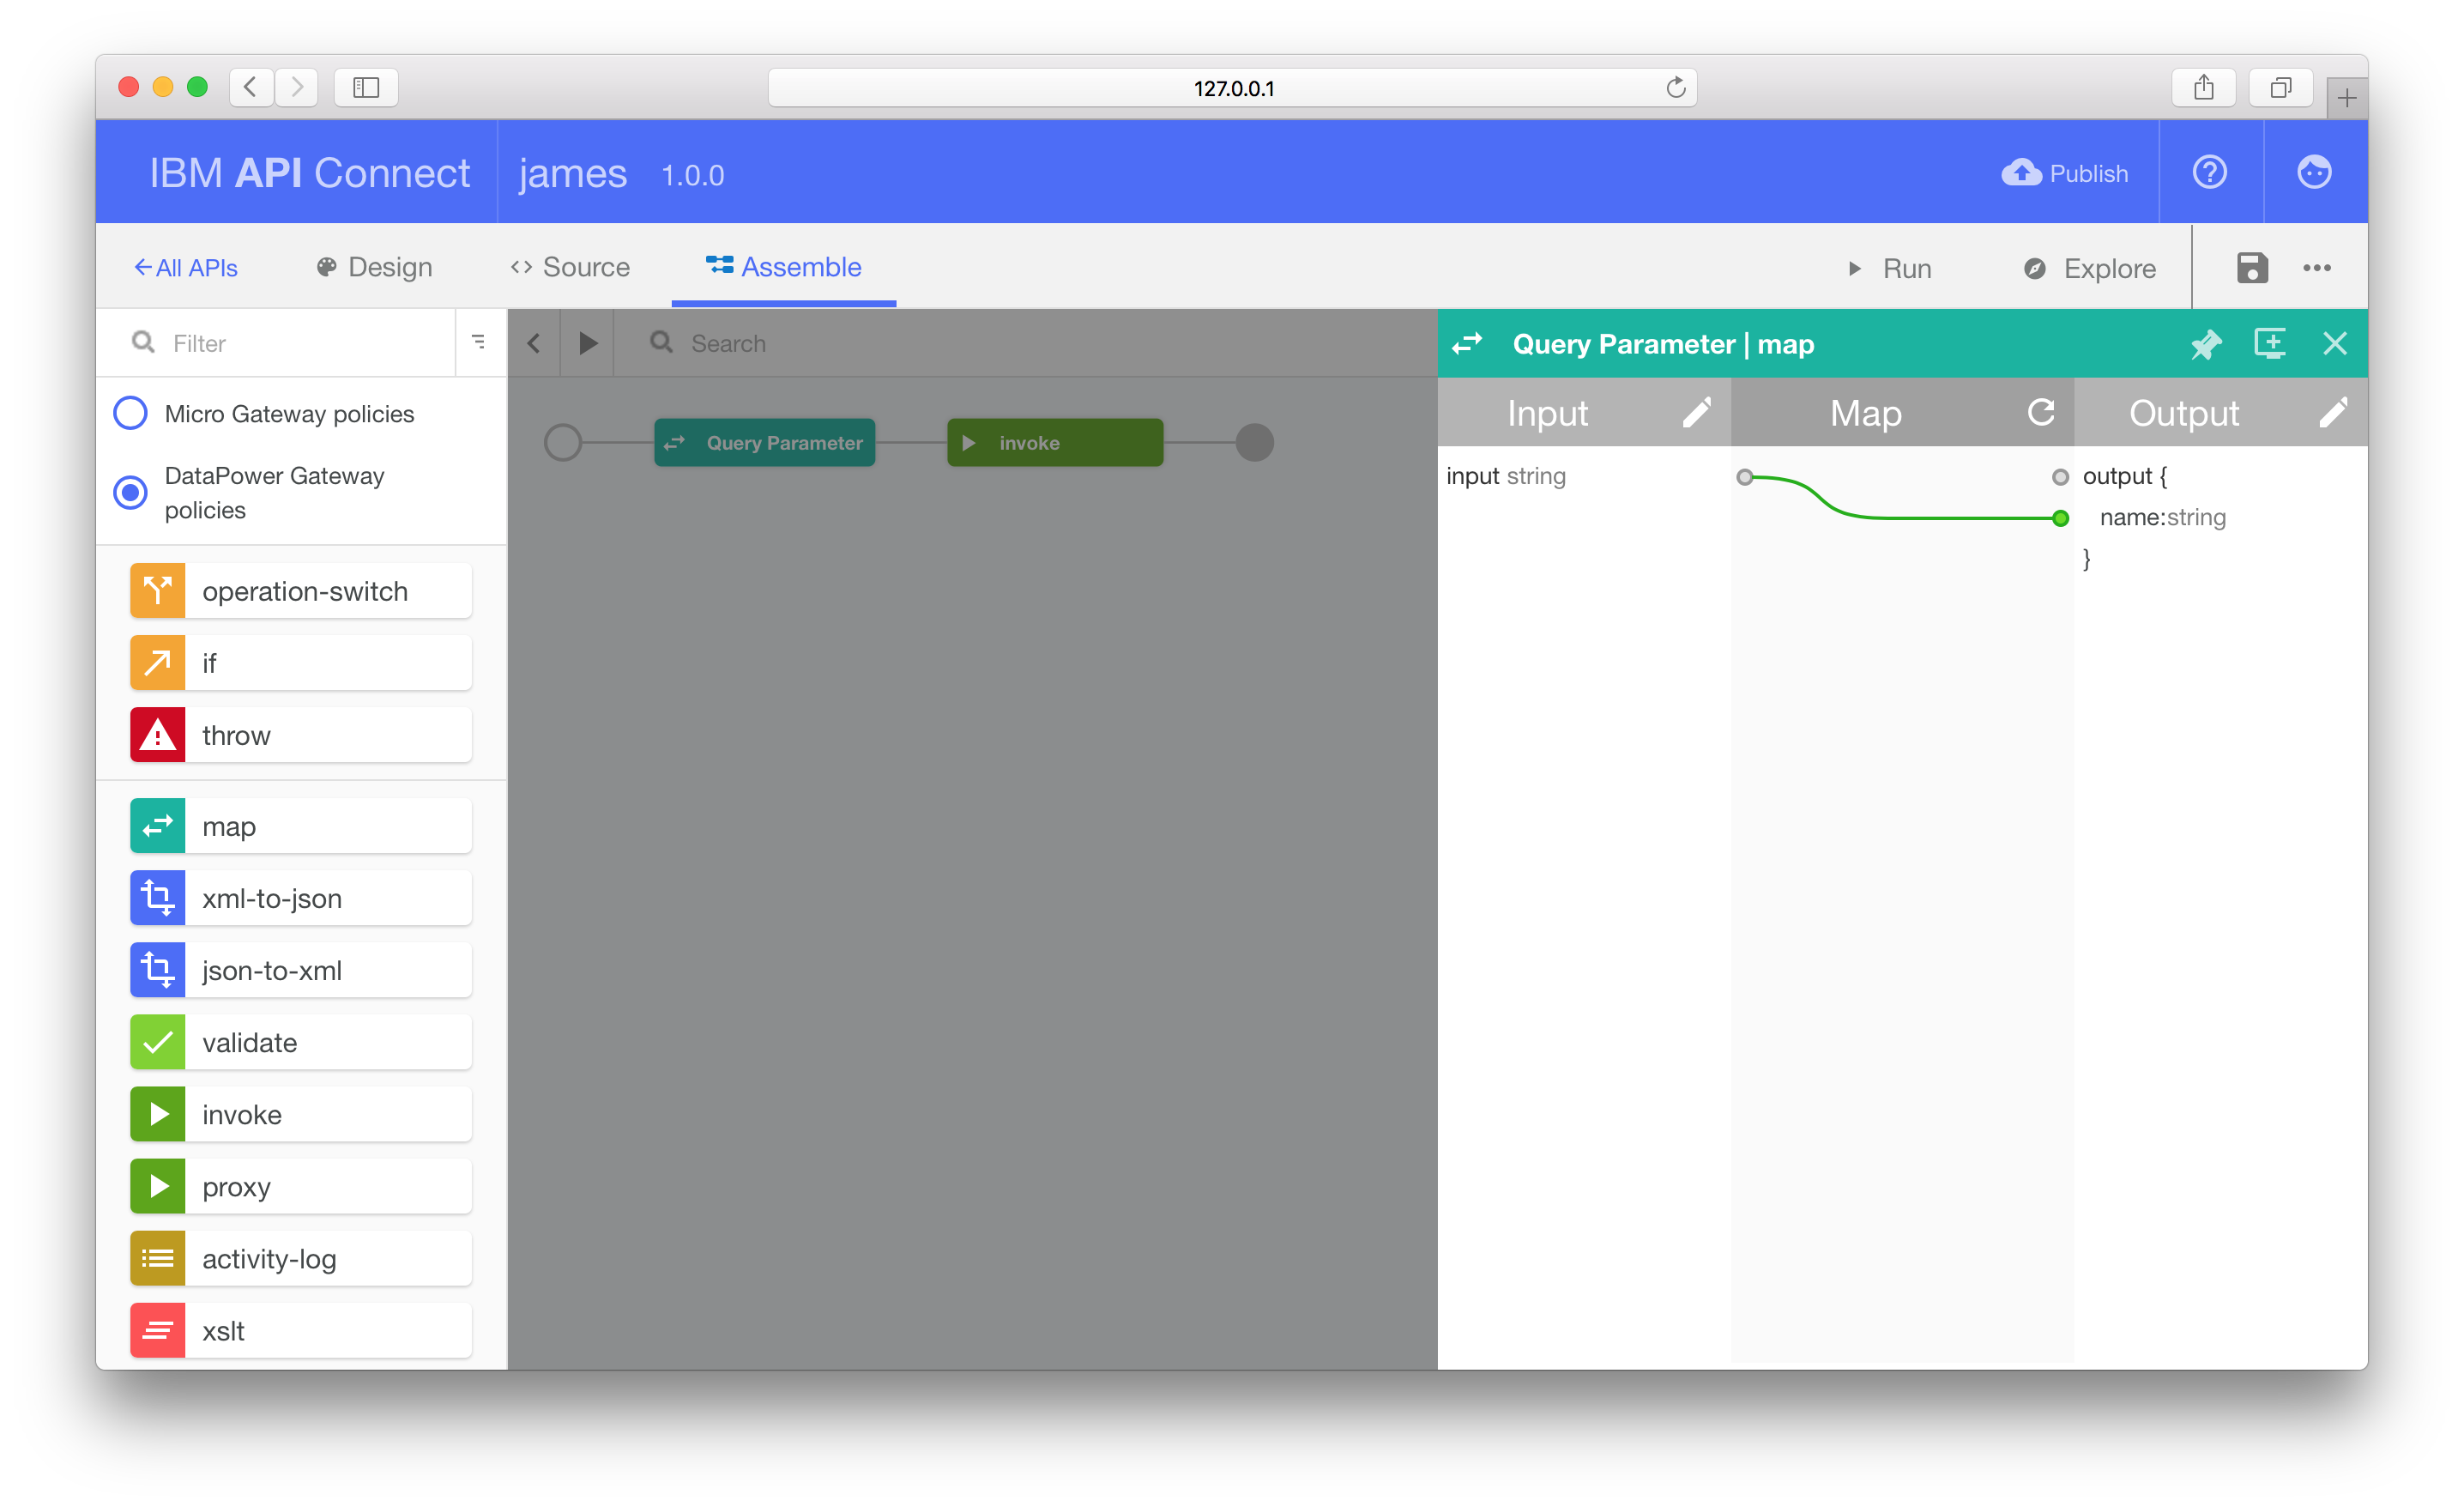
Remember to click Save before proceeding.
Returning Action Result
OpenWhisk Action API invocation responses include both the action result payload and meta-data about the invocation event.
{
  "name": "hello_action",
  "subject": "james.thomas@uk.ibm.com",
  "activationId": "5388b29e9f134737baf57bd12257dfd7",
  "publish": false,
  "annotations": [],
  "version": "0.0.1",
  "response": {
    "result": {
      "payload": "Hello Bernie"
    },
    "success": true,
    "status": "success"
  },
  "end": 1461667635975,
  "logs": [],
  "start": 1461667635970,
  "namespace": "james.thomas@uk.ibm.com"
}
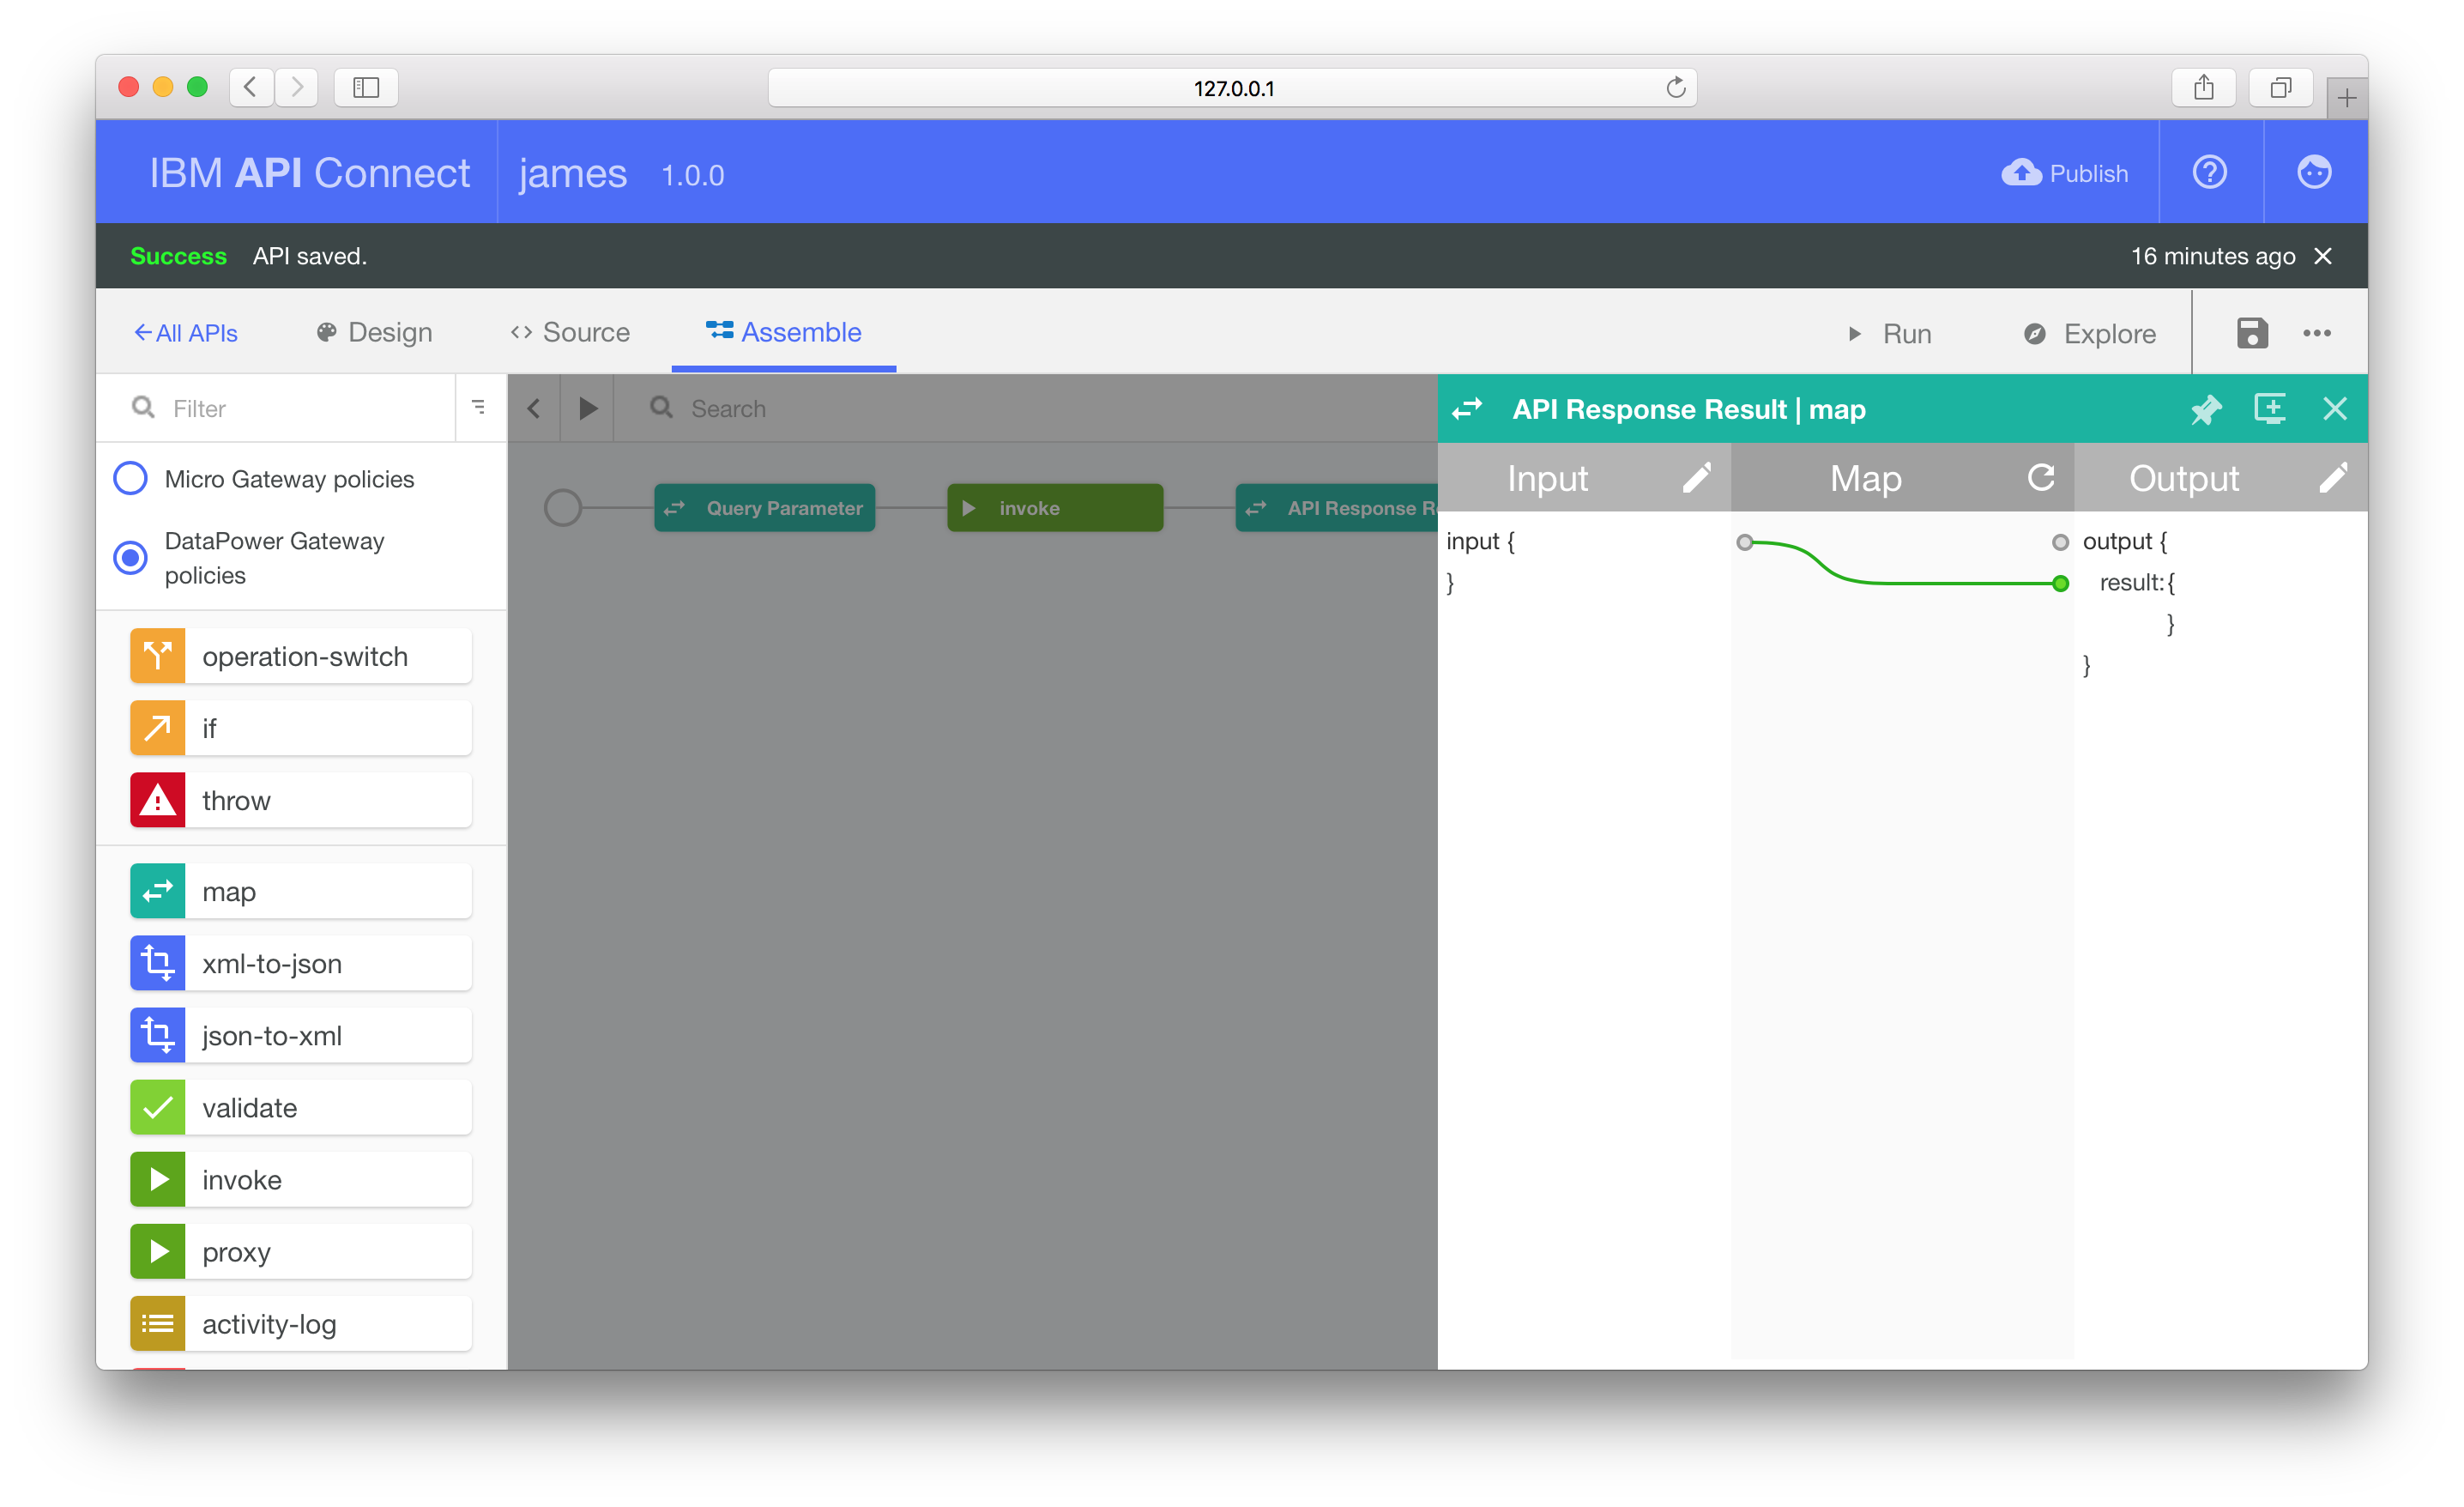
Rather than returning the raw result, we only want to return the result payload property (response.result). Using another map node we can define a subset of the invoked API response to be the HTTP response body.
Add a second map node to the flow, this time after the invoke node.
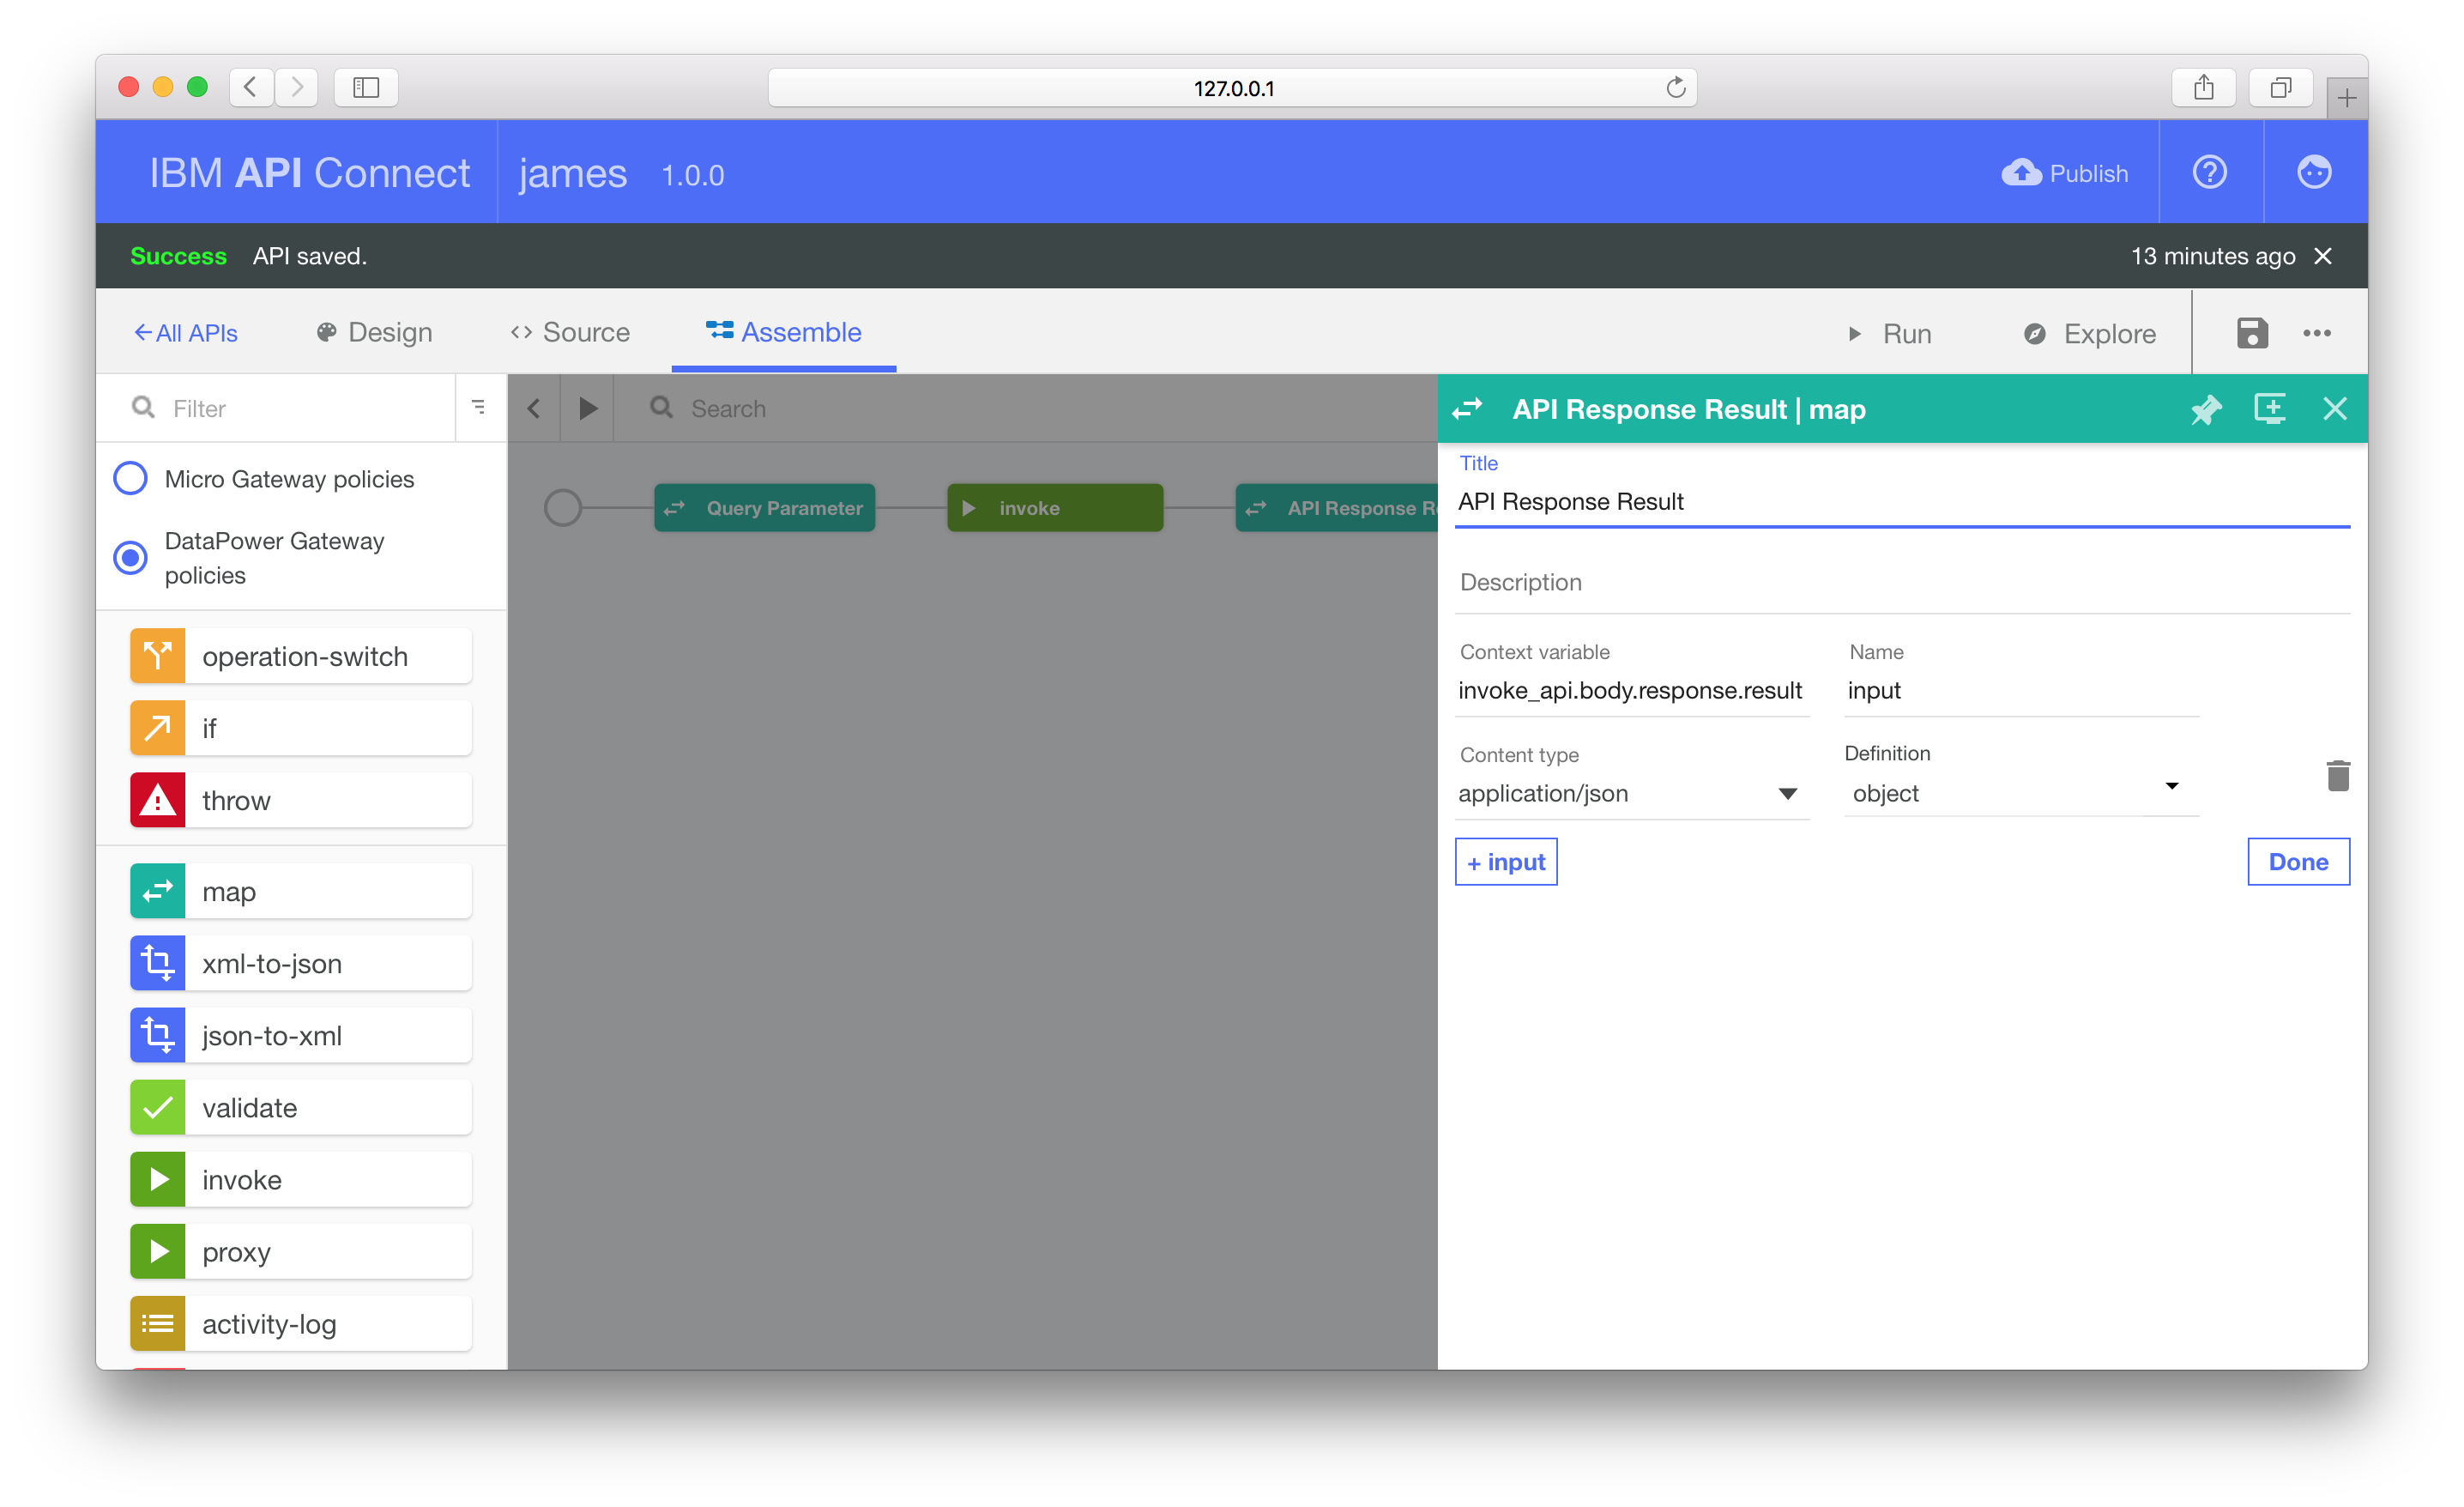
Add a new input property. We previously set a context variable in the invoke definition that will contain the API response (invoke_api). The response body is available as the body property of this variable.
Edit the context variable to be invoke_api.body.response.result to set the input property as the child property of the invoke result. Set the content type to application/json and schema to object.
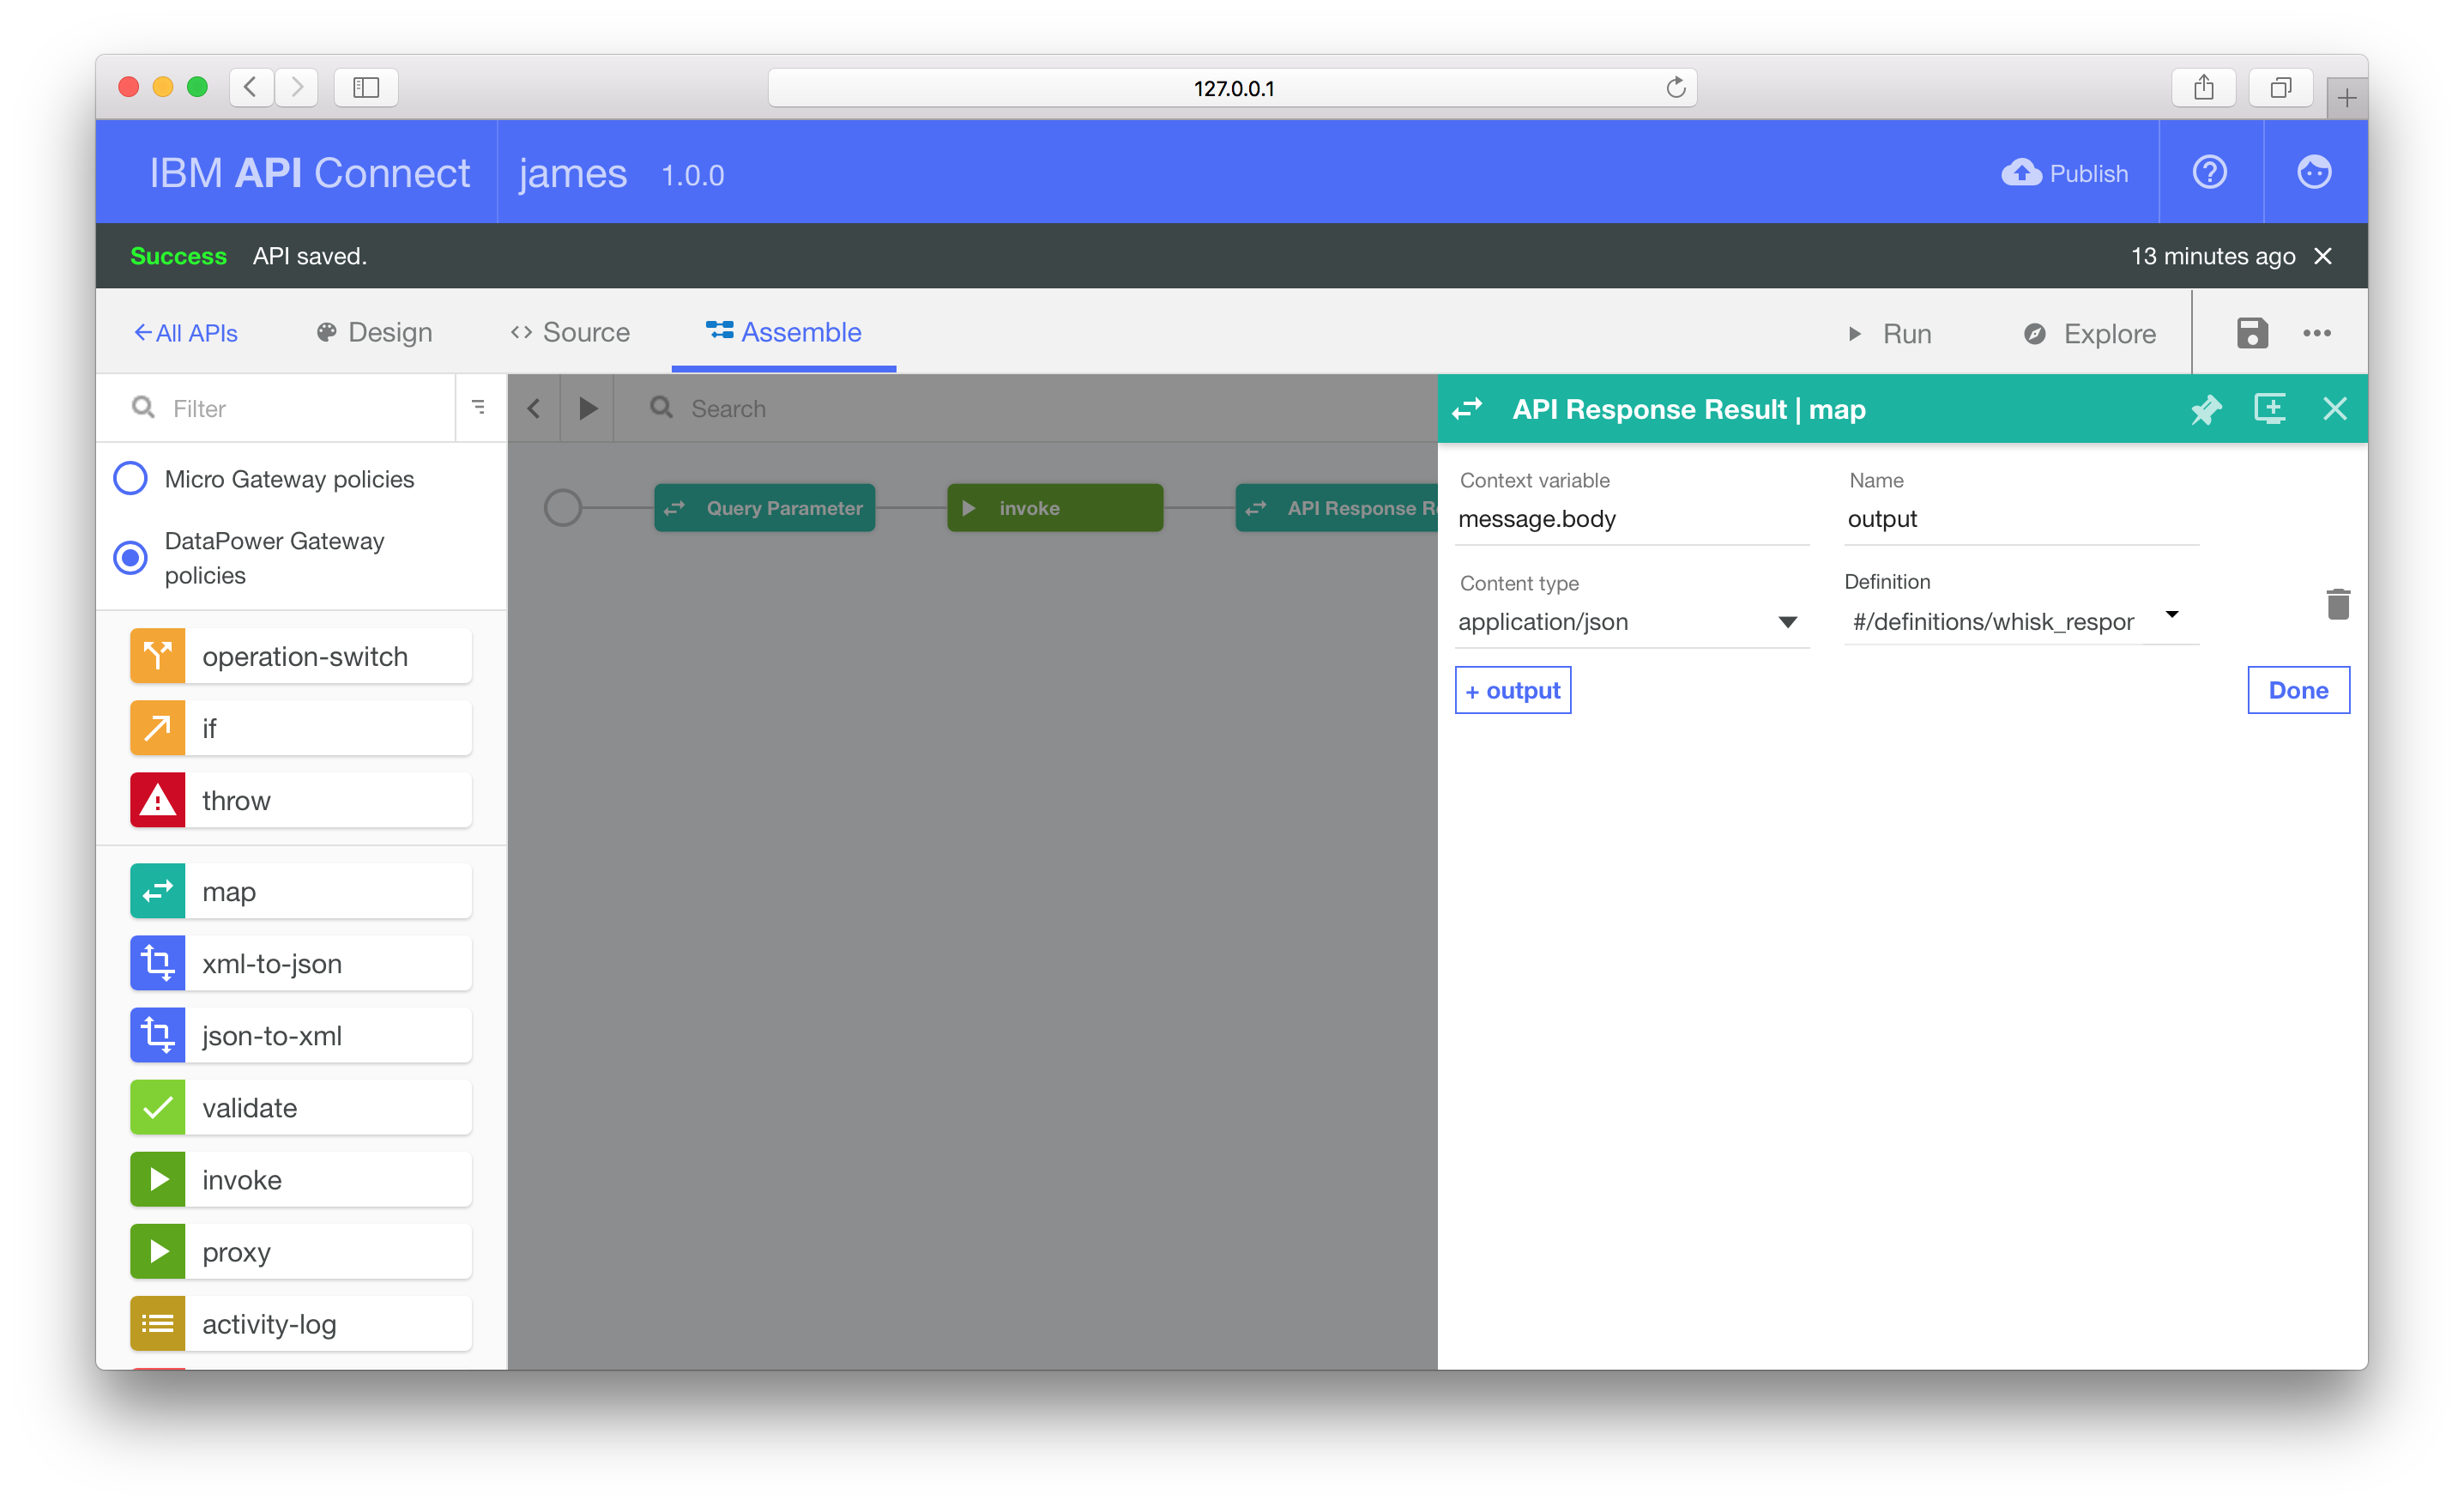
Add a new output property. Leave the context variable as message.body. This context variable is used as the response body.
Set content type to application/json and change the definition to #/definitions/whisk_response. This was the JSON schema we created during the external API definition.
Returning to the map overview, wire together the input property to the result attribute of the output property.
Click the Save icon before making any further changes.
Using the invoke and map nodes, we’ve now implemented our external API. Making our API live requires us to deploy the flow definition to IBM Bluemix.
Deploying to IBM Bluemix
After saving your flow, click the Publish icon in the top-right hand corner. We’re going to publish to the default Sandbox target. Follow the steps to find and add this target to the local editor.
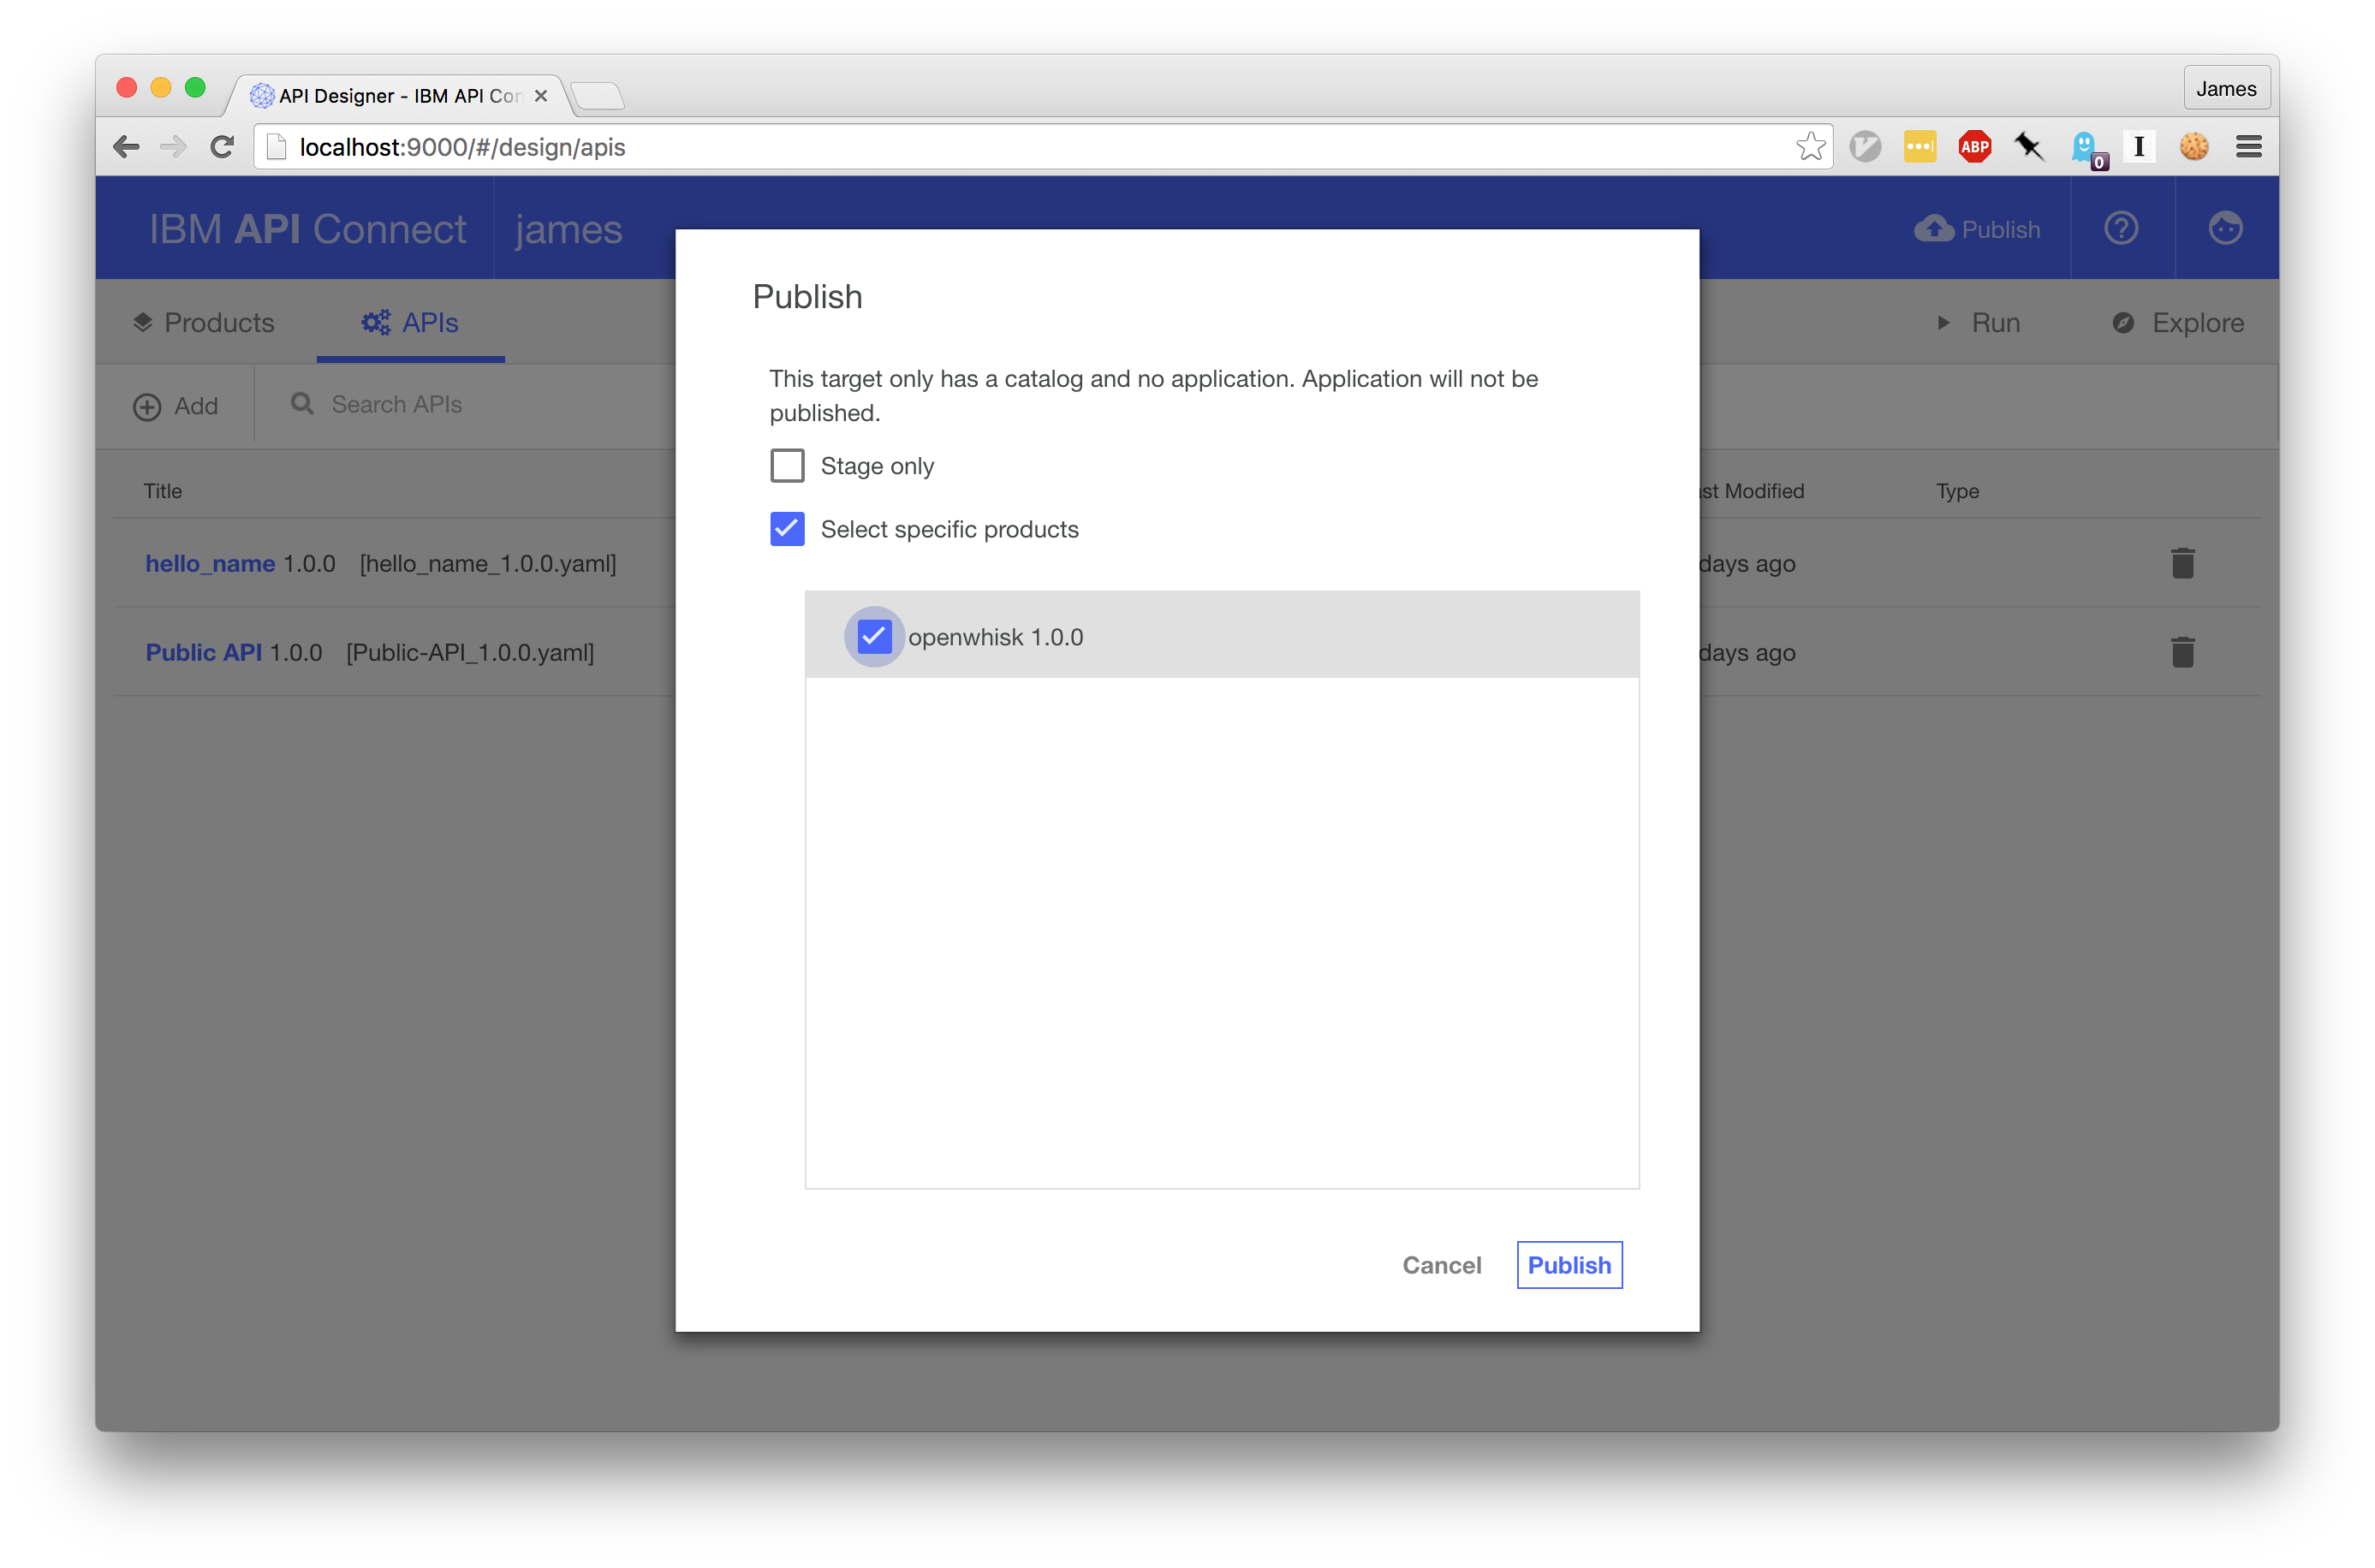
Once you’ve added Sandbox as the default target, select Publish and click the configured catalogue. On the dialog box, select the Select Specific Products option and choose the openwhisk product.
Clicking the confirmation button will upload our API definition to the external API Connect platform.
If everything has been configured and deploying correctly, your new API should now be live!
Let’s test it…
Testing
Opening the API Connect dashboard, the sandbox catalogue should now contain the openwhisk product with the public API we defined using the editor.
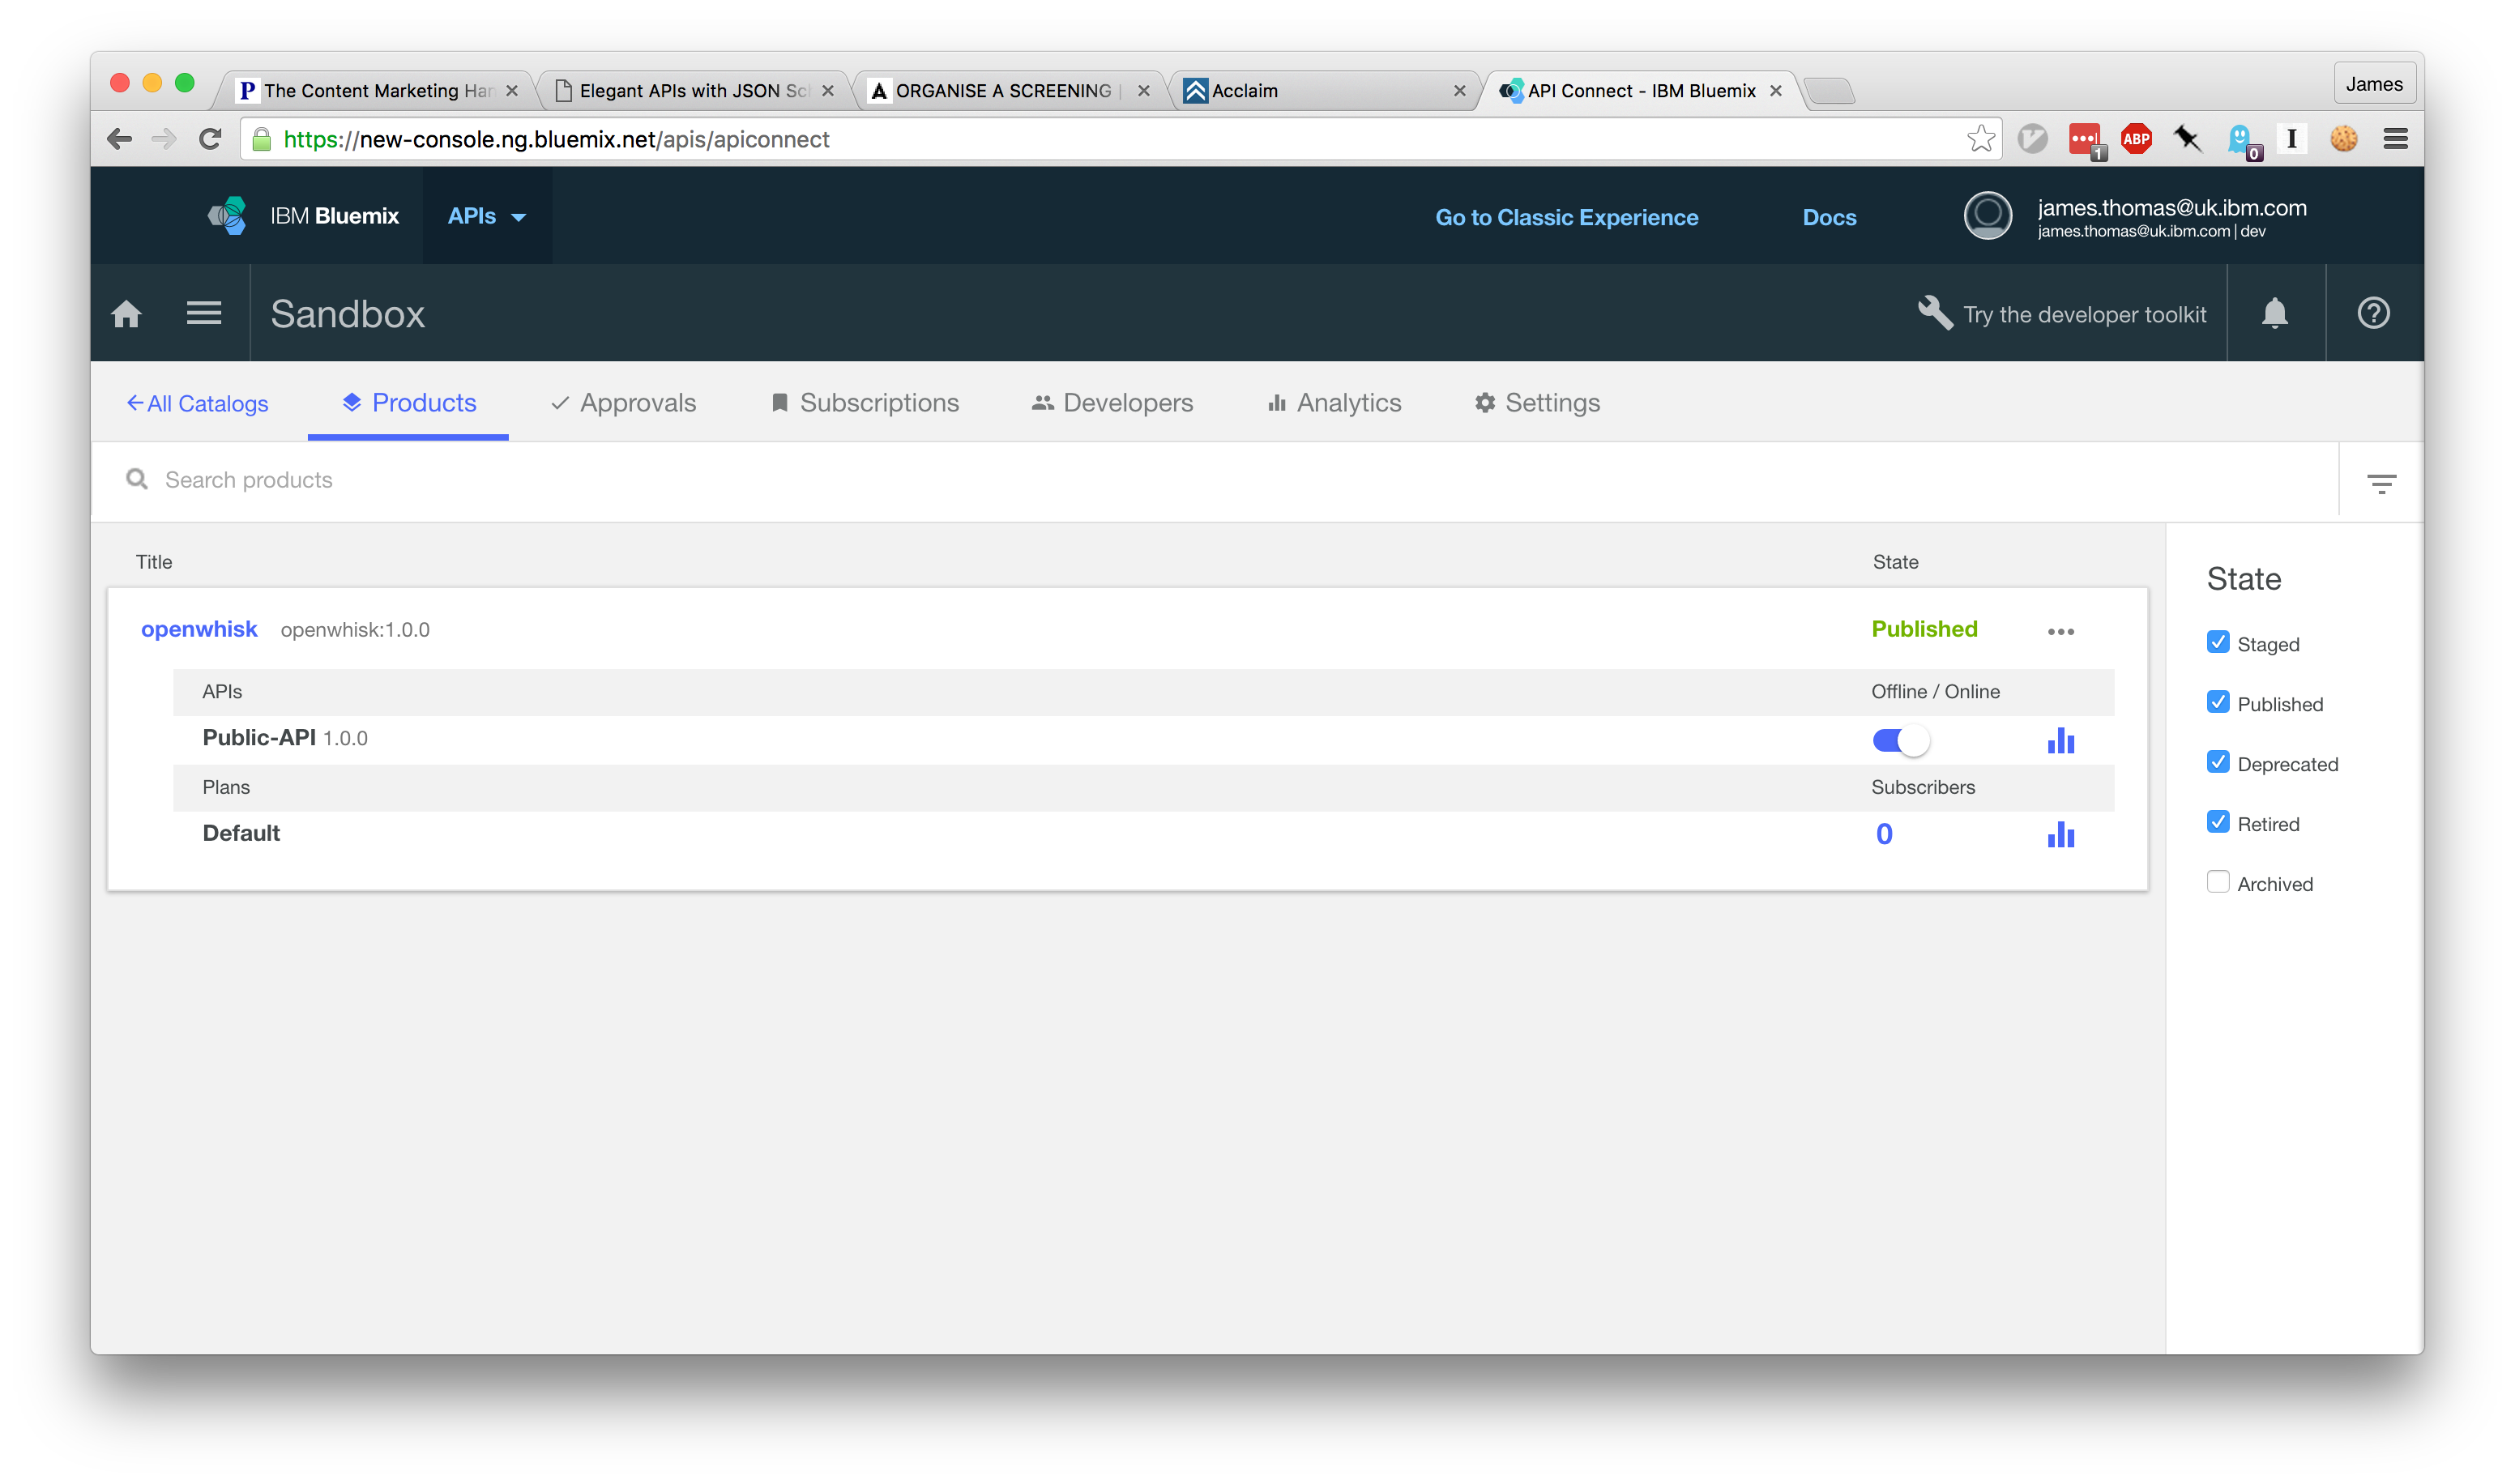
We can now verify this API works by making the HTTP request to the endpoint. Under the Settings tab, the API Endpoint section contains the Base URL for our API catalogue. APIs deployed under this catalogue will use this path as the endpoint root.
The API definition registered a relative URL path, /hello-name, which we can combine with the catalogue endpoint (e.g. _https://api.us.apiconnect.ibmcloud.com/USER_ORG_SPACE/sb_) to generate an public API endpoint.
We can now test this API by sending a HTTP GET request to the URL, passing the name as a query parameter.
[17:13:10 ~]$ http get https://api.us.apiconnect.ibmcloud.com/jamesthomasukibmcom-dev2/sb/hello-name?name="Bernie Sanders"
HTTP/1.1 200 OK
Content-Encoding: gzip
Content-Type: application/json
Date: Tue, 26 Apr 2016 16:24:36 GMT

{
    "result": {
        "payload": "Hello Bernie Sanders"
    }
}

[17:24:36 ~]$
It works! 😃
We’ve successfully used API Connect to create an external API which proxies the OpenWhisk API. We now have a public endpoint we can use to invoke OpenWhisk Actions, without exposing our credentials and enabling CORS-support for cross-domain XHRs.
Conclusion
Serverless computing platforms give developers a rapid way to build APIs without servers. Combining this approach for building backend services with static file hosting provides an architecture for developing entire serverless web applications.
Experimenting with OpenWhisk as the backend platform for building serverless web applications, there were two challenges, authentication and cross-domain support.
Both issues were resolved using the API Connect service on IBM Bluemix.
API Connect is an incredibly powerful tool for creating, running, managing and securing APIs. Using the editor application to construct a new API, the endpoint was implemented using the invoke and map nodes. Deploying the generated flow to IBM Bluemix exposed the API as a public endpoint.