
How do you manage files for a serverless application? 🤔
Previous blog posts discussed this common problem and introduced the most popular solution, using a cloud-based object storage service. 👏👏👏
Object stores provide elastic storage in the cloud, with a billing model which charges for capacity used. These services are the storage solution for serverless applications, which do not have access to a traditional file system. 👍
I’m now going to demonstrate how to use IBM Cloud Object Storage from IBM Cloud Functions.
This blog post will show you…
- How to provision IBM Cloud Object Storage and create authentication tokens.
- How use client libraries to access IBM Cloud Object Storage from IBM Cloud Functions.
- Example serverless functions for common use-cases, e.g uploading files.
Code examples in this blog post will focus on the Node.js runtime.
Instructions on service provisioning and authentication credentials are relevant for any runtime.
IBM Cloud Accounts and Storage Services
IBM Cloud Object Storage is available to all IBM Cloud users.
IBM Cloud has three different account types: lite, pay-as-you-go or subscription.
Lite Accounts
Lite accounts do not require a credit card to register and do not expire after a limited time period.
Numerous platform services, including Cloud Object Storage, provide free resources for lite account users. IBM Cloud Object Storage’s free resource tier comes the following monthly limits.
- Store 25GB of new data.
- Issue 20,000 GET and 2,000 PUT requests.
- Use 10GB of public bandwidth.
Lite tier usage supports all resiliency and storage class options but are limited to a single service instance.
Users can sign up for a free “Lite” account here. Please follow the instructions to install the IBM Cloud CLI.
Pay-as-you-Go & Subscription Accounts
Lite accounts can be upgraded to Pay-As-You-Go or Subscription accounts. Upgraded accounts still have access to the free tiers provided in Lite accounts. Users with Pay-As-You-Go or Subscriptions accounts can access services and tiers not included in the Lite account.
Benefits of the additional service tiers for IBM Cloud Object Storage include unlimited instances of the object storage service. Costs are billed according to usage per month. See the pricing page for more details: https://www.ibm.com/cloud-computing/bluemix/pricing-object-storage#s3api
Provisioning IBM Cloud Object Storage
IBM Cloud Object Storage can be provisioned through the IBM Cloud service catalog.
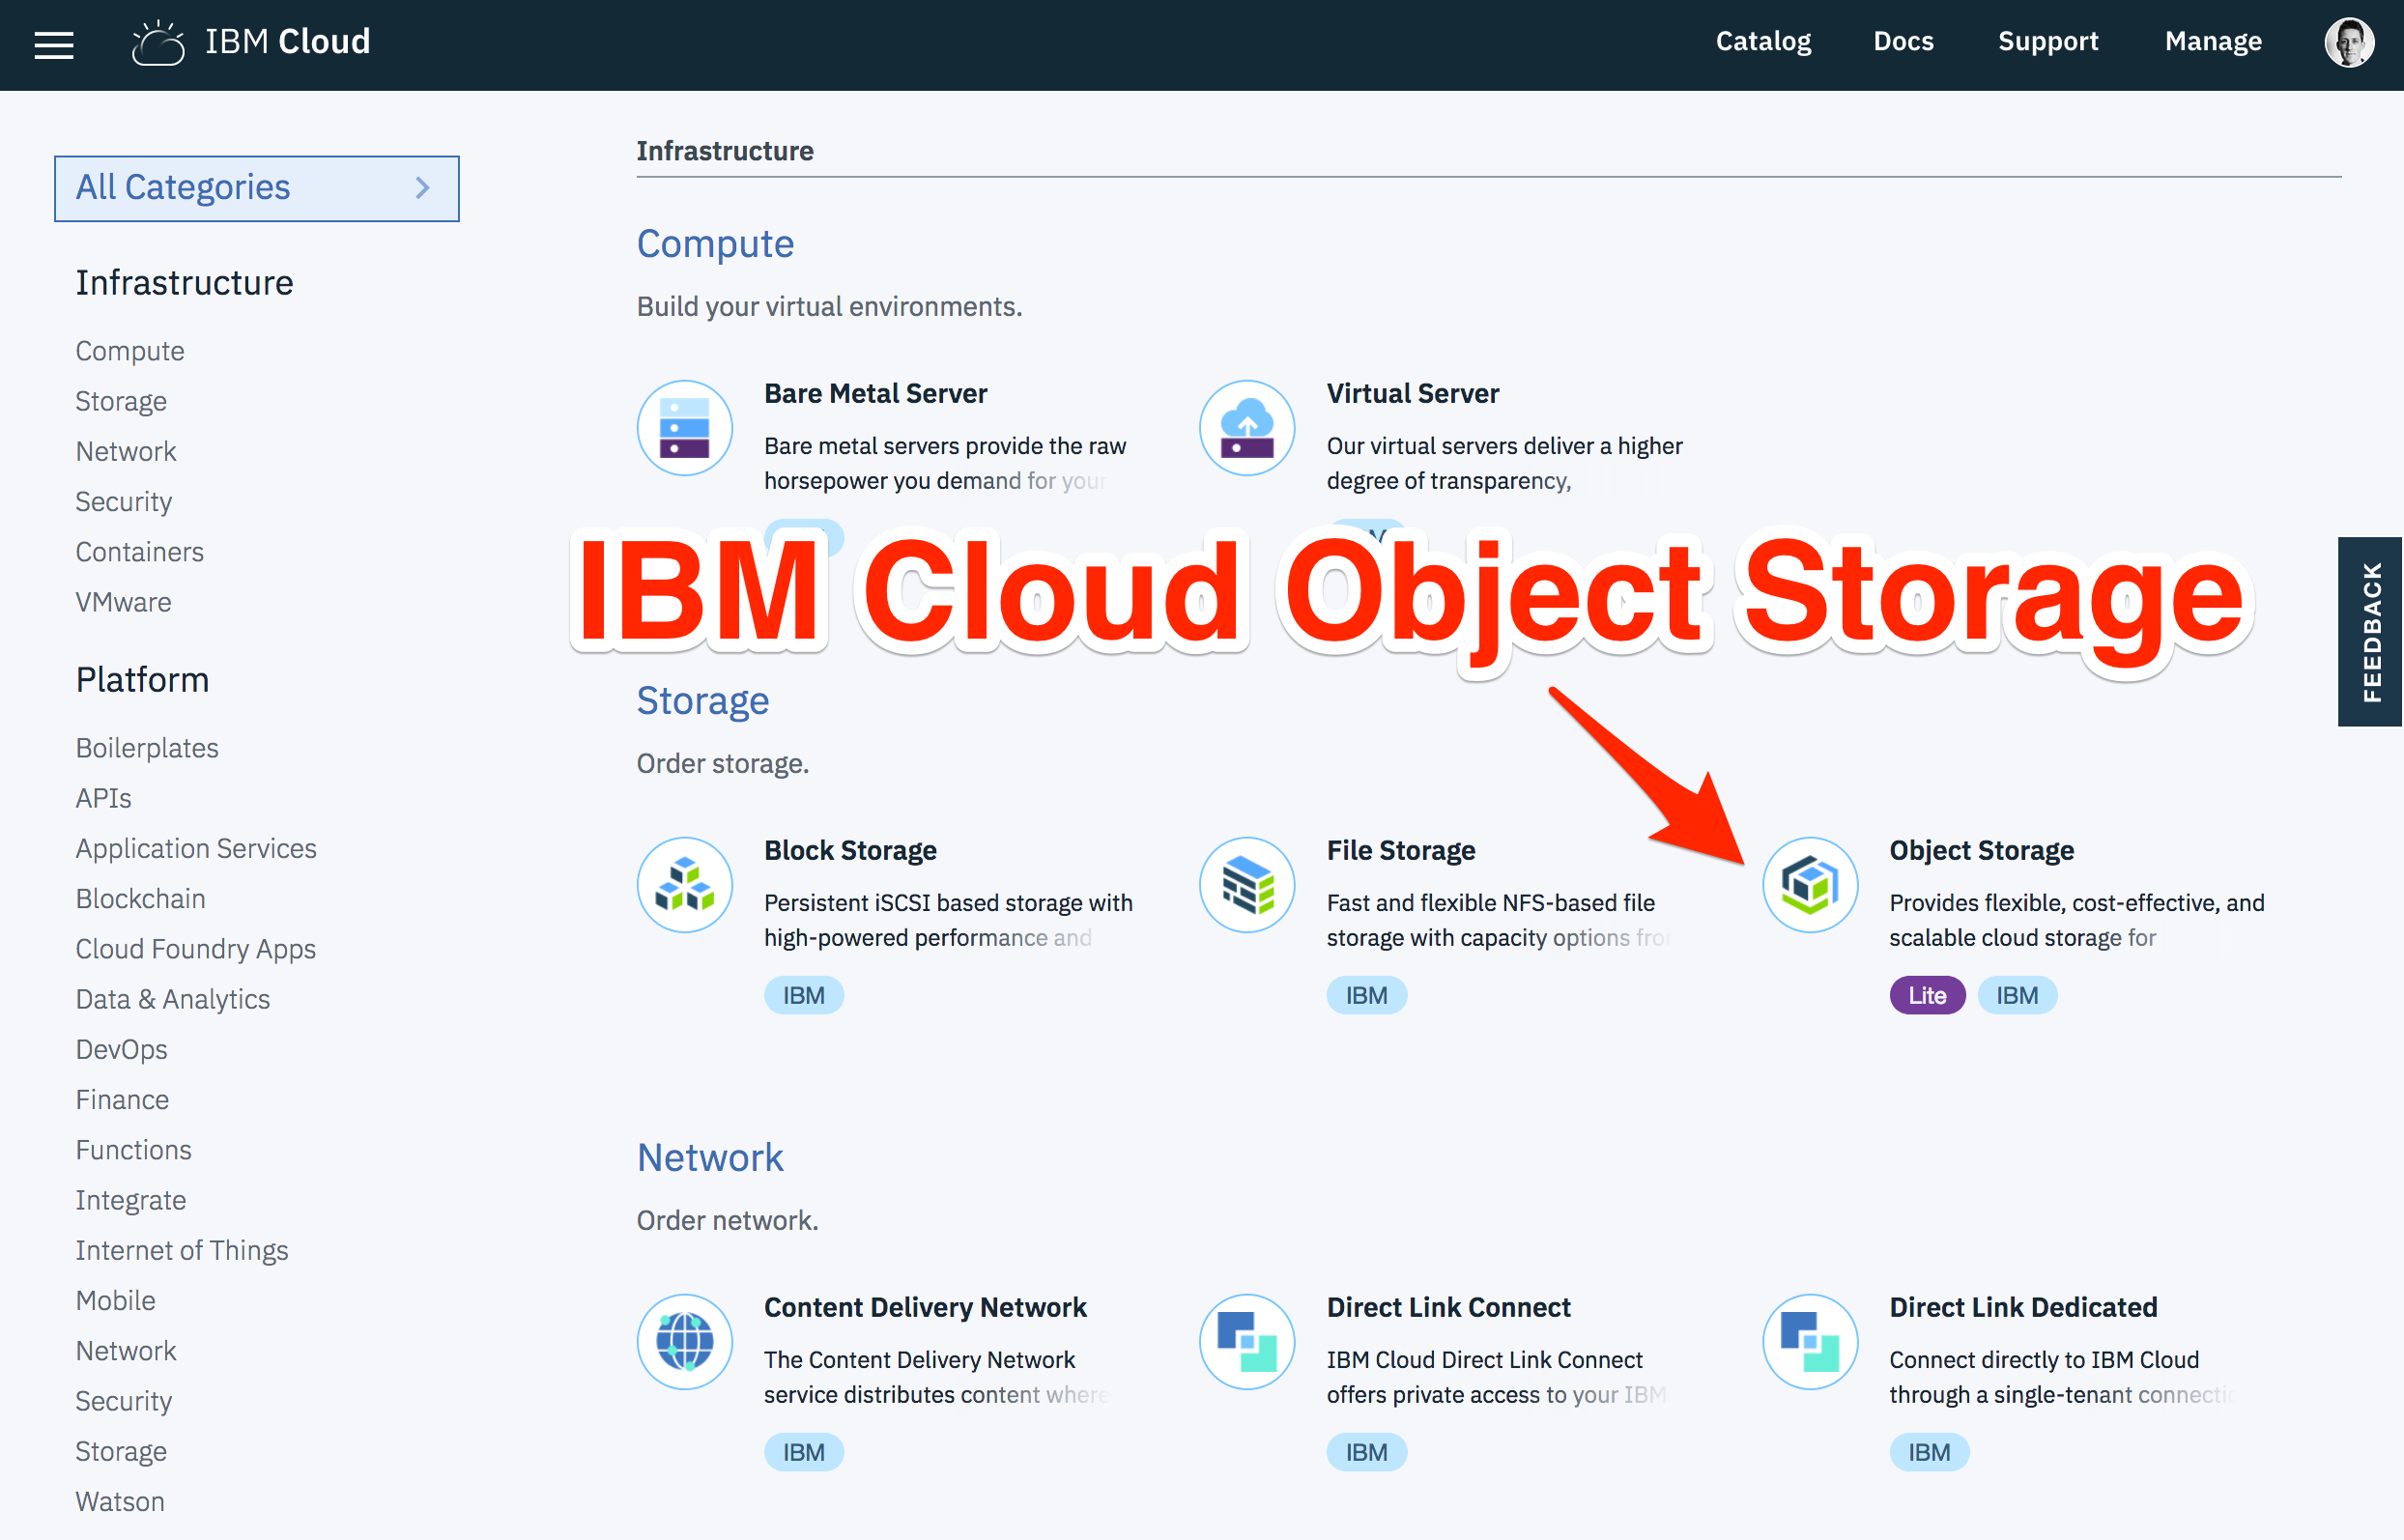
From the Service Details page, follow these instructions to provision a new instance.
- Give the service an identifying name.
- Leave the resource group as “default”.
- Click the “Create” button.
Once the service has been provisioned, it will be shown under the “Services” section of the IBM Cloud Dashboard. IBM Cloud Object Storage services are global services and not bound to individual regions.
- Click the service instance from the dashboard to visit the service management page.
Once the service has been provisioned, we need to create authentication credentials for external access…
Service Credentials
Service credentials for IBM Cloud Object Storage use IBM Cloud’s IAM service.
I’m just going to cover the basics of using IAM with Cloud Object Storage. Explaining all the concepts and capabilities of the IAM service would need a separate (and lengthy) blog post!
Auto-Binding Service Credentials
IBM Cloud Functions can automatically provision and bind service credentials to actions.
This feature is supported through the IBM Cloud CLI command: bx wsk service bind.
Bound service credentials are stored as default action parameters. Default parameters are automatically included as request parameters for each invocation.
Using this approach means users do not have to manually provision and manage service credentials. 👍
Service credentials provisioned in this manner use the following configuration options:
- IAM Role: Manager
- Optional Configuration Parameters: None.
If you need to use different configuration options, you will have to manually provision service credentials.
Manually Creating Credentials
- Select the “Service Credentials” menu item from the service management page.
- Click the “New credential” button.
Fill in the details for the new credentials.
-
Choose an identifying name for the credentials.
-
Select an access role. Access roles define which operations applications using these credentials can perform. Permissions for each role are listed in the documentation.
Note: If you want to make objects publicly accessible make sure you use the manager permission.
-
Leave the
Service IDunselected.
If you need HMAC service keys, which are necessary for generating presigned URLs, use the following inline configuration parameters before. Otherwise, leave this field blank.
{"HMAC": true}
- Click the “Add” button.
🔐 Credentials shown in this GIF were deleted after the demo (before you get any ideas…) 🔐
Once created, new service credentials will be shown in the credentials table.
IBM Cloud Object Storage API
Cloud Object Storage exposes a HTTP API for interacting with buckets and files.
This API implements the same interface as AWS S3 API.
Service credentials created above are used to authenticate requests to the API endpoints. Full details on the API operations are available in the documentation.
HTTP Endpoints
IBM Cloud Object Storage’s HTTP API is available through region-based endpoints.
When creating new buckets to store files, the data resiliency for the bucket (and therefore the files within it) is based upon the endpoint used for the bucket create operation.
Current endpoints are listed in the external documentation and available through an external API: https://cos-service.bluemix.net/endpoints
Choosing an endpoint
IBM Cloud Functions is available in the following regions: US-South, United Kingdom and Germany.
Accessing Cloud Object Storage using regional endpoints closest to the Cloud Functions application region will result in better application performance.
IBM Cloud Object Storage lists public and private endpoints for each region (and resiliency) choice. IBM Cloud Functions only supports access using public endpoints.
In the following examples, IBM Cloud Functions applications will be hosted in the US-South region. Using the US Regional endpoint for Cloud Object Storage will minimise network latency when using the service from IBM Cloud Functions.
This endpoint will be used in all our examples: s3-api.us-geo.objectstorage.softlayer.net
Client Libraries
Rather than manually creating HTTP requests to interact with the Cloud Object Storage API, client libraries are available.
IBM Cloud Object Storage publishes modified versions of the Node.js, Python and Java AWS S3 SDKs, enhanced with IBM Cloud specific features.
ibm-cos-sdk-js- https://github.com/IBM/ibm-cos-sdk-jsibm-cos-sdk-python- https://github.com/ibm/ibm-cos-sdk-pythonibm-cos-sdk-java- https://github.com/ibm/ibm-cos-sdk-java
Both the Node.js and Python COS libraries are pre-installed in the IBM Cloud Functions runtime environments for those languages. They can be used without bundling those dependencies in the deployment package.
We’re going to look at using the JavaScript client library from the Node.js runtime in IBM Cloud Functions.
JavaScript Client Library
When using the JavaScript client library for IBM Cloud Object Storage, endpoint and authentication credentials need to be passed as configuration parameters.
const COS = require('ibm-cos-sdk');

const config = {
    endpoint: '<endpoint>',
    apiKeyId: '<api-key>',
    serviceInstanceId: '<resource-instance-id>',
};

const cos = new COS.S3(config);
Hardcoding configuration values within source code is not recommended. IBM Cloud Functions allows default parameters to be bound to actions. Default parameters are automatically passed into action invocations within the event parameters.
Default parameters are recommended for managing application secrets for IBM Cloud Functions applications.
Having provisioned the storage service instance, learnt about service credentials, chosen an access endpoint and understood how to use the client library, there’s one final step before we can start to creating functions…
Creating Buckets
IBM Cloud Object Storage organises files into a flat hierarchy of named containers, called buckets. Buckets can be created through the command-line, using the API or the web console.
Let’s create a new bucket, to store all files for our serverless application, using the web console.
-
Open the “Buckets” page from the COS management page.
-
Click the “Create Bucket” link.
-
Create a bucket name. Bucket names must be unique across the entire platform, rather than just your account.
-
Select the following configuration options
- Resiliency:
Cross Region - Location:
us-geo - Storage class:
Standard
- Resiliency:
-
Click the “Create” button.
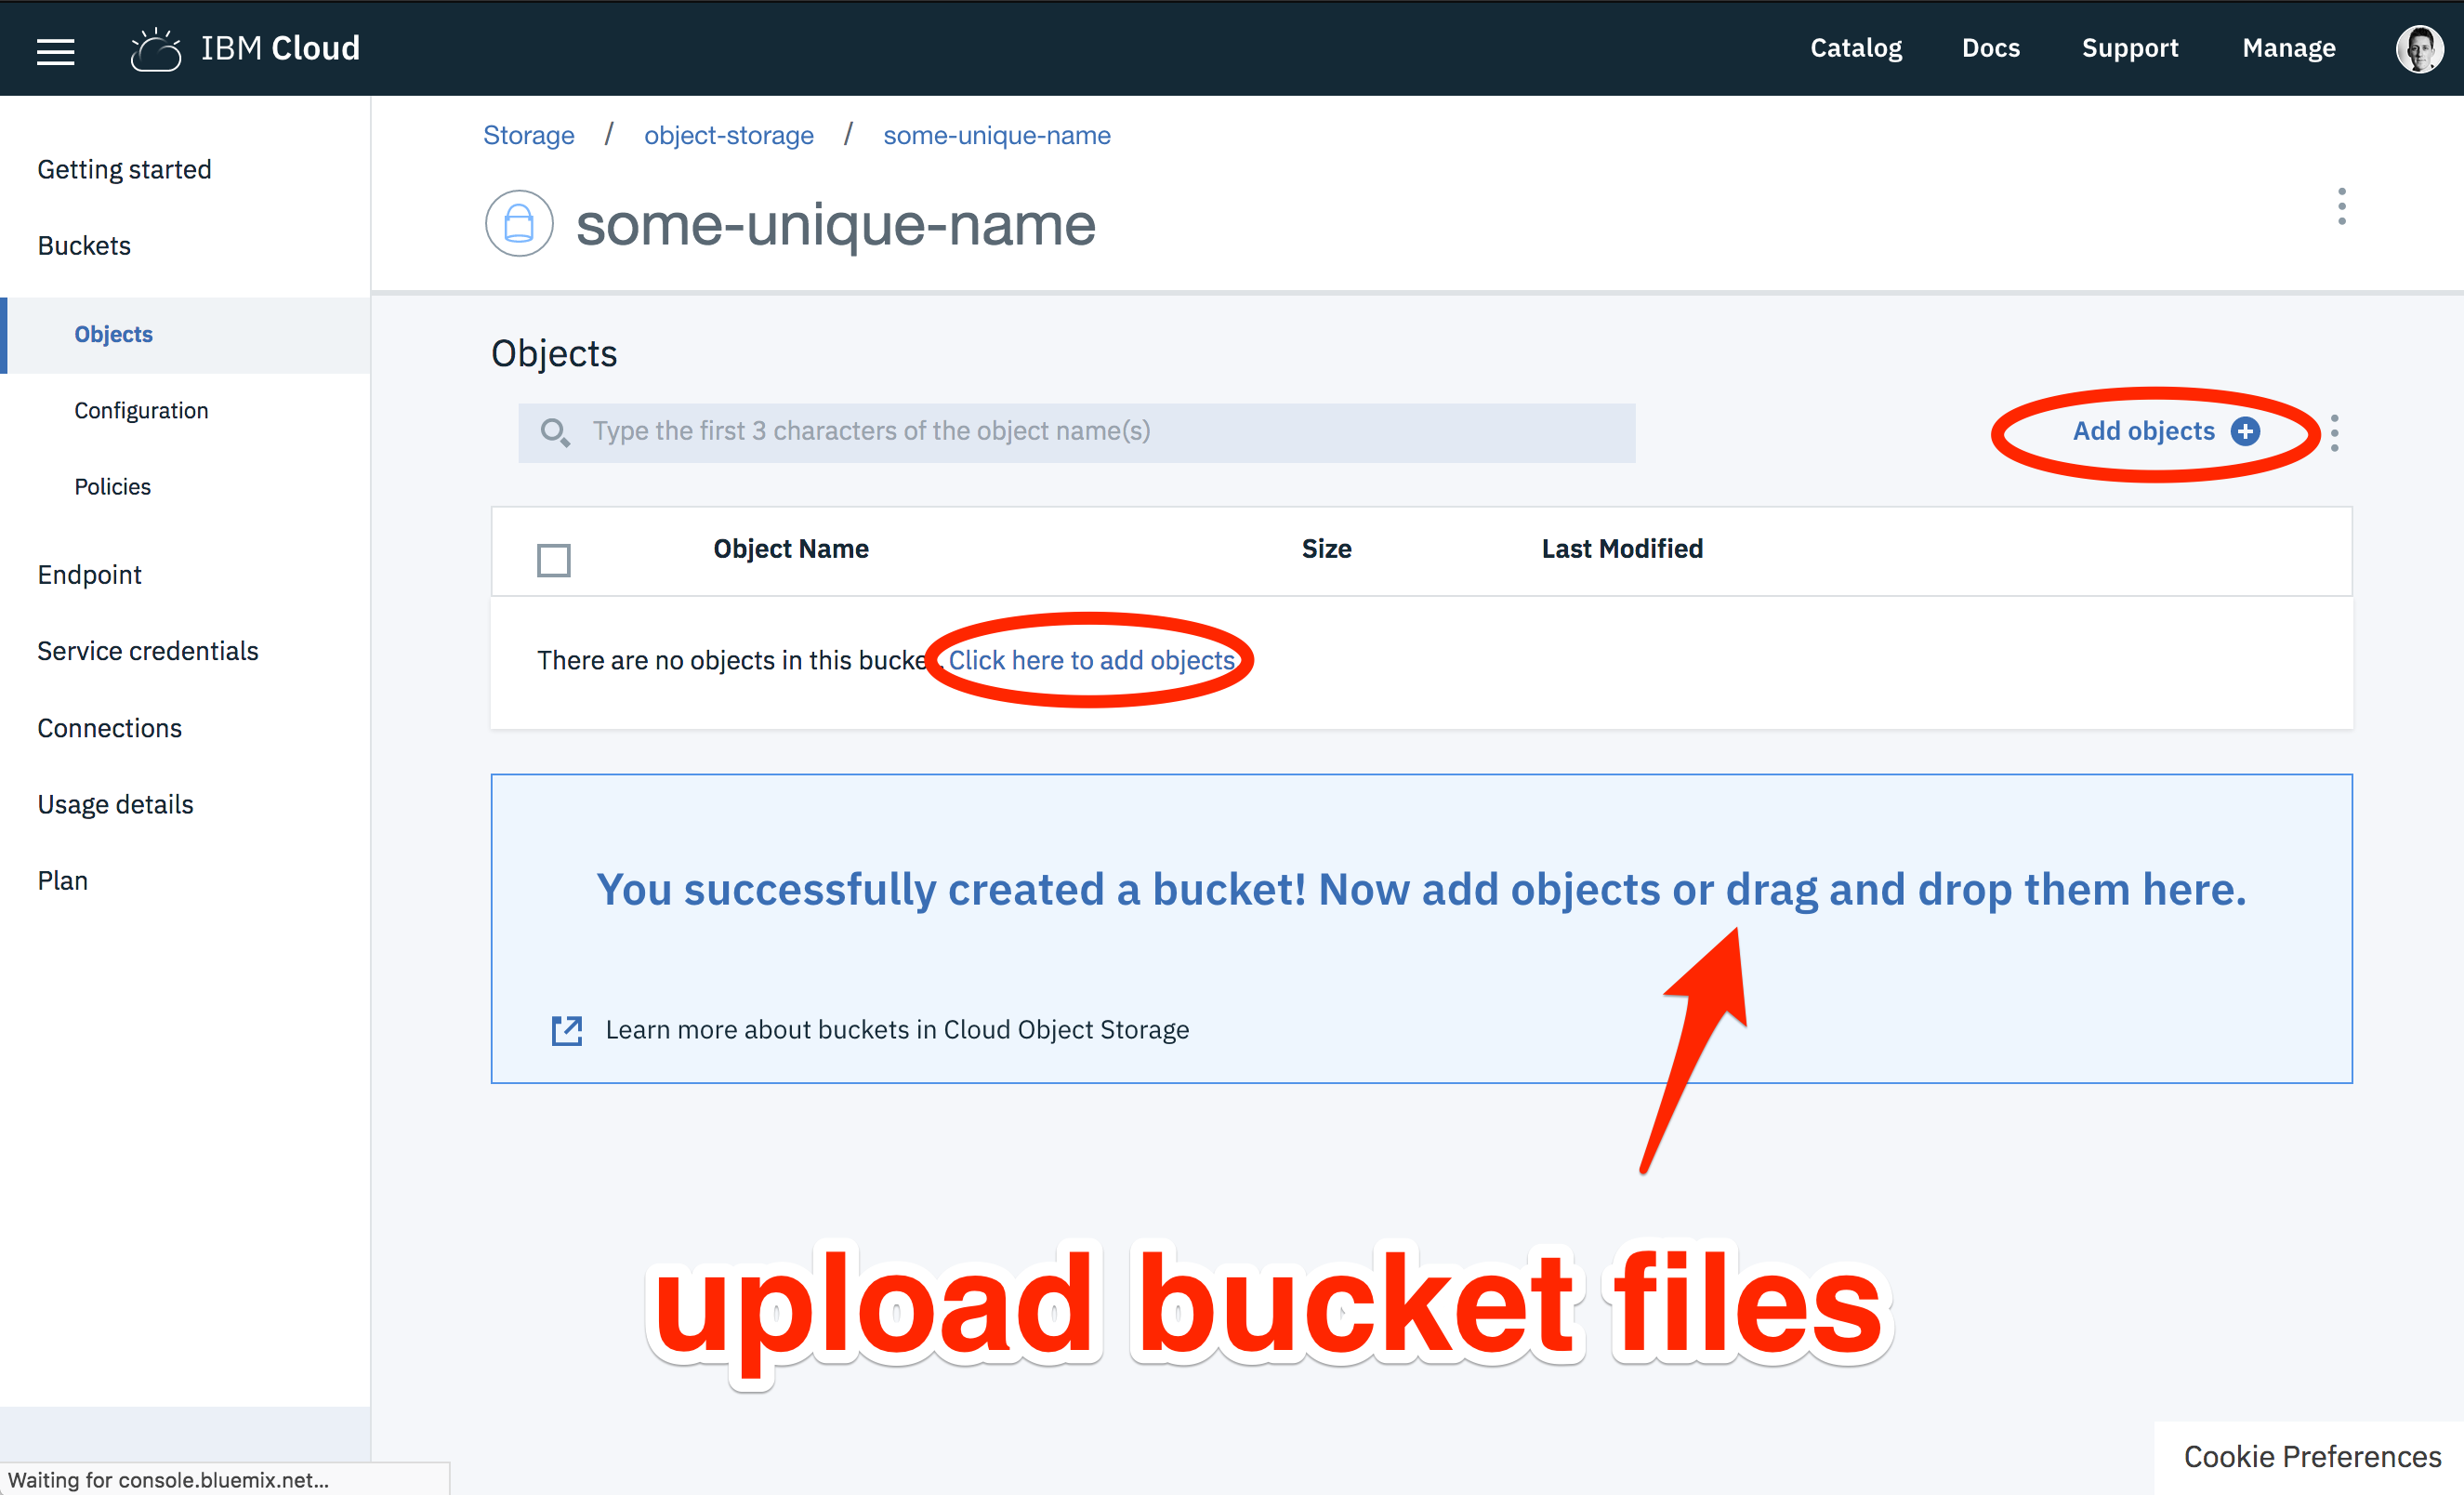
Once the bucket has been created, you will be taken back to the bucket management page.
Test Files
We need to put some test files in our new bucket. Download the following images files.
Using the bucket management page, upload these files to the new bucket.
Using Cloud Object Storage from Cloud Functions
Having created a storage bucket containing test files, we can start to develop our serverless application.
Let’s begin with a serverless function that returns a list of files within a bucket. Once this works, we will extend the application to support retrieving, removing and uploading files to a bucket. We can also show how to make objects publicly accessible and generate pre-signed URLs, allowing external clients to upload new content directly.
Separate IBM Cloud Functions actions will be created for each storage operation.
Managing Default Parameters
Serverless functions will need the bucket name, service endpoint and authentication parameters to access the object storage service. Configuration parameters will be bound to actions as default parameters.
Packages can be used to share configuration values across multiple actions. Actions created within a package inherit all default parameters stored on that package. This removes the need to manually configure the same default parameters for each action.
Let’s create a new package (serverless-files) for our serverless application.
$ bx wsk package create serverless-files
ok: created package serverless-files
Update the package with default parameters for the bucket name (bucket) and service endpoint (cos_endpoint).
$ bx wsk package update serverless-files -p bucket <MY_BUCKET_NAME> -p cos_endpoint s3-api.us-geo.objectstorage.softlayer.net
ok: updated package serverless-files
Did you notice we didn’t provide authentication credentials as default parameters?
Rather than manually adding these credentials, the CLI can automatically provision and bind them. Let’s do this now for the cloud-object-storage service…
- Bind service credentials to the
serverless-filespackage using thebx wsk service bindcommand.
$ bx wsk service bind cloud-object-storage serverless-files
Credentials 'cloud-fns-key' from 'cloud-object-storage' service instance 'object-storage' bound to 'serverless-files'.
- Retrieve package details to check default parameters contain expected configuration values.
$ bx wsk package get serverless-files
ok: got package serverless-files
{
    ...
    "parameters": [
        {
            "key": "bucket",
            "value": "<MY_BUCKET_NAME>"
        },
        {
            "key": "cos_endpoint",
            "value": "s3-api.us-geo.objectstorage.softlayer.net"
        },
        {
            "key": "__bx_creds",
            "value": {
                "cloud-object-storage": {
                    ...
                }
            }
        }
    ]
}
List Objects Within the Bucket
- Create a new file (
action.js) with the following contents.
const COS = require('ibm-cos-sdk')

function cos_client (params) {
  const bx_creds = params['__bx_creds']
  if (!bx_creds) throw new Error('Missing __bx_creds parameter.')

  const cos_creds = bx_creds['cloud-object-storage']
  if (!cos_creds) throw new Error('Missing cloud-object-storage parameter.')

  const endpoint = params['cos_endpoint']
  if (!endpoint) throw new Error('Missing cos_endpoint parameter.')

  const config = {
    endpoint: endpoint,
    apiKeyId: cos_creds.apikey,
    serviceInstanceId: cos_creds.resource_instance_id
  }

  return new COS.S3(config);
}

function list (params) {
  if (!params.bucket) throw new Error("Missing bucket parameter.")
  const client = cos_client(params)

  return client.listObjects({ Bucket: params.bucket }).promise()
    .then(results => ({ files: results.Contents }))
}
This action retrieves the bucket name, service endpoint and authentication credentials from invocation parameters. Errors are returned if those parameters are missing.
- Create a new package action from this source file with the following command.
$ bx wsk action create serverless-files/list-files actions.js --main list --kind nodejs:8
ok: created action list-files
The —main flag set the function name to call for each invocation. This defaults to main. Setting this to an explicit value allows us to use a single source file for multiple actions.
The —kind sets the action runtime. This optional flag ensures we use the Node.js 8 runtime rather than Node.js 6, which is the default for JavaScript actions. The IBM Cloud Object Storage client library is only included in the Node.js 8 runtime.
- Invoke the new action to verify it works.
$ bx wsk action invoke serverless-files/list-files -r
{
    "files": [
        { "Key": "jumping pug.jpg", ... },
        { "Key": "pug blanket.jpg", ... },
        { "Key": "swimming pug.jpg", ... }
    ]
}
The action response should contain a list of the files uploaded before. 💯💯💯
Retrieve Object Contents From Bucket
Let’s add another action for retrieving object contents from a bucket.
- Add a new function (
retrieve) to the existing source file (action.js) with the following source code.
function retrieve (params) {
  if (!params.bucket) throw new Error("Missing bucket parameter.")
  if (!params.name) throw new Error("Missing name parameter.")
  const client = cos_client(params)

  return client.getObject({ Bucket: params.bucket, Key: params.name }).promise()
    .then(result => ({ body: result.Body.toString('base64') }))
}
Retrieving files needs a file name in addition to the bucket name. File contents needs encoding as a Base64 string to support returning in the JSON response returned by IBM Cloud Functions.
- Create an additional action from this updated source file with the following command.
$ bx wsk action create serverless-files/retrieve-file actions.js --main retrieve --kind nodejs:8
ok: created action serverless-files/retrieve-file
- Invoke this action to test it works, passing the parameter name for the file to retrieve.
$ bx wsk action invoke serverless-files/retrieve-file -r -p name "jumping pug.jpg"
{
    "body": "<BASE64 ENCODED STRING>"
}
If this is successful, a (very long) response body containing a base64 encoded image should be returned. 👍
Delete Objects From Bucket
Let’s finish this section by adding a final action that removes objects from our bucket.
- Update the source file (
actions.js) with this additional function.
function remove (params) {
  if (!params.bucket) throw new Error("Missing bucket parameter.")
  if (!params.name) throw new Error("Missing name parameter.")
  const client = cos_client(params)

  return client.deleteObject({ Bucket: params.bucket, Key: params.name }).promise()
}
- Create a new action (
remove-file) from the updated source file.
$ bx wsk action create serverless-files/remove-file actions.js --main remove --kind nodejs:8
ok: created action serverless-files/remove-file
- Test this new action using it to remove a file from the bucket.
$ bx wsk action invoke serverless-files/remove-file -r -p name "jumping pug.jpg"
{}
- Listing bucket files should now return two files, rather than three.
$ bx wsk action invoke serverless-files/list-files -r
{
    "files": [
        { "Key": "pug blanket.jpg", ... },
        { "Key": "swimming pug.jpg", ... }
    ]
}
Listing, retrieving and removing files using the client library is relatively simple. Functions just need to call the correct method passing the bucket and object name.
Let’s move onto a more advanced example, creating new files in the bucket from our action…
Create New Objects Within Bucket
File content will be passed into our action as Base64 encoded strings. JSON does not support binary data.
When creating new objects, we should set the MIME type. This is necessary for public access from web browsers, something we’ll be doing later on. Node.js libraries can calculate the correct MIME type value, rather than requiring this as an invocation parameter.
- Update the source file (
action.js) with the following additional code.
const mime = require('mime-types');

function upload (params) {
  if (!params.bucket) throw new Error("Missing bucket parameter.")
  if (!params.name) throw new Error("Missing name parameter.")
  if (!params.body) throw new Error("Missing object parameter.")

  const client = cos_client(params)
  const body = Buffer.from(params.body, 'base64')

  const ContentType = mime.contentType(params.name) || 'application/octet-stream'
  const object = {
    Bucket: params.bucket,
    Key: params.name,
    Body: body,
    ContentType
  }

  return client.upload(object).promise()
}

exports.upload = upload;
As this code uses an external NPM library, we need to create the action from a zip file containing source files and external dependencies.
- Create a
package.jsonfile with the following contents.
{
  "name": "upload-files",
  "main": "actions.js",
  "dependencies": {
    "mime-types": "^2.1.18"
  }
}
- Install external libraries in local environment.
$ npm install
added 2 packages in 0.804s
- Bundle source file and dependencies into zip file.
$ zip -r upload.zip package.json actions.js node_modules
  adding: actions.js (deflated 72%)
  adding: node_modules/ (stored 0%)
  ...
- Create a new action from the zip file.
$ bx wsk action create serverless-files/upload-file upload.zip --main upload --kind nodejs:8
ok: created action serverless-files/upload-file
- Create the Base64-encoded string used to pass the new file’s content.
$ wget http://www.pugnow.com/wp-content/uploads/2016/04/fly-pug-300x300.jpg
$ base64 fly-pug-300x300.jpg > body.txt
- Invoke the action with the file name and content as parameters.
$ bx wsk action invoke serverless-files/upload-file -r -p body $(cat body.txt) -p name "flying pug.jpg"
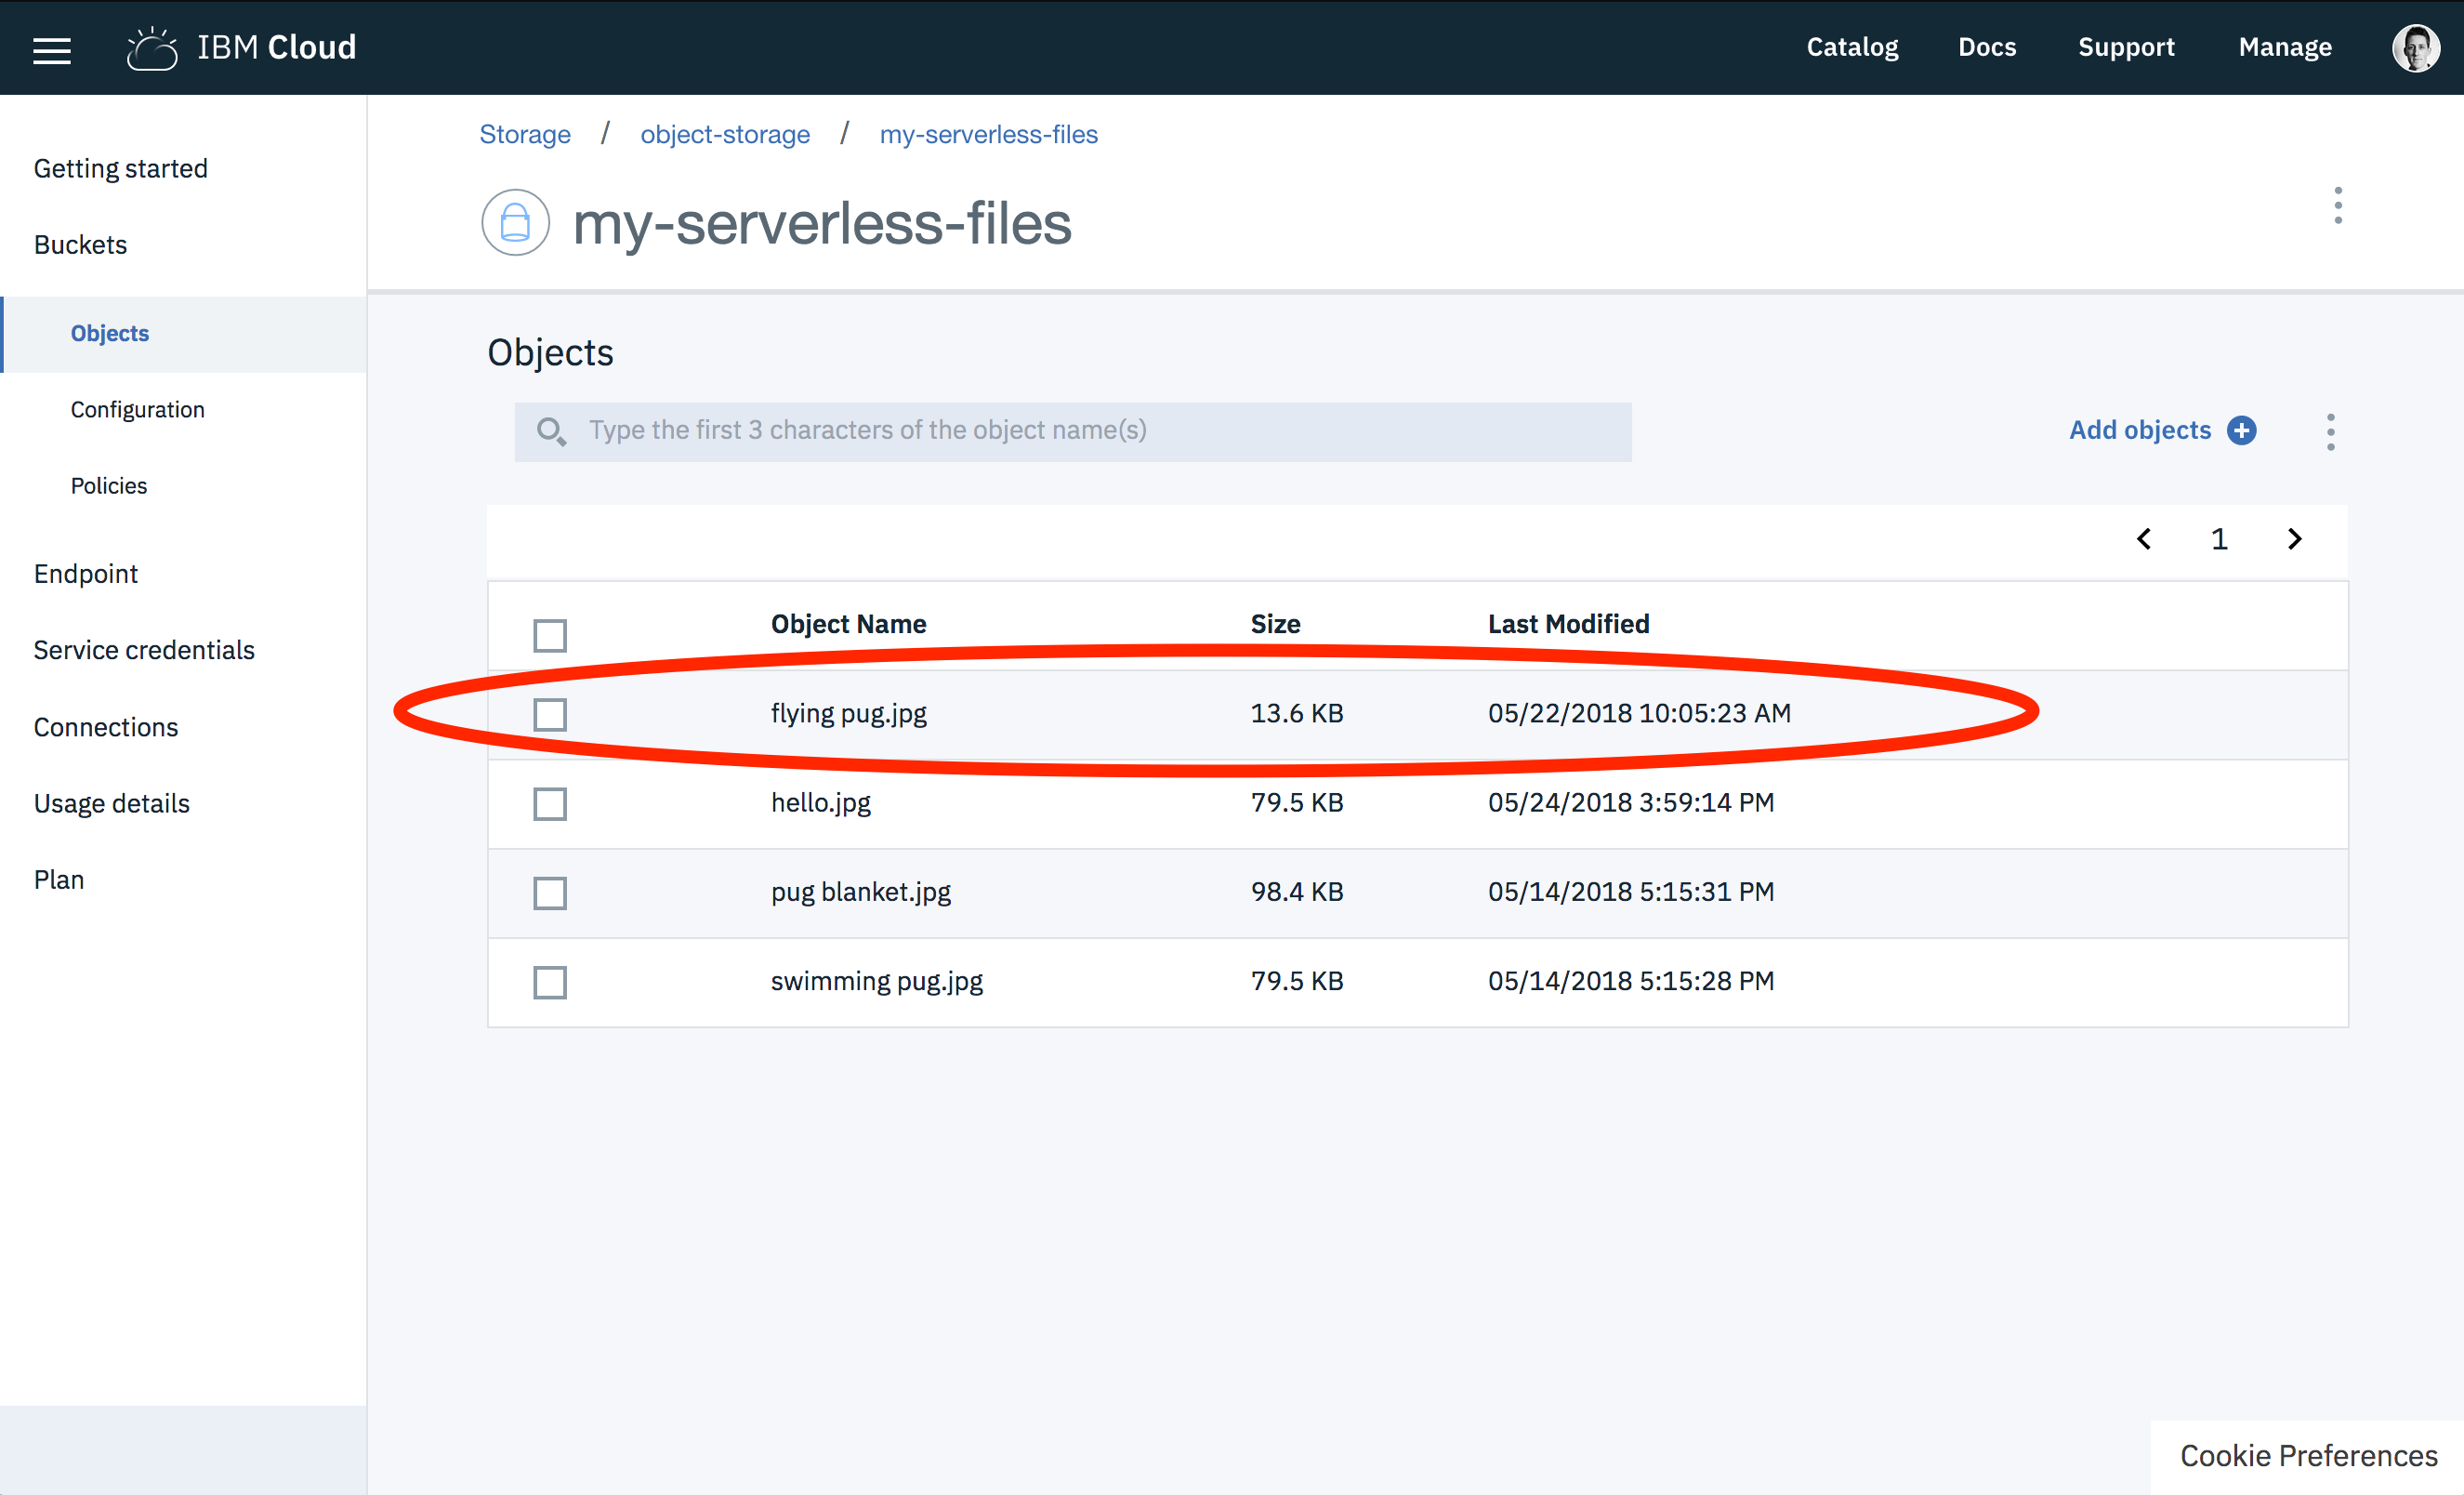
Object details should be returned if the file was uploaded correctly.
{
    "Bucket": "my-serverless-files",
    "ETag": "\"b2ae0fb61dc827c03d6920dfae58e2ba\"",
    "Key": "flying pug.jpg",
    "Location": "https://<MY_BUCKET_NAME>.s3-api.us-geo.objectstorage.softlayer.net/flying%20pug.jpg",
    "key": "flying pug.jpg"
}
Accessing the object storage dashboard shows the new object in the bucket, with the correct file name and size.
Having actions to create, delete and access objects within a bucket, what’s left to do? 🤔
Expose Public Objects From Buckets
Users can also choose to make certain objects within a bucket public. Public objects can be retrieved, using the external HTTP API, without any further authentication.
Public file access allows external clients to access files directly. It removes the need to invoke (and pay for) a serverless function to serve content. This is useful for serving static assets and media files.
Objects have an explicit property (x-amz-acl) which controls access rights. Files default to having this value set as private, meaning all operations require authentication. Setting this value to public-read will enable GET operations without authentication.
Files can be created with an explicit ACL property using credentials with the Writer or Manager role. Modifying ACL values for existing files is only supported using credentials with the Manager role.
- Add the following source code to the existing actions file (
action.js).
function make_public (params) {
  return update_acl(params, 'public-read')
}

function make_private (params) {
  return update_acl(params, 'private')
}

function update_acl (params, acl) => {
  if (!params.bucket) throw new Error("Missing bucket parameter.")
  if (!params.name) throw new Error("Missing name parameter.")
  const client = cos_client(params)

  const options = {
    Bucket: params.bucket,
    Key: params.name,
    ACL: acl
  }

  return client.putObjectAcl(options).promise()
}
- Create two new actions with the update source file.
$ bx wsk action create serverless-files/make-public actions.js --main make_public --kind nodejs:8
ok: created action serverless-files/make-public
$ bx wsk action create serverless-files/make-private actions.js --main make_private --kind nodejs:8
ok: created action serverless-files/make-private
Bucket objects use the following URL scheme: https://<BUCKET_NAME>.<ENDPOINT_HOST>/<OBJECT_NAME>
We have been using the following endpoint hostname: s3-api.us-geo.objectstorage.softlayer.net.
- Checking the status code returned when accessing an existing object confirms it defaults to private.
$ curl -I https://<BUCKET_NAME>.s3-api.us-geo.objectstorage.softlayer.net/flying%20pug.jpg
HTTP/1.1 403 Forbidden
...
- Invoke the
make-publicaction to allow GET requests without authentication.
$ bx wsk action invoke serverless-files/make-public -r -p name "flying pug.jpg"
- Retry file access using the external HTTP API. This time a
200response is returned with the content.
$ curl -I https://<BUCKET_NAME>.s3-api.us-geo.objectstorage.softlayer.net/flying%20pug.jpg
HTTP/1.1 200 OK
Content-Type: image/jpeg
...
Having set an explicit content type for the file, opening this URL in a web browser will show the image.

- Disable public access using the other new action.
bx wsk action invoke serverless-files/make-private -r -p name "flying pug.jpg"
- Re-issue the
curlrequest to the file location.
$ curl -I https://<BUCKET_NAME>.s3-api.us-geo.objectstorage.softlayer.net/flying%20pug.jpg
HTTP/1.1 403 Forbidden
...
HTTP requests to this file now return a 403 status. Authentication is required again. 🔑
In addition to allowing public read access we can go even further in allowing clients to interact with buckets…
Provide Direct Upload Access To Buckets
Cloud Object Storage provides a mechanism (presigned URLs) to generate temporary links that allow clients to interact with buckets without further authentication. Passing these links to clients means they can access to private objects or upload new files to buckets. Presigned URLs expire after a configurable time period.
Generating presigned URLs is only supported from HMAC authentication keys.
HMAC service credentials must be manually provisioned, rather than using the bx wsk service bind command. See above for instructions on how to do this.
- Save provisioned HMAC keys into a file called
credentials.json.
Let’s create an action that returns presigned URLs, allowing users to upload files directly. Users will call the action with a new file name. Returned URLs will support an unauthenticated PUT request for the next five minutes.
- Create a new file called
presign.js
'use strict';

const COS = require('ibm-cos-sdk');
const mime = require('mime-types');

function cos_client (params) {
  const creds = params.cos_hmac_keys
  if (!creds) throw new Error('Missing cos_hmac_keys parameter.')

  const endpoint = params.cos_endpoint
  if (!endpoint) throw new Error('Missing cos_endpoint parameter.')

  const config = {
    endpoint: endpoint,
    accessKeyId: creds.access_key_id,
    secretAccessKey: creds.secret_access_key
  }

  return new COS.S3(config);
}

function presign (params) {
  if (!params.bucket) throw new Error("Missing bucket parameter.")
  if (!params.name) throw new Error("Missing name parameter.")

  const client = cos_client(params)

  const options = {
    Bucket: params.bucket,
    Key: params.name,
    Expires: 300,
    ContentType: mime.contentType(params.name) || 'application/octet-stream'
  }

  return { url: client.getSignedUrl('putObject', options) }
}

exports.presign = presign;
- Update the
package.jsonfile with the following contents.
{
  "name": "presign",
  "main": "presign.js",
  "dependencies": {
    "mime-types": "^2.1.18"
  }
}
- Bundle source file and dependencies into zip file.
$ zip -r presign.zip package.json presign.js node_modules
  adding: actions.js (deflated 72%)
  adding: node_modules/ (stored 0%)
  ...
- Create a new action from the zip file.
$ bx wsk action create serverless-files/presign presign.zip --main presign --kind nodejs:8 -P credentials.json
ok: created action serverless-files/presign
- Invoke the action to return a presigned URL for a new file.
$ bx wsk action invoke serverless-files/presign -r -p name pug.jpg
{
    "url": "https://<BUCKET>.s3-api.us-geo.objectstorage.softlayer.net/pug.jpg?AWSAccessKeyId=<SECRET>&Content-Type=image%2Fjpeg&Expires=<TIME>&Signature=<KEY>"
}
Using this URL we can upload a new image without providing authentication credentials.
- This curl command
—upload-filewill send a HTTP PUT, with image file as request body, to that URL.
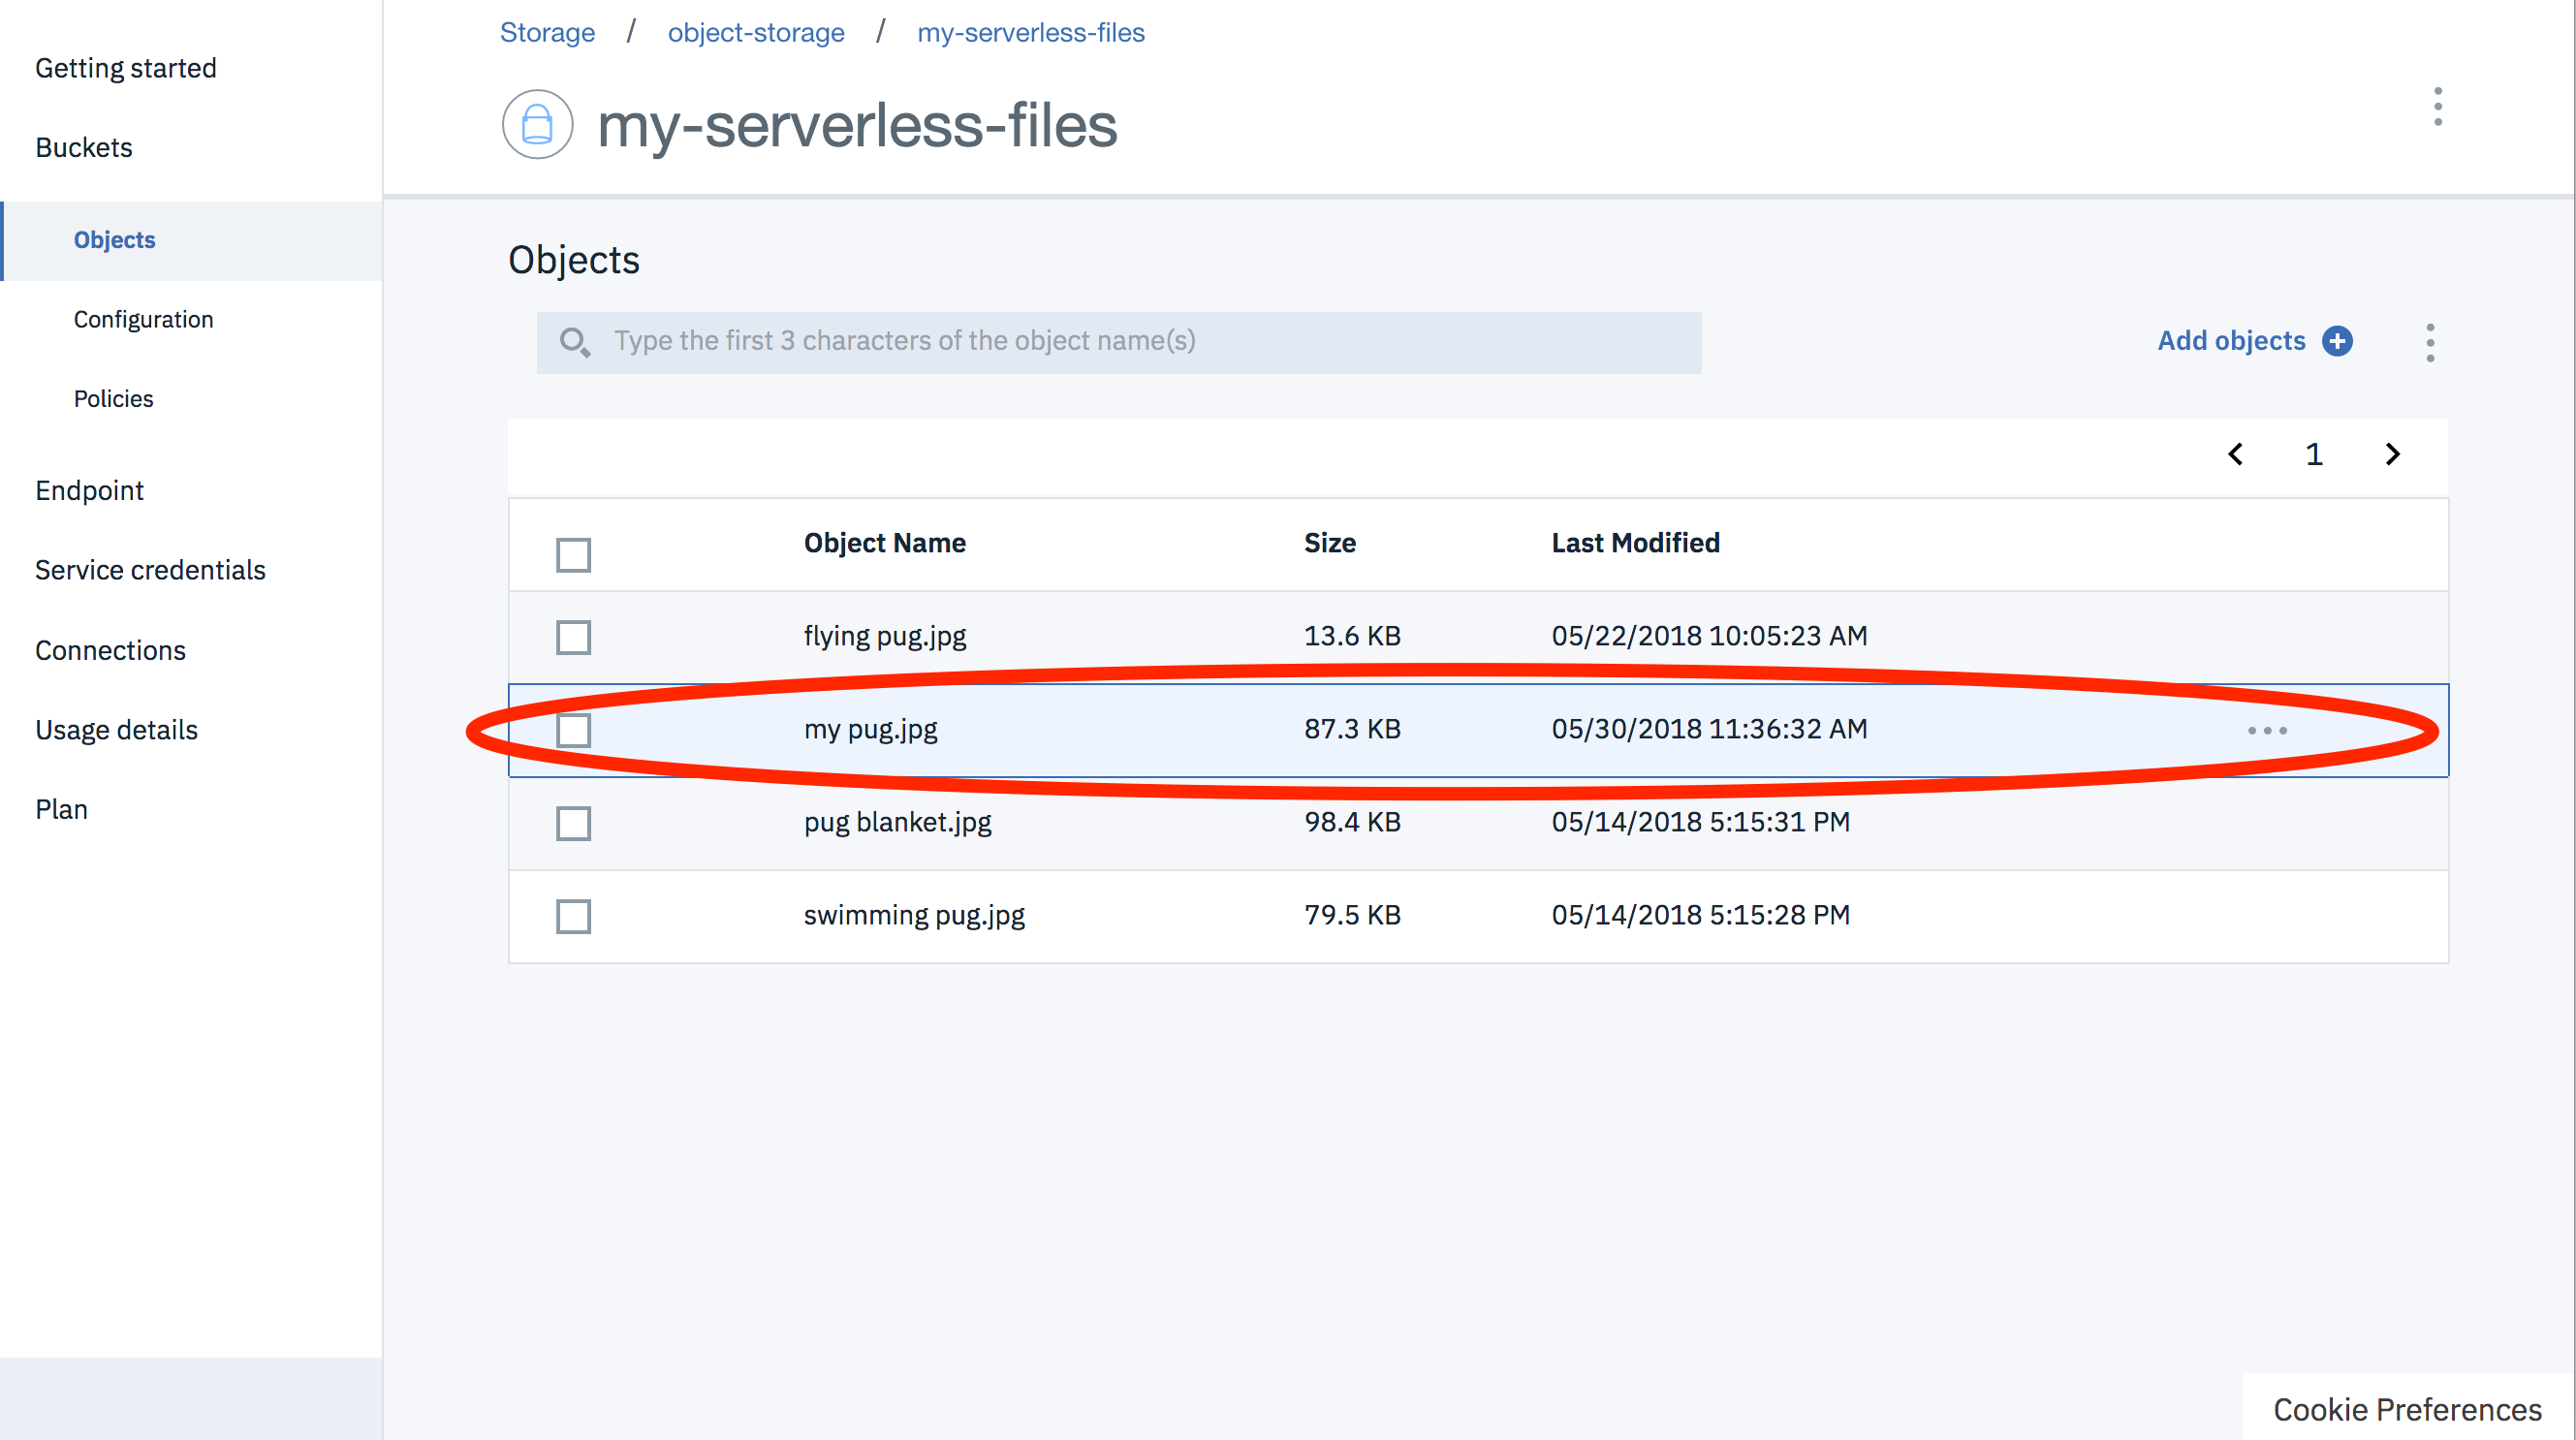
$ curl --upload-file "my pug.jpg" <URL> --header "Content-Type: image/jpeg"
The HTTP request must include the correct “Content-Type” header. Use the value provided when creating the presigned URL. If these values do not match, the request will be rejected.
Exploring the objects in our bucket confirms we have uploaded a file! 🕺💃
Presigned URLs are a brilliant feature of Cloud Object Storage. Allowing users to upload files directly overcomes the payload limit for cloud functions. It also reduces the cost for uploading files, removing the cloud functions’ invocation cost.
conclusion
Object storage services are the solution for managing files with serverless applications.
IBM Cloud provides both a serverless runtime (IBM Cloud Functions) and an object storage service (IBM Cloud Object Store). In this blog post, we looked at how integrate these services to provide a file storage solution for serverless applications.
We showed you how to provision new COS services, create and manage authentication credentials, access files using a client library and even allow external clients to interact directly with buckets. Sample serverless functions using the Node.js runtime were also provided.
Do you have any questions, comments or issues about the content above? Please leave a comment below, find me on the openwhisk slack or send me a tweet.