
As a developer advocate, I spend a lot of time at developer conferences (talking about serverless 😎). Upon returning from each trip, I need to compile a “trip report” on the event for my bosses. This helps demonstrate the value in attending events and that I’m not just accruing air miles and hotel points for fun… 🛫🏨
I always include any social media content people post about my talks in the trip report. This is usually tweets with photos of me on stage. If people are tweeting about your session, I assume they enjoyed it and wanted to share with their followers.
"Servers kill your productivity" @thomasj at #CodeMobileUK pic.twitter.com/Y4NsiBBSxT
— Mihai Cîrlănaru (@MCirlanaru) April 3, 2018
Finding tweets with photos about your talk from attendees is surprisingly challenging.
Attendees often forget to include your twitter username in their tweets. This means the only way to find those photos is to manually scroll through all the results from the conference hashtag. This is problematic at conferences with thousands of attendees all tweeting during the event. #devrelproblems.
Having become bored of manually trawling through all the tweets for each conference, I had a thought…
“Can’t I write some code to do this for me?"
This didn’t seem like too ridiculous an idea. Twitter has an API, which would allow me to retrieve all tweets for a conference hashtag. Once I had all the tweet photos, couldn’t I run some magic AI algorithm over the images to tell me if I was in them? 🤔
After a couple of weeks of hacking around (and overcoming numerous challenges) I had (to my own amazement) managed to build a serverless application which can find unlabelled photos of a person on twitter using machine learning with TensorFlow.js.

If you just want to try this application yourself, follow the instructions in the Github repo: https://github.com/jthomas/findme
architecture
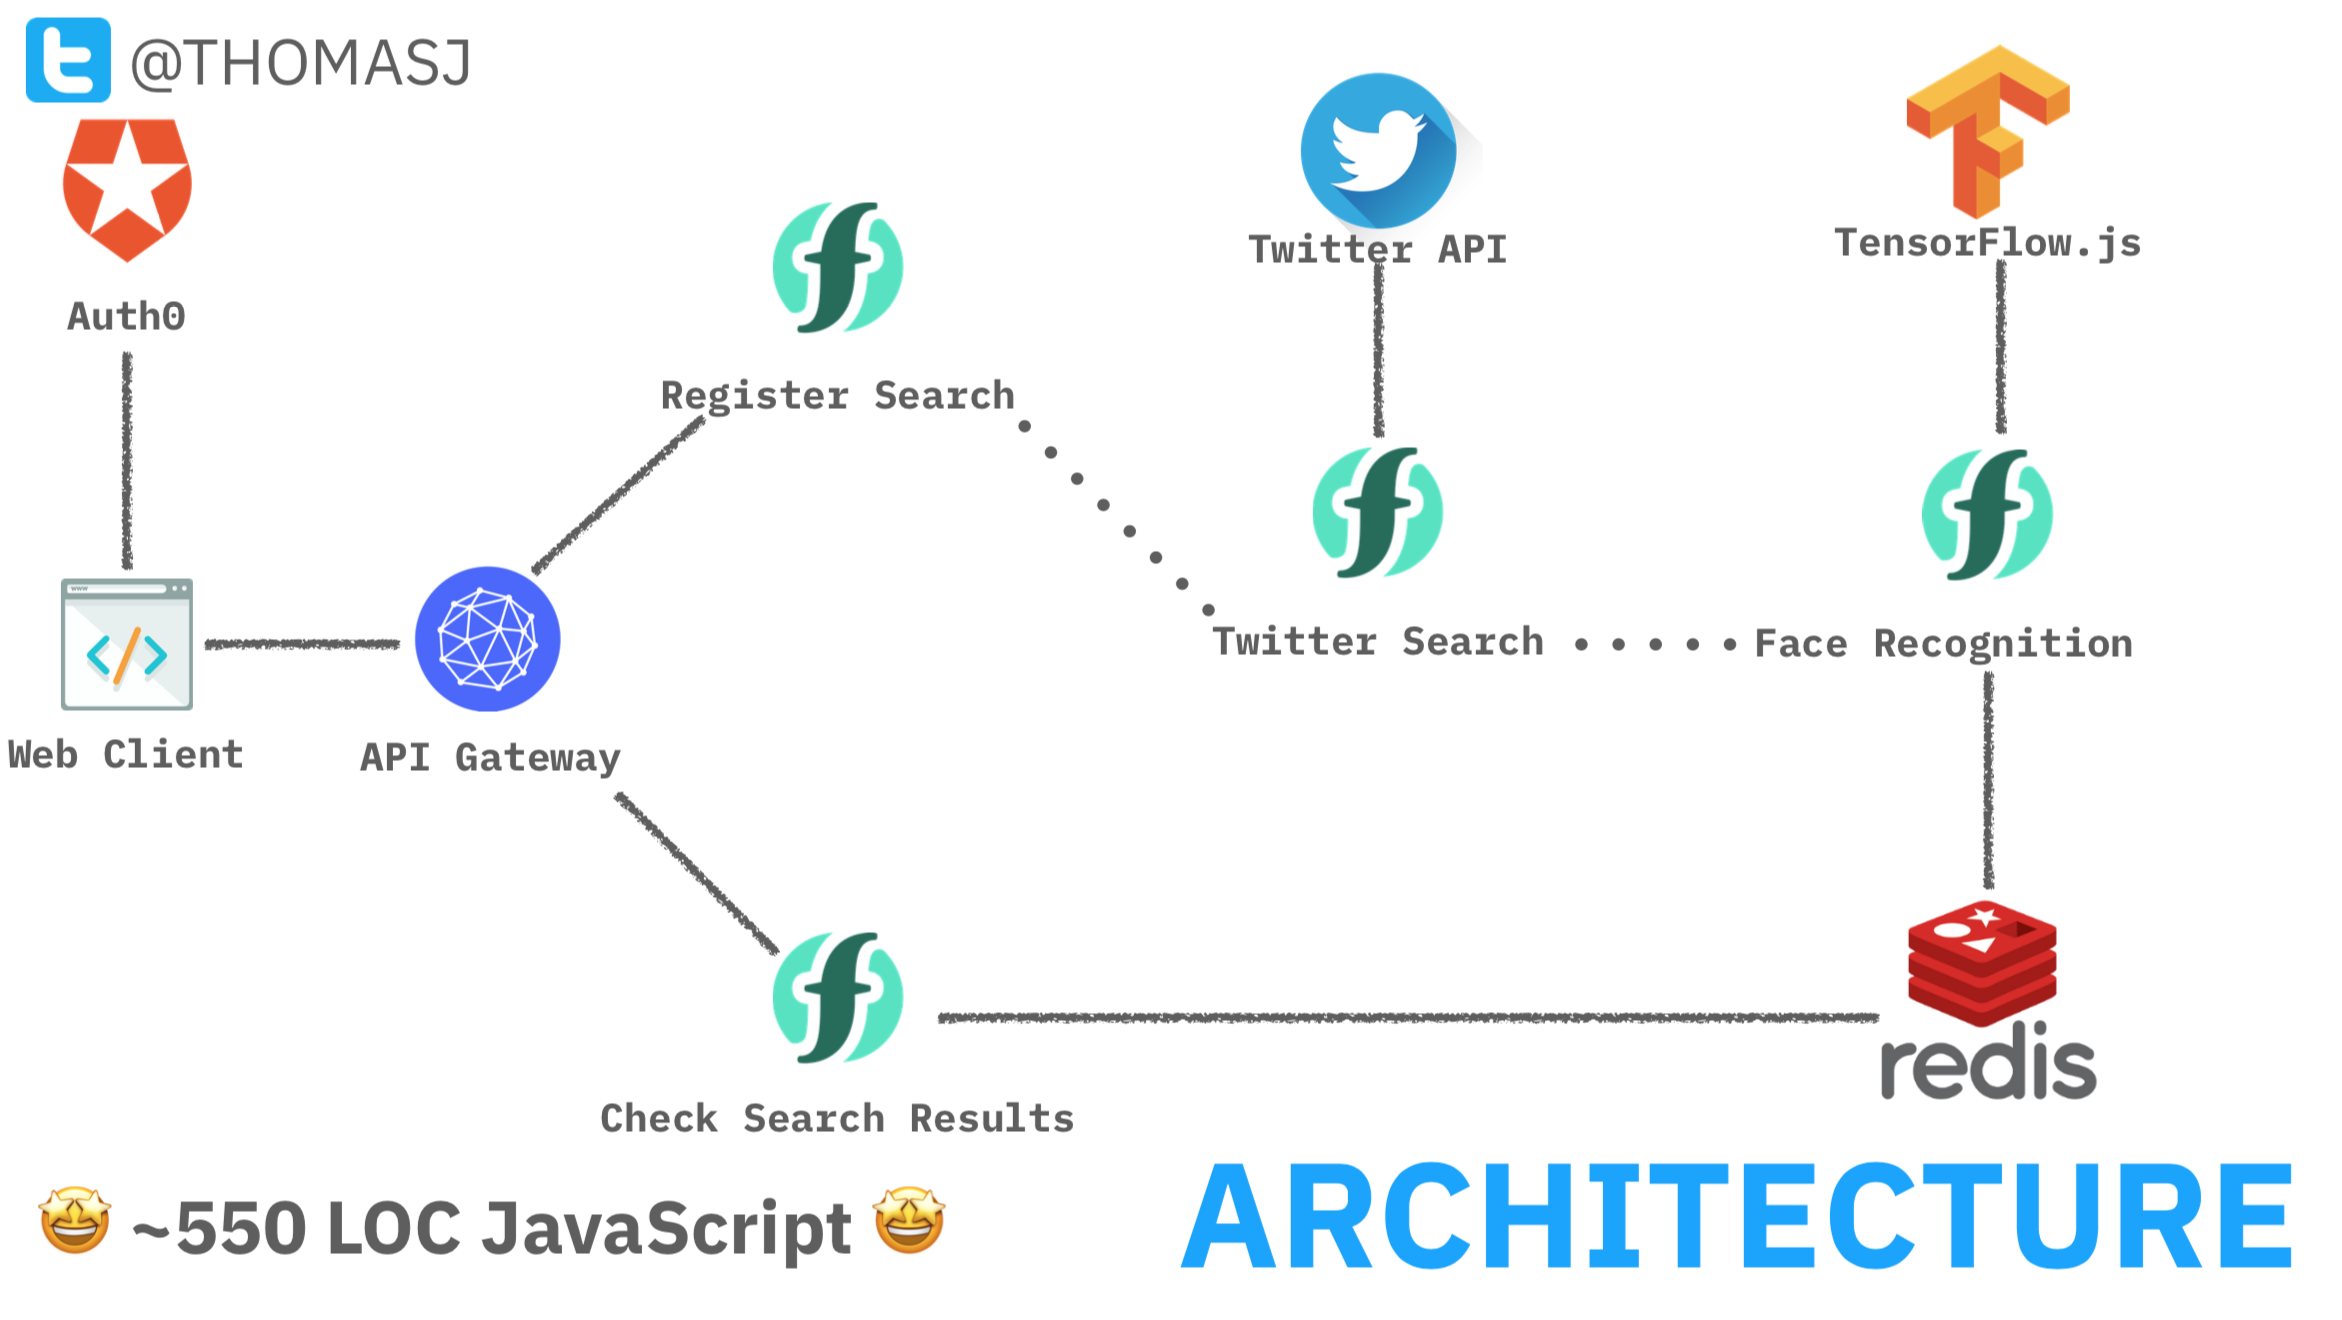
This application has four serverless functions (two API handlers and two backend services) and a client-side application from a static web page. Users log into the client-side application using Auth0 with their Twitter account. This provides the backend application with the user’s profile image and Twitter API credentials.
When the user invokes a search query, the client-side application invokes the API endpoint for the register_search function with the query terms and twitter credentials. This function registers a new search job in Redis and fires a new search_request trigger event with the query and job id. This job identifier is returned to the client to poll for real-time status updates.
The twitter_search function is connected to the search_request trigger and invoked for each event. It uses the Twitter Search API to retrieve all tweets for the search terms. If tweets retrieved from the API contain photos, those tweet ids (with photo urls) are fired as new tweet_image trigger events.
The compare_images function is connected to the tweet_image trigger. When invoked, it downloads the user’s twitter profile image along with the tweet image and runs face detection against both images, using the face-api.js library. If any faces in the tweet photo match the face in the user’s profile image, tweet ids are written to Redis before exiting.
The client-side web page polls for real-time search results by polling the API endpoint for the search_status function with the search job id. Tweets with matching faces are displayed on the web page using the Twitter JS library.
challenges
Since I had found an NPM library to handle face detection, I could just use this on a serverless platform by including the library within the zip file used to create my serverless application? Sounds easy, right?!
ahem - not so faas-t…. ✋
As discussed in previous blog posts, there are numerous challenges in using TF.js-based libraries on serverless platforms. Starting with making the packages available in the runtime and loading model files to converting images for classification, these libraries are not like using normal NPM modules.
Here are the main challenges I had to overcome to make this serverless application work…
using tf.js libraries on a serverless platform
The Node.js backend drivers for TensorFlow.js use a native shared C++ library (libtensorflow.so) to execute models on the CPU or GPU. This native dependency is compiled for the platform during the npm install process. The shared library file is around 142MB, which is too large to include in the deployment package for most serverless platforms.
Normal workarounds for this issue store large dependencies in an object store. These files are dynamically retrieved during cold starts and stored in the runtime filesystem, as shown in this pseudo-code. This workaround does add an additional delay to cold start invocations.
let cold_start = false

const library = 'libtensorflow.so'

if (cold_start) {
  const data = from_object_store(library)
  write_to_fs(library, data)
  cold_start = true
}

// rest of function code…
Fortunately, I had a better solution using Apache OpenWhisk’s support for custom Docker runtimes!
This feature allows serverless applications to use custom Docker images as the runtime environment. Creating custom images with large libraries pre-installed means they can be excluded from deployment packages. 💯
Apache OpenWhisk publishes all existing runtime images on Docker Hub. Using existing runtime images as base images means Dockerfiles for custom runtimes are minimal. Here’s the Dockerfile needed to build a custom runtime with the TensorFlow.js Node.js backend drivers pre-installed.
FROM openwhisk/action-nodejs-v8:latest

RUN npm install @tensorflow/tfjs-node
Once this image has been built and published on Dockerhub, you can use it when creating new functions.
I used this approach to build a custom TensorFlow.js runtime which is available on Docker Hub: jamesthomas/action-nodejs-v8:tfjs-faceapi
OpenWhisk actions created using the wsk command-line use a configuration flag (--docker) to specify custom runtime images.
wsk action create classify source.js --docker jamesthomas/action-nodejs-v8:tfjs-faceapi
The OpenWhisk provider plugin for The Serverless Framework also supports custom runtime images through a configuration parameter (image) under the function configuration.
service: machine-learning

provider:
  name: openwhisk

functions:
  classify:
    handler: source.main
    image: jamesthomas/action-nodejs-v8:tfjs-faceapi
Having fixed the issue of library loading on serverless platforms, I could move onto the next problem, loading the pre-trained models… 💽
loading pre-trained models
Running the example code to load the pre-trained models for face recognition gave me this error:
ReferenceError: fetch is not defined
In the previous blog post, I discovered how to manually load TensorFlow.js models from the filesystem using the file:// URI prefix. Unfortunately, the face-api.js library doesn’t support this feature. Models are automatically loaded using the fetch HTTP client. This HTTP client is available into modern browsers but not in the Node.js runtime.
Overcoming this issue relies on providing an instance of a compatible HTTP client in the runtime. The node-fetch library is a implementation of the fetch client API for the Node.js runtime. By manually installing this module and exporting as a global variable, the library can then use the HTTP client as expected.
// Make HTTP client available in runtime
global.fetch = require('node-fetch')
Model configuration and weight files can then be loaded from the library’s Github repository using this URL:
https://raw.githubusercontent.com/justadudewhohacks/face-api.js/master/weights/
faceapi.loadFaceDetectionModel('<GITHUB_URL>')
face detection in images
The face-api.js library has a utility function (models.allFaces) to automatically detect and calculate descriptors for all faces found in an image. Descriptors are a feature vector (of 128 32-bit float values) which uniquely describes the characteristics of a persons face.
const results = await models.allFaces(input, minConfidence)
The input to this function is the input tensor with the RGB values from an image. In a previous blog post, I explained how to convert an image from the filesystem in Node.js to the input tensor needed by the model.
Finding a user by comparing their twitter profile against photos from tweets starts by running face detection against both images. By comparing computed descriptor values, a measure of similarity can be established between faces from the images.
face comparison
Once the face descriptors have been calculated the library provides a utility function to compute the euclidian distance between two descriptors vectors. If the difference between two face descriptors is less than a threshold value, this is used to identify the same person in both images.
const distance = faceapi.euclideanDistance(descriptor1, descriptor2)

if (distance < 0.6)
  console.log('match')
else
  console.log('no match')
I’ve no idea why 0.6 is chosen as the threshold value but this seemed to work for me! Even small changes to this value dramatically reduced the precision and recall rates for my test data. I’m calling it the Goldilocks value, just use it…
performance
Once I had the end to end application working, I wanted to make it was fast as possible. By optimising the performance, I could improve the application responsiveness and reduce compute costs for my backend. Time is literally money with serverless platforms.
baseline performance
Before attempting to optimise my application, I needed to understand the baseline performance. Setting up experiments to record invocation durations gave me the following average test results.
- Warm invocations: ~5 seconds
- Cold invocations: ~8 seconds
Instrumenting the code with console.time statements revealed execution time was comprised of five main sections.
| Cold Starts | Warm Starts |
|---|---|
| Initialisation | 1200 ms |
| Model Loading | 3200 ms |
| Image Loading | 500 ms x 2 |
| Face Detection | 700 ms - 900 ms x 2 |
| Everything Else | 1000 ms |
| Total Duration | ~ 8 seconds |
Initialisation was the delay during cold starts to create the runtime environment and load all the library files and application code. Model Loading recorded the time spent instantiating the TF.js models from the source files. Image Loading was the time spent converting the RGB values from images into input tensors, this happened twice, once for the twitter profile picture and again for the tweet photo. Face Detection is the elapsed time to execute the models.allFaces method and faceapi.euclideanDistance methods for all the detected faces. Everything else is well… everything else.
Since model loading was the largest section, this seemed like an obvious place to start optimising. 📈📉
loading model files from disk
Overcoming the initial model loading issue relied on manually exposing the expected HTTP client in the Node.js runtime. This allowed models to be dynamically loaded (over HTTP) from the external Github repository. Models files were about 36MB.
My first idea was to load these model files from the filesystem, which should be much faster than downloading from Github. Since I was already building a custom Docker runtime, it was a one-line change to include the model files within the runtime filesystem.
FROM openwhisk/action-nodejs-v8:latest

RUN npm install @tensorflow/tfjs-node

COPY weights weights
Having re-built the image and pushed to Docker Hub, the classification function’s runtime environment now included models files in the filesystem.
But how do we make the face-api.js library load models files from the filesystem when it is using a HTTP client?
My solution was to write a fetch client that proxied calls to retrieve files from a HTTP endpoint to the local filesystem. 😱 I’d let you decide whether this is a brilliant or terrible idea!
global.fetch = async (file) => {
  return {
    json: () => JSON.parse(fs.readFileSync(file, 'utf8')),
    arrayBuffer: () => fs.readFileSync(file)
  }
}

const model = await models.load('/weights')
The face-api.js library only used two methods (json() & arrayBuffer()) from the HTTP client. Stubbing out these methods to proxy fs.readFileSync meant files paths were loaded from the filesystem. Amazingly, this seemed to just work, hurrah!
Implementing this feature and re-running performance tests revealed this optimisation saved about 500 ms from the Model Loading section.
| Cold Starts | Warm Starts |
|---|---|
| Initialisation | 1200 ms |
| Model Loading | 2700 ms |
| Image Loading | 500 ms x 2 |
| Face Detection | 700 ms - 900 ms x 2 |
| Everything Else | 1000 ms |
| Total Duration | ~ 7.5 seconds |
This was less of an improvement than I’d expected. Parsing all the model files and instantiating the internal objects was more computationally intensive than I realised. This performance improvement did improve both cold and warm invocations, which was a bonus.
Despite this optimisation, model loading was still the largest section in the classification function…
caching loaded models
There’s a good strategy to use when optimising serverless functions…

Serverless runtimes re-use runtime containers for consecutive requests, known as warm environments. Using local state, like global variables or the runtime filesystem, to cache data between requests can be used to improve performance during those invocations.
Since model loading was such an expensive process, I wanted to cache initialised models. Using a global variable, I could control whether to trigger model loading or return the pre-loaded models. Warm environments would re-use pre-loaded models and remove model loading delay.
const faceapi = require('face-api.js')

let LOADED = false

exports.load = async location => {
  if (!LOADED) {
    await faceapi.loadFaceDetectionModel(location)
    await faceapi.loadFaceRecognitionModel(location)
    await faceapi.loadFaceLandmarkModel(location)

    LOADED = true
  }

  return faceapi
}
This performance improvement had a significant impact of the performance for warm invocations. Model loading became “free”. 👍
| Cold Starts | Warm Starts |
|---|---|
| Initialisation | 1200 ms |
| Model Loading | 2700 ms |
| Image Loading | 500 ms x 2 |
| Face Detection | 700 ms - 900 ms x 2 |
| Everything Else | 1000 ms |
| Total Duration | ~ 7.5 seconds |
caching face descriptors
In the initial implementation, the face comparison function was executing face detection against both the user’s twitter profile image and tweet photo for comparison. Since the twitter profile image was the same in each search request, running face detection against this image would always return the same results.
Rather than having this work being redundantly computed in each function, caching the results of the computed face descriptor for the profile image meant it could re-used across invocations. This would reduce by 50% the work necessary in the Image & Model Loading sections.
The face-api.js library returns the face descriptor as a typed array with 128 32-bit float values. Encoding this values as a hex string allows them to be stored and retrieved from Redis. This code was used to convert float values to hex strings, whilst maintaining the exact precision of those float values.
const encode = typearr => {
  const encoded = Buffer.from(typearr.buffer).toString('hex')
  return encoded
}

const decode = encoded => {
  const decoded = Buffer.from(encoded, 'hex')
  const uints = new Uint8Array(decoded)
  const floats = new Float32Array(uints.buffer)
  return floats
}
This optimisation improves the performance of most cold invocations and all warm invocations, removing over 1200 ms of computation time to compute the results.
| Cold Starts (Cached) | Warm Starts | |
|---|---|---|
| Initialisation | 1200 ms | 0 ms |
| Model Loading | 2700 ms | 1500 ms |
| Image Loading | 500 ms | 500 ms |
| Face Detection | 700 ms - 900 ms | 700 ms - 900 ms |
| Everything Else | 1000 ms | 500 ms |
| Total Duration | ~ 6 seconds | ~ 2.5 seconds |
| Cold Starts | Warm Starts |
|---|---|
| Initialisation | 1200 ms |
| Model Loading | 2700 ms |
| Image Loading | 500 ms |
| Face Detection | 700 ms - 900 ms |
| Everything Else | 1000 ms |
| Total Duration | ~ 7.5 seconds |
final results + cost
Application performance was massively improved with all these optimisations. As demonstrated in the video above, the application could process tweets in real-time, returning almost instant results. Average invocation durations were now.
- Warm invocations: ~2.5 seconds
- Cold invocations (Cached): ~6 seconds
Serverless platforms charge for compute time by the millisecond, so these improvements led to cost savings of 25% for cold invocations (apart the first classification for a user) and 50% for warm invocations.
Classification functions used 512MB of RAM which meant IBM Cloud Functions would provide 320,000 “warm” classifications or 133,333 “cold” classifications within the free tier each month. Ignoring the free tier, 100,000 “warm” classifications would cost $5.10 and 100,000 “cold” classifications $2.13.
conclusion
Using TensorFlow.js with serverless cloud platforms makes it easy to build scalable machine learning applications in the cloud. Using the horizontal scaling capabilities of serverless platforms, thousands of model classifications can be ran in parallel. This can be more performant than having dedicated hardware with a GPU, especially with compute costs for serverless applications being so cheap.
TensorFlow.js is ideally suited to serverless application due to the JS interface, (relatively) small library size and availability of pre-trained models. Despite having no prior experience in Machine Learning, I was able to use the library to build a face recognition pipeline, processing 100s of images in parallel, for real-time results. This amazing library opens up machine learning to a whole new audience!