OpenWhisk Feeds
provide the mechanism to bind external events sources to serverless function
executions.
Want to use OpenWhisk to listen for database updates to generate usage
statistics? Or write Slack bots that respond to trigger words? Or notify users
when Github project changes?
Rather than manually listening for these events with an external application
and calling OpenWhisk Actions
through the API, OpenWhisk Feeds automate connecting external events sources with Actions.
Feeds allow users to register
Triggers
to be invoked when external events occur. Defining
Rules
that bind these Triggers to Actions, we can have Actions run for external events.
OpenWhisk Packages
Feeds are contained within and accessible through Packages.
OpenWhisk provides numerous built-in packages under the whisk.system namespace.
These packages contain both public Actions and Feeds.
Retrieving the package summary, the Actions and Feeds contained within are
returned. Feeds are referenced by the publisher’s namespace, package and feed name, e.g.
/whisk.system/alarms/alarm
1234
$ wsk package get /whisk.system/alarms --summary
package /whisk.system/alarms: Alarms and periodic utility
   (params: cron trigger_payload)
 feed   /whisk.system/alarms/alarm: Fire trigger when alarm occurs
The Alarm package (/whisk.system/alarms) contains a single Feed
(/whisk.system/alarms/alarm) that calls the registered Trigger on a fixed
schedule. Users provide the timer schedule through the cron parameter.
When creating new Triggers, users can specify a Feed source to bind their new
Trigger to the external event source. Parameters from the command-line will be
passed to the Feed source. The Feed provider will execute the Trigger each time
an external event occurs.
This new Trigger will be invoked every second with the payload contents by the
alarm Feed. Using rules, the Feed Trigger can be bound to call an Action on
each invocation.
As well as using the built-in Feeds, users can create and register custom
Feeds. This provides a way to integrate almost any external event source into
the platform. Publishing custom Feeds within a public package will also make
this event source available to all users on the systen, provided they know the
package identifier.
Creating Custom Feeds
Users register new Feeds by providing a custom Action to the platform. This
Action is invoked each time the Feed is bound to a new Trigger. Authentication
credentials, supporting Trigger invocation through the OpenWhisk API, are
passed in as invocation parameters.
This sample Action contains an outline for processing requests.
Feed Action
12345678910111213
// params.lifeCycleEvent - Enum value (CREATE|DELETE) // params.triggerName - User's Trigger identifier to call// params.authKey - Authentication details for calling Triggerfunctionmain(params){if(params.lifecycleEvent==='CREATE'){create(params);}elseif(params.lifecycleEvent==='DELETE'){remove(params)}returnwhisk.async();}
The params argument contains the Trigger information provided by the
platform and any parameters from the user during creation.
The lifeCycleEvent parameter is a string value, informing the Feed provider
whether to register (CREATE) or remove (DELETE) the user’s Trigger with the
event source. The Trigger identifier is passed as the triggerName parameter,
with the authentication key (authKey) used for the API requests.
Feed Actions must be registered with a custom annotation (feed), allowing the
platform to distinguish them from “normal” Actions. This annotation can be set
during the create command.
1
$ wsk action create -a feed true feed_name feed_action.js
Once a custom Feed Action has been registered, users can create new Triggers
using that Feed source, following the steps above.
MQTT Feeds
The “Internet of Things”
is often cited as a common usecase for serverless
platforms. Solutions are often event-driven and stateless, e.g. wait for data
from this device, do some processing and then store the results in this
database.
MQTT is a lightweight publish-subscribe
messaging protocol, commonly used for edge of network device-to-device
communication.
Bridging MQTT messages to OpenWhisk Actions can be achieved by creating a new
Feed provider. This provider would subscribe to message topics and execute
registered Triggers with incoming messages.
The custom feed provider
would need to establish and maintain long-lived MQTT
connections, waiting for messages to arrive. This requirements means the Feed
provider needs an external service to handle managing these connections, it
won’t be possible within the Feed Action.
This feed provider service is implemented using Node.js, using Cloudant for the
database. The service listens for HTTP requests, with Trigger registration
details, from the Feed Action.
The Node.js MQTT library is used to subscribe to
registered topics. When messages are received, the OpenWhisk client library is
used to invoke the Trigger remotely, passing the message contents as event parameters.
With the Feed service provider running, the Feed Action can be deployed.
The Feed will be registered under the name, mqtt_feed_provider, in a custom
package, mqtt.
Using the –shared command-line flag, the Feed package can be registered as a
public package. Feeds and Actions within public packages are visible to every
system user.
Rather than hardcoding the service provider location within the Feed Action,
this configuration value will be accessible as a package parameter. This can be
updated at runtime with modifying the Feed Action source.
12
$ wsk package create --shared -p provider_endpoint "http://CONTAINER_IP:3000/mqtt" mqtt
$ wsk package update mqtt -a description 'MQTT topic feed. Messages received on broker topic as passed to triggers"
Having created the package, we can add the Feed Action, using the custom
attribute to denote this is a Feed Action.
1
$ wsk action create -a feed true mqtt/mqtt_feed mqtt_feed.js
Once the Feed has been registered, it can be referenced when creating new Triggers.
MQTT broker url and topic name are passed as Trigger parameters, using the -p
flags. These values are included within the invocation arguments to the Feed
Action, shown below.
Once the Feed service provider has connected to the broker and subscribed to
the topic, incoming messages will register as Trigger events invocations for
the public_feed Trigger.
Using this custom Feed, users can easily connect MQTT messages to OpenWhisk Actions.
Github Project
Source code for this custom OpenWhisk Feed is available here.
The project contains the Feed Action
and Provider service.
The README contains the deployment and usage instructions.
Later this month, I’m speaking at Twilio’s conference about
building cognitive bots with IBM Watson.
Preparing for this presentation, I’ve been experimenting with the IBM Watson
services to build sample bots that can understand, and act on, natural language.
IBM’s artificial intelligence system, Watson, now provides a
series of “cognitive” services
available through IBM’s Bluemix cloud platform.
Developers can integrate everything from natural language processing, image and
speech recognition, emotion analysis and more into their applications using
RESTful APIs.
The Watson Developer Cloud
site has numerous
sampleapps
to help you understand how to integrate the services together to build “cognitive” bots.
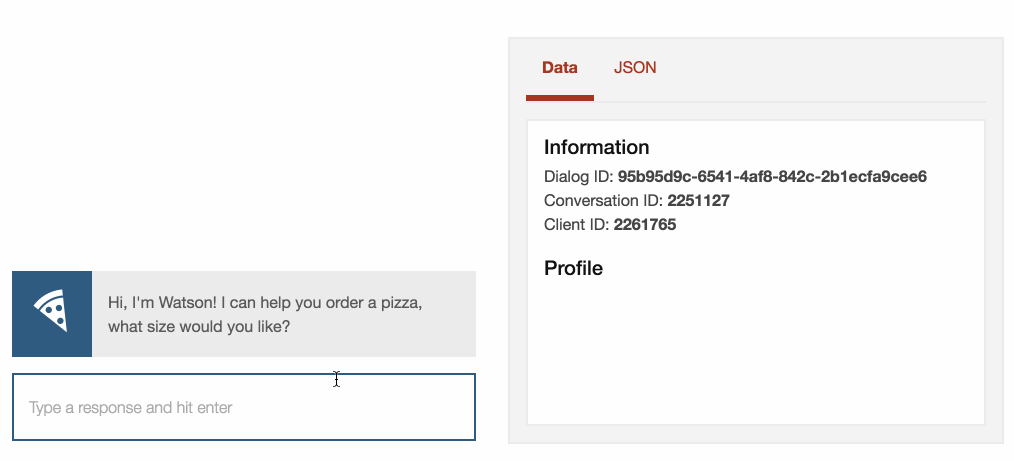
In one of the samples, the Dialog service
is used to develop a pizza ordering bot.
Users can order a pizza, specifying the size, toppings and delivery method,
using natural language.
After understanding how this sample worked, I had an idea to enhance it with
the tone analysis service…
Where the heck is my pizza?
Let’s imagine the customer has ordered a delivery using pizza-bot and the
driver is being (even) slower than normal.
If the customer asks
“Where is my pizza?”
We return the standard message all pizza takeaways use when calling to
inquire where the driver is….
“The driver has just left, he’ll be ten minutes.”
An hour later…
When the driver still hasn’t arrived, the customer would probably ask again and
with a bit less civility…
“Where the heck is my pizza? I ordered an hour ago! This is ridiculous.”
At this point, the “just ten minutes” reply is not going to be well received!
Building bots that can understand conversation tone will mean we can script a
suitable response, rather than infuriating our hungry customers.
Using the tone analyser service, I wanted to enhance the sample to use
conversation sentiment to affect the dialogue.
Bot responses should be generated based upon both user
input and conversation sentiment.
Let’s review both services before looking at how to combine them to create the
improved pizza bot…
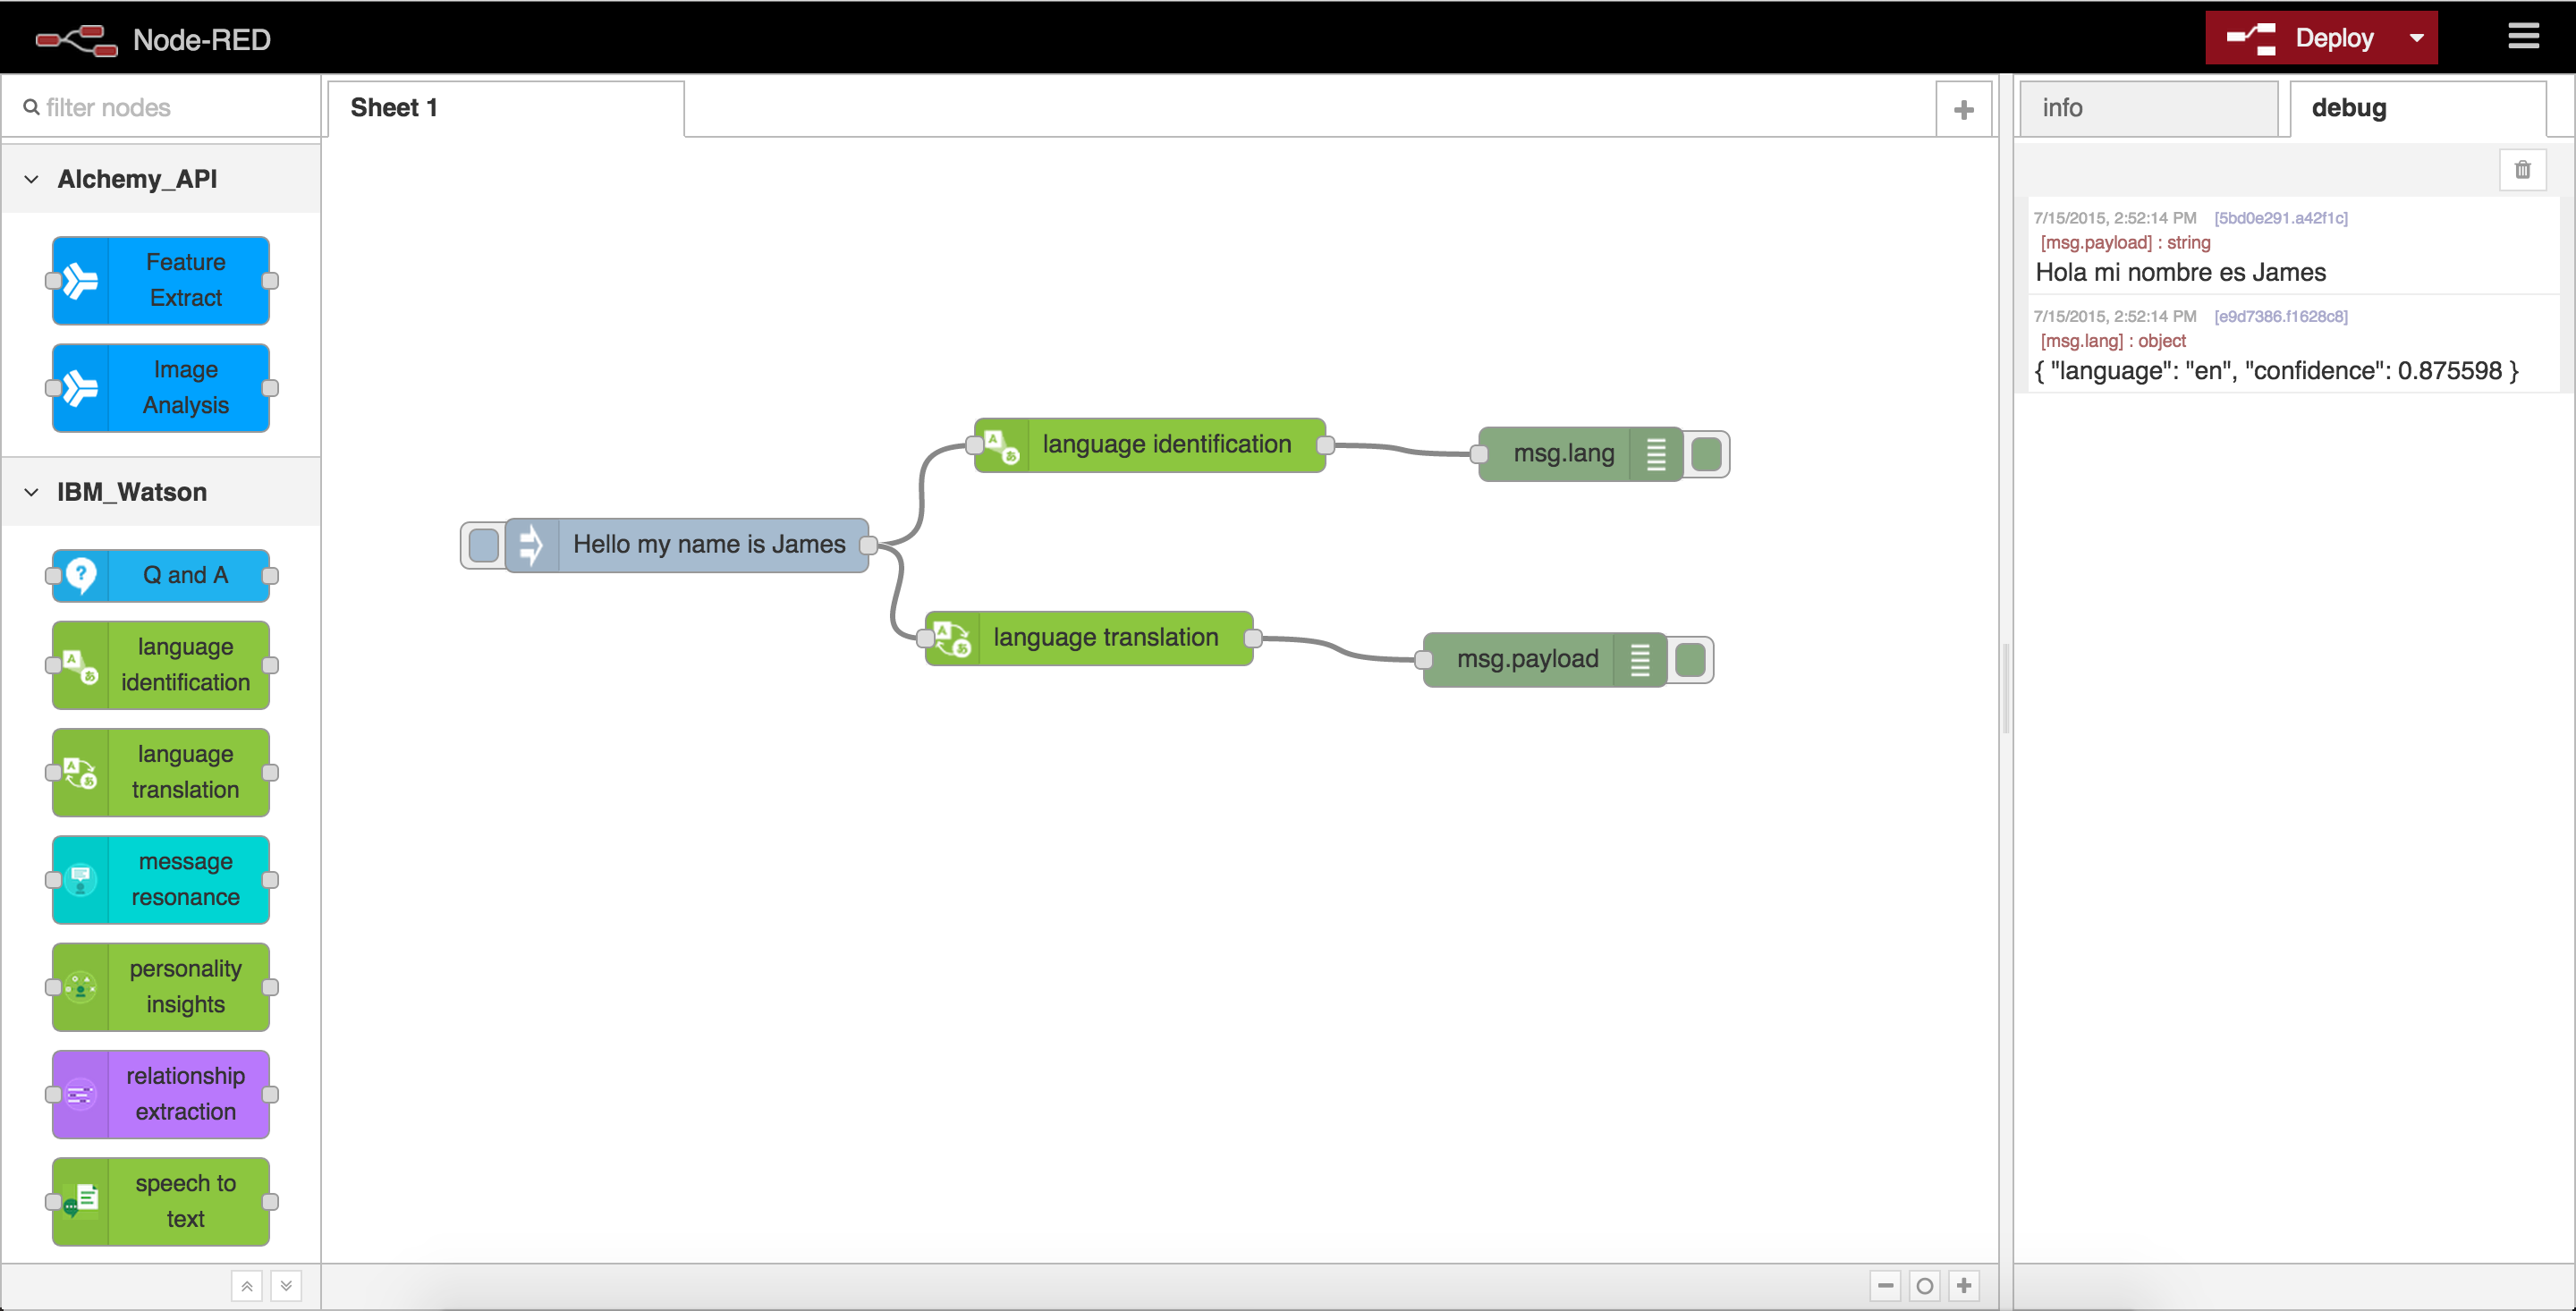
IBM Watson Dialog
The IBM Watson Dialog service
enables a developer to automate scripting
conversations, using natural language, between a virtual agent and a user.
Developers build up a decision tree for dialogue,
using a markup language to define the conversation paths.
Developers can then utilise the pre-defined linguistic model to converse with
users. The system will keep track of the conversation state when processing
user input to generate a suitable response. It can also store
conversation properties, either extracted from user input or manually updated through the
API.
The IBM Watson Tone Analyzer Service
uses linguistic analysis to detect three types of tones from text: emotion, social tendencies, and language style.
Emotions identified include things like anger, fear, joy, sadness, and disgust.
Identified social tendencies include things from the Big Five personality
traits used by some psychologists. These include openness, conscientiousness,
extroversion, agreeableness, and emotional range. Identified language styles
include confident, analytical, and tentative.
Enhancing pizza bot to support dialogue about delivery times, we can start by
identifying when the user is asking about the pizza delivery. At this point,
unless the user is angry, we can return the default response. When sentiment
analysis indicates this user is angry, we should branch to returning a more
sympathetic message.
Matching User Input
Matching user input about delivery times, there a few common questions we want to capture.
This structure will process the output element, to generate the bot reply, only
if the input grammar matches user input. Adding item nodes under the input’s
grammar element will let us define the dialogue matching criteria, shown here.
Using wildcard matching characters,
$ and *, means the grammar (“$where * order”) will match questions including “Where is my pizza?” and “Where’s my
pizza?” rather than having to manually define every permutation.
People often use synonyms in natural language. Rather than manually defining
grammar rules for all alternative words for pizza and order, we can add
concept elements
to automatically match these. The sample already has a concept element defined for the pizza term, we only have to add elements for order.
<output><promptselectionType="RANDOM"><item>I've just checked and the driver is ten minutes away, is there anything else I can help with?</item><item>Hmmm the driver's running a bit late, they'll be about ten minutes. Is there anything else I can help with?</item><item>They should be with you in ten minutes. Is there anything else I can help with?</item></prompt><gotoref="getUserInput_2442994"/></output>
Handling Angry Customers
Within the dialog markup, profile variables
can be defined to store conversation entities. These variables can be referenced by
conditional branches
in the markup to control responses.
Defining a new profile variable for the anger score, this value can be updated
manually before the current user input is processed to return the dialogue
response.
<variables><var_foldername="Home"> ...
<varname="anger"type="NUMBER"initValue="0"description="Anger emotion score for conversation."/></var_folder></variables>
Adding a child branch, for the conditional response, after the input grammar
will allow us to return a custom response if the profile variable for the anger
emotion is above a threshold.
<folderlabel="Order"><input><grammar><item>$where* order</item></grammar><ifmatchType="ANY"><condvarName="anger"operator="GREATER_THEN">0.50</cond><output><promptselectionType="RANDOM"><item>Please accept our apologies for the delivery driver being very late. Could you call us on 0800 800 800 and we'll get this fixed?</item></prompt></output></if>
When we’ve detected the user is angry about the delivery delay, we direct
them to ring the restaurant to find out what’s happened to the driver.
Combining Watson Services
Modifying the backend service that calls the Watson services, we’re now passing
the user’s input through the Tone Analyzer service and manually updating user’s
anger score in their profile, before calling the Dialog service.
This anger score will be used to control the dialogue response in real-time.
The commit log
for the fork shows the full changes needed to integrate this feature.
Conclusion
Bots are a huge trend for 2016.
One of the major challenges to developing your
own bots is handling user input using natural language. How can you go beyond
simple keyword matching and regular expressions to build solutions that
actually understand what your user is asking?
Using the IBM Watson Dialog service users can script natural language
conversations. Defining a linguistic model for their dialogue using markup
language, the system can use this to process natural language and return the
appropriate response. Conversation entities are recognised and stored in a user
profile.
Combining this service with the IBM Watson Tone Analyzer, users can script
conversations that use the user’s emotional tone to modify the response.
Modifying the pizza sample, we incorporate the anger score to return a more
appropriate response when the user is angry about their delivery being delayed.
IBM Watson has many other services
that can be integrated with the Dialog
service using the same pattern to build “cognitive” bots. Using these services
takes the hard work out of building bots that actually understand and respond
with emotion to input using natural language.
“Serverless” cloud platforms are a
major trend in 2016.
Following on from Amazon’s Lambda service,
released eighteen months ago, this year has seen IBM,
Microsoft
and Google all launch their own solutions.
These platforms let you build stateless microservices,
combining APIs with
business logic, without servers. Microservices are executed on-demand, in
milliseconds, rather than having to sit idle waiting for incoming requests.
Users pay only for the raw computation time used.
Combining serverless APIs with static file hosting for site resources, e.g.
HTML, JavaScript and CSS, means we can build entire serverless web applications.
Playing with OpenWhisk recently to build simple microservices, I began to
investigate using the platform to build the APIs for serverless applications.
How can we use OpenWhisk to define a new microservice and then expose that
service as an API with a HTTP interface?
Let’s start by looking at OpenWhisk…
OpenWhisk
Using the OpenWhisk platform, developers register small bits of code, known as
Actions,
that can be invoked on-demand. These functions can be written in
Node.js, Swift or Docker images. Let’s look at a simple Node.js Action that
takes a parameter and returns a message with that value.
Node.js actions must include a function named main. OpenWhisk executes
this function for each invocation, passing request parameters as arguments.
Return values from the function will be included in the response.
Using the OpenWhisk command-line utility,
we turn this local JavaScript code into a remote action.
1234567
[~/code/serverless]$ ls
source.js
[~/code/serverless]$ wsk action create hello_action source.js
ok: created action hello_action
[~/code/serverless]$ wsk action list
actions
/james.thomas@uk.ibm.com_dev/hello_action                         private
With the action registered, we can test the service from the command-line.
12345678910
[~/code/serverless]$ wsk action invoke -b hello_action -p name "Bernie Sanders"ok: invoked hello_action with id 429b35c3e3ac494ea902390ca64afe32
response:
{"result": {"payload": "Hello Bernie Sanders"},
"status": "success",
"success": true}
We can also update the action to use default parameter values.
12345678910111213
[~/code/serverless]$ wsk action update hello_action -p name "Donald Trump"ok: updated action hello_action
[~/code/serverless]$ wsk action invoke -b hello_action
ok: invoked hello_action with id 0299bf2baf9242b7a00a8095caaeb7a4
response:
{"result": {"payload": "Hello Donald Trump"},
"status": "success",
"success": true}[~/code/serverless]$
Registered actions can be executed manually, using an authenticated API
request, or automatically, hooking actions to triggers and feeds using rules.
For more details on triggers, feeds and rules, please see the OpenWhisk documentation.
The command-line utility translates commands into HTTP requests to
the OpenWhisk API.
Pro-Tip: Adding the ‘-v’ flag when using command-line utility will show HTTP
traffic sent to the OpenWhisk API.
Serverless APIs With OpenWhisk
Building backend services for serverless web applications, there were two
challenges to resolve before invoking these APIs from client-side JavaScript code.
Authentication.OpenWhisk API
requests require HTTP authentication, using the
developer’s credentials. Embedding these credentials within client-side files
is a terrible idea…
Cross-Domain Requests.CORS support
is not enabled on the OpenWhisk platform.
Calling services from a browser would mandate us having CNAME records
configured with an external domain.
Authentication needs to be resolved, while cross-domain support is an inconvenience.
Using OpenWhisk on IBM Bluemix, we have access to a huge range of cloud
services to help build applications. Reviewing the catalogue, there’s a new
service API Connect which can help us
resolve both issues with minimal effort.
API Connect
Announced in February, API Connect is IBM’s new “API Management-as-a-Service”
solution. Developers can use the service for creating, running, managing and
securing APIs in the cloud.
Using this service, we can construct new public APIs, with CORS support, that
proxy the authenticated OpenWhisk APIs used to trigger our services. Using these
APIs from our serverless frontends will be possible without leaking
credentials or having to configure DNS records.
Once we’ve signed up for an account with API Connect, you need to install the
developer toolbox locally. Using this tool will allow us to construct new APIs and
publish them to the cloud.
TLDR: I’ve exported the sample flow configuration generated below
here.
Import this YAML file into the API Connect editor, replacing USERNAME, PASSWORD
and NAMESPACE, before deploying this flow to IBM Bluemix.
API Editor
Install the API Connect Toolkit using NPM and run the following command to open
the editor.
12
$ npm install -g apiconnect
$ apic edit
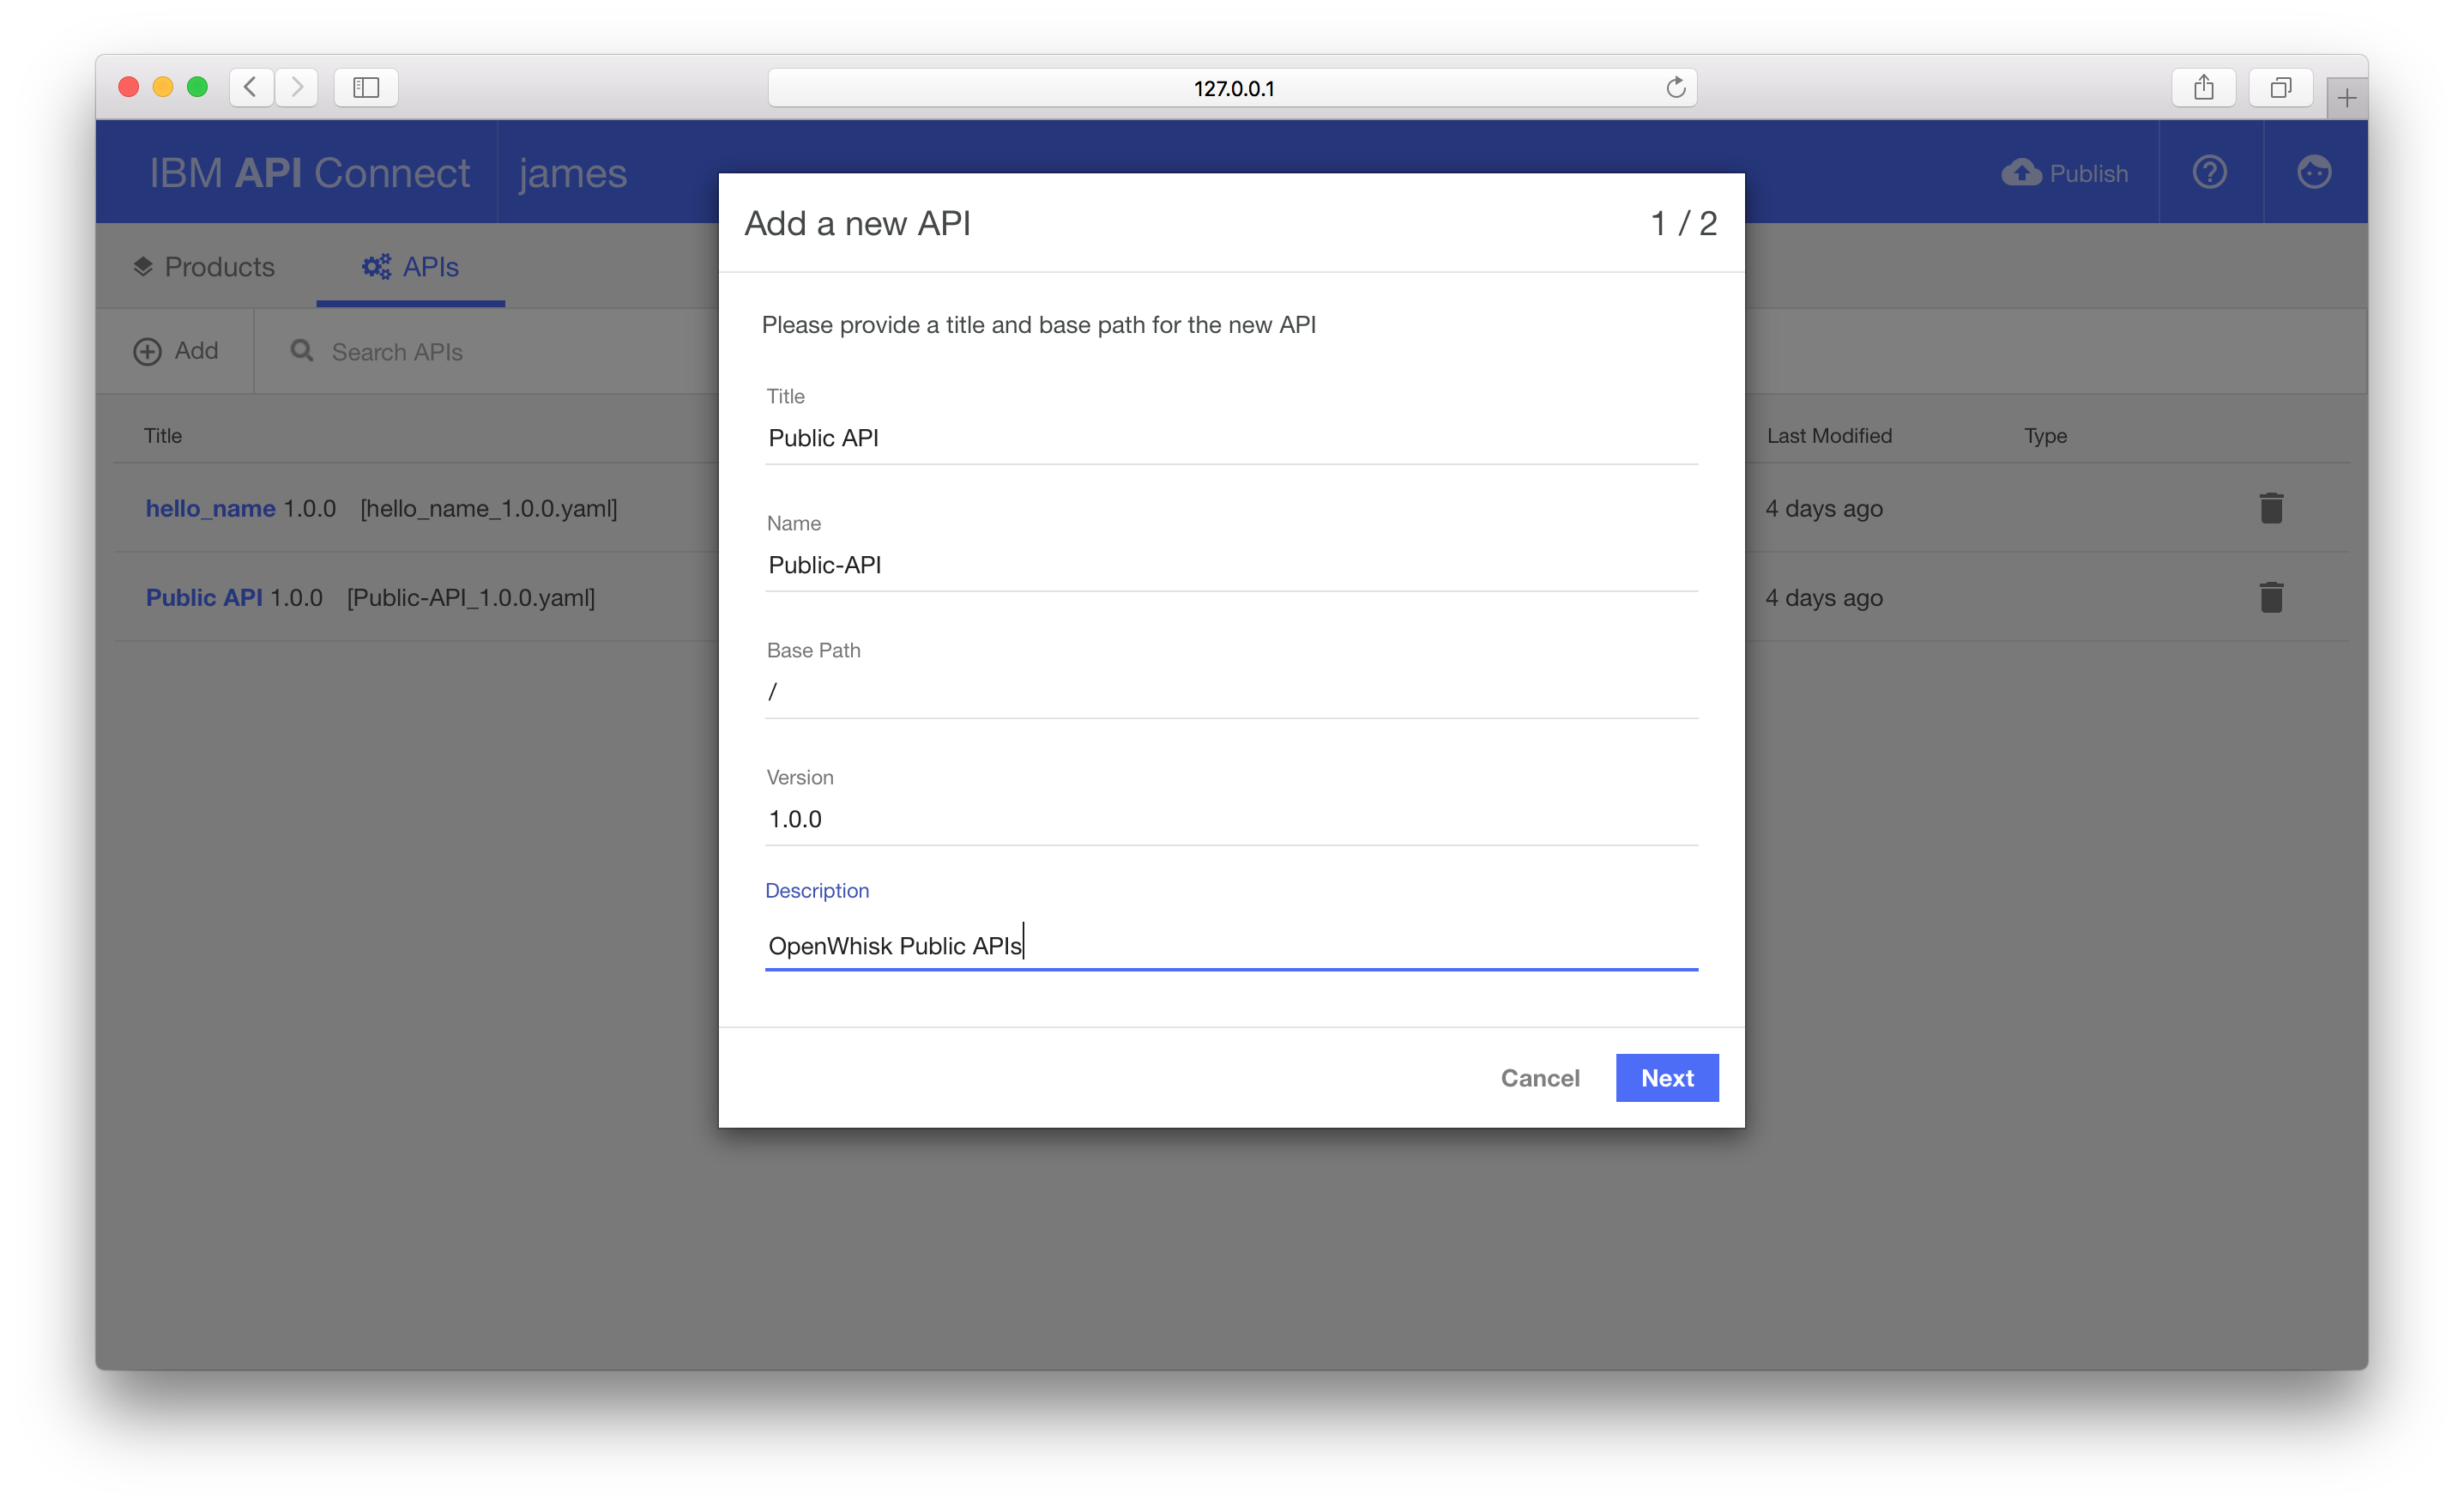
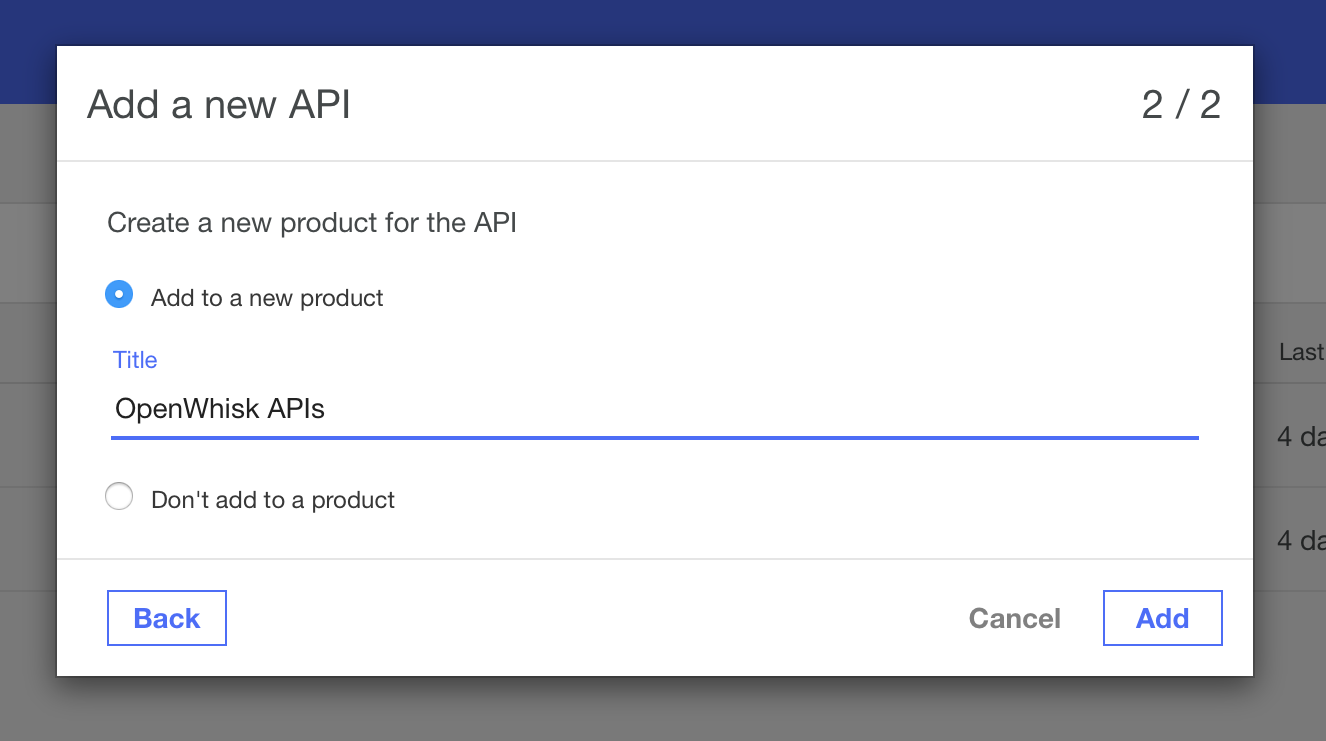
Using the APIs panel, select the Add button. Provide a title for your
service.
Leave the Add to a new product checkbox selected and provide a
title for the product.
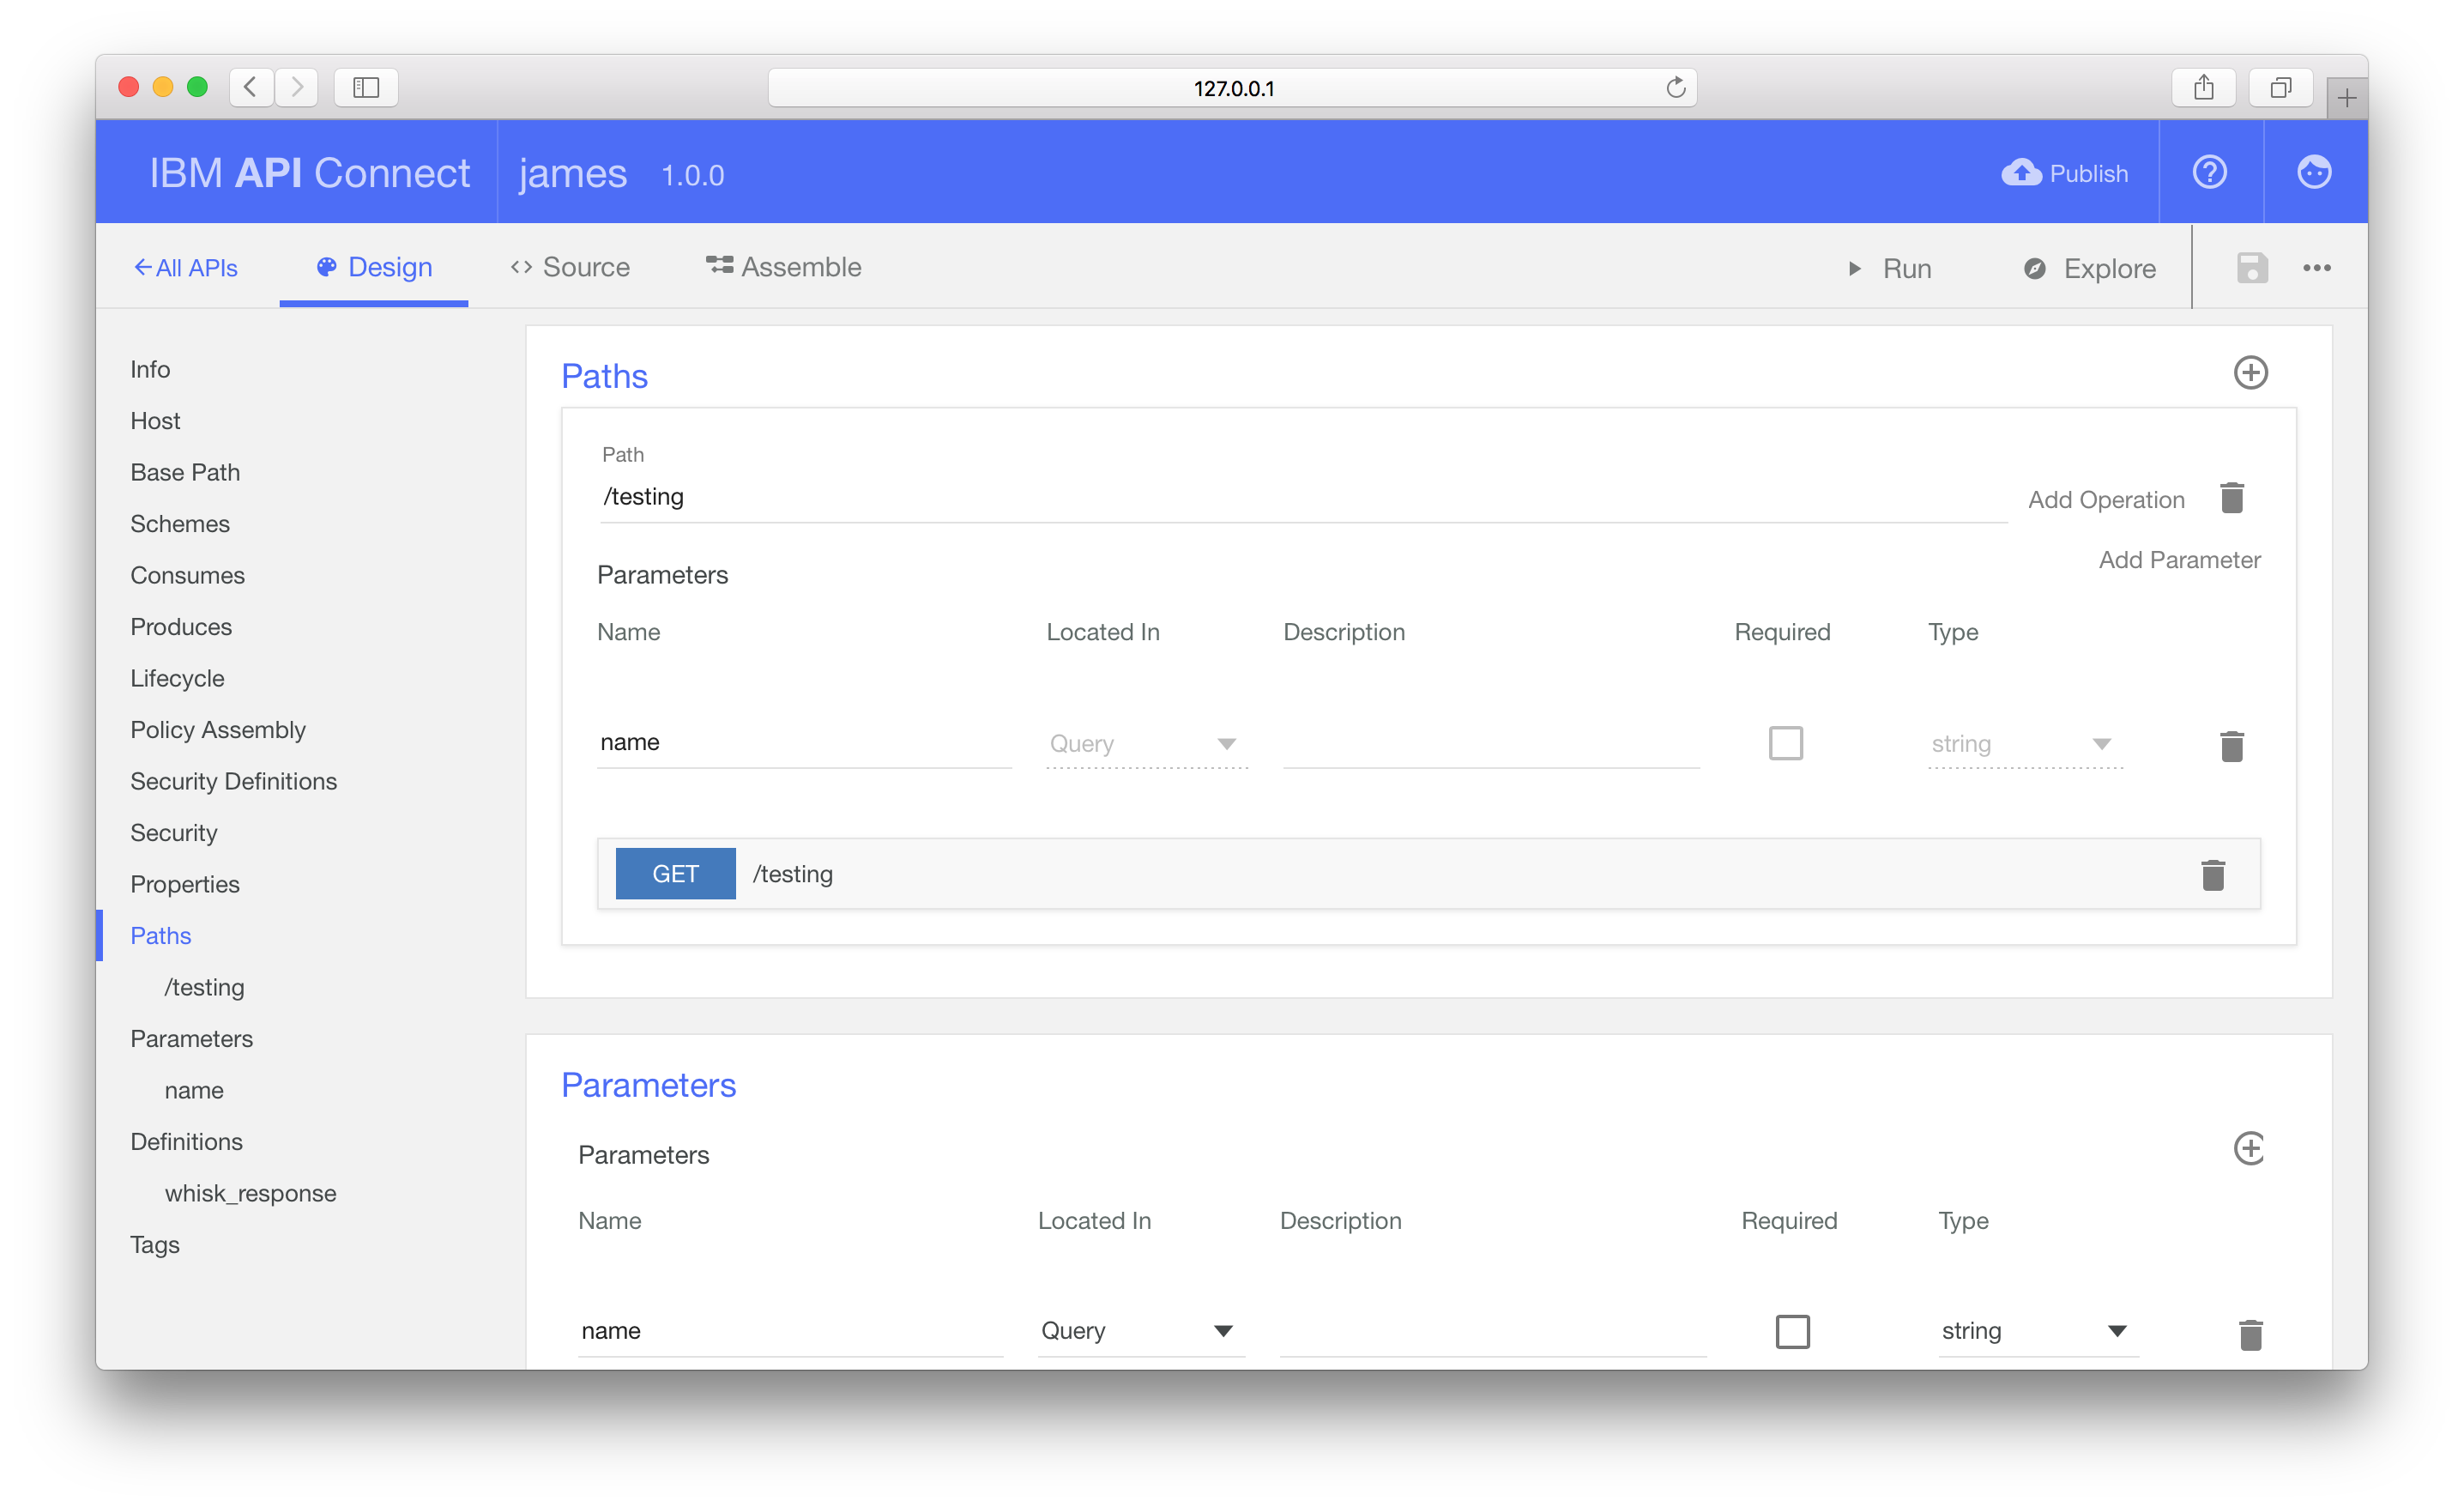
The editor now shows the Design panel, allowing you to define the external
public API schema.
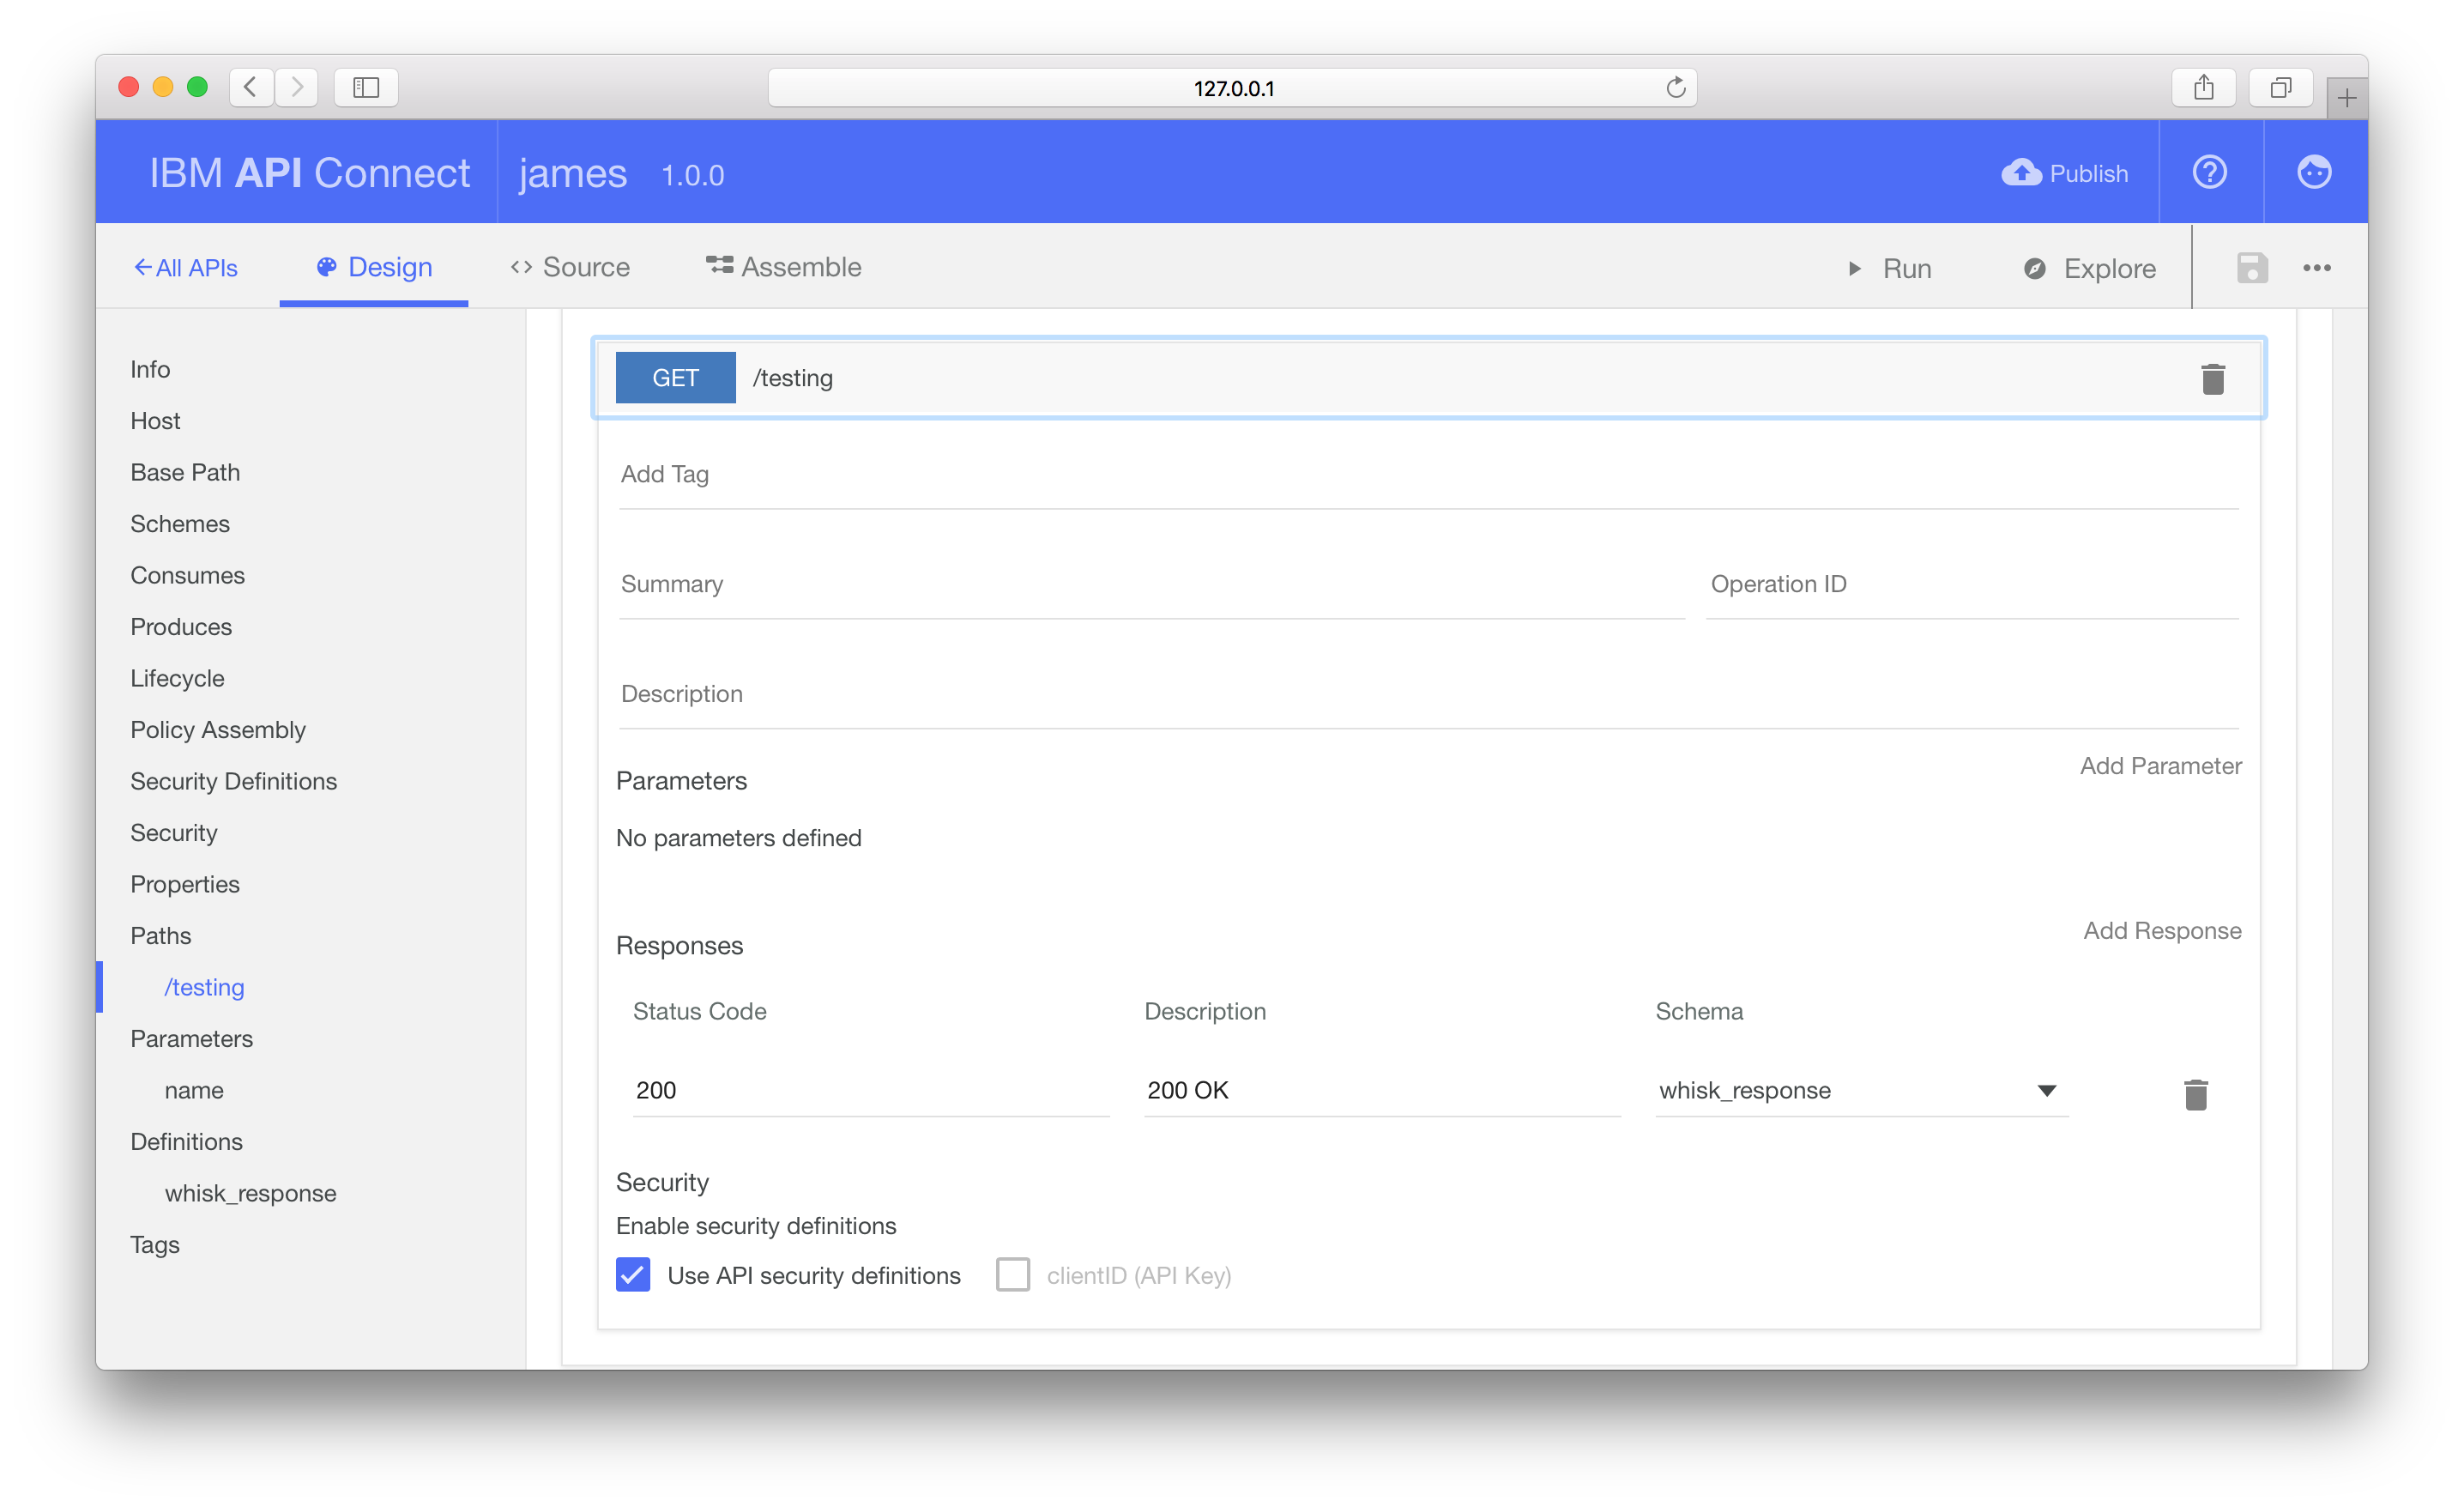
We’re going to define a single endpoint (/hello-name) which supports HTTP GET
requests with a single query parameter.
Adding the endpoint
Disable the clientID definition under the “Security” panel and then scroll down
to the Paths section.
Add a new path for the endpoint /hello-name. Set a parameter for this path,
using the identifier name from location as query and type as string.
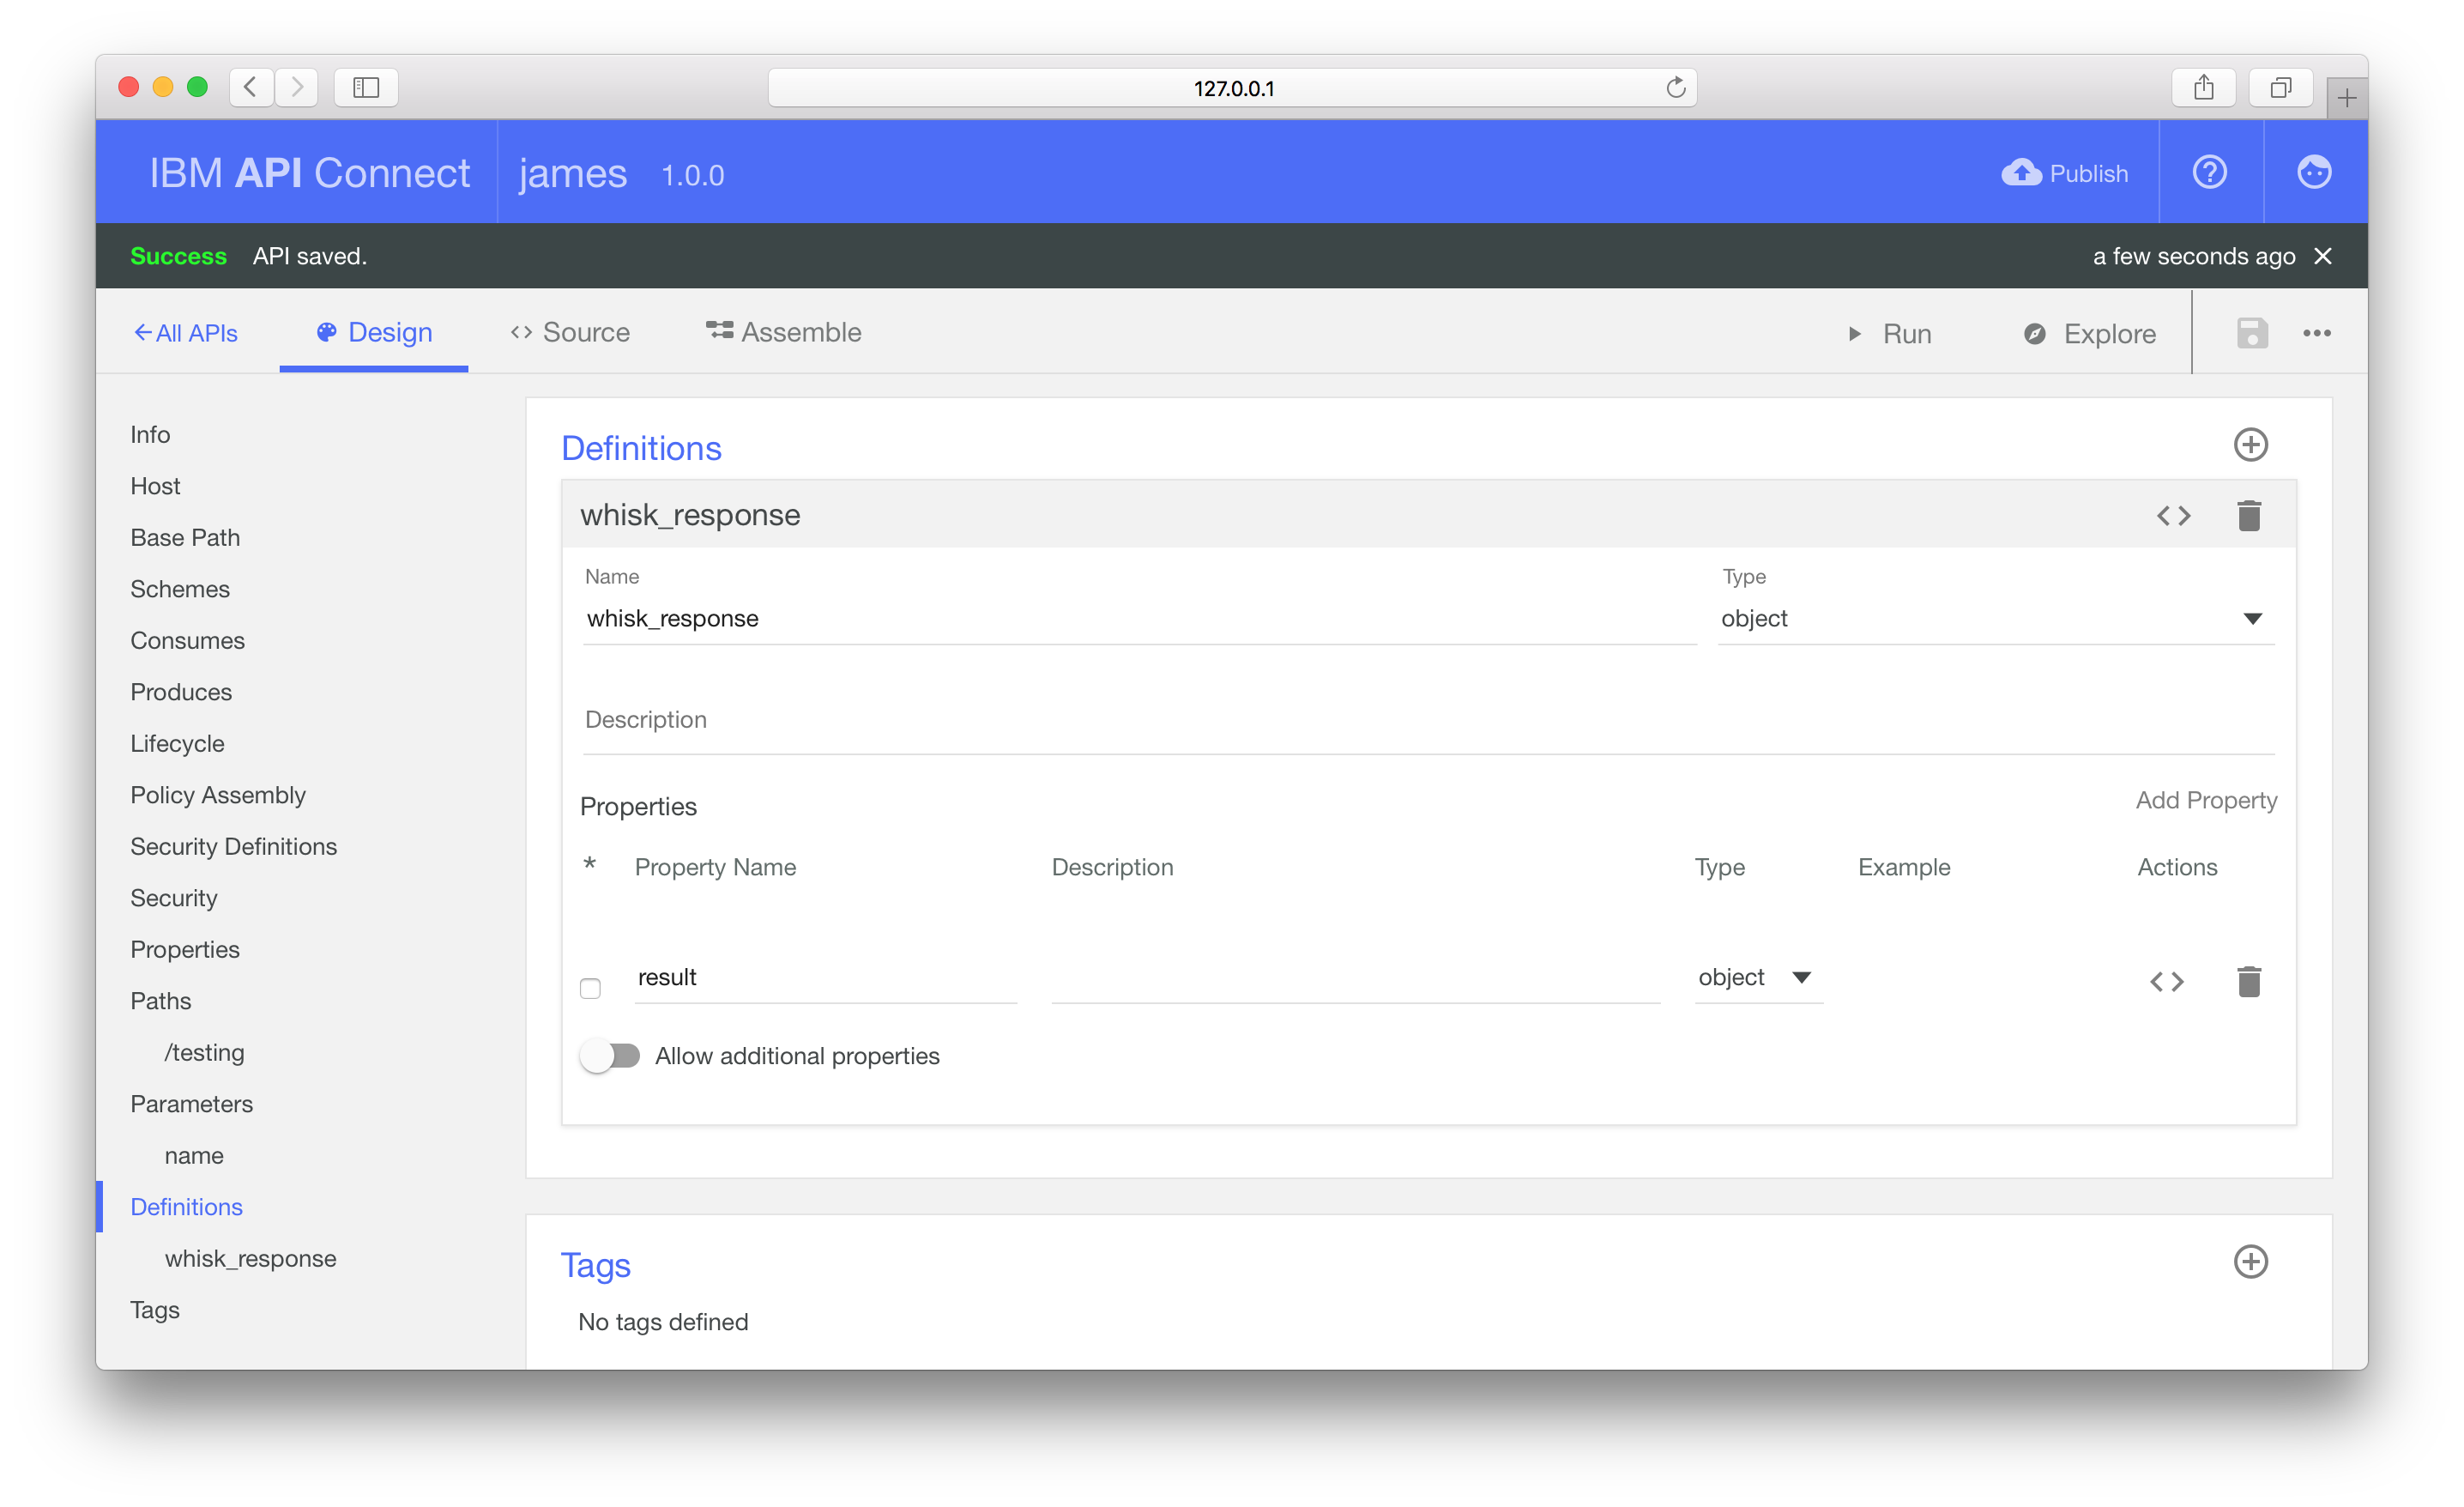
Move to the Definitions section to define the API response schema. We
want to return a JSON object with a single property, result, that contains the
JSON object returned from the Action response.
Add a new Definition, named whisk_response and type as object, with a
single object property, result.
Under the Paths panel, expand the GET operation.
Set the schema for the 200 response to whisk_response.
CORS supported is already enabled by default (under the Lifecycle section).
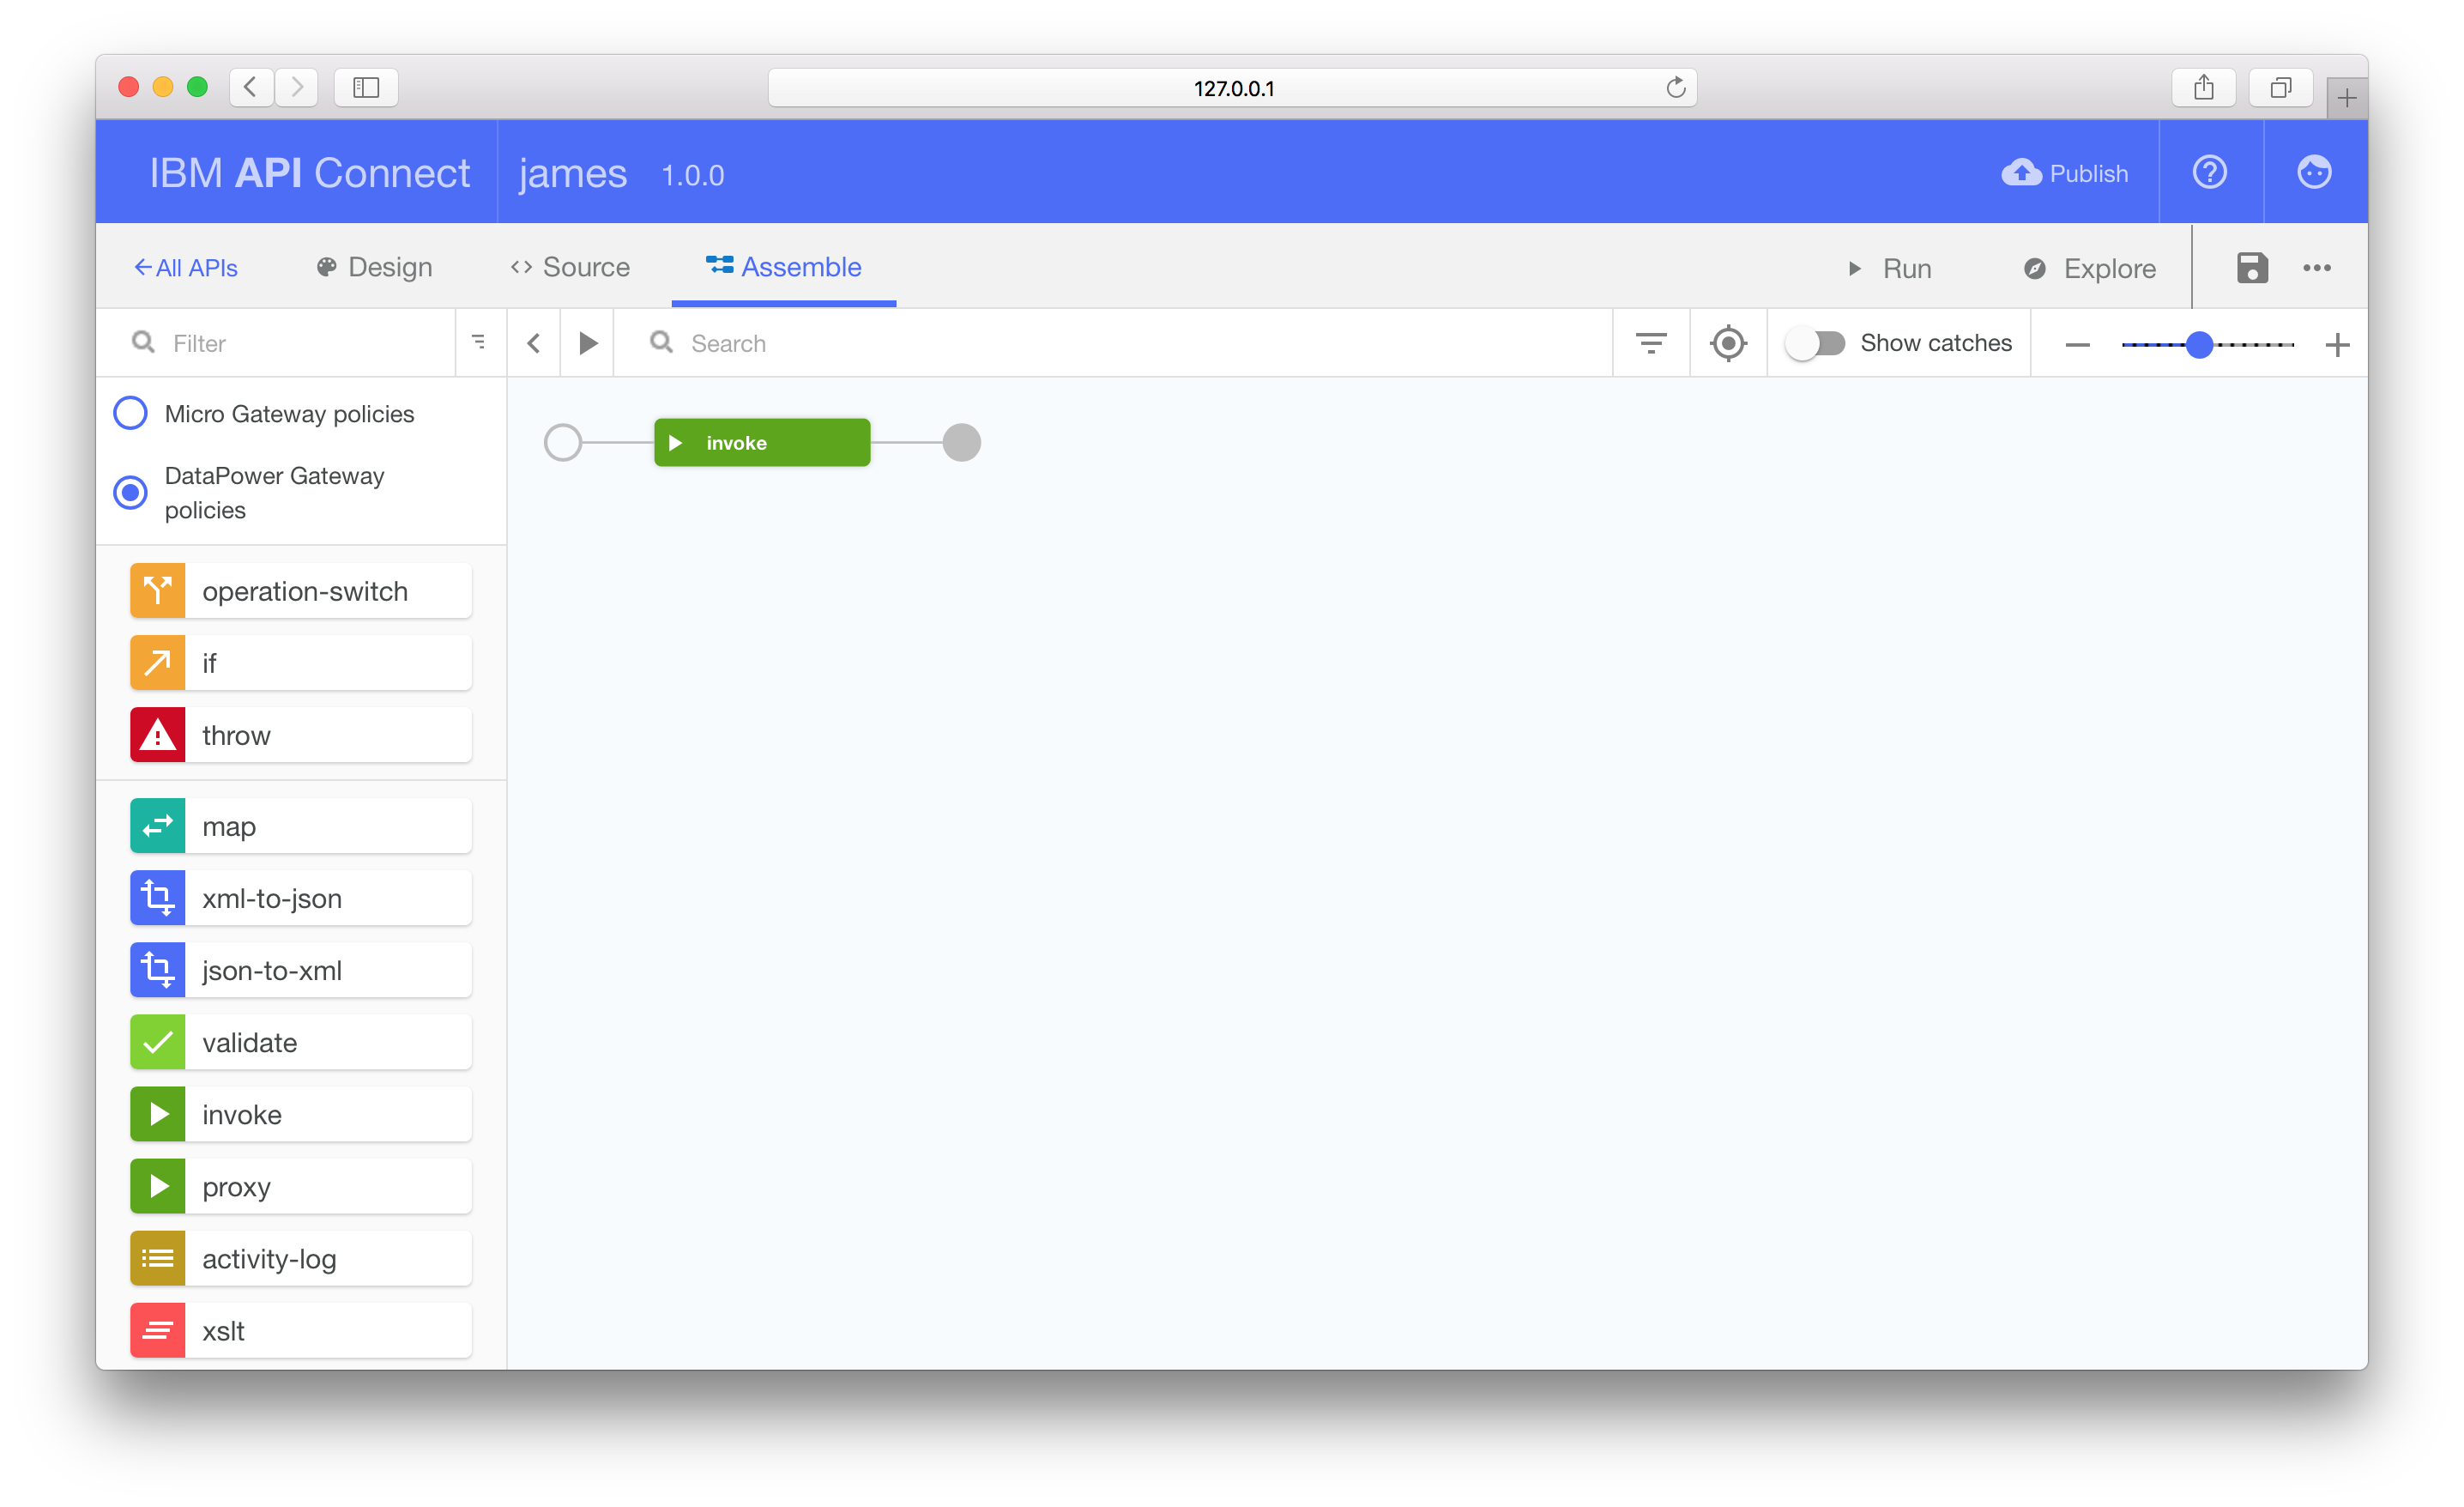
Click the Save icon in toolbar and then move to the “Assemble” tab.
Defining API operations
Having defined the public API schema, we need to implement the API operations.
On the “Assemble” tab, the flow editor allows us to connect different backend
operations to construct our service. IBM Bluemix only supports deploying flows
constructed with the “DataPower Gateway policies” nodes. Microgateway nodes,
e.g. Javascript, are not supported.
Invoking OpenWhisk Actions
The default flow contains a single invoke node. This node type makes HTTP
requests, passing the result to the next node in the flow.
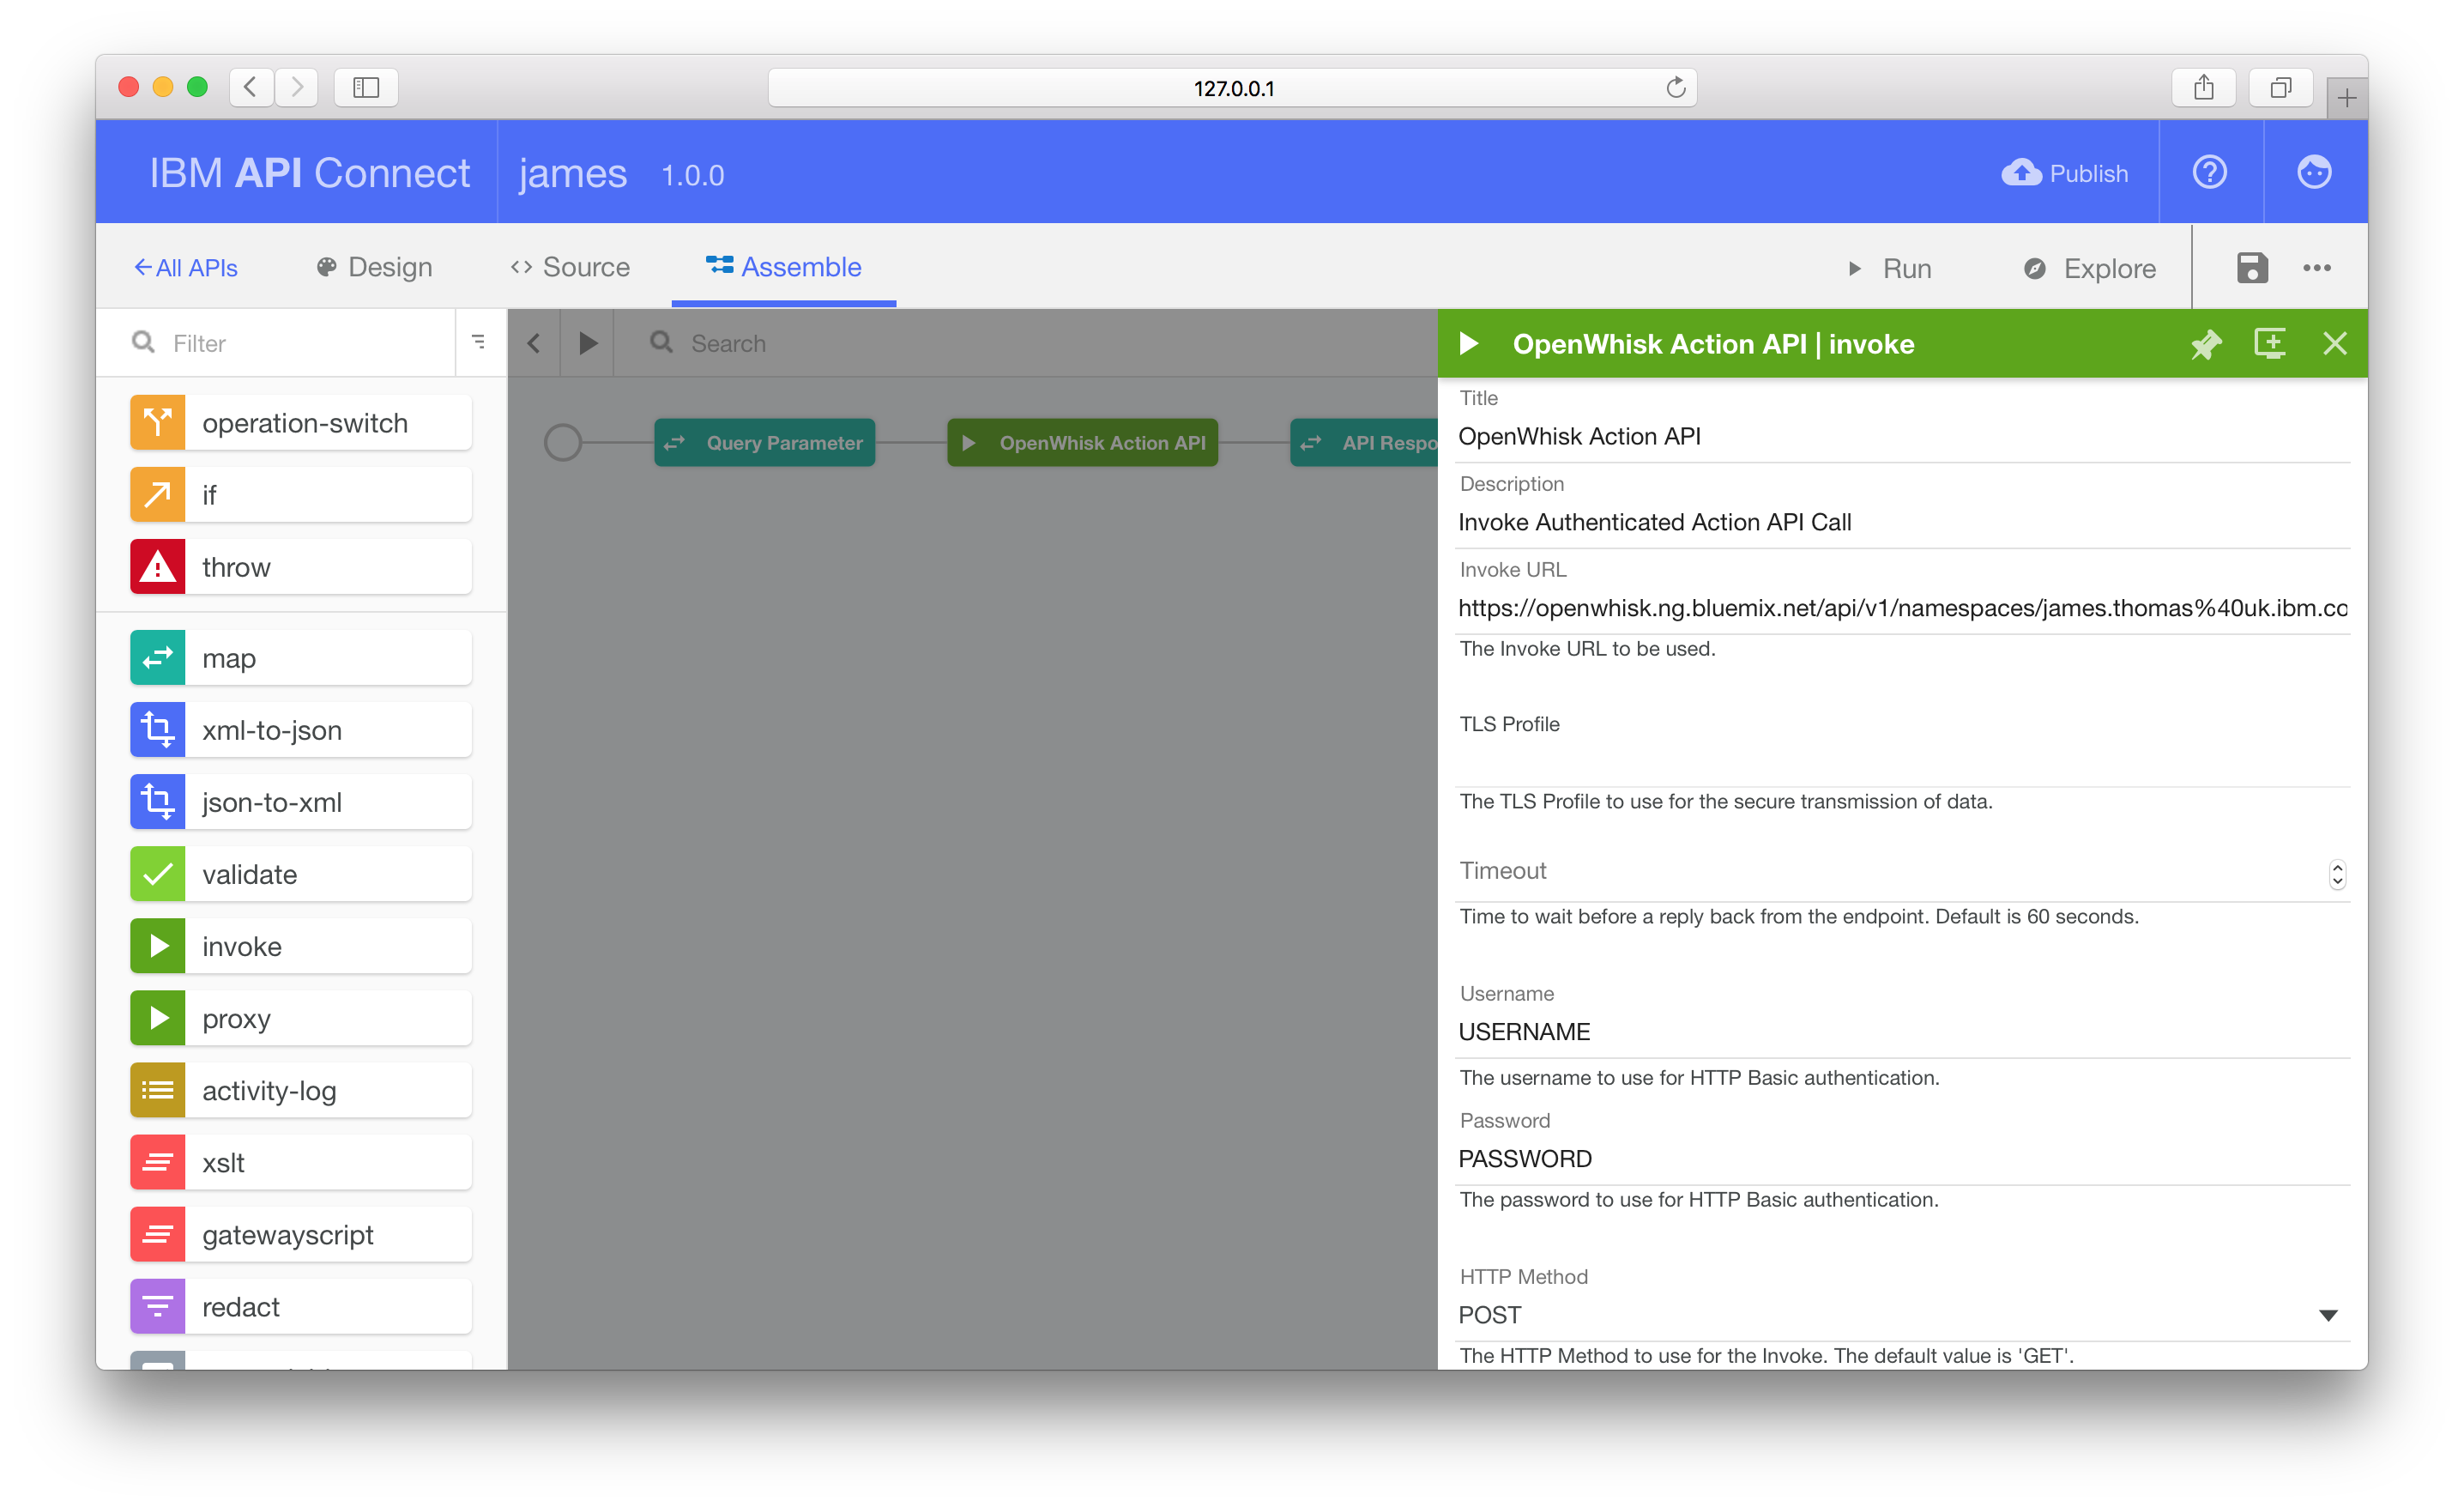
Use this node to execute your OpenWhisk Action by bringing up the editor and changing the URL to the correct endpoint, e.g.
https://openwhisk.ng.bluemix.net/api/v1/namespaces/YOUR_NAMESPACE/actions/ACTION_ID?blocking=true
Make sure to include the query parameter, blocking=true. This makes OpenWhisk
wait until the Action has completed execution before returning, rather than
after invocation starts.
Change the HTTP method from GET to POST and fill in the username and passwords fields.
Add the value invoke_result to the Response Object Variable field. This
will save the HTTP response into a context variable we can reference in the
following map node definition.
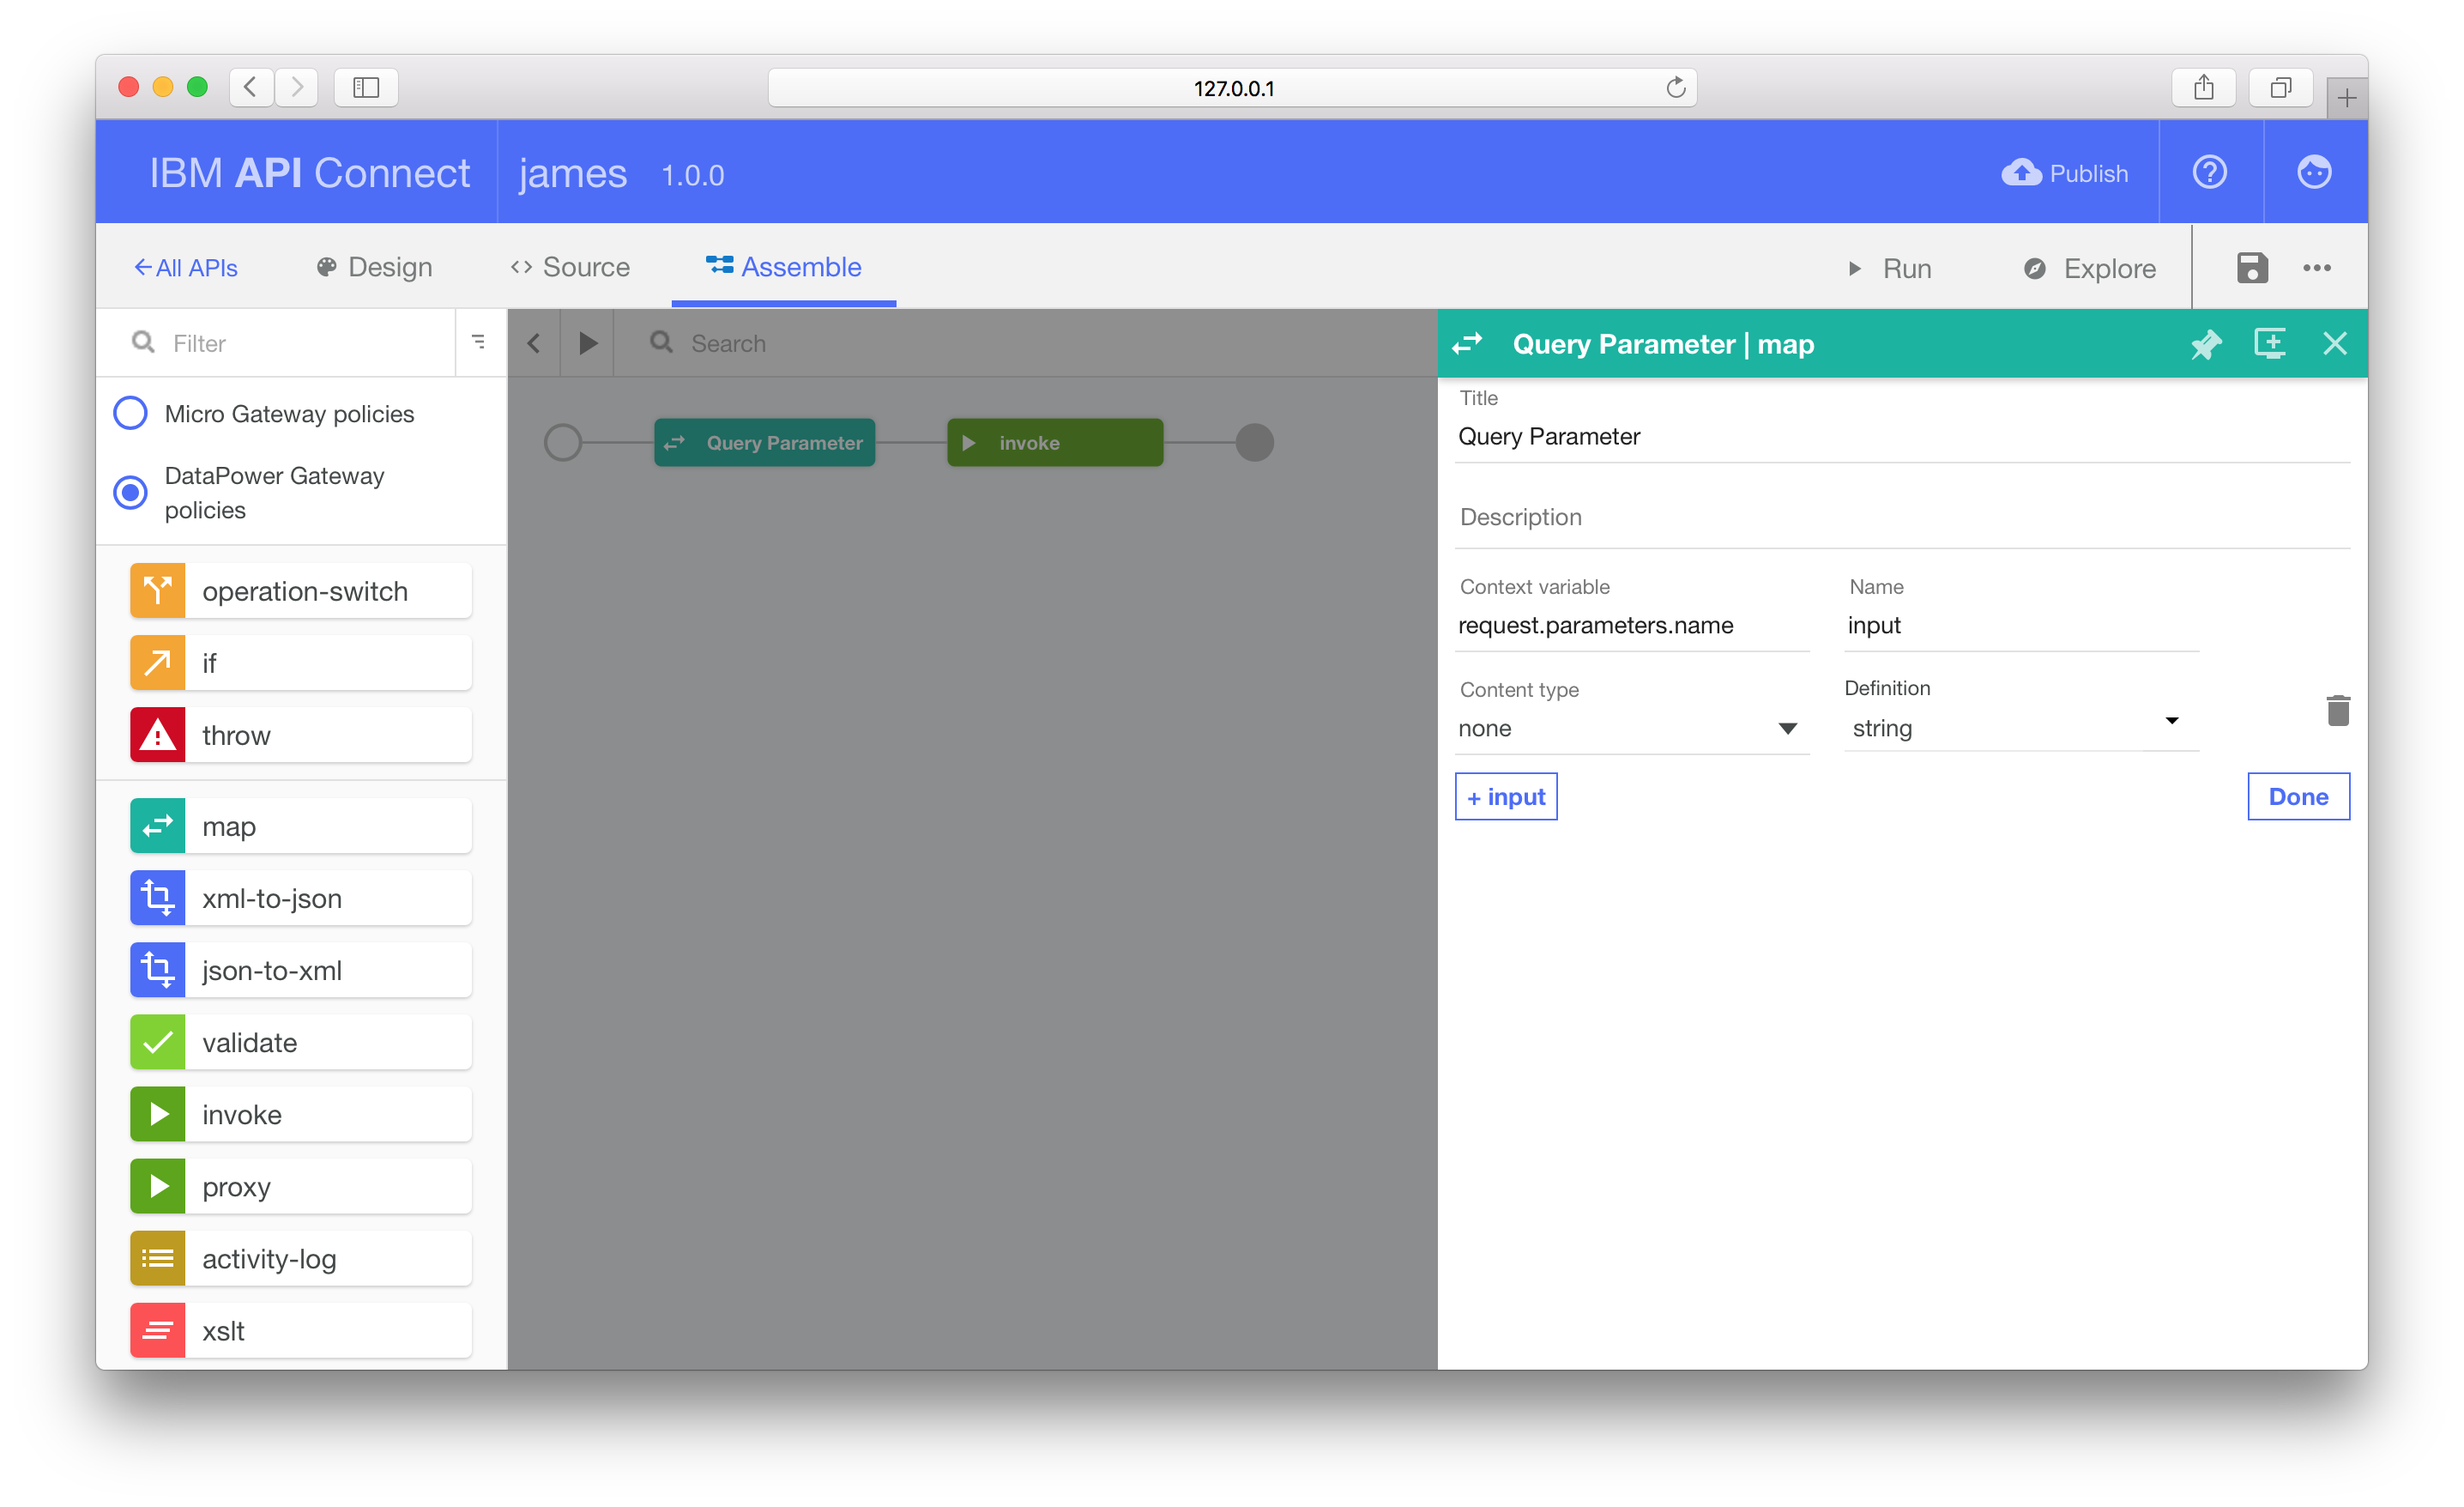
Passing Query Parameters
Invoking OpenWhisk Actions through the API uses a HTTP POST request, passing
parameters within the JSON body. Our external API supports HTTP GET
operations, with parameters through query string values in the URL.
Using the map node in the flow will translate between these two methods.
Drag a map node from the left-hand panel and drop it on the wire between the
circle and the invoke node.
Open the map node editor and add a new input parameter.
Change the context variable to request.parameters.name with type string.
This contains the query parameter value we’re using to pass in action arguments.
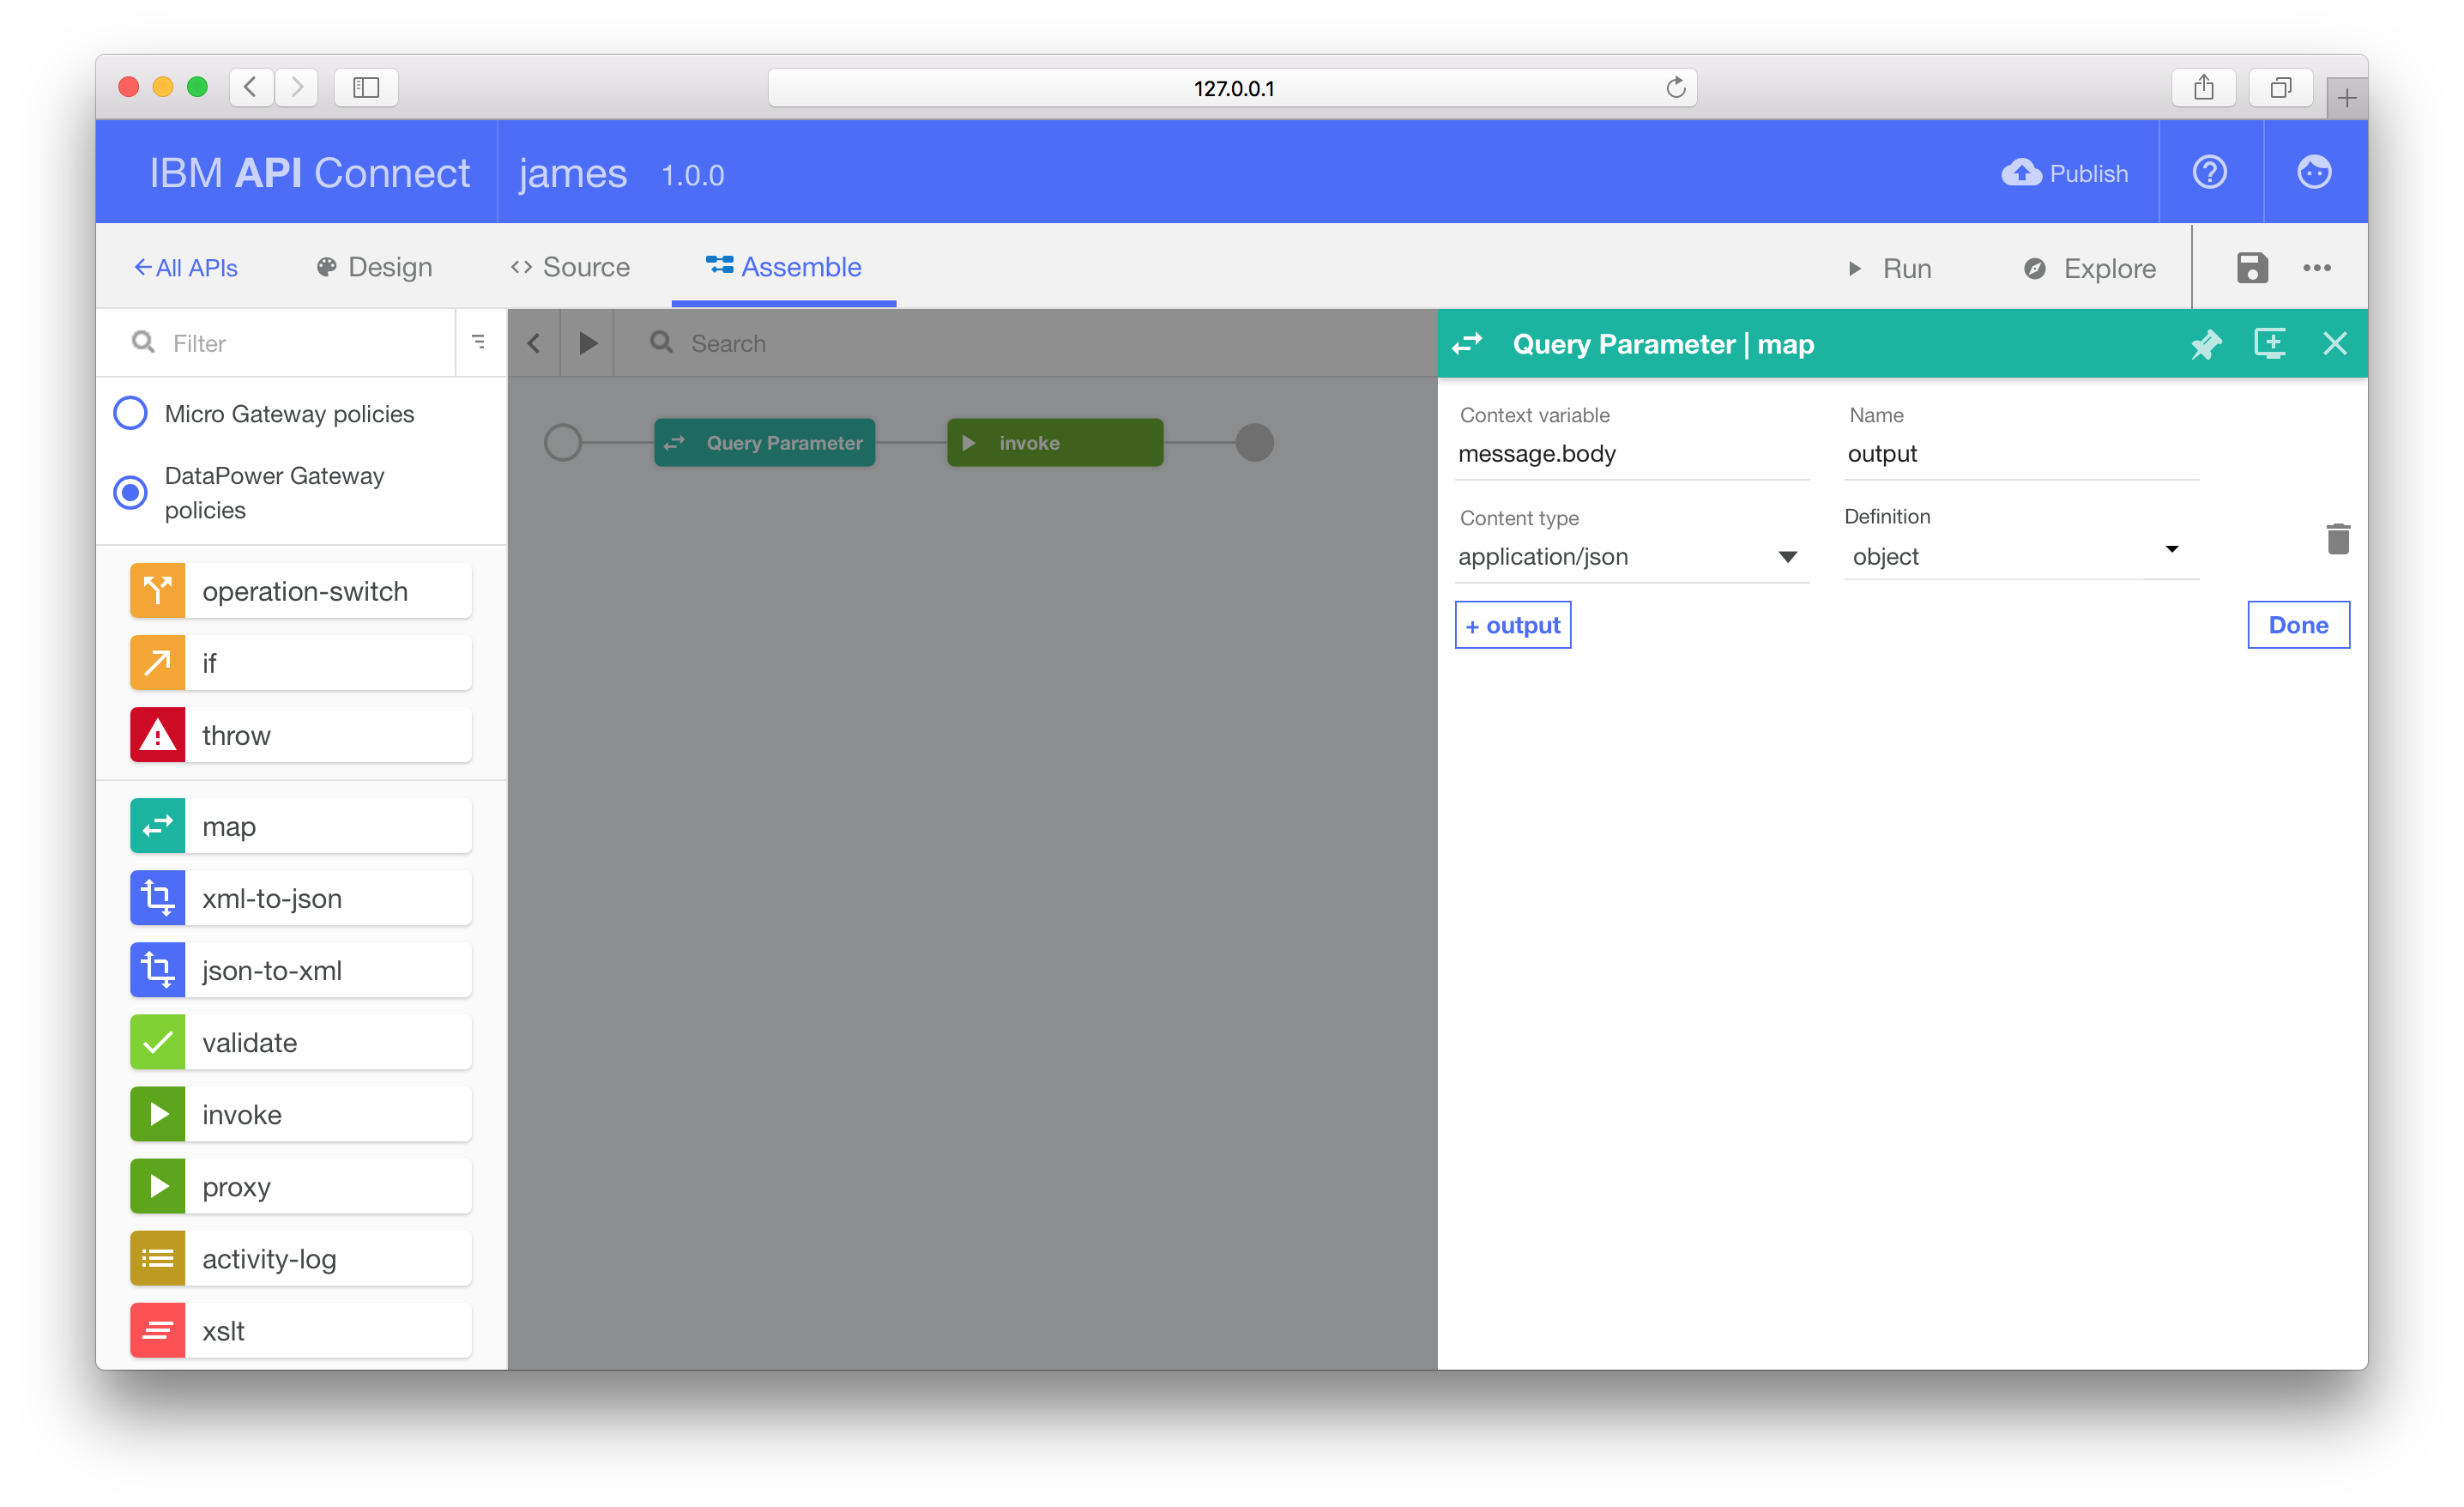
Returning to the map node editor, add a new output parameter. Leave the
Context variable as message.body. This variable will be used by the invoke
node to populate the request body.
Change the Content Type to application/json.
Select the definition as inline schema to define the JSON schema for the HTTP POST body.
Add the following JSON Schema definition to the editor form.
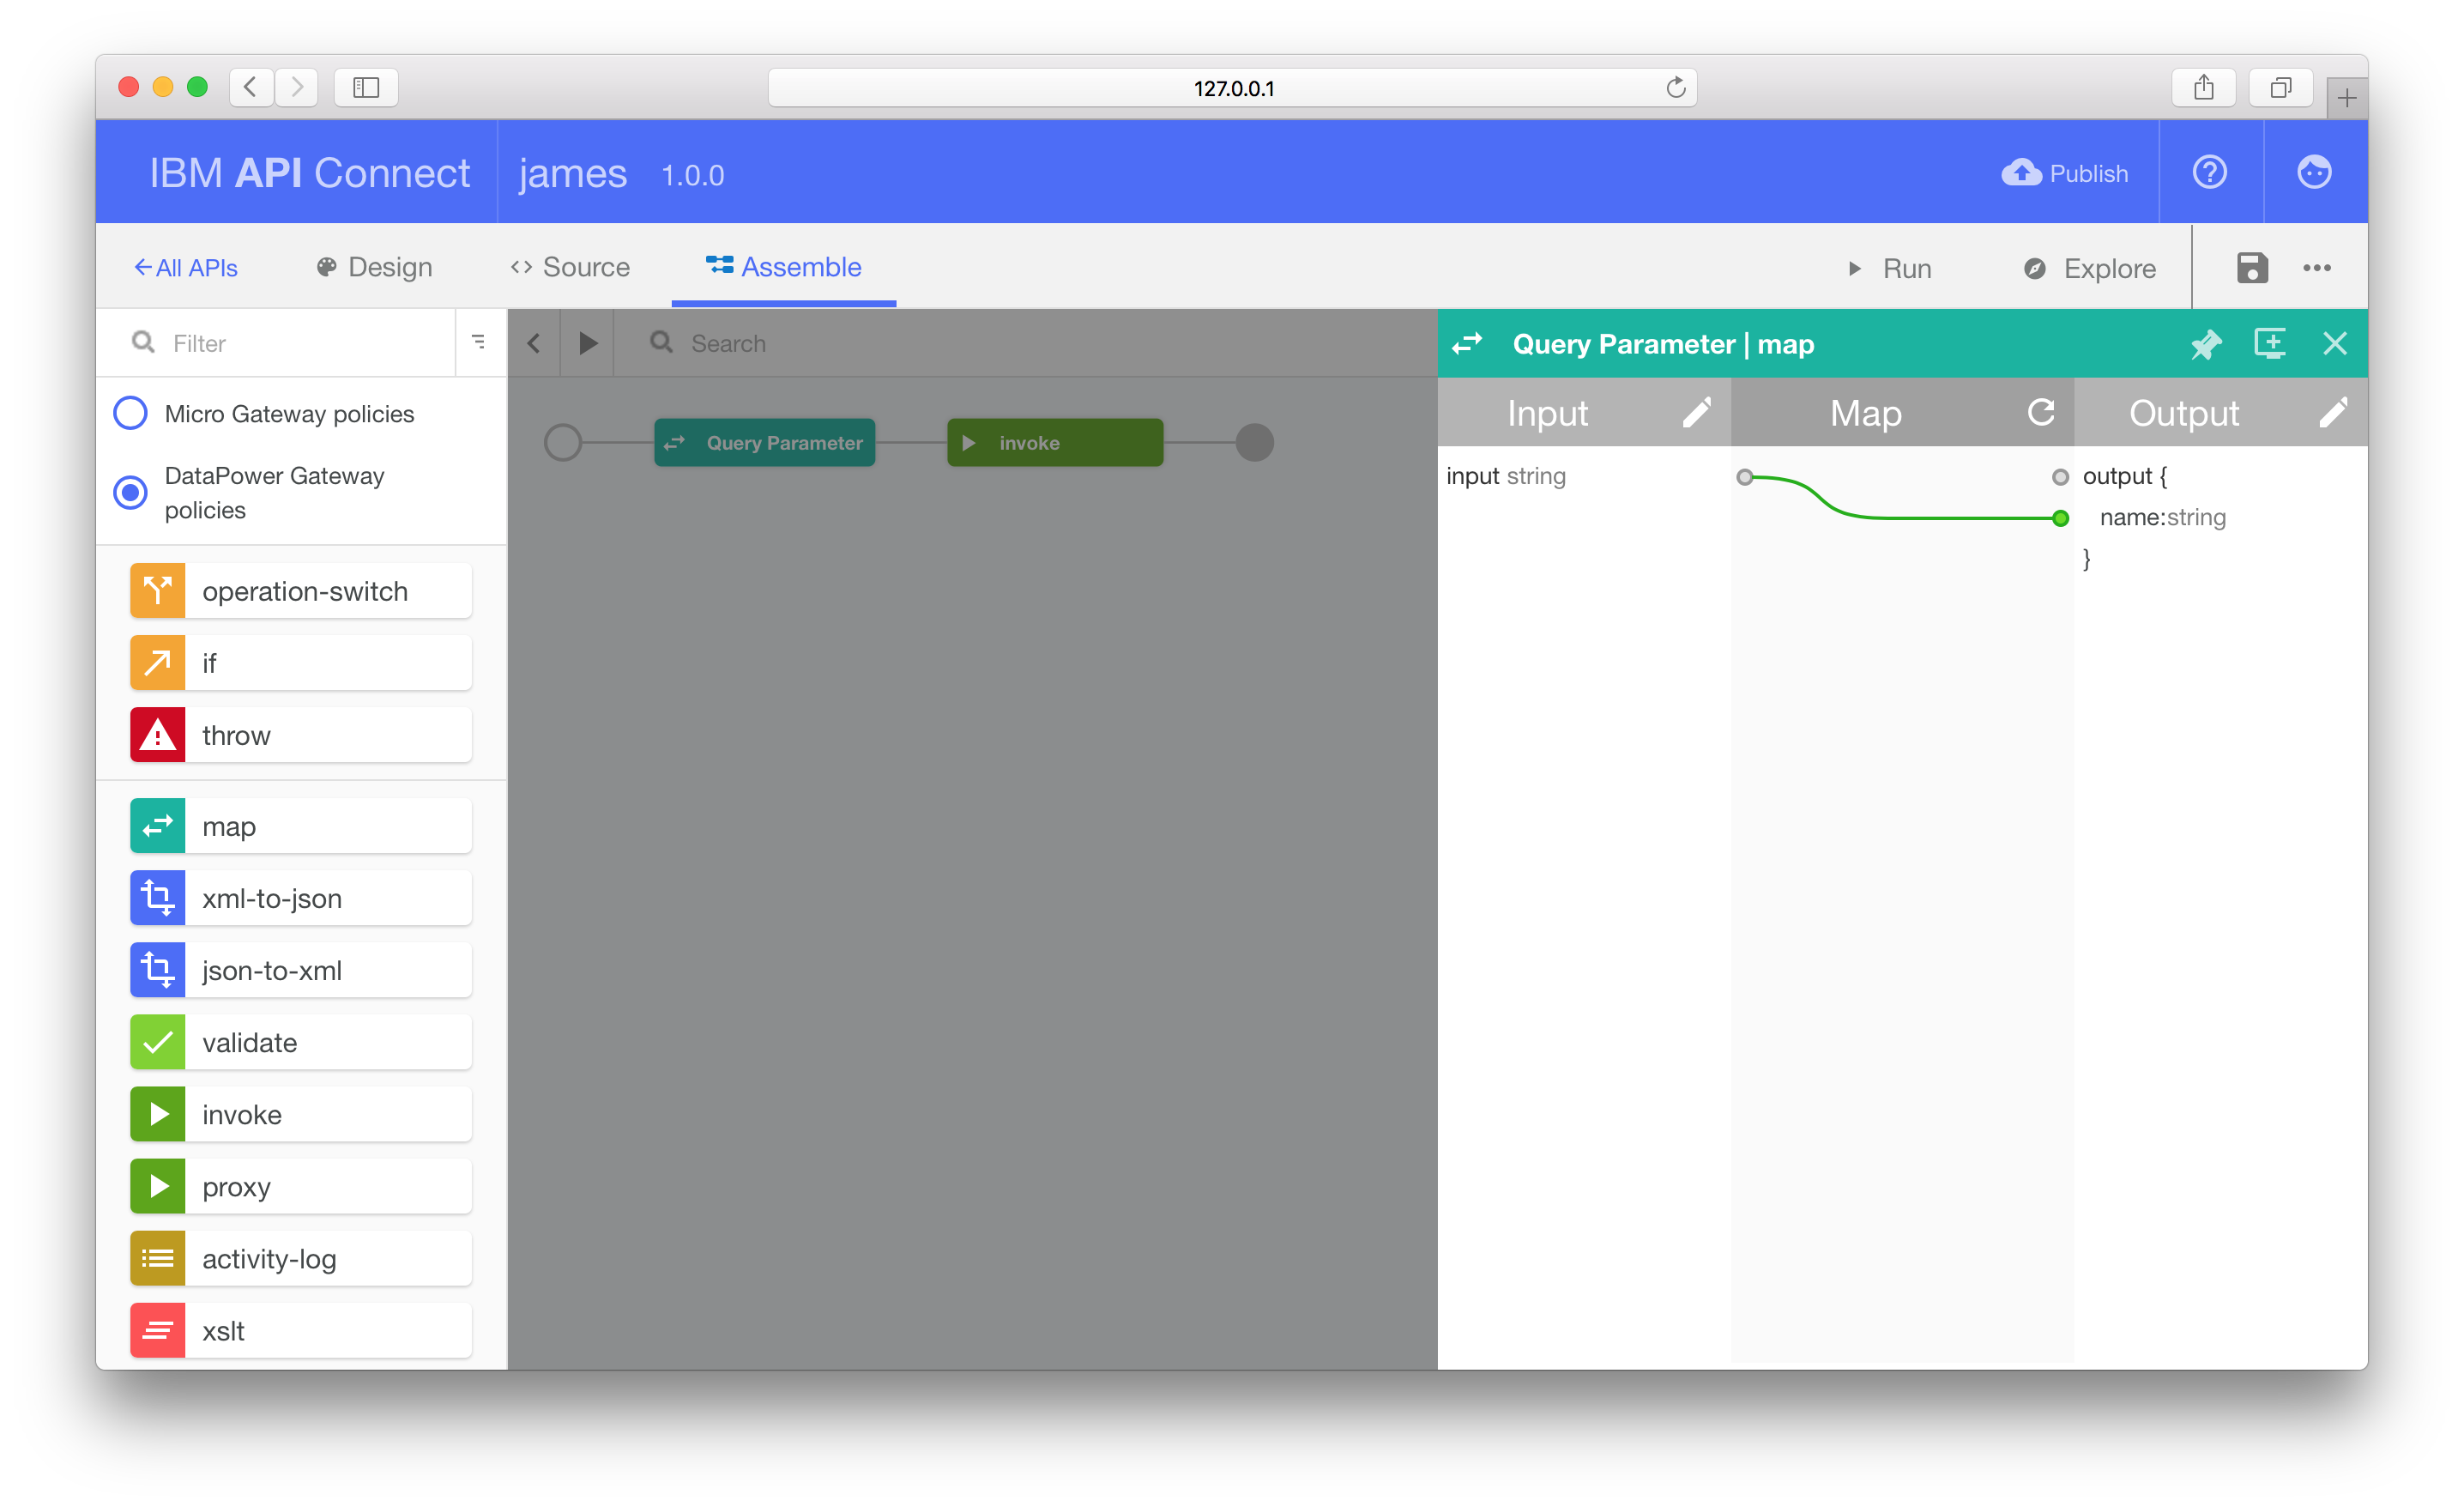
With the input and output formats defined, we can wire the two parameters together.
Under the Map panel, click the dot next to the input parameter and then click the second dot on the right, next to the name:string label.
Remember to click Save before proceeding.
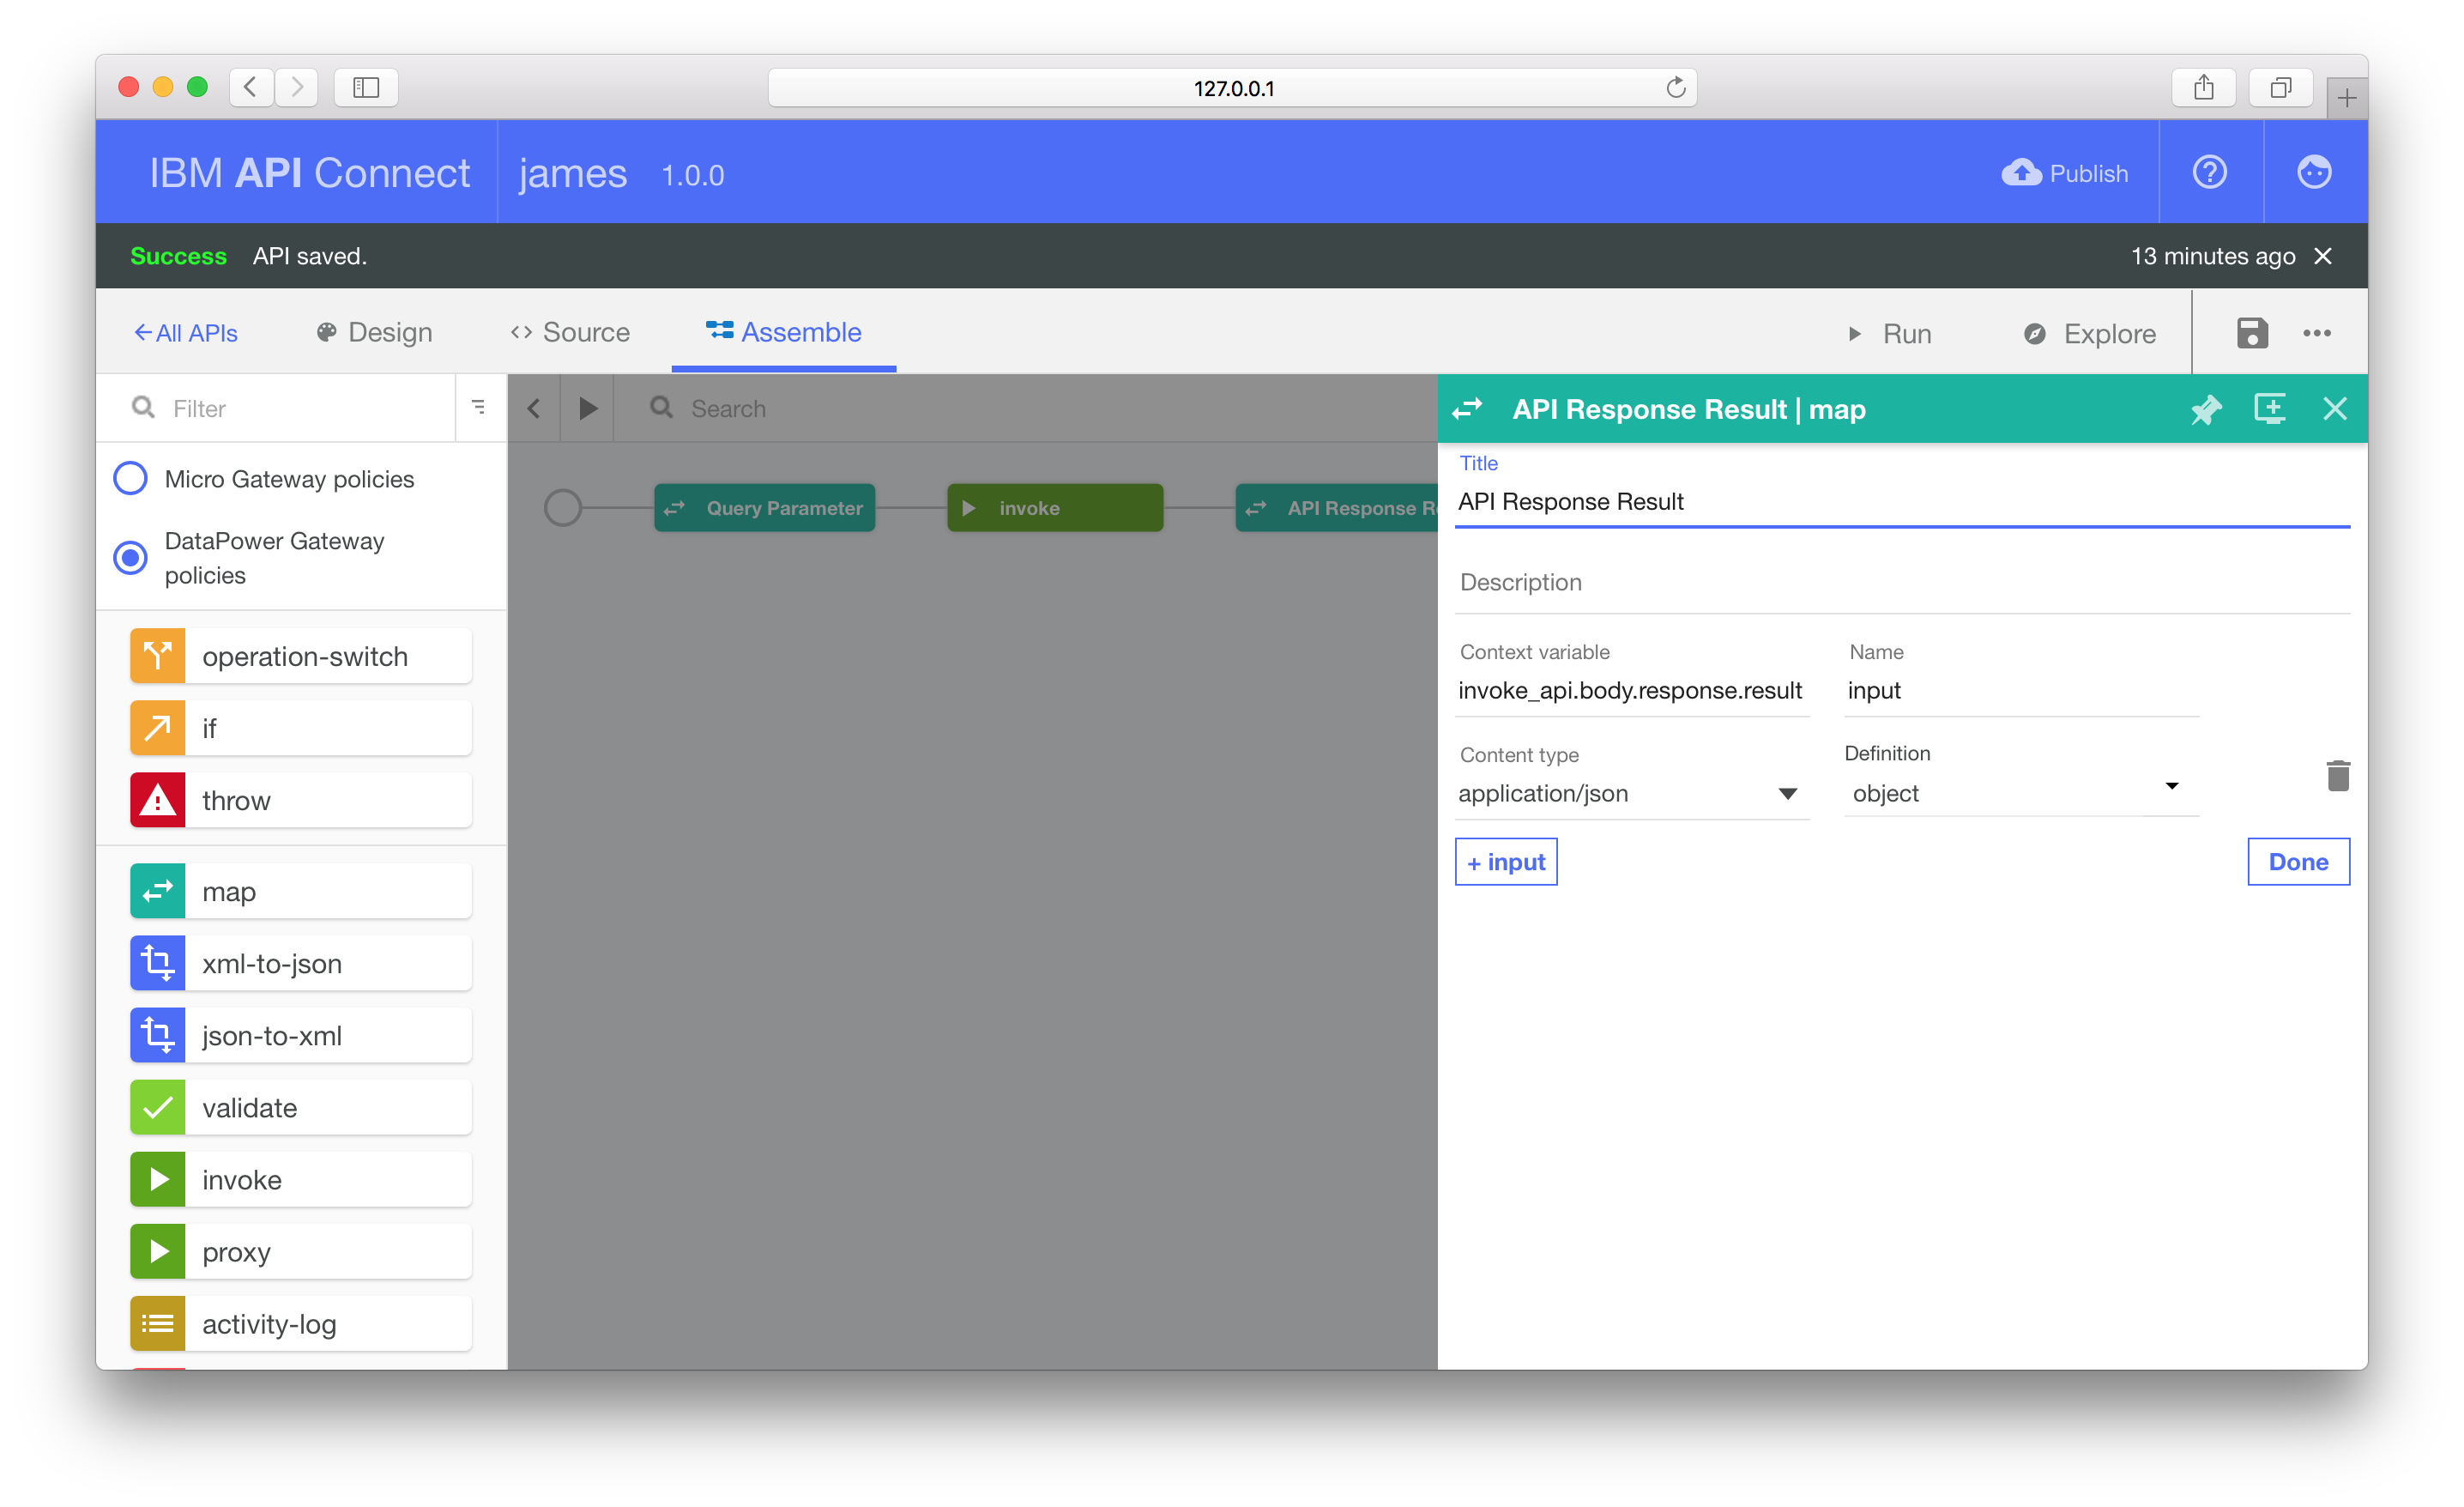
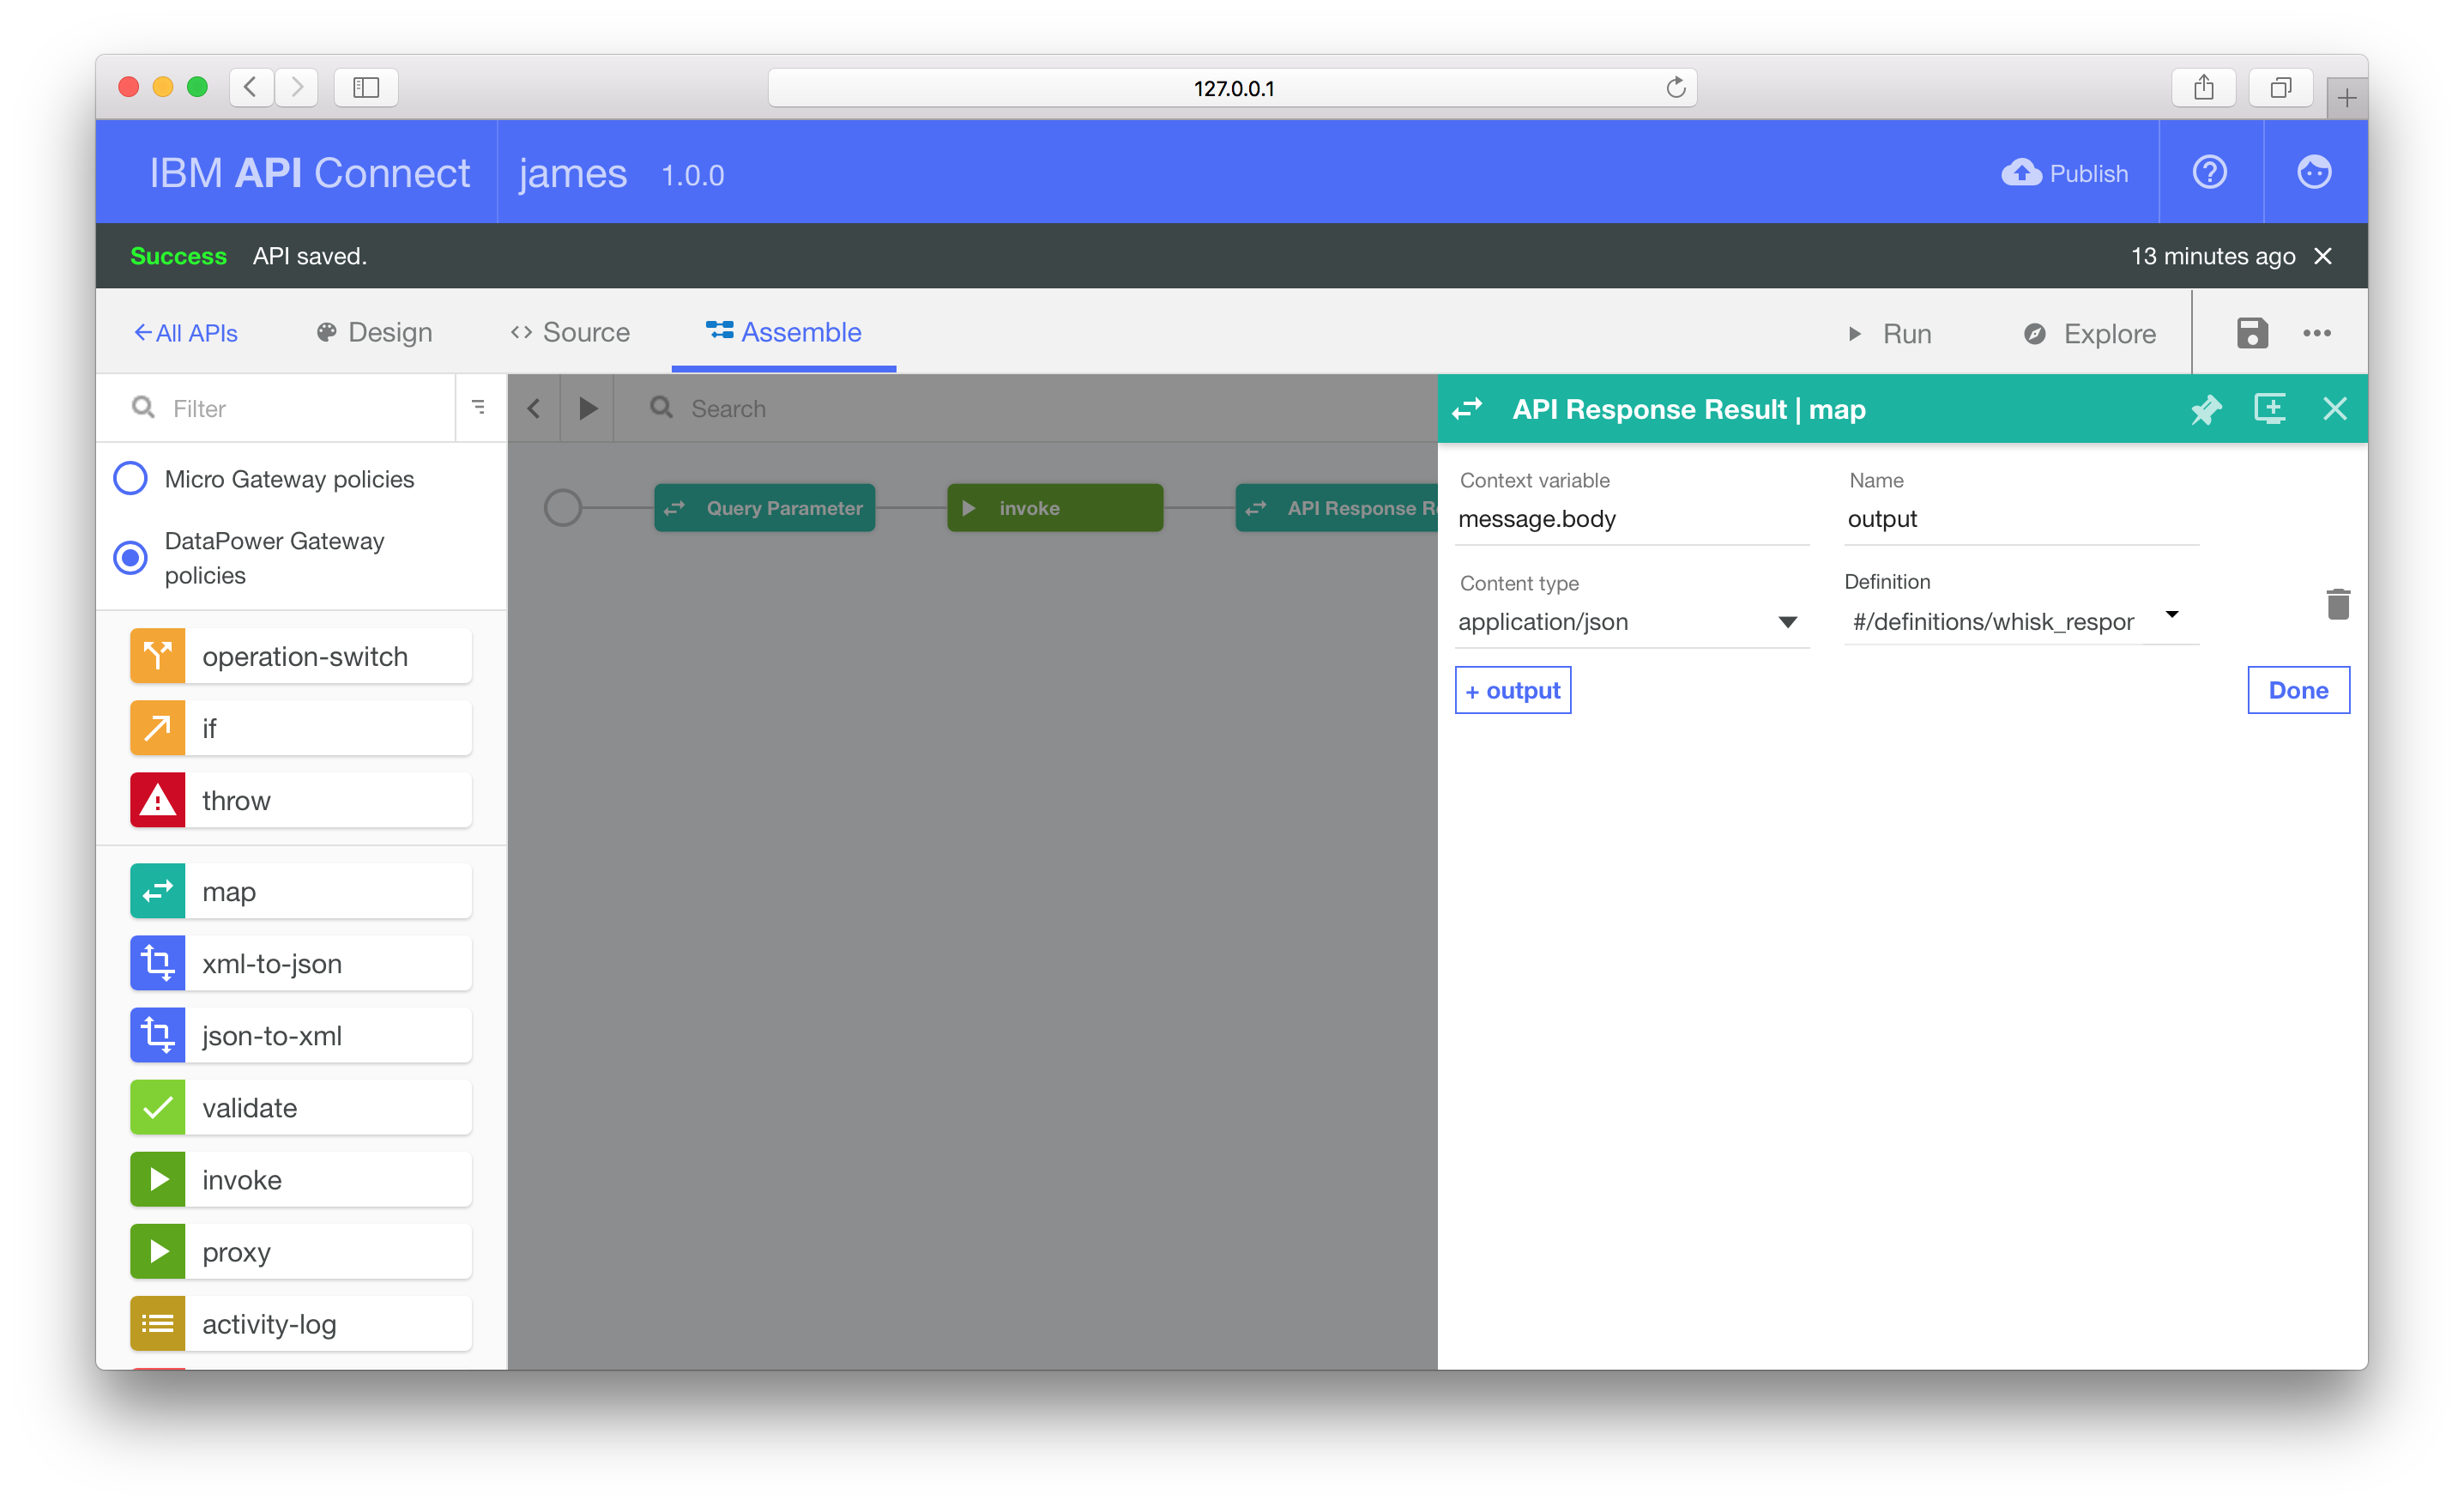
Returning Action Result
OpenWhisk Action API invocation responses include both the action result
payload and meta-data about the invocation event.
Rather than returning the raw result, we only want to return the result payload
property (response.result). Using another map node we can define a subset
of the invoked API response to be the HTTP response body.
Add a second map node to the flow, this time after the invoke node.
Add a new input property. We previously set a
context variable in the invoke definition that will contain the API response
(invoke_api). The response body is available as the body property of this
variable.
Edit the context variable to be invoke_api.body.response.result to set the
input property as the child property of the invoke result. Set the content
type to application/json and schema to object.
Add a new output property. Leave the context variable as message.body.
This context variable is used as the response body.
Set content type to application/json and change the definition to #/definitions/whisk_response.
This was the JSON schema we created during the external API definition.
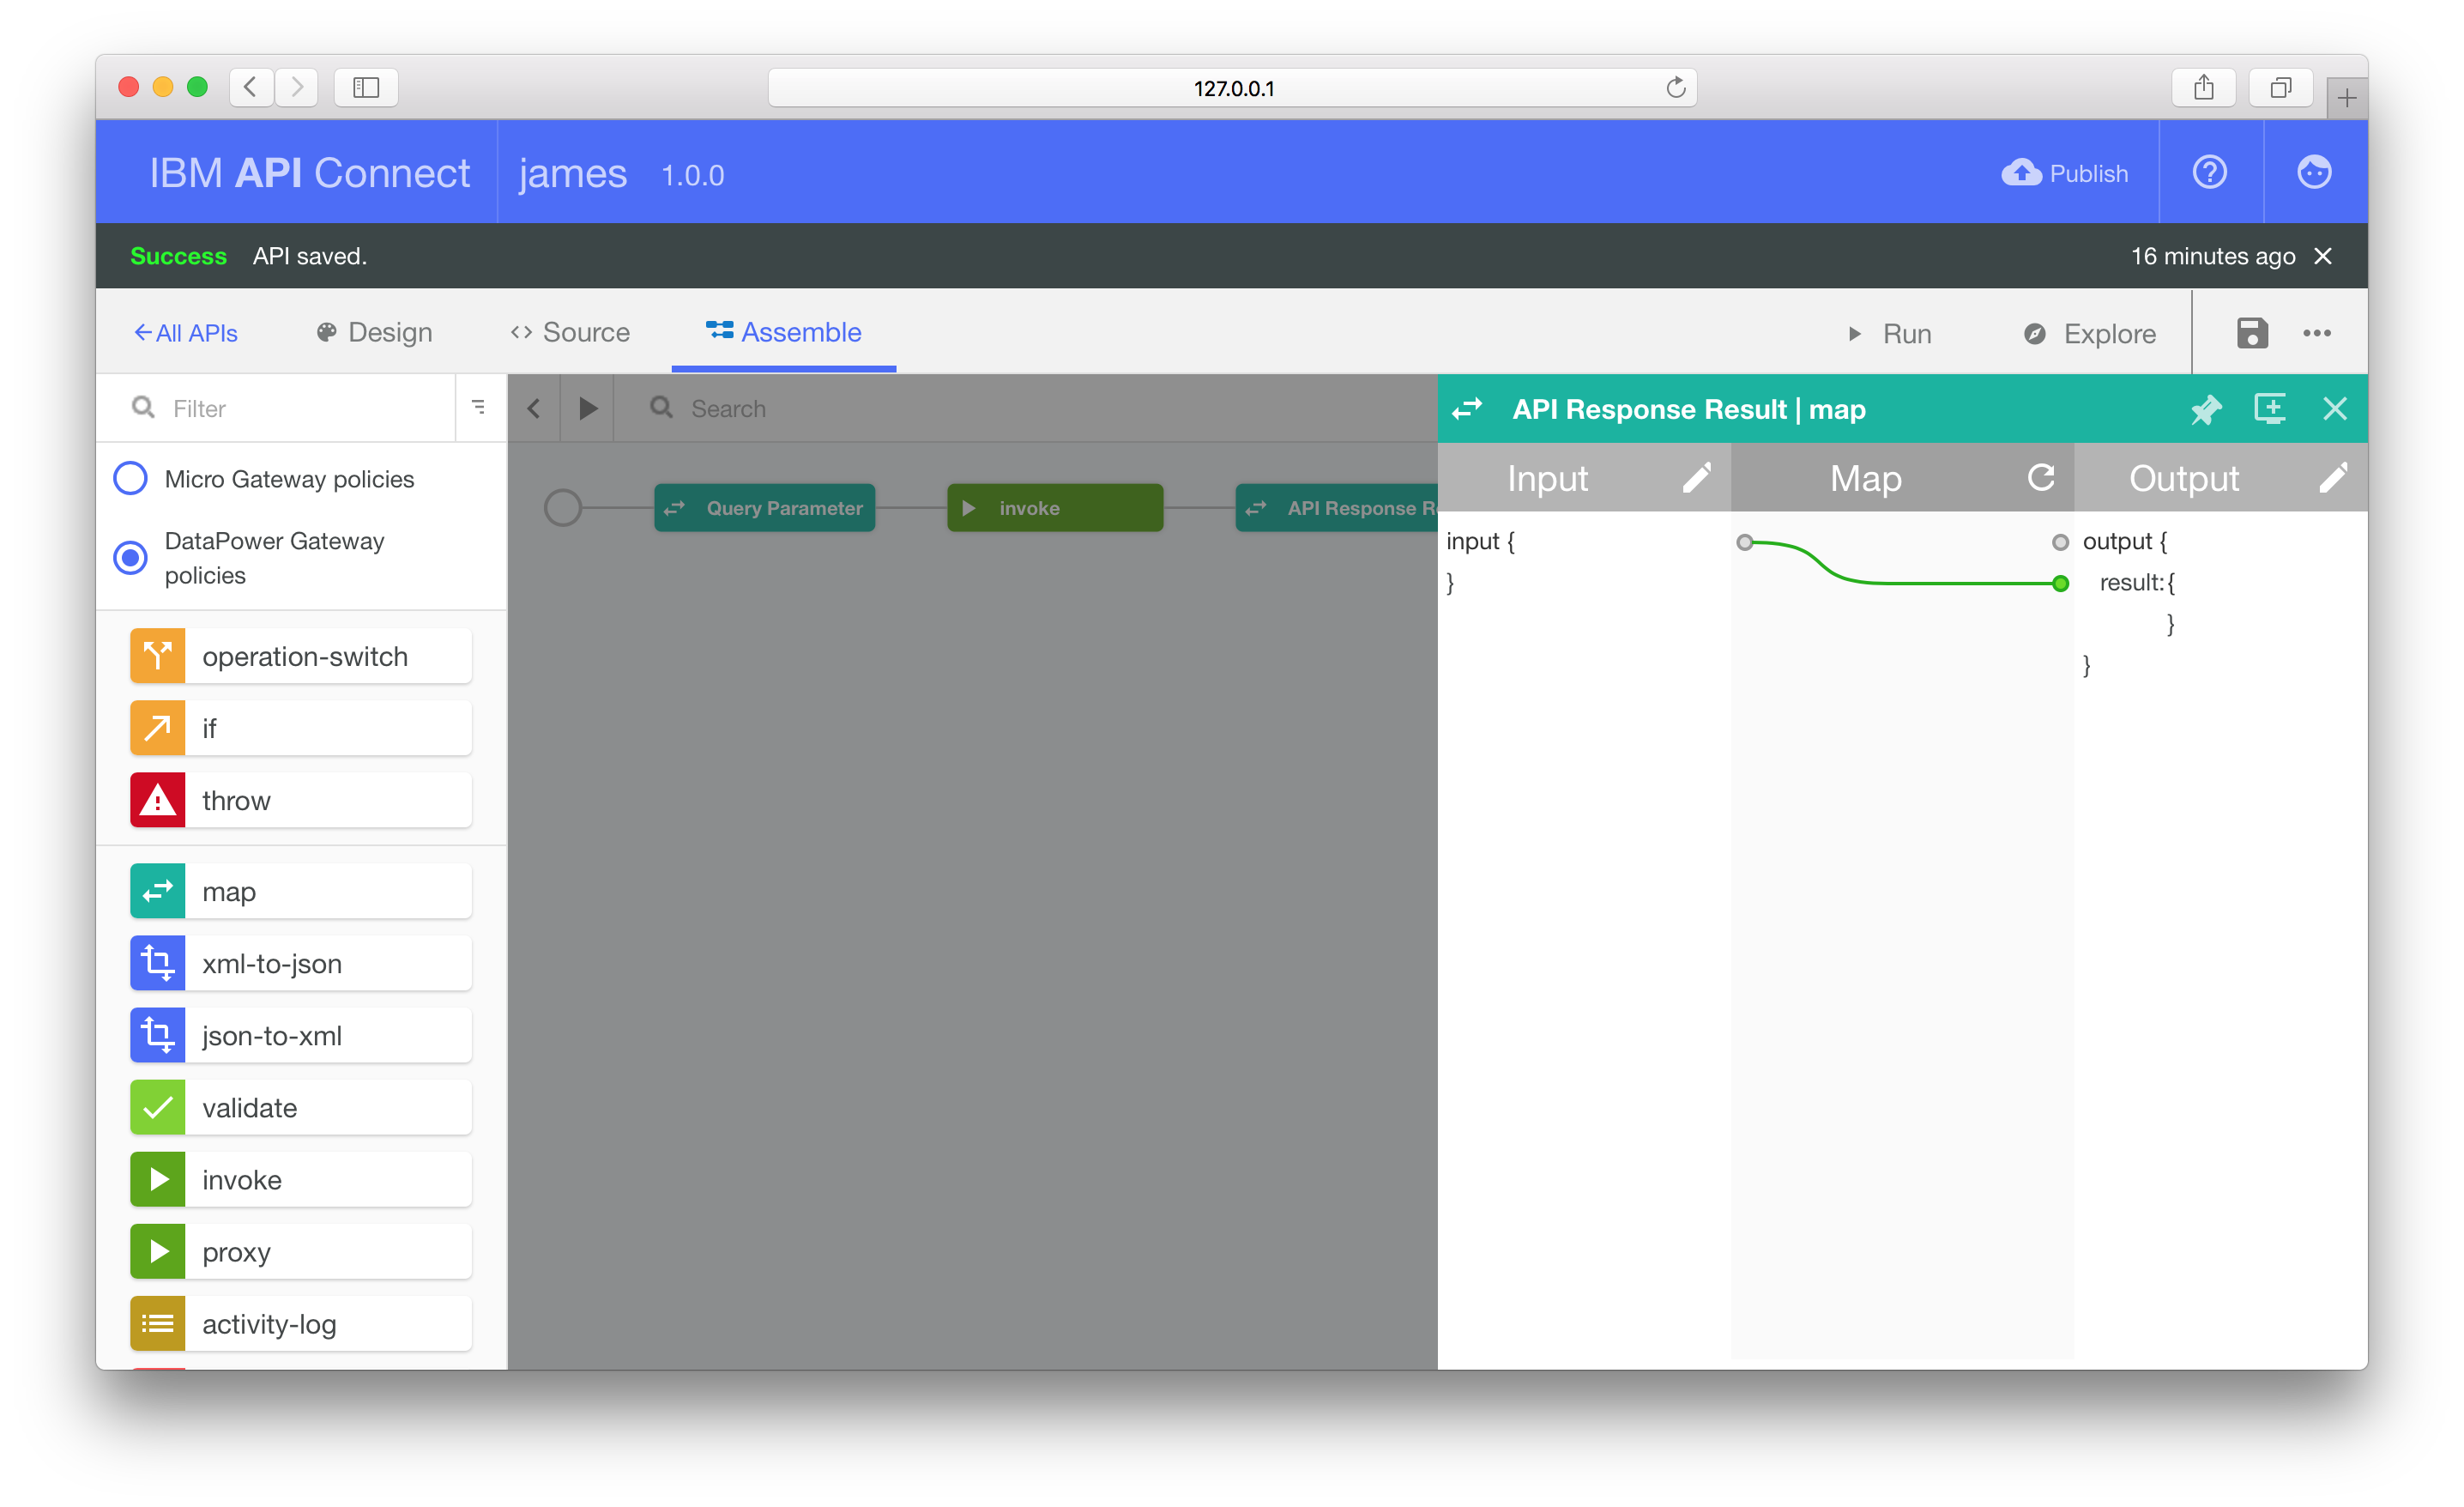
Returning to the map overview, wire together the input property to the result
attribute of the output property.
Click the Save icon before making any further changes.
Using the invoke and map nodes, we’ve now implemented our external API.
Making our API live requires us to deploy the flow definition to IBM Bluemix.
Deploying to IBM Bluemix
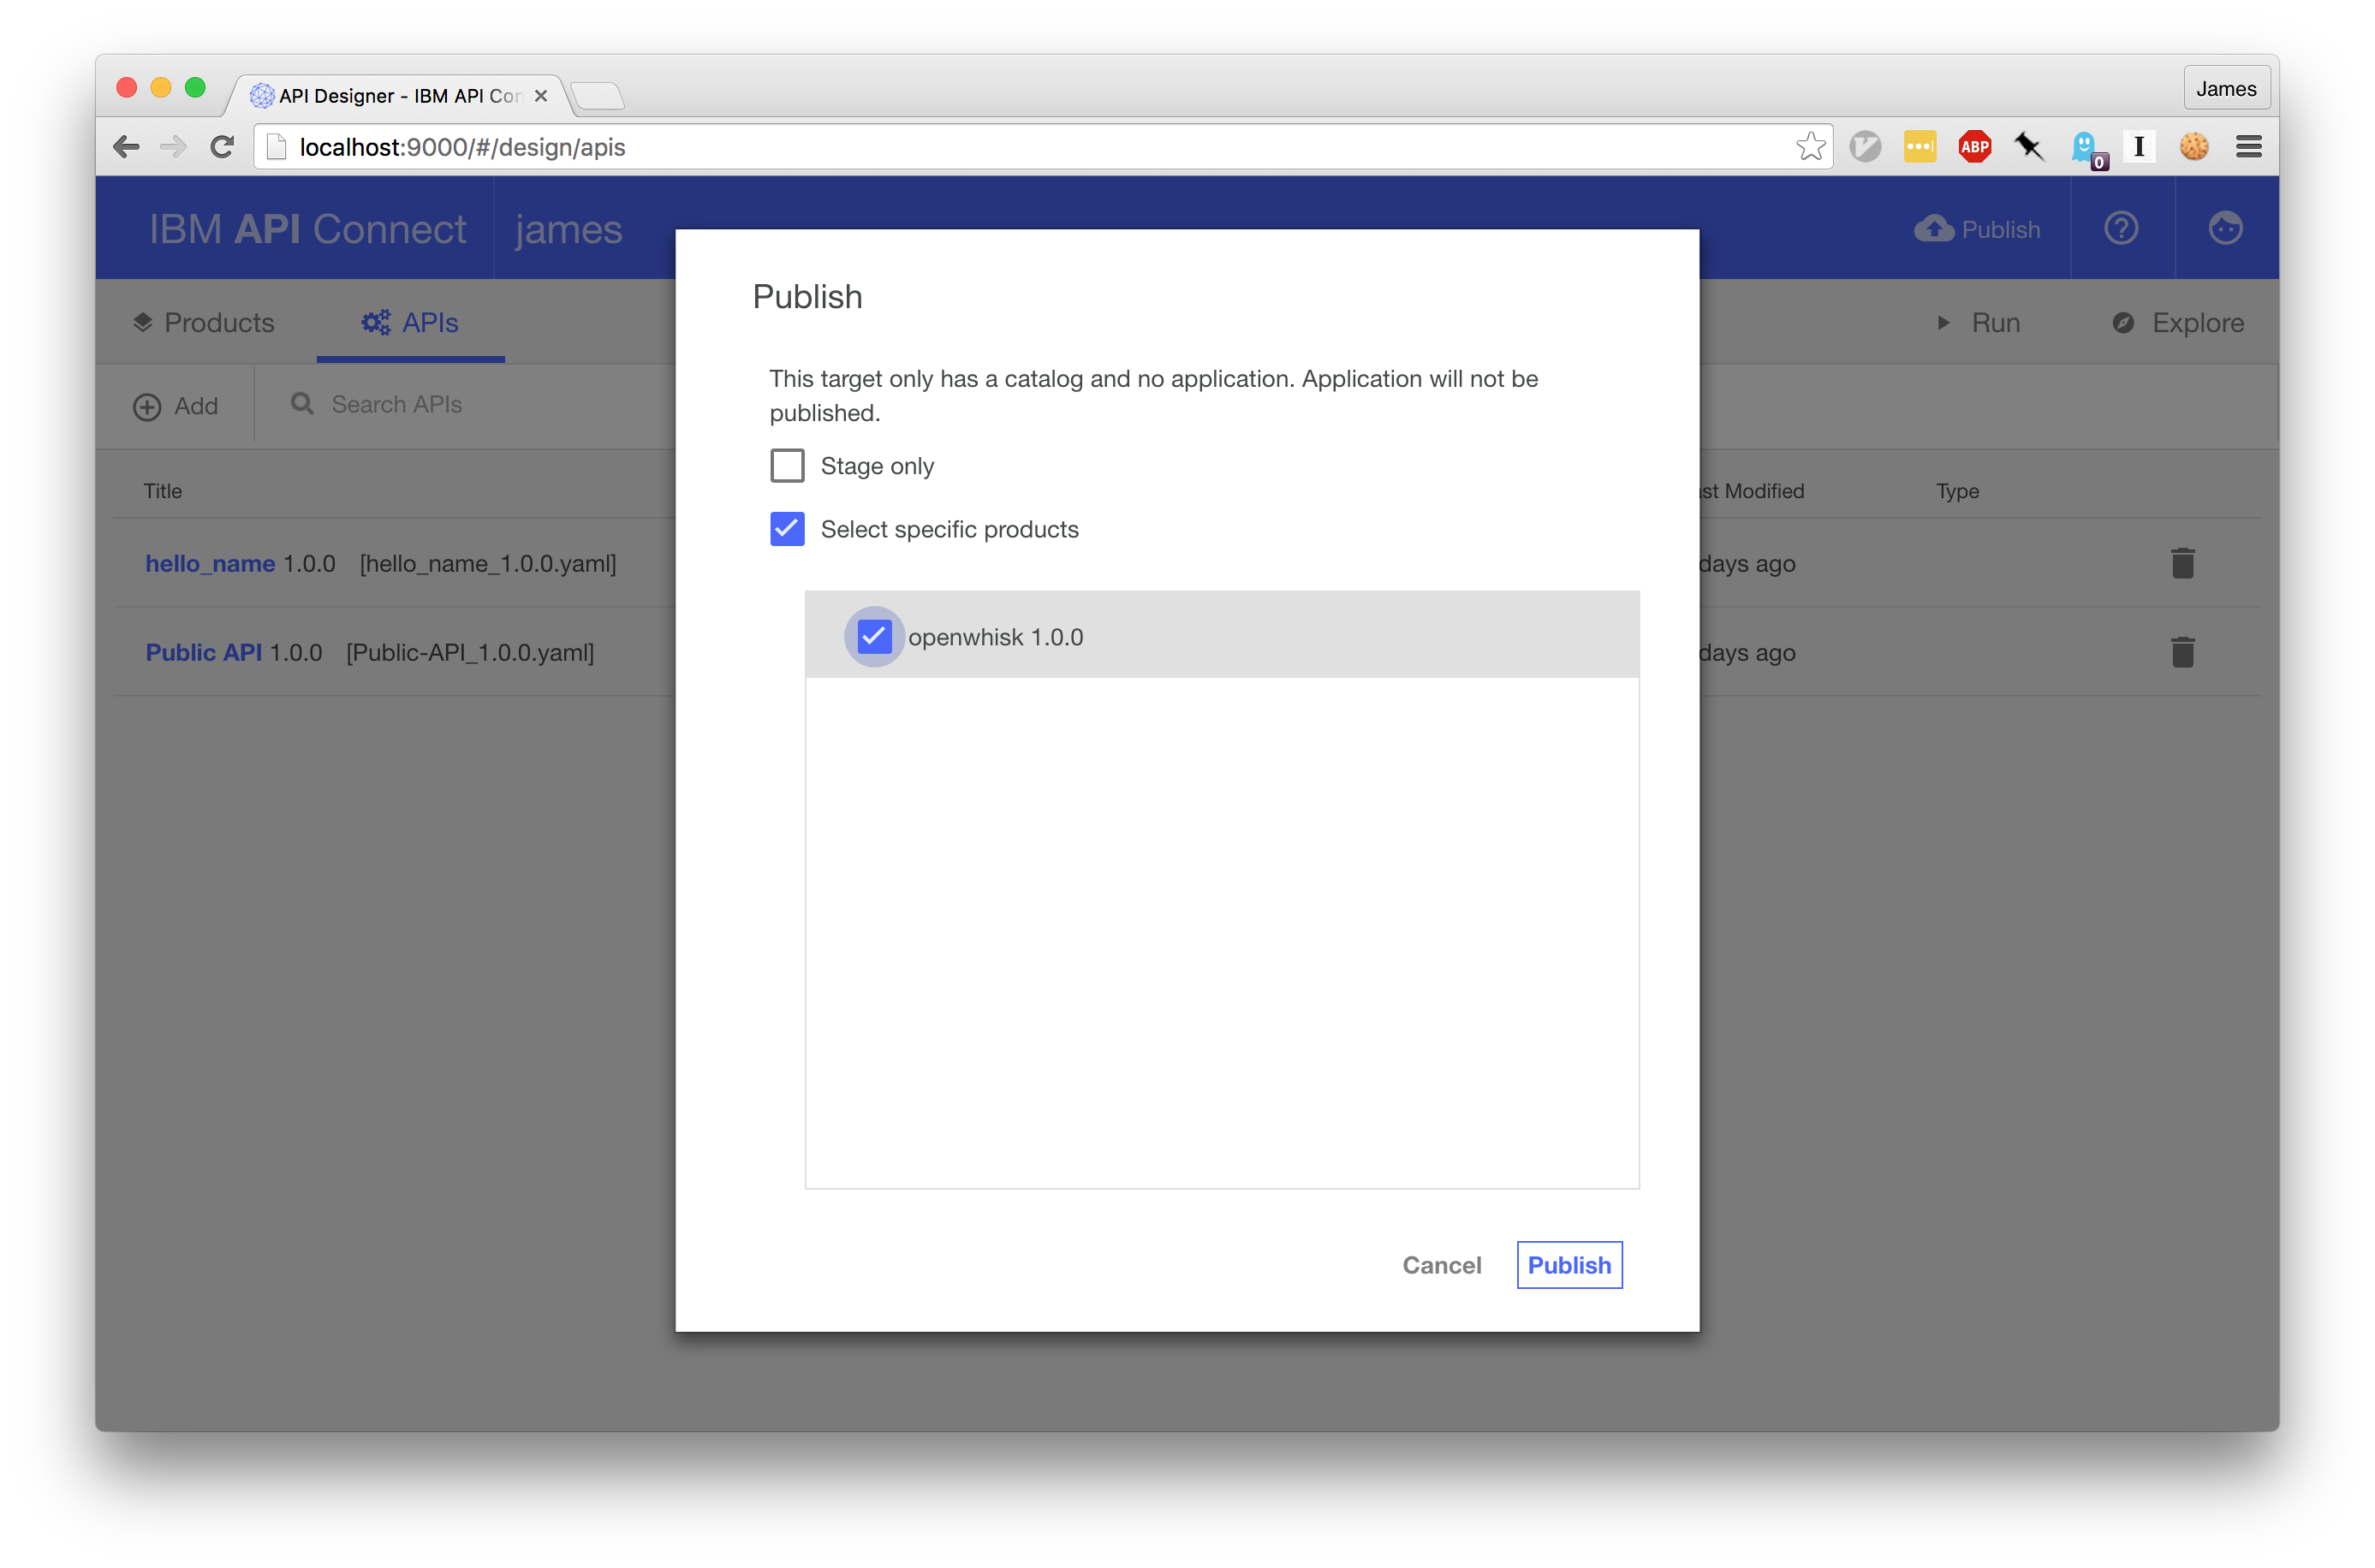
After saving your flow, click the Publish icon in the top-right hand corner.
We’re going to publish to the default Sandbox target. Follow the steps to
find and add this target to the local editor.
Once you’ve added Sandbox as the default
target, select Publish and click the configured catalogue. On the dialog box,
select the Select Specific Products option and choose the openwhisk
product.
Clicking the confirmation button will upload our API definition to
the external API Connect platform.
If everything has been configured and deploying correctly, your new API should
now be live!
Let’s test it…
Testing
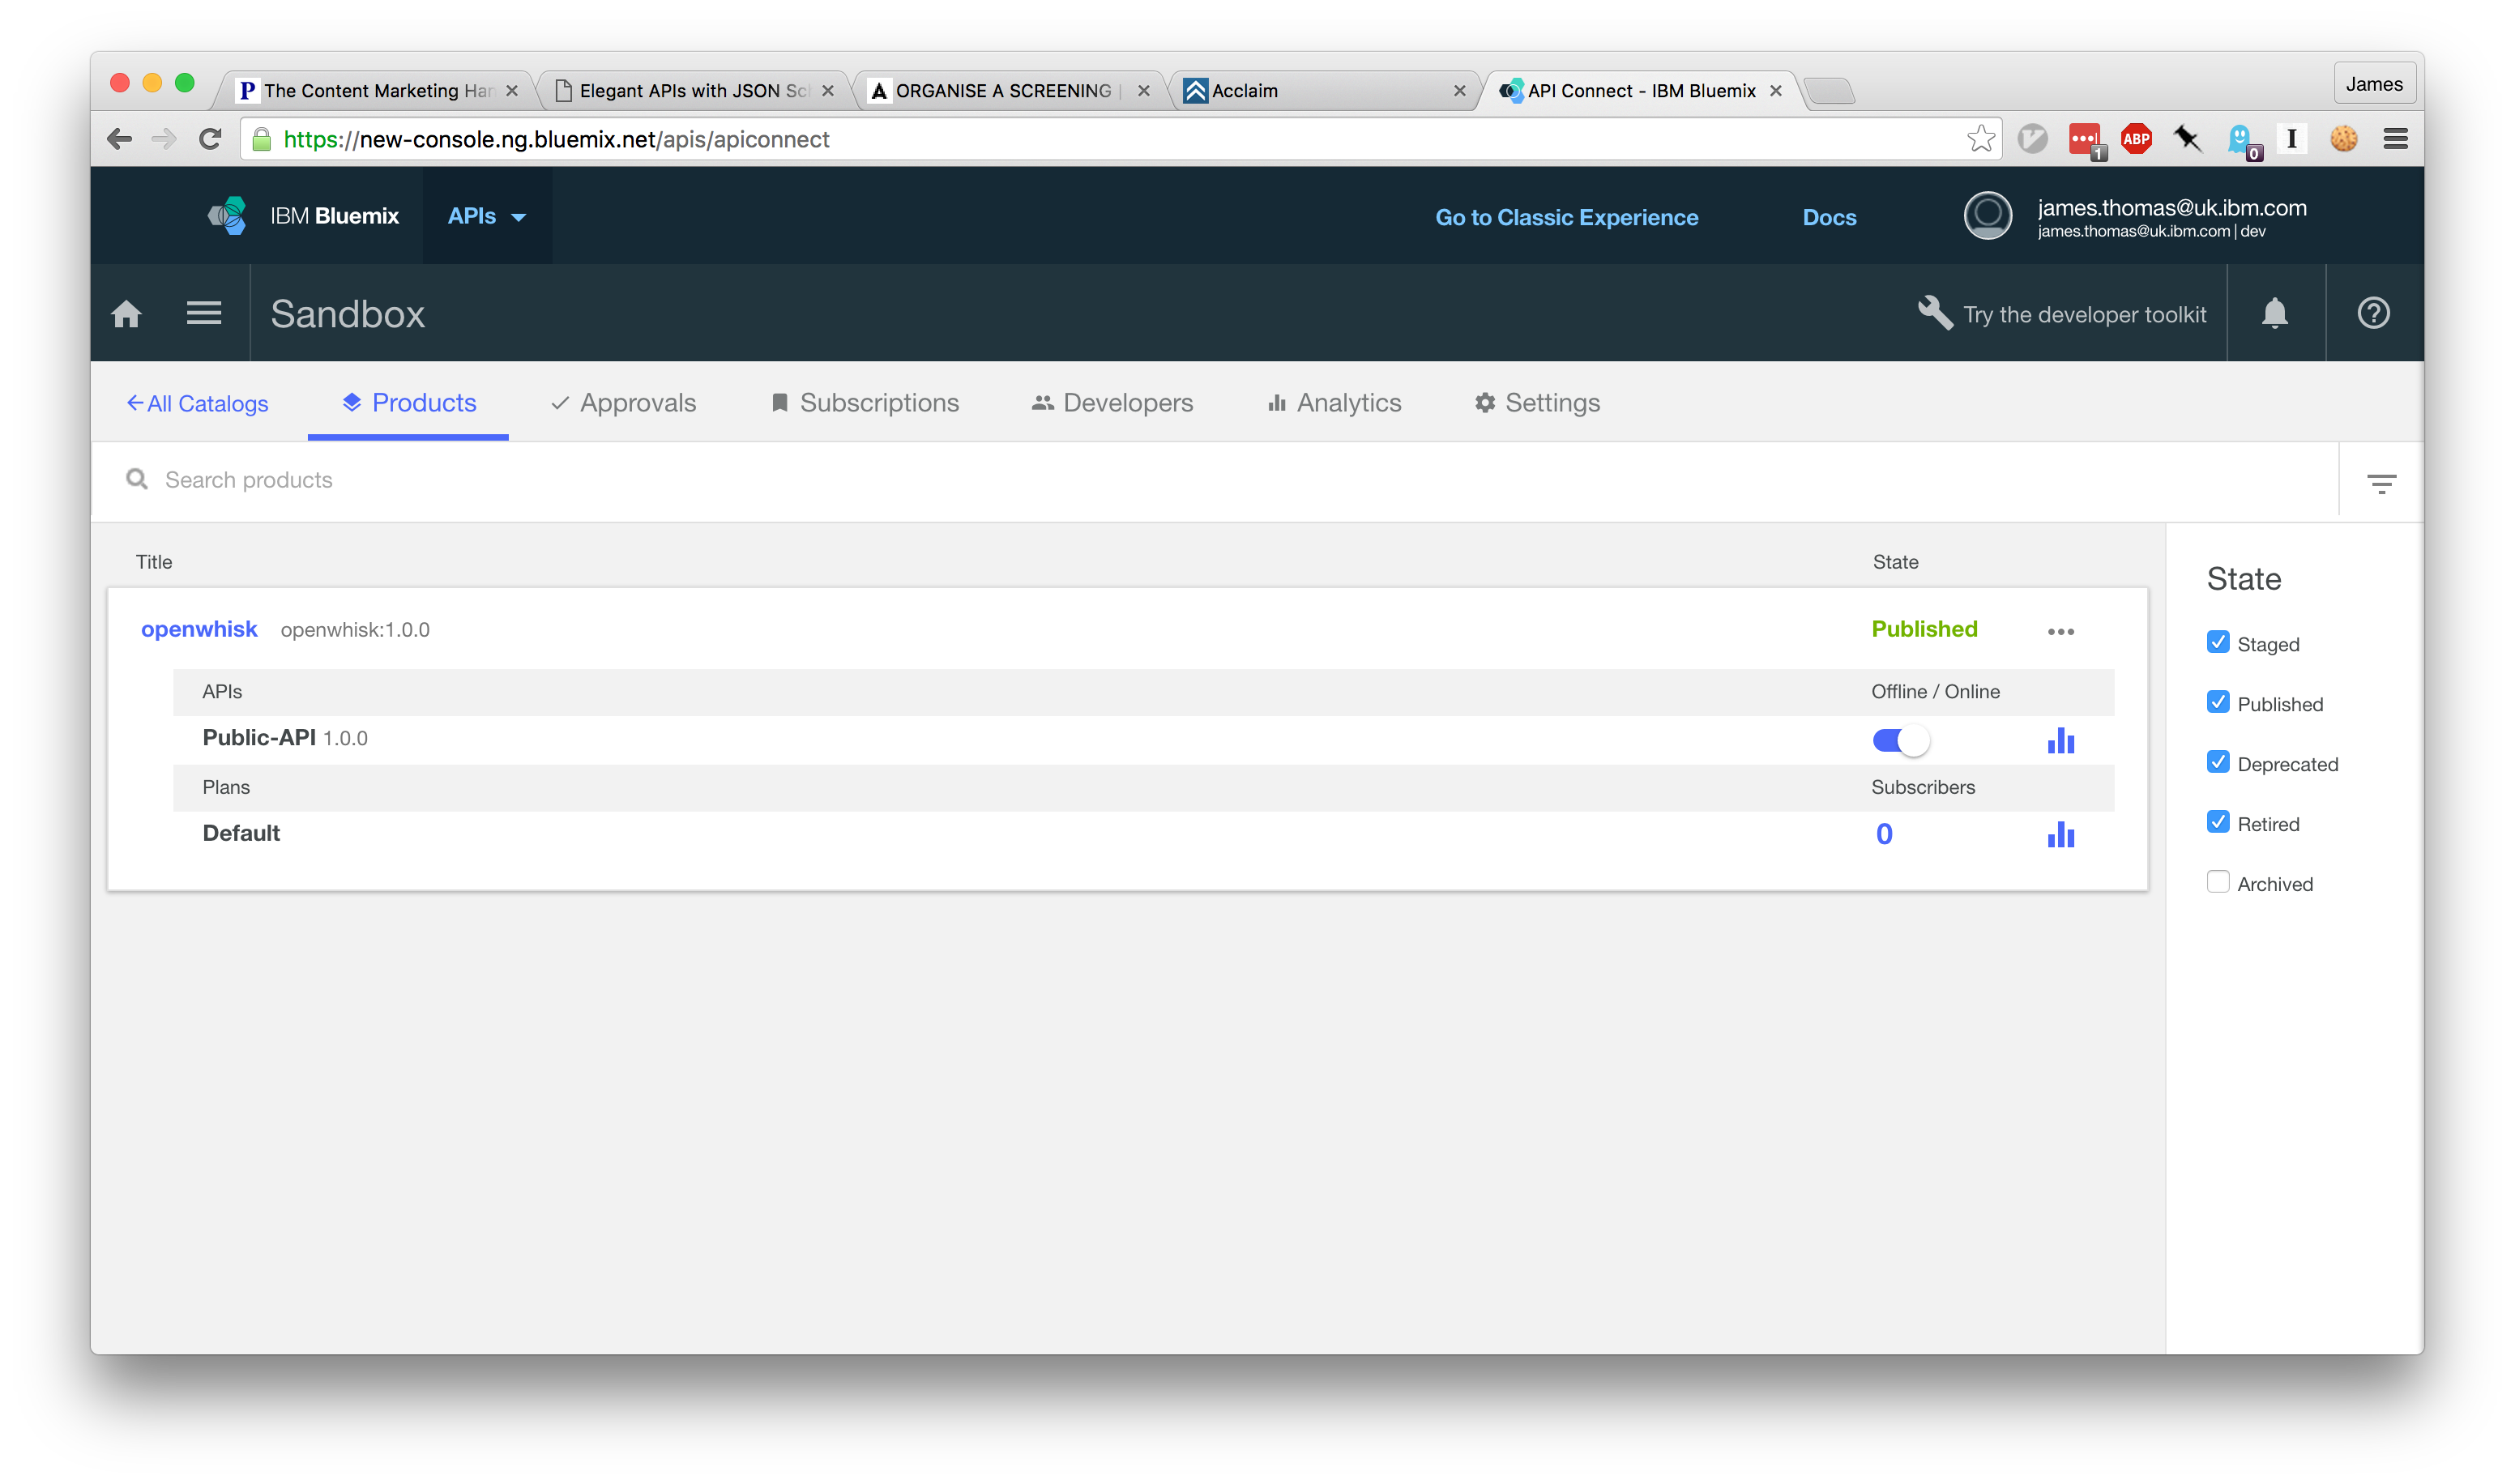
Opening the API Connect dashboard,
the sandbox catalogue should now contain the openwhisk product with the public API we defined using the editor.
We can now verify this API works by making the HTTP request to the endpoint.
Under the Settings tab, the API Endpoint section contains the Base URL
for our API catalogue. APIs deployed under this catalogue will use this
path as the endpoint root.
The API definition registered a relative URL path, /hello-name, which
we can combine with the catalogue endpoint (e.g.
https://api.us.apiconnect.ibmcloud.com/USER_ORG_SPACE/sb) to generate an
public API endpoint.
We can now test this API by sending a HTTP GET request to the URL, passing the
name as a query parameter.
We’ve successfully used API Connect to create an external API which proxies the
OpenWhisk API. We now have a public endpoint we can use to invoke OpenWhisk
Actions, without exposing our credentials and enabling CORS-support for
cross-domain XHRs.
Conclusion
Serverless computing platforms give developers a rapid way to build APIs
without servers. Combining this approach for building backend services with
static file hosting provides an architecture for developing entire serverless
web applications.
Experimenting with OpenWhisk as the backend platform for building serverless
web applications, there were two challenges, authentication and cross-domain
support.
Both issues were resolved using the API Connect service on IBM Bluemix.
API Connect is an incredibly powerful tool for creating, running, managing and
securing APIs. Using the editor application to construct a new API, the
endpoint was implemented using the invoke and map nodes. Deploying the
generated flow to IBM Bluemix exposed the API as a public endpoint.
This service allows developers to register small bits of
code that are executed on-demand in response to external events. The
“serverless” stack started in 2014, when Amazon launched
Lambda, but is now set to be a major
technology trend in 2016 with IBM, Microsoft and Google all launching their own
solutions.
OpenWhisk is the first open-source “serverless” platform. It supports running registered
actions in Node.js, Swift and even executing custom Docker containers.
Playing around with the technology recently, I’ve created two projects using the platform.
OpenWhisk Client Library
OpenWhisk exposes a RESTful API
for interacting with the service. Wrapping this API with a
small client library makes it easy for developers to interact with the service from JavaScript.
This library has been donated back to the OpenWhisk project and is available through NPM.
12345
constopenwhisk=require('openwhisk')constow=openwhisk({api:'https://openwhisk.ng.bluemix.net/api/v1/',api_key:'...',namespace:'...'})ow.actions.invoke({actionName:'action'}).then(result=>{// result is service response})
Whiskify
This project, available through NPM, makes it easy to run arbitary JavaScript
functions as OpenWhisk actions. Passing a reference to a JavaScript function
into the module, an OpenWhisk action is created using the function source. The
module returns a new JavaScript function, that when executed, will call the
remote action and returns a Promise with the service response.
For the last few months, I’ve been using the ELK stack to collect logs from my
Cloud Foundry applications. This service has been deployed on IBM Bluemix using
a Docker container, previously detailed in this blog post, and running happily
until it ran into issues this week.
Trying to load the Kibana web application, the server was returning connection
refused errors. Looking at the container in the IBM Bluemix dashboard showed
no obvious signs of issues. Reviewing the container log output uncovered nothing
indicating what had failed.
Hmmm…
Fixing this issue would require me to start debugging from within the live
container, but how?
This container image had not included an SSH daemon that would allow remote
access over SSH.
Using the IBM Containers plugin for the Cloud Foundry CLI, I can find the
container id for the instance I want to debug and then start a bash shell to
start resolving my issue.
12
$ cf ic ps
$ cf ic exec -it <container_id> /bin/bash
Having a live shell to my container allowed me to resolve the issue within a
few minutes, without having to affect the running state of the container. This
command also removes the need to keep an SSH daemon running on containers for
remote access.
For more information on the subset of Docker commands supported by IBM
Containers, see the following documentation.
Cloud Foundry makes it so easy to build, deploy and manage applications that it
can be a struggle just to keep up with development progress…
“Who is restarting this application?” “What is this new service instance?” “When did this application instance run out of memory?”
Development teams are increasingly using Slack to
collaborate on projects and using custom bots to manage and monitor
applications, triggered through the channel messages. This approach,
popularised by Github, has now become known as
“ChatOps”. Using group
chat for development projects gives
greater operational visibility to everyone in the team.
Slack has exploded in use over the past two years, recently signing up more
than a million active users.
The platform publishes an API for writing bots that
respond automatically to messages, allowing users to write custom integrations
for external services.
Users can register webhooks to receive channel messages, based upon keyword
triggers, and allow bots to reply with new channel messages. The platform also
provides a websocket channel with registered bots for real-time communication.
Could we write a custom bot for monitoring applications on the Cloud Foundry
platform?
The bot would publish notifications about applications and services into group
channels, helping keep teams updated with platform events in real-time.
Cloud Foundry Monitoring APIs
Cloud Foundry provides access to the platform through a series of RESTful APIs,
exposed by the Cloud Controller
component. User commands from the CF CLI tool are translated into calls
to these APIs.
Platform user account credentials are used to obtain OAuth2 tokens
for authenticating service calls.
Looking at the documentation, there’s an endpoint for retrieving all platform events.
This API is used to retrieve events for an application when using the CF CLI
events command. Events can be filtered by the application, event type and
timestamps. Responses include events about changes to applications, services
and service instances.
Polling this API, with timestamp filtering to ignore old events, we can
retrieve a continuous stream of new platform events.
Slack Integration
Setting up a new bot integration for a Slack group provides you with a token
you can use to authenticate with the Real-Time Messaging API. Rather than
having to implement the Websocket-based API handler ourselves, we can use one
of the many existing community libraries.
Using the Node.js client library, passing in the authentication token, we just
need to implement callback handlers for the API events.
Slack Client
123456789101112
varSlack=require('slack-client')varslackToken='xoxb-YOUR-TOKEN-HERE'#Addabotathttps://my.slack.com/services/new/bot and copy the token here.varautoReconnect=true#AutomaticallyreconnectafteranerrorresponsefromSlack.varautoMark=true#Automaticallymarkeachmessageasreadafteritisprocessed.varslack=newSlack(slackToken,autoReconnect,autoMark)slack.on('message',function(message){...})slack.on('error',function(err){...})slack.on('open',function(){})slack.login()
When platform events occur, we forward these to any channels the bot is registered in.
Plugging together the Cloud Foundry event monitoring code with the Slack bot integration, cfbot was born…
You will need to register the bot with your Slack group to receive an
authentication token. This token, along with login details for a platform
account, need to be created as user-provided service credentials. The bot will
read these service credentials on deployment and start monitoring for events.
Full installation instructions available in the project README.
usage
cfbot will monitor events from applications in all spaces and organisations that the user account has access to.
Users can filter the applications and events being reported using the apps and
events commands. Both commands take application or event identifiers that are
used to match incoming events. The wildcard ‘*’ identifier can be used to
revert to matching all events.
@cf apps // show the currently application filter
@cf apps app_name // add the 'app_name' to the filter list
@cf apps * // reset to the filter to wildcard matching

@cf events // show the currently event filter
@cf events event_type // add the 'event_type' to the filter list
@cf events * // reset to the filter to wildcard matching

@cf status // show the current bot status message

@cf polling_frequency // show the cf events api polling time in seconds
@cf polling_frequency 10 // set the cf events api polling time in seconds
Earlier this year, I made a major upate to the Node-RED nodes for the IBM
Watson services available through IBM Bluemix. Since then, the IBM Watson team
has been busy, with lots of changes to APIs. I’ve recently been working through
these changes, updating the nodes, to ensure they work against the latest APIs.
Updates to these nodes have now been finished and are available through the
boilerplate on IBM Bluemix or by installing the IBM Bluemix Nodes package
locally.
If you have an existing Node-RED instance running in IBM Bluemix, please review
the documentation for upgrade instructions.
If you encounter any issues, please raise a issue on Github.
For full details on the changes are available in the pull request.
Before Christmas, my department
at IBM had one of our semi-regular Hack Days to
get everyone together and work on interesting ideas away from the day job. I spent
the time playing with an idea to make exposing NPM packages in Node-RED easier…
Node-RED is a visual tool for wiring the Internet of Things.
It makes it easy to create, combine and control data flowing between hardware
devices, web APIs and open protocols. The tool exposes operations through a
series of nodes, which can be created through the browser-based editor and
connected to other nodes to create message flows.
The tool comes built-in with a huge selection of nodes, from connecting to a
Raspberry Pi to handling HTTP requests, for creating flows. Users create their own nodes
to expose new functionality, by creating small modules using JavaScript and HTML.
People often wrap existing NPM modules into custom Node-RED nodes to use that module functionality in flows.
NPM has over two hundred thousand modules, many of which provide simple
“stateless” functions that return a result based upon the input data. These
modules are ideally suited for using within Node-RED message flows.
Exposing multiple new NPM modules required creating custom Node-RED nodes for every
module you wanted to use. Whilst the Node-RED node boilerplate is small,
it becomes a bit laborious and repetitive to keep doing this for extremely simple modules.
Wondering how to make this easier, I started hacking on ideas.
Two days later…
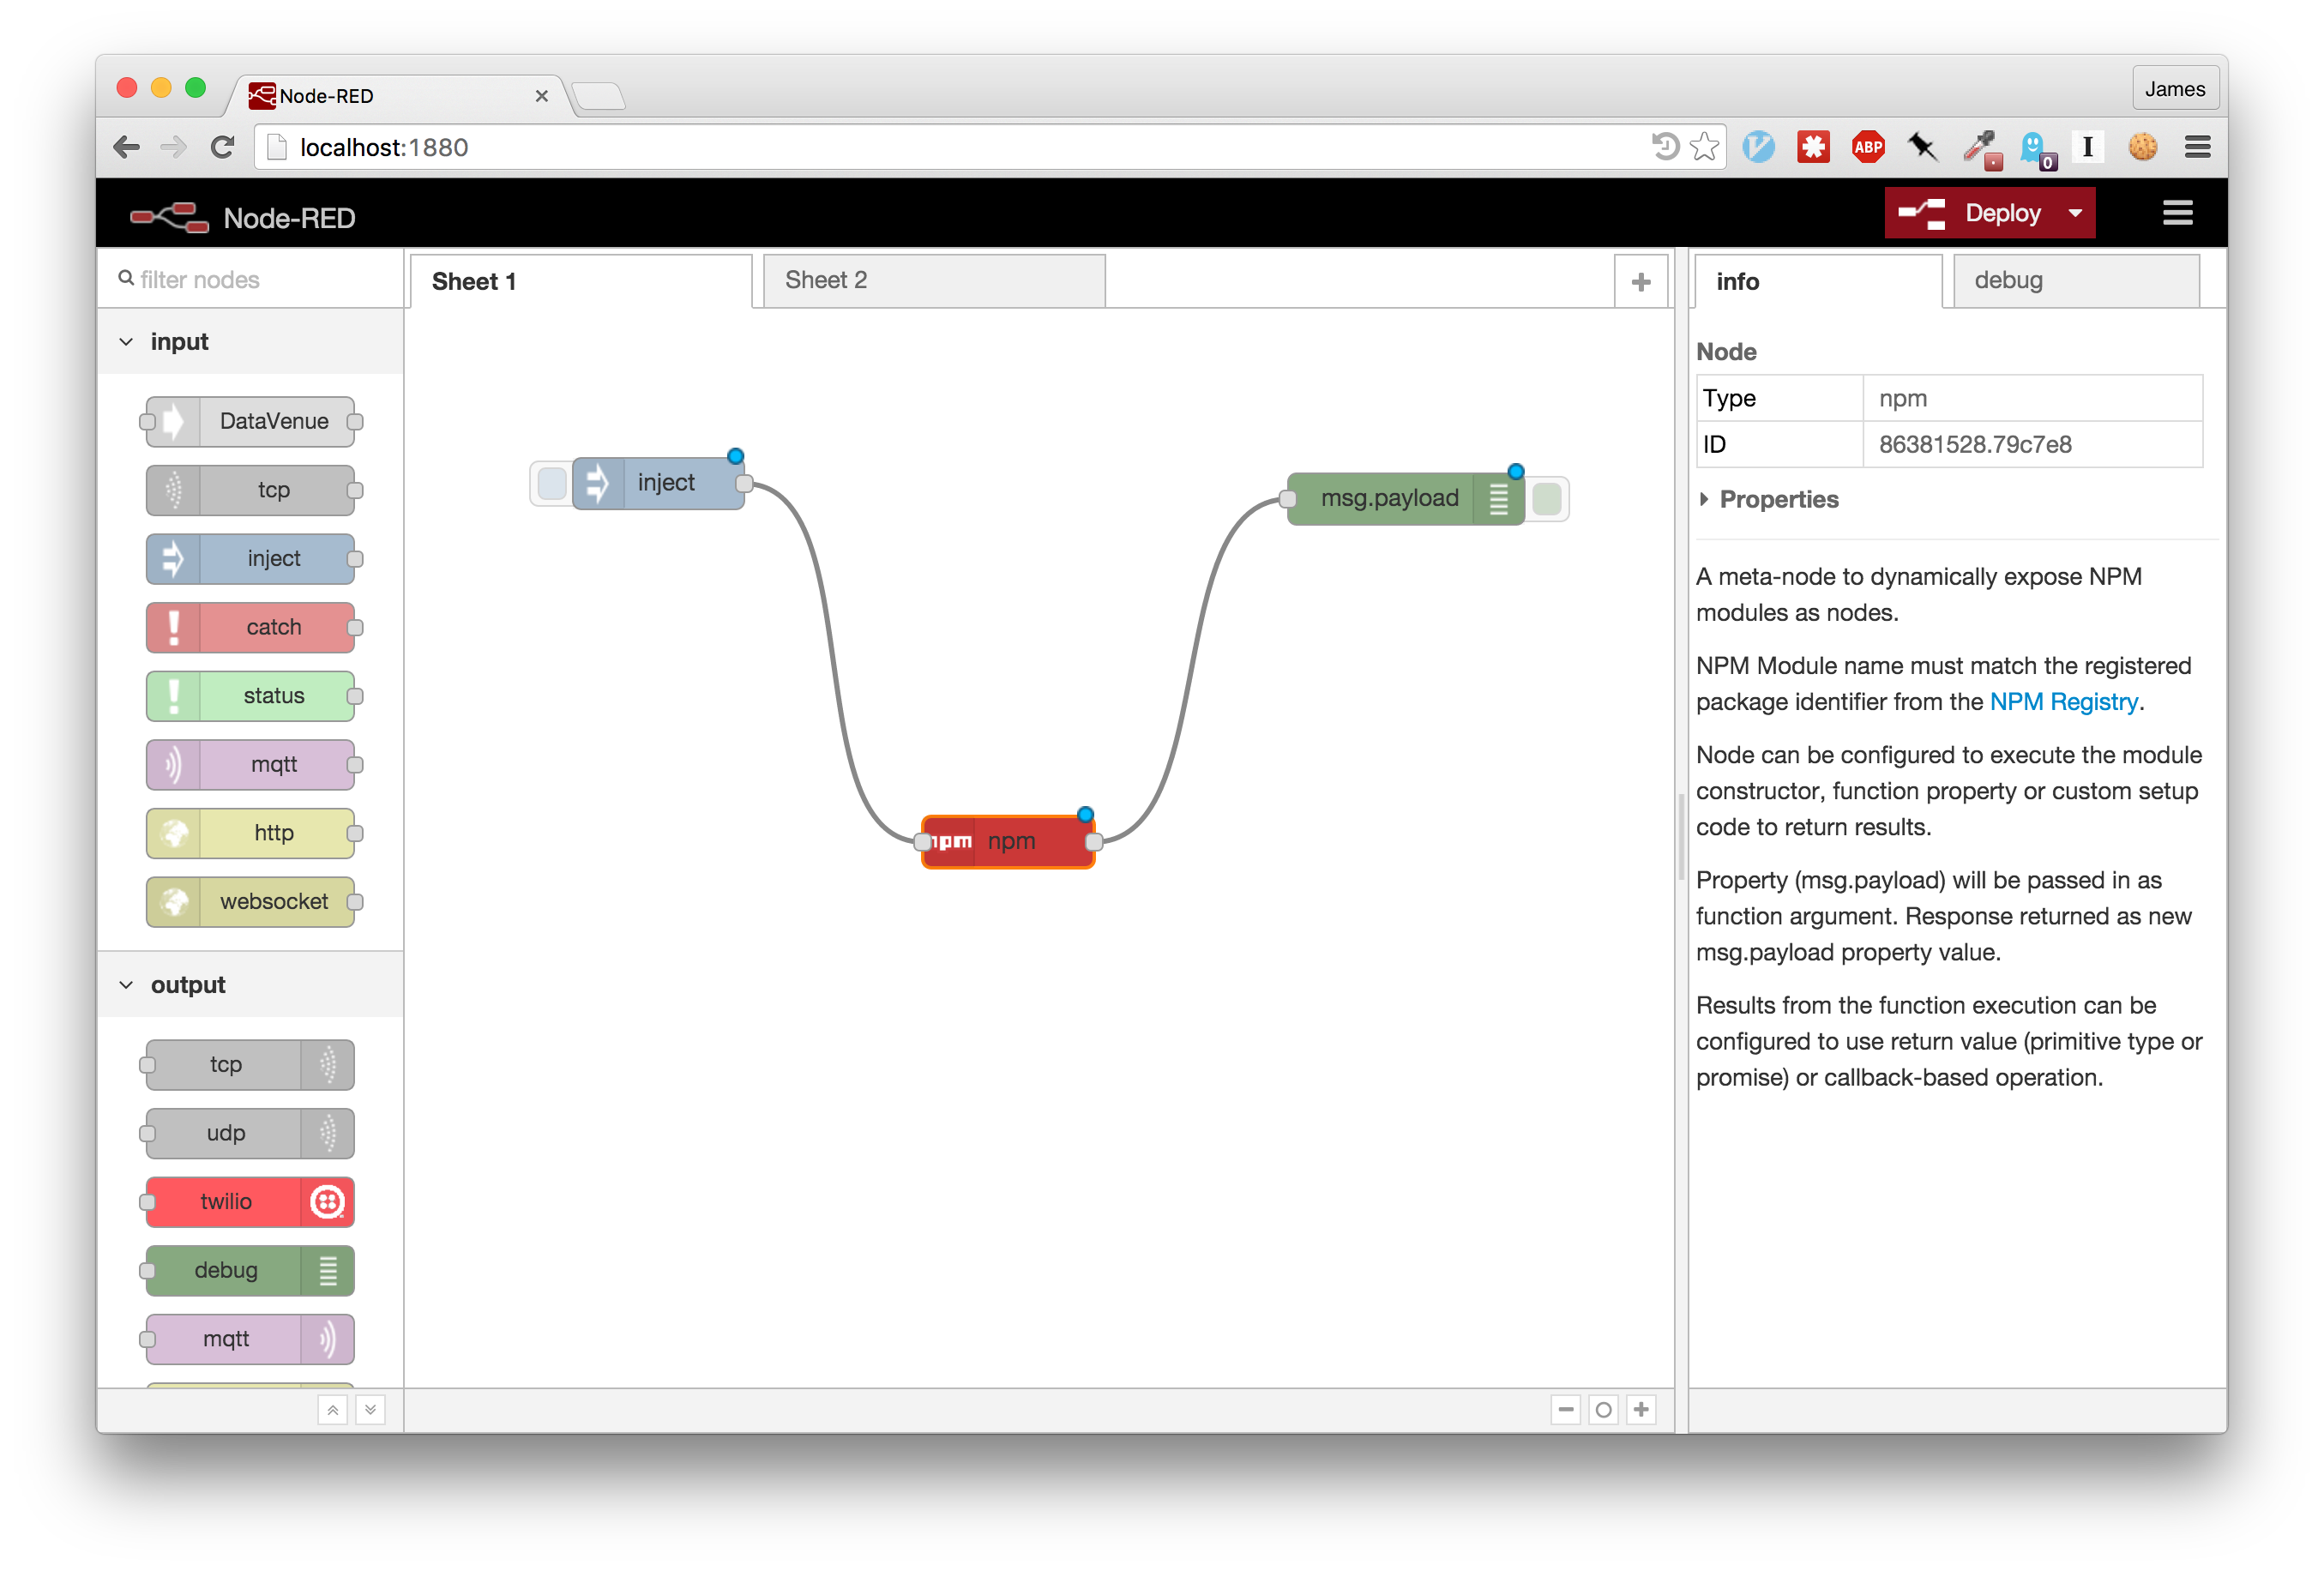
Node-RED node to dynamically expose NPM modules as nodes.
This new node allows you to dynamically expose NPM modules as Node-RED nodes
without needing to manually create new nodes for them.
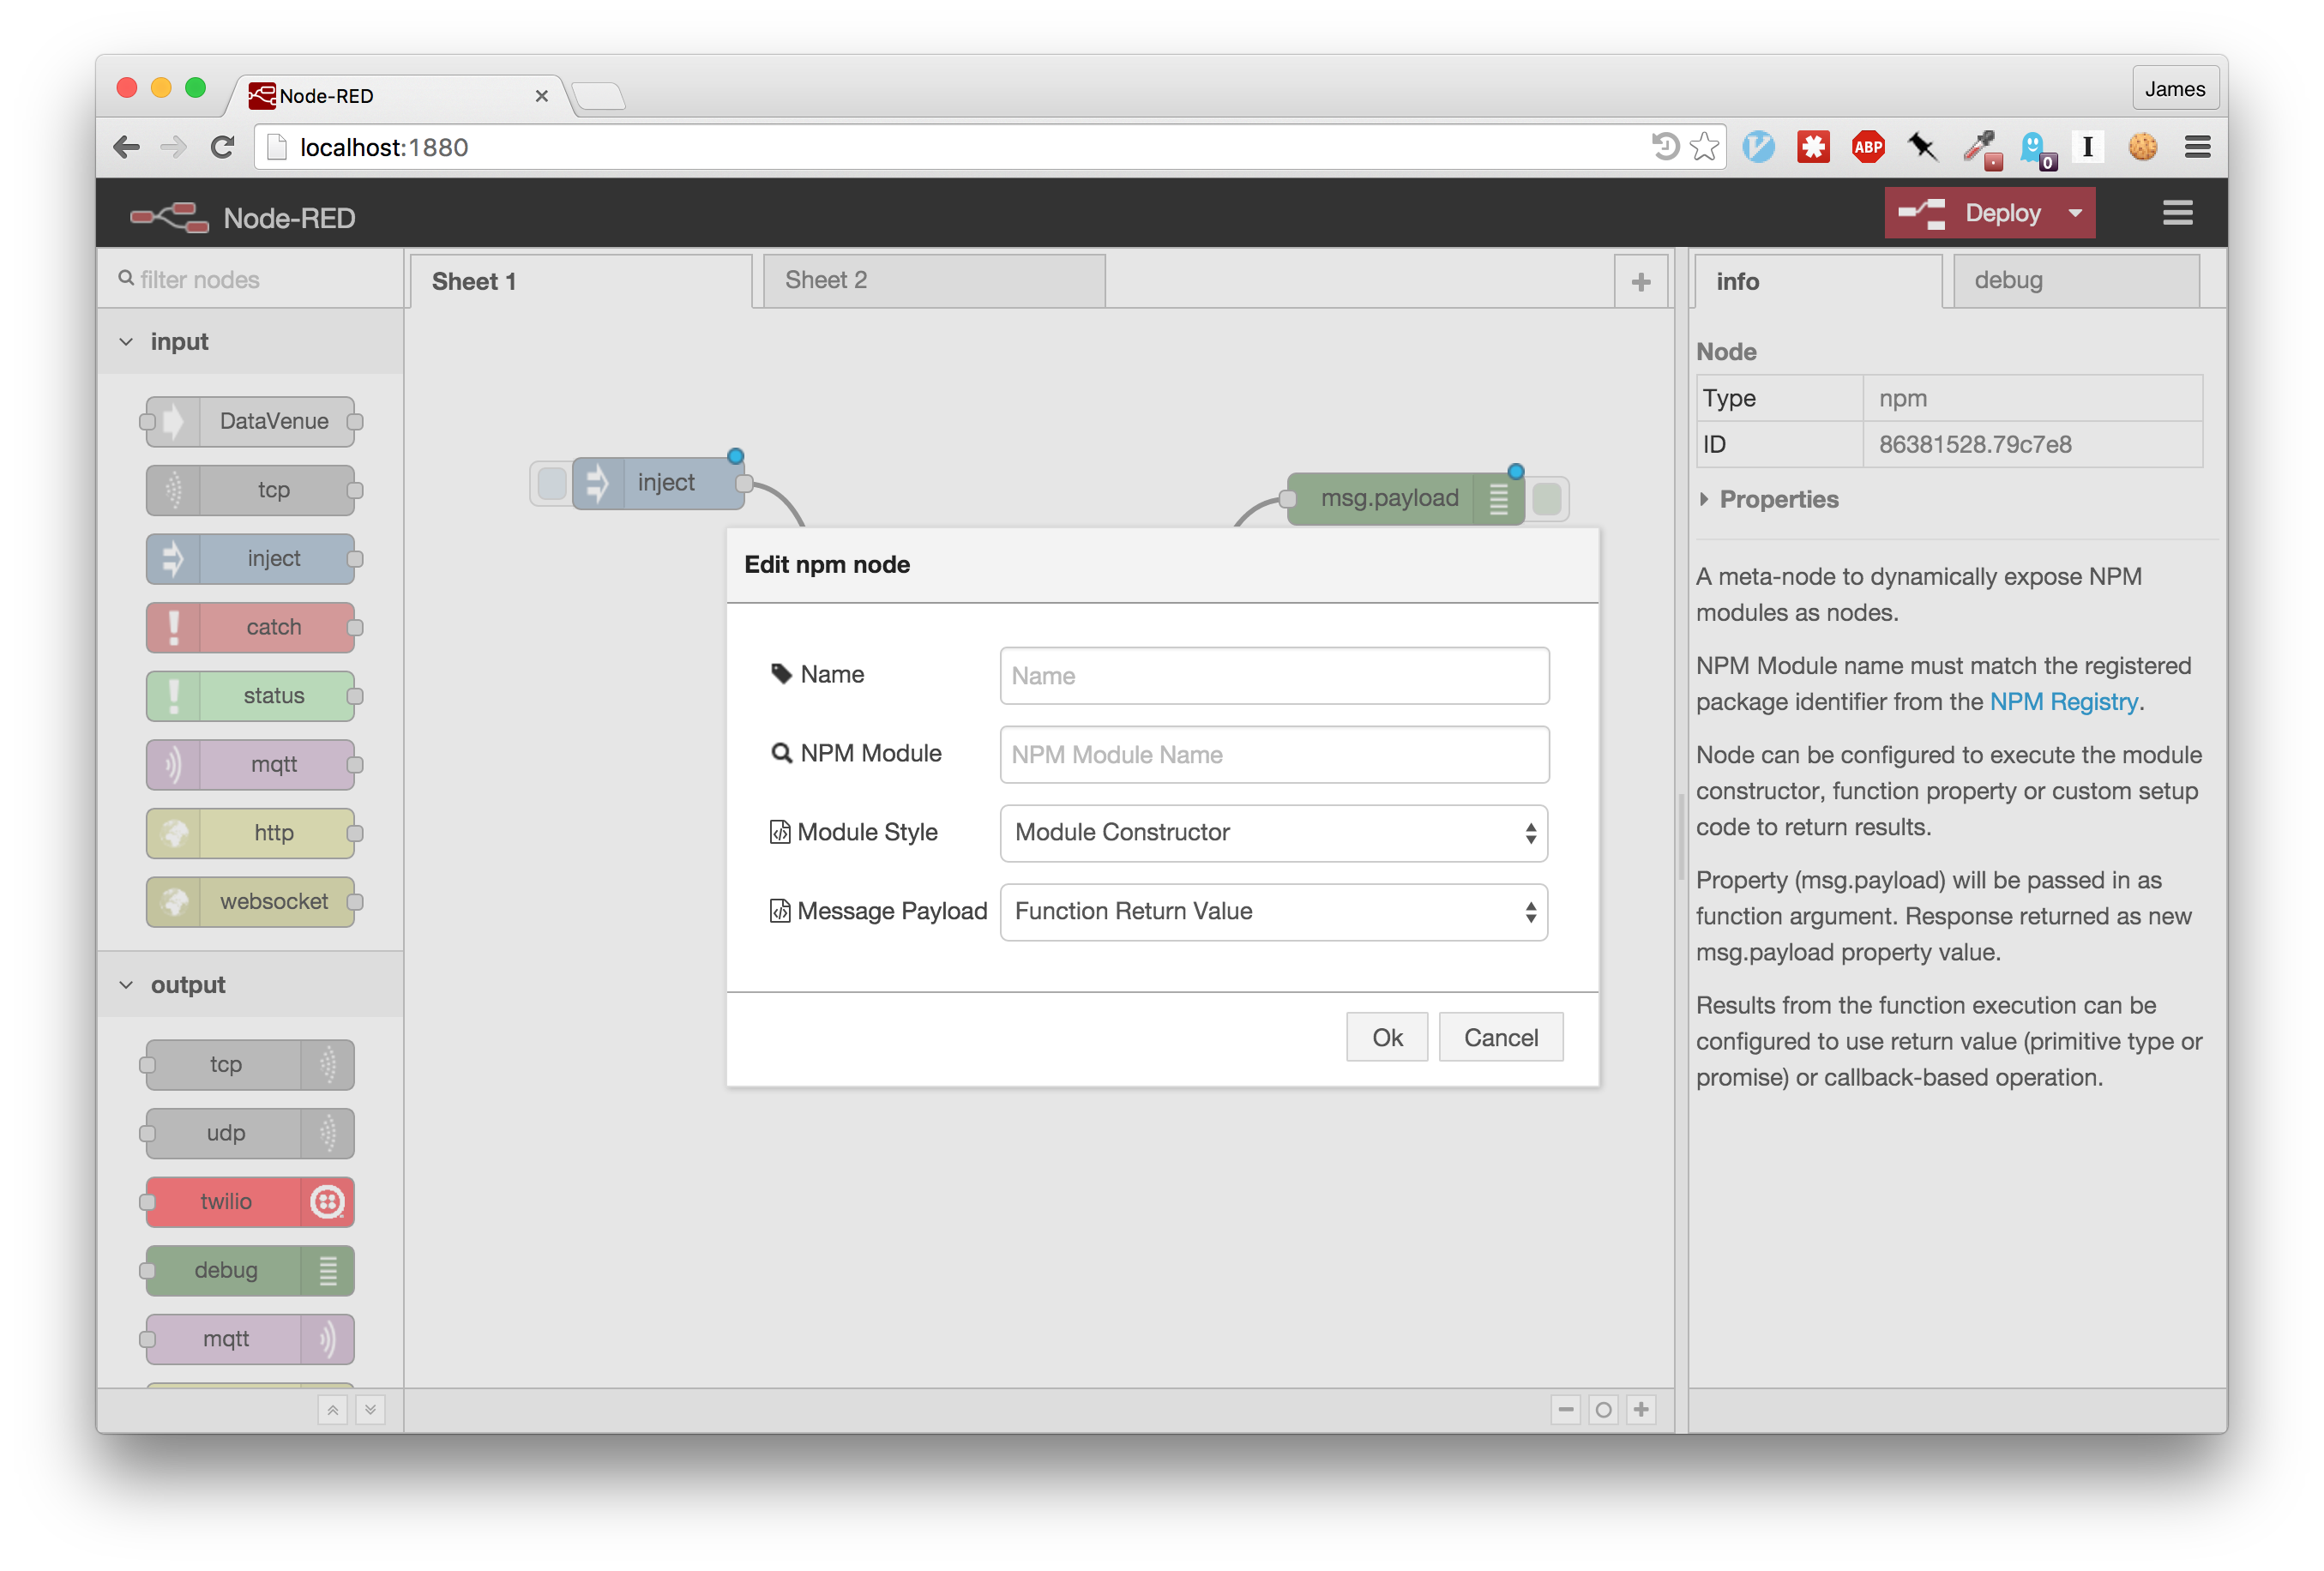
Using the node editor panel, the user can set the name of the NPM package to
expose along with the module invocation style.
Incoming flow messages are
passed as an argument to the function being executed. Users can set up the node
to call the module, a module function or even run custom setup code in response
to incoming messages.
Execution results, either returned directly or asynchronously
(Promises and callback-style supported), are sent as the outgoing message
payload.
When the flow is deployed, the NPM module will be automatically installed and instantiated.
Now we don’t have to write lots of extra boilerplate code every time we
want to use a tiny NPM module in a Node-RED flow, hurrah!
Here’s a short demonstration using the node to expose the sentiment package
in a flow:
Last week, Node.js released the latest version
of their project, v4.0.0. This release, representing the convergence of io.js with the original Node.js
project, came with lots of exciting features like improved ES6 support.
Cloud Foundry already supports multiple versions of the Node.js runtime.
Developers select the desired runtime version using a parameter in their
application’s package descriptor.
So, we just update package.json to include “4.0.0” and re-deploy our application?
To do this, we need to explore how Cloud Foundry configures the runtime
environment for applications.
Buildpacks
Rather than hardcoding supported runtimes and frameworks into the platform,
Cloud Foundry borrowed the buildpack model from Heroku. Buildpacks are a
set of scripts, run by the platform during deployment, to configure the runtime
environment.
Users can set an explicit buildpack for an application, using the manifest, or let
the platform decide. Buildpacks for common runtimes are pre-installed with the platform.
Buildpacks set through the manifest can point to external URLs, allowing users to create
new buildpacks supporting custom runtimes.
Each buildpack must contain the following files as executable scripts.
bin/detect - determine whether a buildpack is suitable for an application.
bin/compile - install and configure the runtime environment on the DEA.
bin/release - provide metadata with information on executing application.
Full details on existing buildpacks for the platform are available here.
Node.js is supported as an “official” buildpack by the platform. This will be
the one we will modify to add support for the latest version of the runtime.
Node.js Buildpack
This is the Node.js
buildpack for Cloud Foundry. Applications using this buildpack can select the
version of Node.js to install using the engine parameter in the package
descriptor.
Looking at the bin/compile
script will show us how the Node.js runtime is installed during deployment.
This snippet handles
accessing the Node.js version configured, using the node.engine parameter from package.json, before calling
install_nodejs to install the correct runtime package.
Searching through the buildpack for this function, it’s in the
lib/binaries.sh
file. Looking at the function code, it translates the version number into a
URL pointing to an archive with the pre-compiled Node.js binary. This archive
file is downloaded, extracted and installed into the runtime environment.
Translating Node.js version identifiers into archive URLs uses a special file
in the buildpack, manifest.yml. This file maps every supported version to a
pre-built binary location.
Looking at previous commits to the Node.js buildpack, adding support for additional
versions of Node.js simply requires updating this file with the extra version
identifier and archive URL.
Until the Cloud Foundry team updates the buildpack to support Node.js v4, they won’t
provide an external archive containing the pre-built runtime environment.
Where can we find a suitable build of the Node.js binary?
Node.js Runtime Binaries
Cloud Foundry borrowed the buildpack concept from Heroku and still
maintains backwards compatibility with their platform. Heroku buildpacks will
work with Cloud Foundry applications. The Node.js buildpack for Cloud Foundry
is actually still a fork of Heroku’s.
Looking back through the original buildpack source, this URL template is used to translate
Node.js versions to archive URLs being built by Heroku.
Combining the correct version identifier and platform parameters with this
template gave the following location for a potential build of the Node.js v4
runtime.
Running curl against the location successfully downloaded the Node.js v4 binary archive!
Custom v4 Buildpack
Forking the Cloud Foundry Node.js buildpack on Github, we can update the
manifest.yml with the Node.js v4 identifier pointing to the Heroku runtime
archive. This external Git repository will be used as the buildpack identifier
in the application manfest.
Deploying with v4
Having updated our application manifest with the custom buildpack location and
set the updated node version flag, re-deploying our application will start it
running on Node.js v4.
123456789101112131415
[20:02:29 ~]$ cf app sample-demo-app
Showing health and status for app sample-demo-app in org james.thomas@uk.ibm.com / space dev as james.thomas@uk.ibm.com...
OK
requested state: started
instances: 1/1
usage: 256M x 1 instances
urls: sample-demo-app.mybluemix.net
last uploaded: Fri Sep 18 18:33:56 UTC 2015
stack: lucid64
buildpack: SDK for Node.js(TM)(node.js-4.0.0) state since cpu memory disk details
#0 running 2015-09-18 07:35:01 PM 0.0% 65.3M of 256M 59M of 1G[20:03:13 ~]$
Looking at the logs from the deployment we can see the latest Node.js
runtime has been downloaded and installed within our runtime environment.
Conclusion
Buildpacks are a brilliant feature of Cloud Foundry.
Understanding how buildpacks are structured and used by the platform means we
can start customising existing buildpacks and even start creating our own.
If you want to run Node.js applications using v4 on Cloud Foundry today, you
can use the following buildpack
created using the instructions above.
Cloud Foundry is currently adding support for the version to
the official buildpack, follow their progress here.
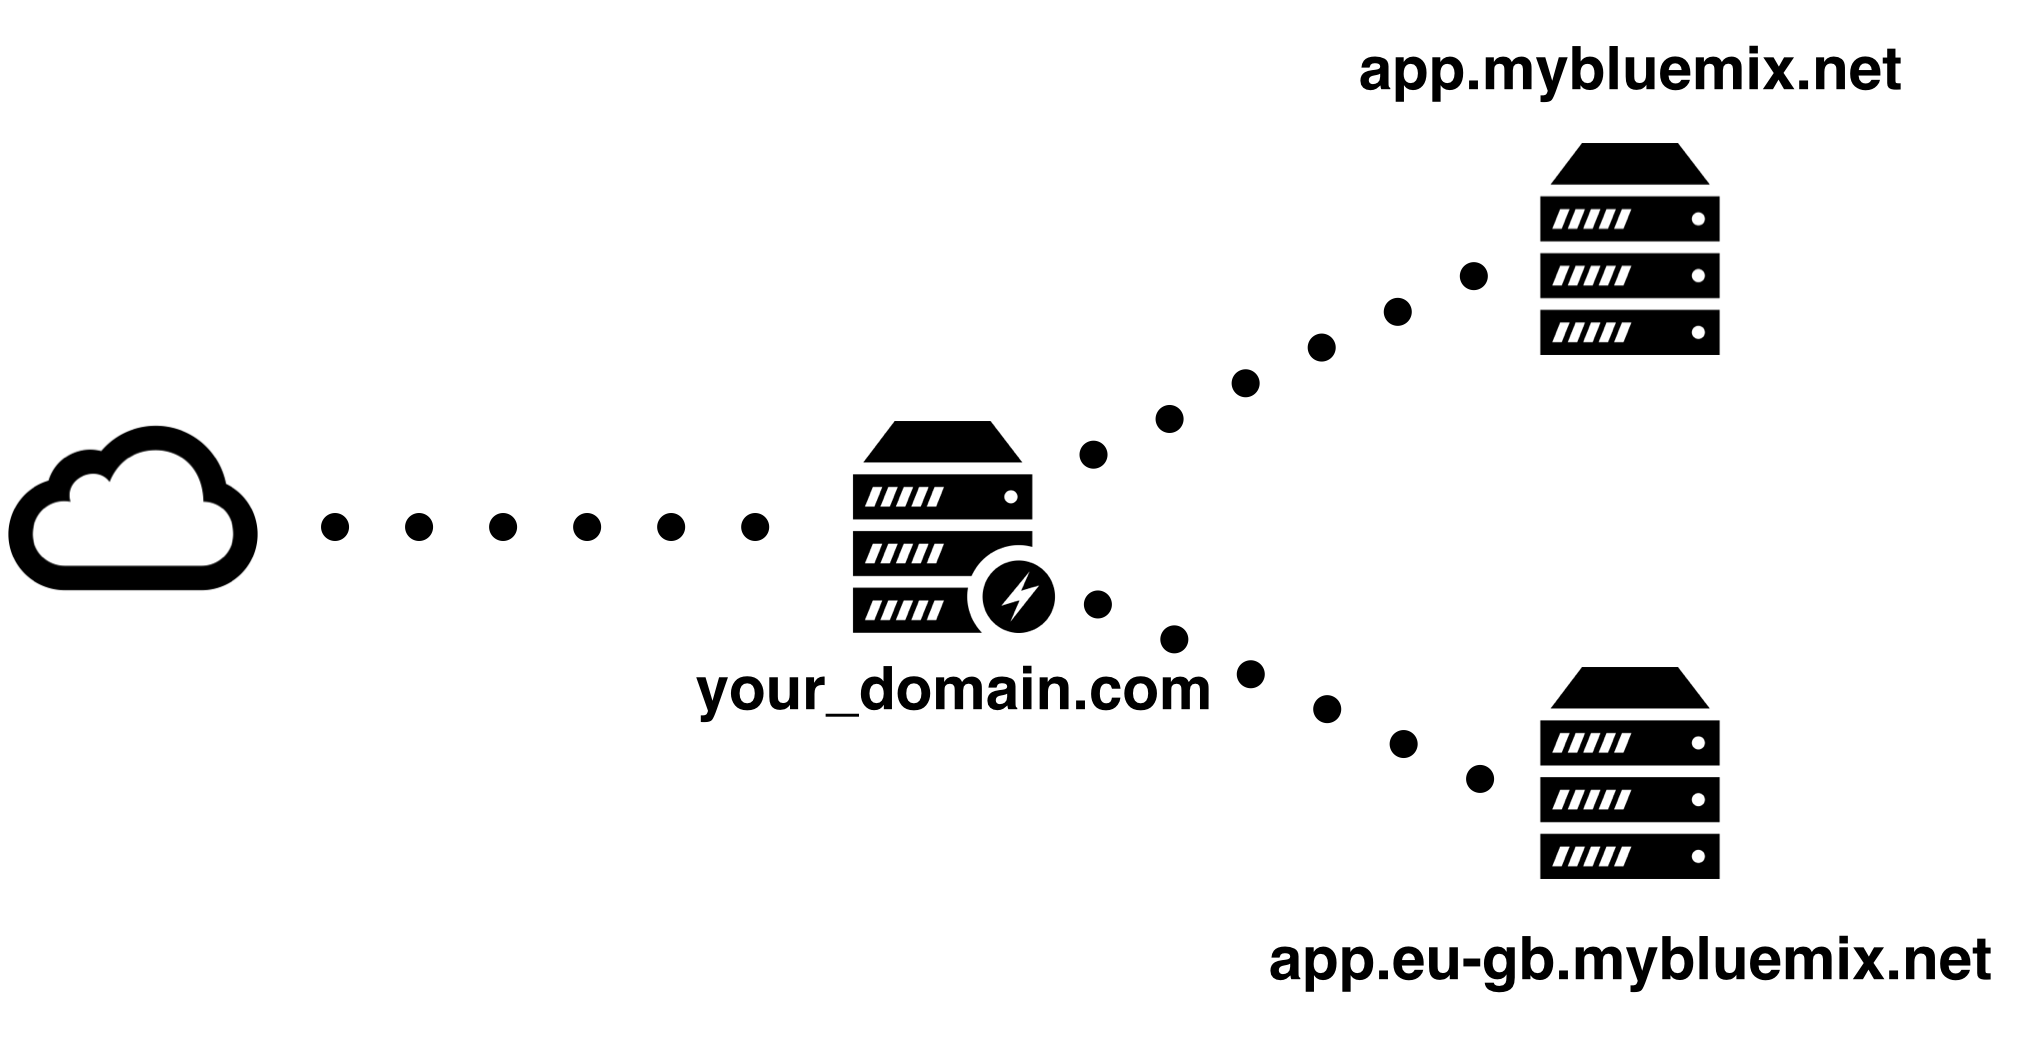
Routing application traffic based upon the geographic location of incoming requests can
be used for a number of scenarios…
Restricting access to your application outside defined geographic regions.
Load-balancing traffic to the closest region for improved performance.
Providing custom applications for different countries.
IBM Bluemix allows deploying applications to different geographic regions through
hosting instances of the Cloud Foundry platform in multiple locations.
Cloud Foundry supports simple HTTP routing rules for deployed applications.
Organisations can register domains and routes for applications. Routes can be
bound to one or more deployed applications. Incoming HTTP traffic is
load-balanced, using the Round-Robin policy, between the application instances bound to a route.
However, the platform does not currently support traffic routing based upon the
geographic location of incoming requests or sharing domains and routes between regions.
So, say we want to deploy custom versions of an application to different regions and
automatically forward users to the correct version based upon their location. How can we
achieve this?
Let’s find out…
Deploying Application To Different Regions
IBM Bluemix currently provides Cloud Foundry in two regions for deploying applications.
US South (api.ng.bluemix.net)
Europe (api.eu-gb.bluemix.net)
Moving between regions is as simple as providing the different region endpoint during the
authentication command.
12345678910111213141516
[16:25:47 ~]$ cf login -a api.ng.bluemix.net -u james.thomas@uk.ibm.com -s dev
API endpoint: api.ng.bluemix.net
Password>
Authenticating...
OK
Targeted org james.thomas@uk.ibm.com
Targeted space dev
API endpoint: https://api.ng.bluemix.net (API version: 2.27.0)User: james.thomas@uk.ibm.com
Org: james.thomas@uk.ibm.com
Space: dev
[16:26:44 ~]$
We’re now authenticated against the US South region.
Let’s start by deploying our sample application, which displays a web
page showing the application URL, to this region.
123456789101112131415161718192021222324
[16:44:24 ~/code/sample]$ cf api
API endpoint: https://api.ng.bluemix.net (API version: 2.27.0)[16:44:32 ~/code/sample]$ cf push sample-demo-app
Using manifest file /Users/james/code/sample/manifest.yml
Updating app sample-demo-app in org james.thomas@uk.ibm.com / space dev as james.thomas@uk.ibm.com...
OK
...
Showing health and status for app sample-demo-app in org james.thomas@uk.ibm.com / space dev as james.thomas@uk.ibm.com...
OK
requested state: started
instances: 1/1
usage: 256M x 1 instances
urls: sample-demo-app.mybluemix.net
last uploaded: Fri Sep 11 15:45:04 UTC 2015
stack: lucid64
buildpack: SDK for Node.js(TM)(node.js-4.0.0) state since cpu memory disk details
#0 running 2015-09-11 04:46:00 PM 0.0% 67.1M of 256M 59M of 1G[16:45:14 ~/code/sample]$
Once that has finished, we can move over to the European region and deploy our application there.
1234567891011121314151617181920212223
[16:52:33 ~/code/sample]$ cf login -a api.eu-gb.bluemix.net -u james.thomas@uk.ibm.com -s dev
[16:52:58 ~/code/sample]$ cf push sample-demo-app
Using manifest file /Users/james/code/sample/manifest.yml
Updating app sample-demo-app in org james.thomas@uk.ibm.com / space dev as james.thomas@uk.ibm.com...
OK
...
Showing health and status for app sample-demo-app in org james.thomas@uk.ibm.com / space dev as james.thomas@uk.ibm.com...
OK
requested state: started
instances: 1/1
usage: 256M x 1 instances
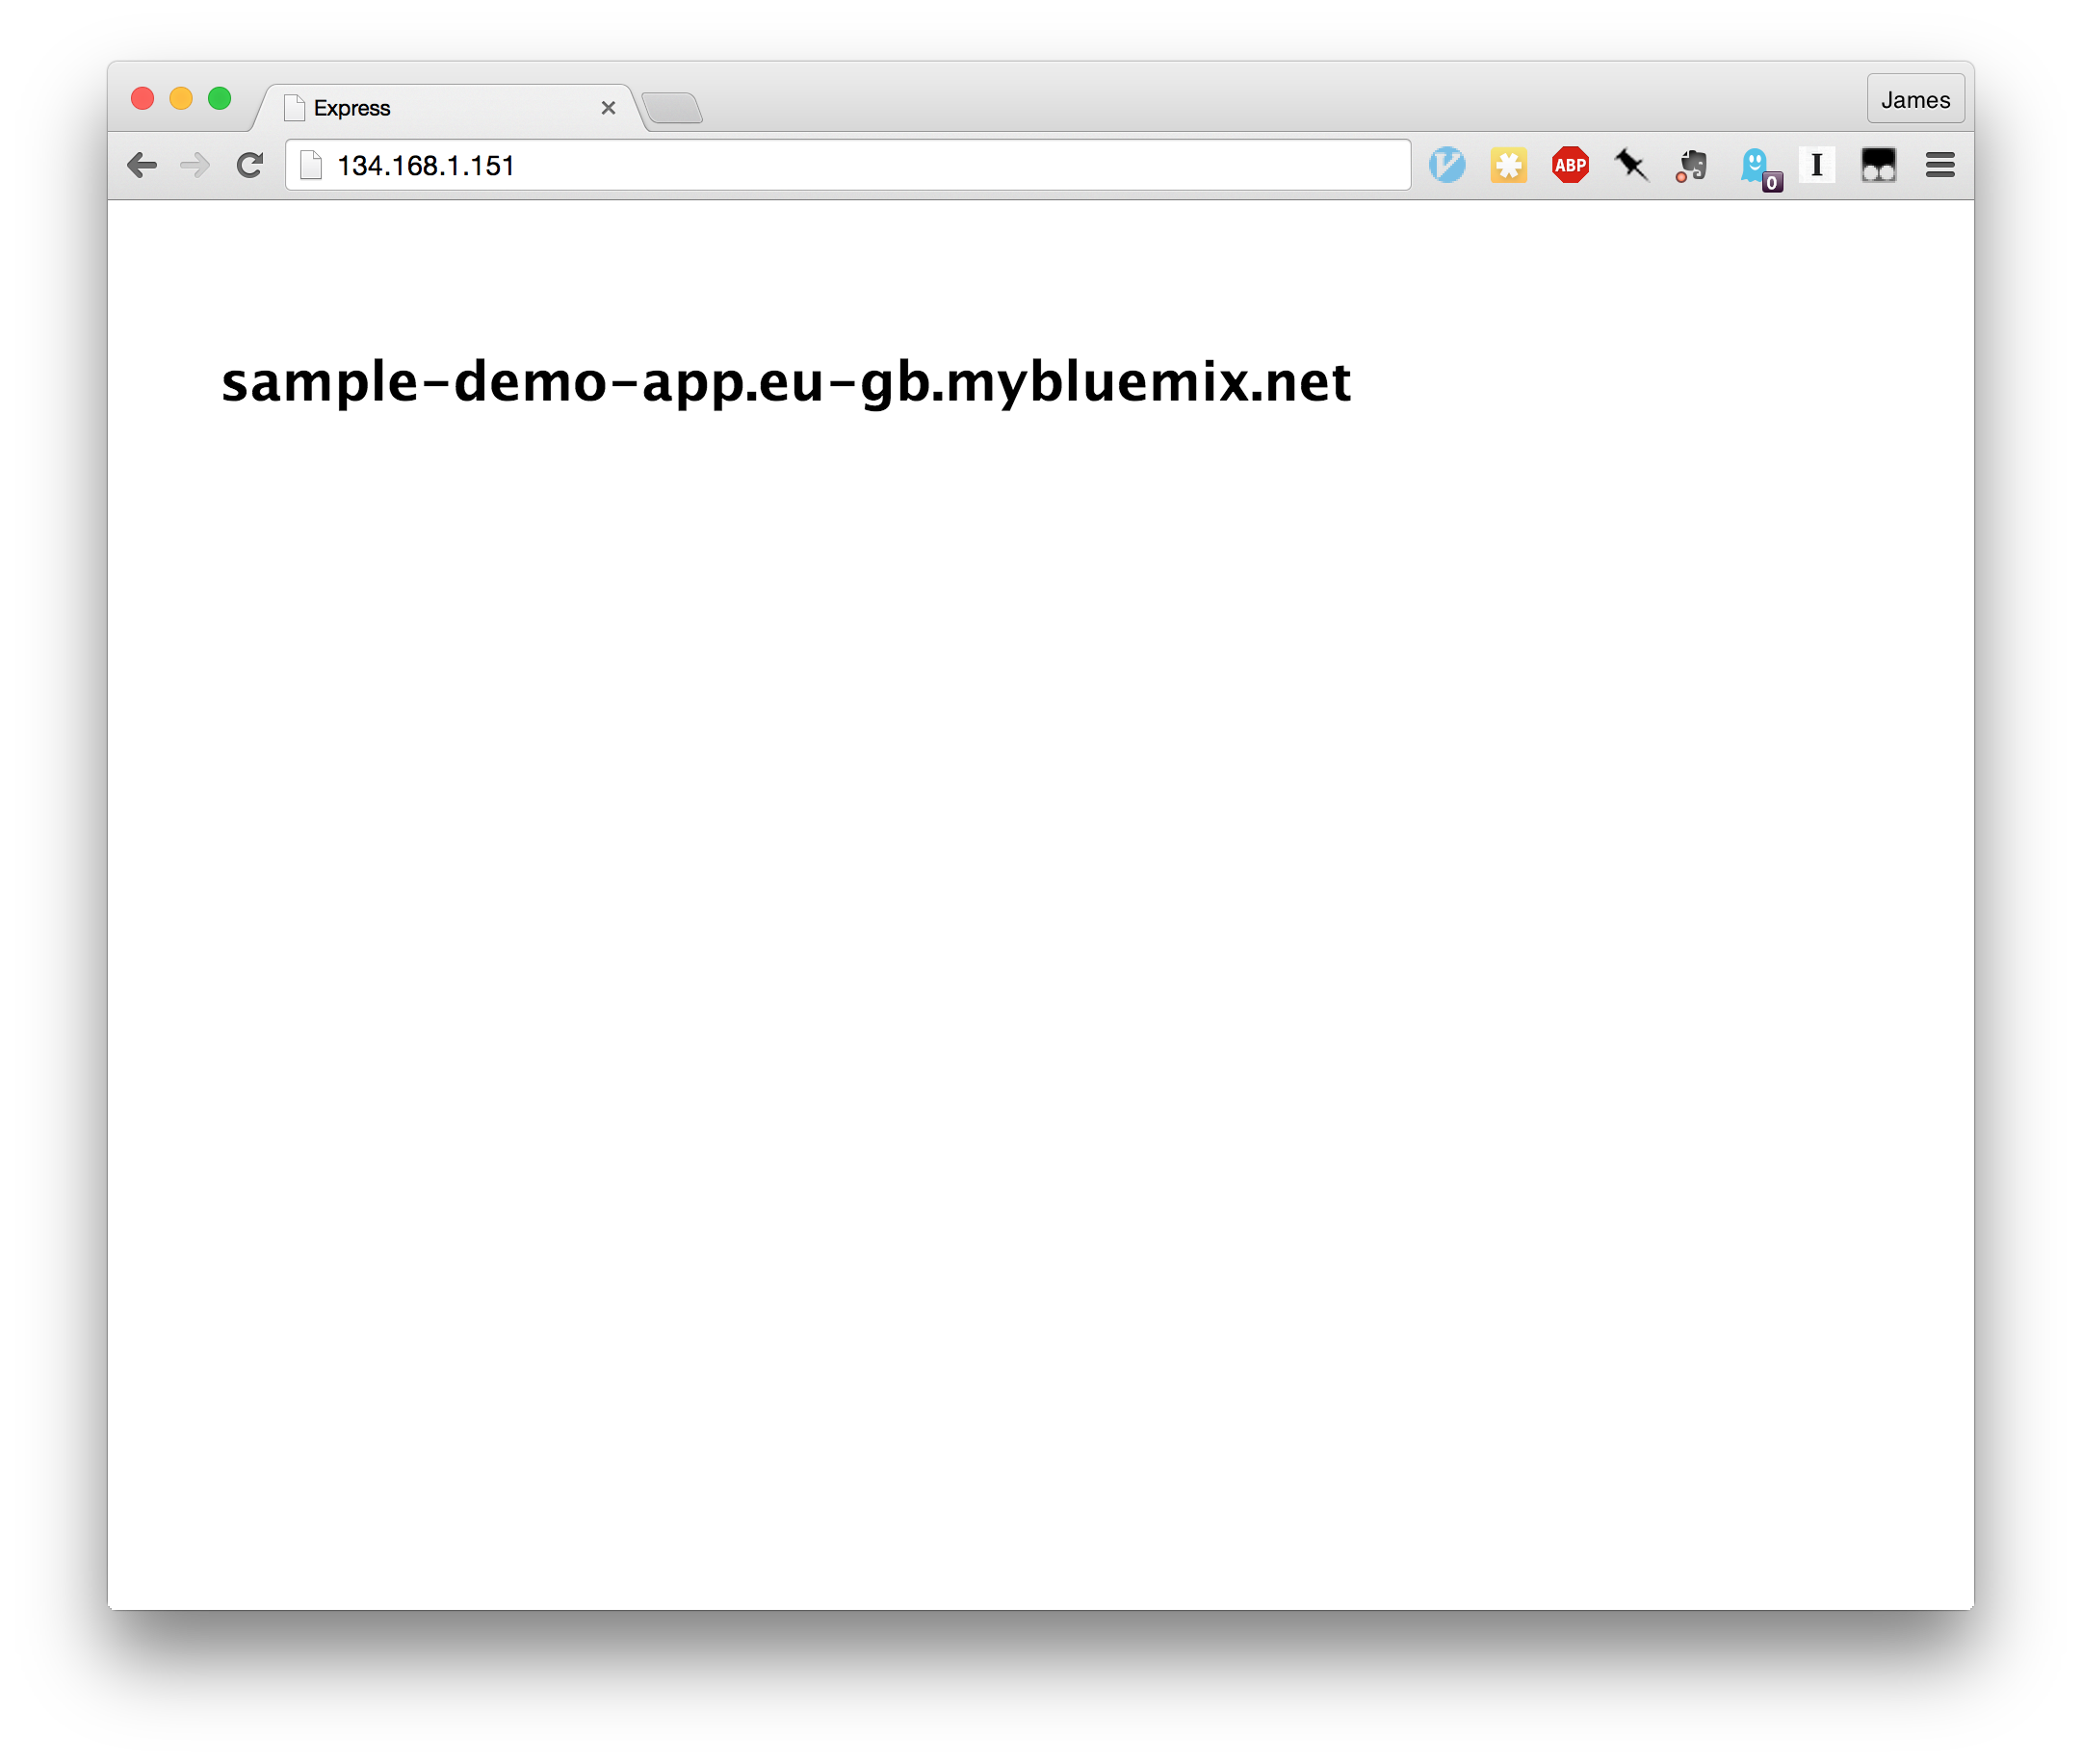
urls: sample-demo-app.eu-gb.mybluemix.net
last uploaded: Fri Sep 11 15:53:31 UTC 2015
stack: lucid64
buildpack: SDK for Node.js(TM)(node.js-4.0.0) state since cpu memory disk details
#0 running 2015-09-11 04:54:17 PM 0.0% 67.4M of 256M 59M of 1G[16:54:25 ~/code/bluemix/sample]$
With the second deployment completed, there are now instances of the same application running in separate regions.
Each instance is available through a separate URL.
Now we need to set up traffic forwarding from the relevant locations to the correct region.
Reverse Proxy with Region Traffic Forwarding
Due to the platform not supporting multi-region traffic routing, we
need to set up a custom reverse proxy. This server will receive
requests from our external application domain and transparently forward
them onto the correct region application.
Nginx (pronounced engine-x) is a free, open-source, high-performance HTTP server and reverse proxy, as well as an IMAP/POP3 proxy server
Nginx comes with a module for looking up locations associated with IP
address using the MaxMind GeoIP library. The module can
resolve incoming request addresses into continents, countries and even cities. Using the variables defined by the module, we
can write traffic forwarding rules to send requests to the correct region.
Nginx Configuration
Nginx defines two configuration directives, geoip_country and geoip_city, to
specify locations for the MaxMind GeoIP database files.
When configured, Nginx will expose a series of variables for each request with
geographical information.
$geoip_country_code - two-letter country code, for example, “RU”, “US”.
$geoip_country_name - country name, for example, “Russian Federation”, “United States”.
$geoip_city_continent_code - two-letter continent code, for example, “EU”, “NA”.
$geoip_city - city name, for example, “Moscow”, “Washington”.
Starting with the default nginx configuration,
there are only a few modifications needed to set up a reverse proxy based upon
location.
For each request, we check the $geoip_city_continent_code against our list of
regions. If the request is valid, setting the proxy_pass directive forwards
the request onto the correct region. We also overwrite the Host: HTTP
header with the region URL. IBM Bluemix uses this header to internally route
incoming requests to the correct application host.
Requests coming from outside these locations will be sent to a custom error
page.
Due to a known issue
with IBM Containers, we must use IP addresses rather than the host names with the proxy_pass directive.
Here is the full configuration for the enabled-site/default file.
server {
  listen 80 default_server;
  listen [::]:80 default_server ipv6only=on;

  root /usr/share/nginx/html;
  index index.html index.htm;
  error_page 404 /404.html;

# Make site accessible from http://localhost/
  server_name localhost;

  location = /404.html {
    internal;
  }

  location / {
    set $host_header "unknown";

    if ($geoip_city_continent_code = "EU") {
      proxy_pass http://5.10.124.141;
      set $host_header "sample-demo-app.eu-gb.mybluemix.net";
    }

    if ($geoip_city_continent_code = "NA") {
      proxy_pass http://75.126.81.66;
      set $host_header "sample-demo-app.mybluemix.net";
    }

    if ($host_header = "unknown") {
      return 404;
    }

    proxy_set_header Host $host_header;
  }
}
With the reverse proxy server configured, we need to provision a new
production server, install Linux and Nginx, configure networking, security updates
and backup services…
…or we can use Docker.
Running Nginx using Docker
There are thousands
of repositories on Docker Hub providing Nginx, including
the official image. Unfortunately, the official image provides a version of Nginx
that is not built with the geo_ip module.
Ubuntu’s default package repository for Nginx does provide a build including
the geo_ip module. By modifying the Dockerfile for the official image, we can
build a new image from Ubuntu with the required version of Nginx and include
our custom configuration files.
FROM ubuntu
RUN apt-get -y install nginx

# copy custom configuration
COPY nginx.conf /etc/nginx/nginx.conf
COPY default /etc/nginx/sites-available/
COPY geoip /etc/nginx/geoip
COPY 404.html /usr/share/nginx/html/

# forward request and error logs to docker log collector
RUN ln -sf /dev/stdout /var/log/nginx/access.log
RUN ln -sf /dev/stderr /var/log/nginx/error.log

# expose HTTP and HTTP ports
EXPOSE 80 443

CMD ["nginx", "-g", "daemon off;"]
Building and running this container locally, we can test that Nginx is configured correctly. The repository containing the Dockerfile
and build artificats is located here.
12345678910
[16:58:40 ~/code/final]$ docker build -t geo_ip .
Sending build context to Docker daemon 15.88 MB
Step 0 : FROM ubuntu
 ---> 91e54dfb1179
...
Step 9 : CMD nginx -g daemon off;
 ---> Using cache
 ---> 7bb6dbaafe3e
Successfully built 7bb6dbaafe3e
[16:58:50 ~/code/final]$ docker run -Pti geo_ip
With the custom image ready, we just need to deploy it somewhere…
Running Nginx on IBM Containers
IBM Bluemix supports deploying Docker containers alongside Cloud Foundry
applications, allowing us to use the same cloud platform for running our custom
region applications as providing the reverse proxy
Pushing pre-built images to the IBM Containers service is really as simple as creating a new tag and typing docker push.
Please read and follow the documentation
about installing the command-line container management tools and authenticating
with the remote service before attempting the commands below.
123456789101112131415161718192021222324
[14:10:52 ~]$ docker tag geo_ip registry.ng.bluemix.net/jthomas/geo_ip
[14:10:59 ~]$ docker images
REPOSITORY TAG IMAGE ID CREATED VIRTUAL SIZE
geo_ip latest 7bb6dbaafe3e 3 days ago 222.3 MB
registry.ng.bluemix.net/jthomas/geo_ip latest 7bb6dbaafe3e 3 days ago 222.3 MB
[14:11:07 ~]$ cf ic login
** Retrieving client certificates from IBM Containers
** Storing client certificates in /Users/james/.ice/certs
Successfully retrieved client certificates
** Authenticating with registry at registry.eu-gb.bluemix.net
Successfully authenticated with registry
[14:24:25 ~]$ docker push registry.ng.bluemix.net/jthomas/geo_ip
The push refers to a repository [registry.ng.bluemix.net/jthomas/geo_ip](len: 1)Sending image list
Pushing repository registry.ng.bluemix.net/jthomas/geo_ip (1 tags)...
Pushing tag for rev [7bb6dbaafe3e] on {https://registry.ng.bluemix.net/v1/repositories/jthomas/geo_ip/tags/latest}[14:25:39 ~]$ cf ic images
REPOSITORY TAG IMAGE ID CREATED VIRTUAL SIZE
registry.ng.bluemix.net/jthomas/geo_ip latest 7b1865be-778 About a minute ago 0 B
registry.ng.bluemix.net/ibmliberty latest 2209a9732f35 3 weeks ago 263.6 MB
registry.ng.bluemix.net/ibmnode latest 8f962f6afc9a 3 weeks ago 178.9 MB
registry.ng.bluemix.net/ibm-mobilefirst-starter latest 97513e56aaa7 3 weeks ago 464.9 MB
[14:26:43 ~]$
We can now use the IBM Bluemix dashboard to start a new container from our custom image,
binding a public IP address and exposing ports.
Once the container starts, accessing the bound IP address shows the
web page coming back with the region-specific application route.
Using DNS A records, we can now
map our external URL to the IP address of the container. Users visiting this
URL will be sent to the reverse proxy server which will then forward the
request onto the correct region application.
Testing it all out…
Testing out the forwarding rules requires us to send HTTP requests from multiple regions.
GeoWebView will run web browsers located in different geographies and show you the rendered page output.
Running the tool with our application’s web address, shows the following rendered page images.
We can see the browsers from the United States and Europe are sent to the correct region. The browser from South Africa is shown the custom error page.
Using Nginx we’ve configured a reverse proxy to route users, based upon their location, to applications running in different IBM Bluemix regions. We’re hosting
the service on the same platform as our applications, using Docker. Most importantly, the whole process is transparent to the user, they aren’t forced to visit
country-specific URLs.