This blog post is one ofa series looking at using Docker Actions in OpenWhisk to support extra runtimes.
Let’s look at writing serverless functions for OpenWhisk using Rust.
Rust is a systems programming language that runs blazingly fast, prevents segfaults, and guarantees thread safety.
Rust has been growing in popularity since it launched in 2010. Rust is a popular language for writing microservices due to the focus on the attention to safety and strong concurrency support.
None of the major serverless platform natively support Rust at the moment. OpenWhisk does not include this as a default runtime. However, recent updates to OpenWhisk provide a path for writing serverless functions with Rust.
Let’s re-write the example from the previous post in Rust and see how to get it running using this new approach…
Have you seen this post explaining how Docker-based Actions work? This post assumes you have already read that first.
Rust Language Actions
Rust has a build system that supports creating static binaries. These binaries contain the application source code and dependent libraries.
Using the same approach as the Go-based example, bundling this binary into a zip file allows us to overwrite the runtime stub prior to invocation.
Runtime binaries will be executed by the Python-based invoker for each invocation. Request parameters will be passed as a JSON string using the first command-line argument. The invoker expects the Action result to be written to standard output as a JSON string.
Action Source Code
Here’s a simple Rust function that returns a greeting string from an input parameter. It parses the JSON string provided on the command-line to look for a name parameter. If this isn’t present, it defaults to stranger. It returns a JSON object with the greeting string (msg) by writing to the console.
Before we can deploy this binary to OpenWhisk, it must be compiled for the platform architecture.
Cross-Compiling Locally
Rust’s compiler uses LLVM under the covers, making it possible to generate machine code for different architectures. Cross-compiling for different platforms requires having the correct compiler, linker and libraries for that architecture installed.
In an earlier blog post, I explained how to use Go language binaries on OpenWhisk using Docker-based Actions. It relied on building Docker images for each serverless function and hosting them on Docker Hub.
Recent updates to Docker-based Actions have made this process much simpler. Developers don’t need to build and expose public images anymore.
Let’s re-visit the example from the previous post and see how to get it running using this new approach…
Have you seen this post explaining how Docker-based Actions work? This post assumes you have already read that first.
Go Language Actions
Go’s build system combines application source code and dependencies into a single execution binary. Bundling this binary into a zip file allows us to overwrite the runtime stub prior to invocation.
Runtime binaries will be executed by the Python-based invoker for each invocation. Request parameters will be passed as a JSON string using the first command-line argument. The invoker expects the Action result to be written to standard output as a JSON string.
Action Source Code
Here’s a simple Go function that returns a greeting string from an input parameter. It parses the JSON string provided on the command-line to look for a name parameter. If this isn’t present, it defaults to Stranger. It returns a JSON object with the greeting string (msg) by writing to the console.
123456789101112131415161718192021
packagemainimport"encoding/json"import"fmt"import"os"funcmain(){// native actions receive one argument, the JSON object as a stringarg:=os.Args[1]// unmarshal the string to a JSON objectvarobjmap[string]interface{}json.Unmarshal([]byte(arg),&obj)name,ok:=obj["name"].(string)if!ok{name="Stranger"}msg:=map[string]string{"msg":("Hello, "+name+"!")}res,_:=json.Marshal(msg)fmt.Println(string(res))}
If you have the development environment installed locally, you can compile the binary for another platform by setting environment variables. The full list of supported architectures is available here.
The image includes a Python application which implements the HTTP API used to handle platform requests, e.g. invoke the action with these parameters.
This service executes a file (/action/exec) for each invocation. Replacing this file allows us to control the runtime environment.
Request parameters are passed, using a JSON string, as the first command-line argument. Response values are interpreted as JSON written to stdout.
Developers can now include a zip file when creating Docker-based Actions. This archive will be extracted into the /action directory prior to invocations. If the archive contains a file named exec this will replace the exectuable file called by the invocation handler.
Testing It Out
Using the wsk command-line, developers can create Actions using this Docker image.
If the archive file is missing, the /action/exec path contains the the following stub file.
1234
$ wsk action create skeleton --docker openwhisk/dockerskeleton
ok: created action skeleton
$ wsk action invoke skeleton --blocking --result
{"error": "This is a stub action. Replace it with custom logic."}
Let’s update this stub file to return a custom greeting.
1234567891011
$ cat exec#!/bin/bashecho"{ \"hello\": \"ran without a docker pull!\" }"$ ./exec
{"hello": "ran without a docker pull!"}$ zip exec.zip execadding: exec(stored 0%)$ wsk action create custom_docker_action exec.zip --docker
ok: created action custom_docker_action
$ wsk action invoke custom_docker_action --blocking --result
{"hello": "ran without a docker pull!"}
The archive file could include a static binary, or even a complete runtime, to replace the exec stub.
All files in the archive file will be available under the /action directory.
Running Locally
The openwhisk/dockerskeleton image exposes a Python-based HTTP server on port 8080.
Pulling the openwhisk/dockerskeleton image from Docker Hub allows us to run it locally for development.
Now we can issue the HTTP request to push this archive into the container.
1234567
$ http post localhost:8080/init < init.json
HTTP/1.1 200 OK
Content-Length: 2
Content-Type: text/html; charset=utf-8
Date: Mon, 16 Jan 2017 14:11:04 GMT

OK
Accessing the container filesystem allows us to verify the archive has been extracted correctly.
12345678910
$ docker ps
CONTAINER ID IMAGE COMMAND CREATED STATUS PORTS NAMES
b37a7dc1cab1 openwhisk/dockerskeleton "/bin/bash -c 'cd ..." About an hour ago Up About an hour 0.0.0.0:8080->8080/tcp relaxed_davinci
$ docker exec -it b37a7dc1cab1 /bin/sh
/ # cd /action/action # lsexec/action # cat exec#!/bin/bashecho"{ \"hello\": \"ran without a docker pull!\" }"
Invocation Requests
Action invocations are triggered by sending a HTTP POST to the /run endpoint.
This endpoint expects the following JSON body.
12345
{"value": {"foo": "bar"}}
The inner object parameters under the value property are passed, as a JSON string, to the executable as the first command-line argument.
Sending this request to our container will trigger the shell script from our archive and return the JSON response.
123456789
$ echo"{}" | jq '{value: .}' | http post localhost:8080/run
HTTP/1.1 200 OK
Content-Length: 44
Content-Type: application/json
Date: Mon, 16 Jan 2017 14:17:15 GMT
{"hello": "ran without a docker pull!"}
Conclusion
Recent updates to Docker-based Actions in OpenWhisk make it much easier to customise the runtime environment.
Being able to deploy arbitrary files into the runtime container, prior to invocation, simplifies the process of supporting new runtimes.
Hopefully this blog post has shown you how to get started with this feature.
Over the next few weeks, we’re going to show you how to use this approach to run lots of new programming languages on the platform. Stay tuned for updates…
OpenWhisk now supports creating Node.js Actions from a zip file. The archive file will be extracted into the runtime environment by the platform. This allows us to split microservice logic across multiple files, use third-party NPM modules or include non-JavaScript assets (configuration files, images, HTML files).
“Hello World” Example
Let’s look at a “Hello World” example of registering a serverless function from a zip file. Our archive will contain two files, the package descriptor and a JavaScript file.
Here is the minimal package.json file required for loading a module from a directory.
package.json
123
{"main":"my_file.js"}
In my_file.js, a function is returned through the main property on the exports object. This function implements the Action interface.
When this Action is invoked, the archive will be unzipped into a temporary directory. OpenWhisk loads the directory as a Node.js module and invokes the function property on the module for each invocation.
This module uses the extremely popularleft-pad module to process an array of strings, passed through a request parameter. The resulting output is returned in the response.
Before using this module, we need to install the dependencies listed in package.json.
Node.js provides a mechanism for JavaScript modules to include native platform code as if they were ordinary modules. This is often used to improve performance by deferring operations to native C/C++ libraries. NPM handles compiling native code during the dependency install process.
Using modules with native dependencies in Actions requires the native code to be compiled for the platform runtime.
Compiling dependencies with Docker
One solution to this problem uses Docker to simulate the same runtime environment.
Running a local container from this image will give access to the same runtime environment. Running npm install within this container will produce the node_modules directory with native code compiled for the correct architecture.
This module returns a function that calculates a SHA3 cryptographic hash for the invocation payload. The hex string for the hash is returned as the function response.
The NPM module (sha3) used to calculate the digest uses a C++ extension for the hashing algorithm.
OpenWhisk uses a public Docker image as the base image for the Action environments. It then builds a custom image by installing Node.js and NPM for the particular runtime version.
Rather than building this image ourselves, we can use existing images published on Docker Hub.
Starting a local container from this image, we can use Docker’s host volume support to mount the local directory into the host container.
1
$ docker run -it -v "/action:/usr/src/app" nodesource/trusty:6.7 /bin/sh
Running npm install in the container, the sha3 dependency is compiled and installed.
1234567891011121314151617181920
# npm install> sha3@1.2.0 install /usr/src/app/node_modules/sha3
> node-gyp rebuild
make: Entering directory `/usr/src/app/node_modules/sha3/build' make: Warning: File `sha3.target.mk' has modification time 0.19 s in the future
CXX(target) Release/obj.target/sha3/src/addon.o
CXX(target) Release/obj.target/sha3/src/displayIntermediateValues.o
CXX(target) Release/obj.target/sha3/src/KeccakF-1600-reference.o
CXX(target) Release/obj.target/sha3/src/KeccakNISTInterface.o
CXX(target) Release/obj.target/sha3/src/KeccakSponge.o
SOLINK_MODULE(target) Release/obj.target/sha3.node
COPY Release/sha3.node
make: warning: Clock skew detected. Your build may be incomplete.
make: Leaving directory `/usr/src/app/node_modules/sha3/build'my-action@1.0.0 /usr/src/app
`-- sha3@1.2.0
`-- nan@2.4.0
The node_modules directory will be available on the host system after exiting the container. Repeat the steps above to archive the source files and deploy our serverless function.
123
$ zip -r action.zip *
$ wsk action create packageAction --kind nodejs:6 action.zip
ok: created action packageAction
Invoking the Action will now use the native code to produce hash values for the invocation parameters.
Node.js expects the directory to have a valid package.json file. The main property is used to define which JavaScript file is evaluated when the module is loaded. This file can assign values to the global exports object. These references are then returned when require is called for this module.
OpenWhisk expects the returned module object to have a property called main which references a function. This function will be executed for each invocation request.
Request parameters are passed as object properties on the first function argument. The function must return an object for the invocation response.
Other files included in the archive will be available in the current working directory. These can also be loaded as modules or read directly from the file-system.
Conclusions
OpenWhisk support for Action packages is a huge step forward for the platform. Node.js has an enormous ecosystem of third-party modules. Developers can now easily use any of these modules within their Actions.
This feature can also be used to include non-JS files within the runtime environment. It would be possible to use configuration files in JSON or static assets like HTML or CSS files.
The team are now working on providing support for other runtimes, watch this space…
Taking your code and turning it into scalable microservices in the cloud without having to set up or manage any infrastructure.
No provisioning VMs. No configuring Linux environments. No upgrading middleware packages.
Which is wonderful until something goes wrong with your microservices in production…
“Let me just log into the machine.”
Serverless platforms do not allow this.
No tracing system calls. No running top. No connecting a debugger to the process. You can’t even grep through the logs!
Many of the tools and techniques we use to diagnose bugs rely on having access to the environment.
Fortunately, we do still have access to logging output generated by our serverless functions. Phew.
Storing, searching and analysing these logs is crucial to efficiently diagnosing and fixing issues on serverless platforms.
In this blog post, we’re going to look at using a popular open-source solution to manage the logs being generated by our serverless functions. This solution is also known as ”The ELK Stack”.
TLDR: There is now a Logstash input plugin for OpenWhisk. This will automatically index serverless application logs into Elasticsearch. See here for usage instructions: https://github.com/jthomas/logstash-input-openwhisk
Elasticsearch, Logstash and Kibana
…are the three open-source projects that, when combined, are known as The ELK Stack. It provides a scalable search engine for indexed documents.
Elasticsearch“is a search engine based on Lucene. It provides a distributed, multitenant-capable full-text search engine with an HTTP web interface and schema-free JSON documents.”
Logstash is a tool for managing events and logs. You can use it to collect logs, parse them, and store them for later use (like, for searching). If you store them in Elasticsearch, you can view and analyze them with Kibana.
Kibana is an open source analytics and visualization platform designed to work with Elasticsearch. You use Kibana to search, view, and interact with data stored in Elasticsearch.
The ELK Stack is a perfect solution for managing logs from our serverless functions.
But how do we configure this solution to automatically index logs from our serverless platform?
Let’s start by looking serverless platform we are using…
OpenWhisk
OpenWhisk is an open-source serverless platform developed by IBM. Developers deploy functions to execute in response to external events, e.g. database updates, messages on a queue or HTTP requests. The platform invokes these functions on-demand in milliseconds, rather than having services sat idle waiting for requests to arrive.
Let’s walk through an example.
Serverless Functions
Here’s a sample serverless function which returns a greeting to the user. The code logs the invocation parameters and response message.
logs.js
123456789
functionmain(params){console.log('invoked with parameters:',params)constuser=params.user||'Donald Trump'constresponse={greeting:`Hello${user}`}console.log('returns: ',response)returnresponse}
Deploying this serverless function to OpenWhisk and invoking it generates an activation record.
OpenWhisk activation records are available through the platform API. Each record contains the stdout and stderr logs generated during the serverless function invocation.
Serverless Logs
Retrieving the activation record for the previous invocation, we can see the output generated by the calls to console.log.
However, developers need more than being able to retrieve logs to be effective at diagnosing and resolving issues with serverless functions.
Forwarding these logs to Elasticsearch will enable us to run full-text search across all logs generated, quickly retrieve all output for a particular serverless function, set up monitoring dashboards and much more…
Using Logstash will allow us to ingest and transform OpenWhisk logs into Elasticsearch documents.
Logstash Input Plugins
Logstash supports a huge variety of event sources through the use of a plugin mechanism. These plugins handle retrieving the external events and converting them to Elasticsearch documents.
Logstash has a huge repository of official and community supported input plugins. These plugins ingest everything from log files, syslog streams, databases, message queues, websockets and much more.
HTTP Polling Input Plugin
Logstash already has an input plugin for pulling events from a HTTP URL by polling. Users provide the URL in the logstash configuration, along with the polling schedule. Logstash will automatically retrieve and ingest the JSON response as an event stream.
1234567891011
input { http_poller {urls=> {"my_events"=> "http://localhost:8000/events"}# Poll site every 10sinterval=> 10
request_timeout=> 60
codec=> "json"}}
Great, so we can configure this plugin to call OpenWhisk API for retrieving activation records and automatically ingest them into Elasticsearch?
Unfortunately not…
Polling OpenWhisk Logs?
Each time the client calls the API to retrieve the activation records, we want to retrieve only those records that have occurred since the last poll. This ensures we are not ingesting the same records more than once.
Using this parameter in the polling URL, updated to the value of the last polling time, will allow us to ensure we only retrieve new activation records.
Unfortunately, the HTTP input plugin does not support setting dynamic query string parameters.
This means we cannot use the existing plugin to efficiently ingest OpenWhisk logs into Elasticsearch.
So we started work on a new plugin to support this behaviour…
OpenWhisk Input Plugin
This input plugin drains logs from OpenWhisk into Elasticsearch.
Once the plugin is installed, you need to configure Logstash with your platform endpoint and user credentials.
This sample configuration will poll the OpenWhisk platform for new logs every fifteen minutes and index them into Elasticsearch. Each activation record will be a separate document.
The plugin supports the same configuration values for the schedule parameter as the HTTP input plugin.
More examples of using the plugin are available in the examples directory in the project repository.
Demonstration
Here’s a demonstration of the OpenWhisk input plugin being used in the ELK stack. As we invoke serverless functions in OpenWhisk, Kibana shows the activation records appearing in the dashboard. Logstash is polling the logs API and ingesting the records into Elasticsearch in real-time.
Conclusion
Developers using serverless platforms have no access to the infrastructure environment running their code. Debugging production bugs relies on using logging output to diagnose and resolve issues.
Elasticsearch, Logstash and Kibana has become the scalable open-source solution for log management and analysis.
Using the Logstash plugin for OpenWhisk, serverless logs will be automatically indexed into Elasticsearch in real-time. Developers can use the Kibana frontend to easily diagnose and monitor issues in production.
In the next post, we’ll look at using Docker to set up Elasticsearch, Logstash and Kibana with our custom OpenWhisk plugin.
IBM will be hosting a full-day workshop at the event. Developers can come and learn how to use OpenWhisk, the open-source serverless platform.
I’m going to be one of the mentors on the day, along with members from the product team.
Working on training material for the session, I remembered that the Node.js community had a popular workshop tool for running training sessions around the world.
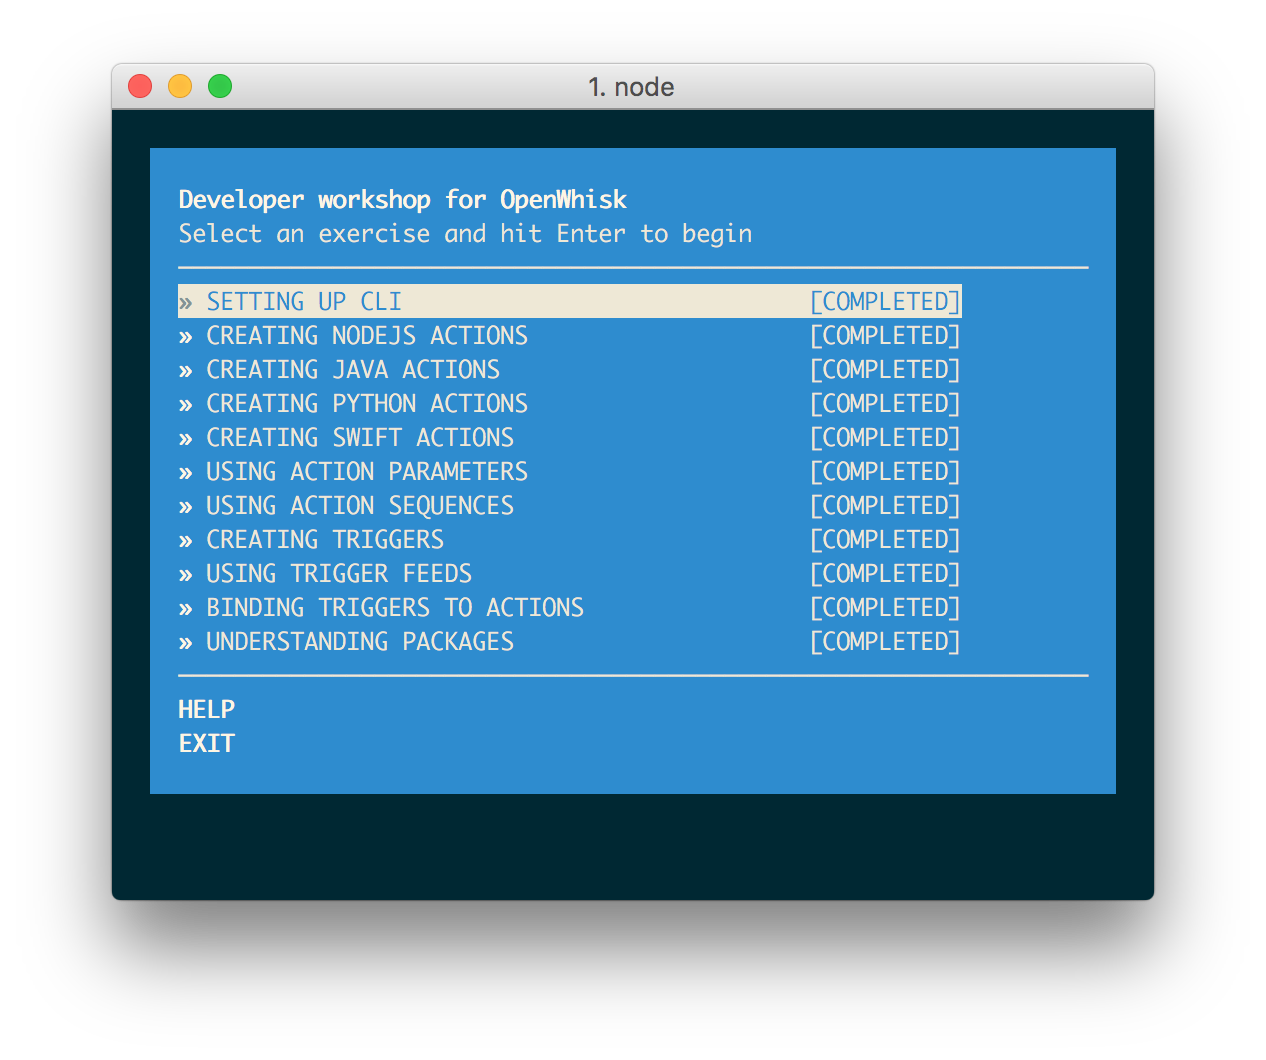
NodeSchool
NodeSchool provides developers with a command-line utility that helps them learn the platform. This tool provides a series of interactive exercises to test their knowledge. Each exercise requires the developers to write some code. The application can then verify their solution and record their progress.
Would it be possible to use this material with the NodeSchool toolchain to create an interactive OpenWhisk workshop for developers?
Developers would review the relevant documentation for a particular feature and use the tool to test their knowledge through an interactive exercise.
Each exercise would require them to build, deploy and configure a sample serverless function which used that platform feature.
After getting set up with the toolchain and reviewing other example projects, we started work on it…
openwhisk-workshop
🎉 Developers can now install the workshop from NPM as a global command. 🎉
1
$ npm install -g openwhisk-workshop
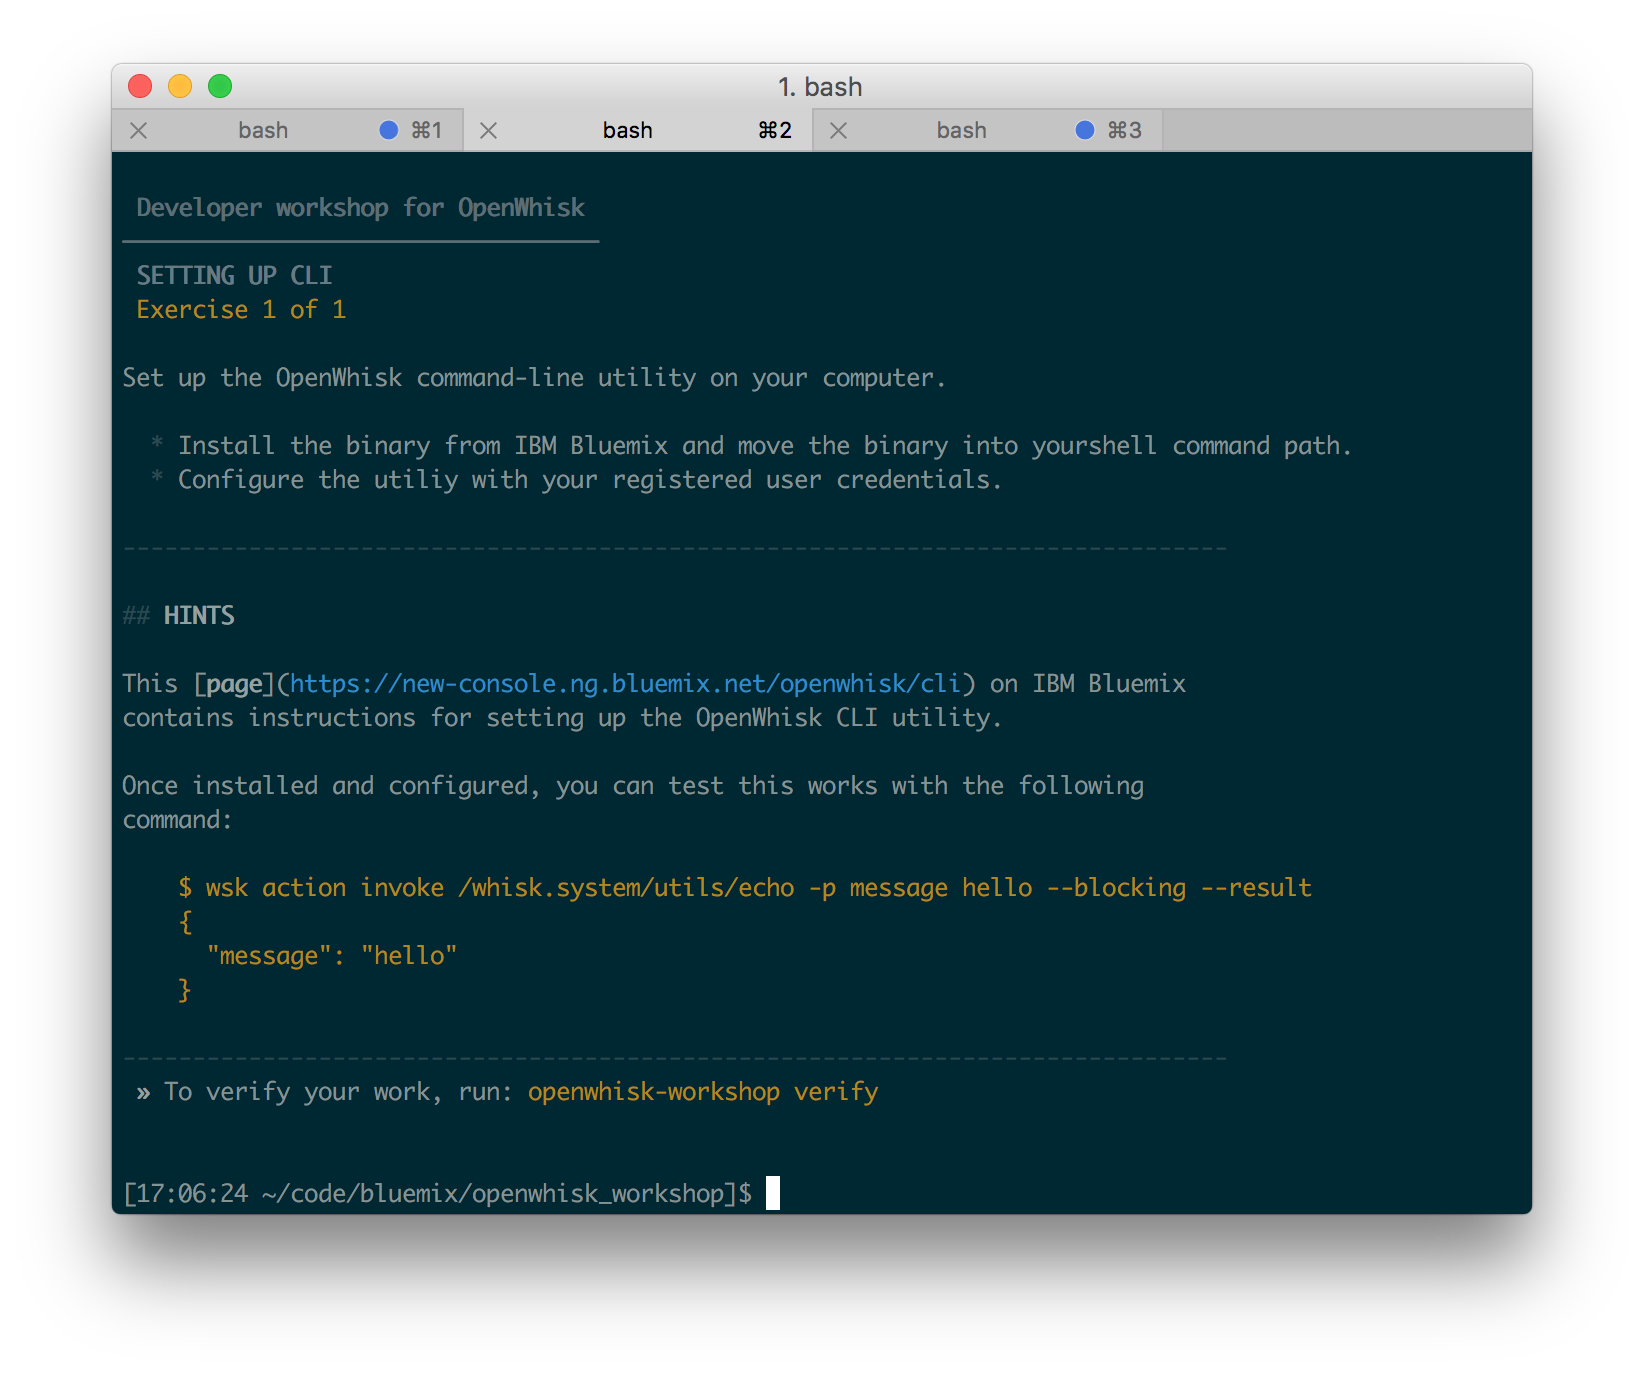
This tool needs the OpenWhisk command-line utility installed and authenticated against an instance of the platform. For more details on getting this environment setup, see the following documentation here.
Once the tool is installed, developers can open the application by running the following command.
1
$ openwhisk-workshop
The list of exercises will be displayed, along with current completion progress. Using the arrow keys (↑↓) to navigate the menu, press RETURN to open an exercise.
On selecting an exercise, the problem challenge will be printed to the terminal.
Each exercise comes with a documentation page which explains the concepts behind the challenge. Use the following command to display the exercise documentation in the terminal.
1
$ openwhisk-workshop more
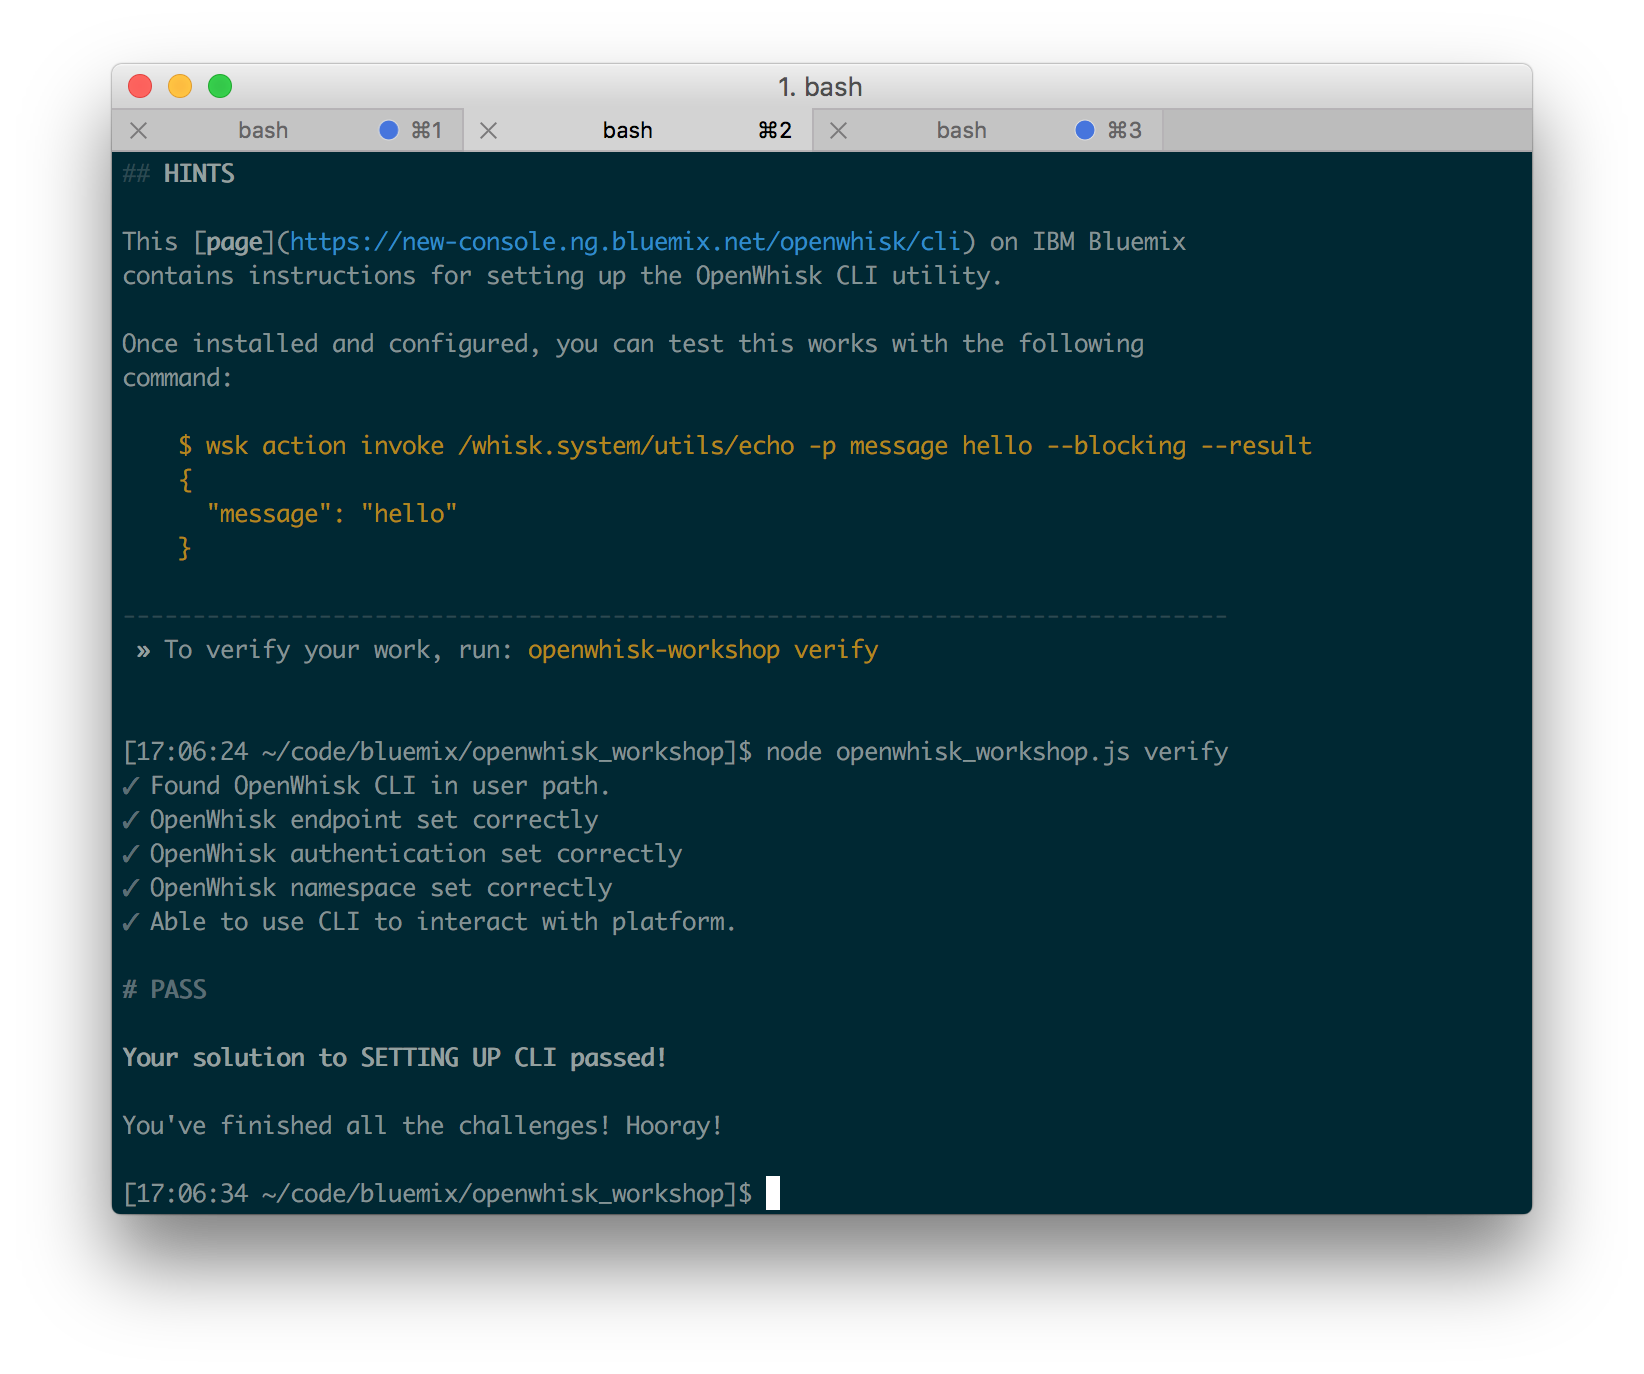
Once the developer has solved the challenge, they can verify their solution with the following command.
1
$ openwhisk-workshop verify
If their solution is correct, that task is marked as completed and the utility returns to the list of exercises. Developers can continue working through the exercises until they have completed them all.
feedback
If you have problems with the workshop, please raise an issue in the repository.
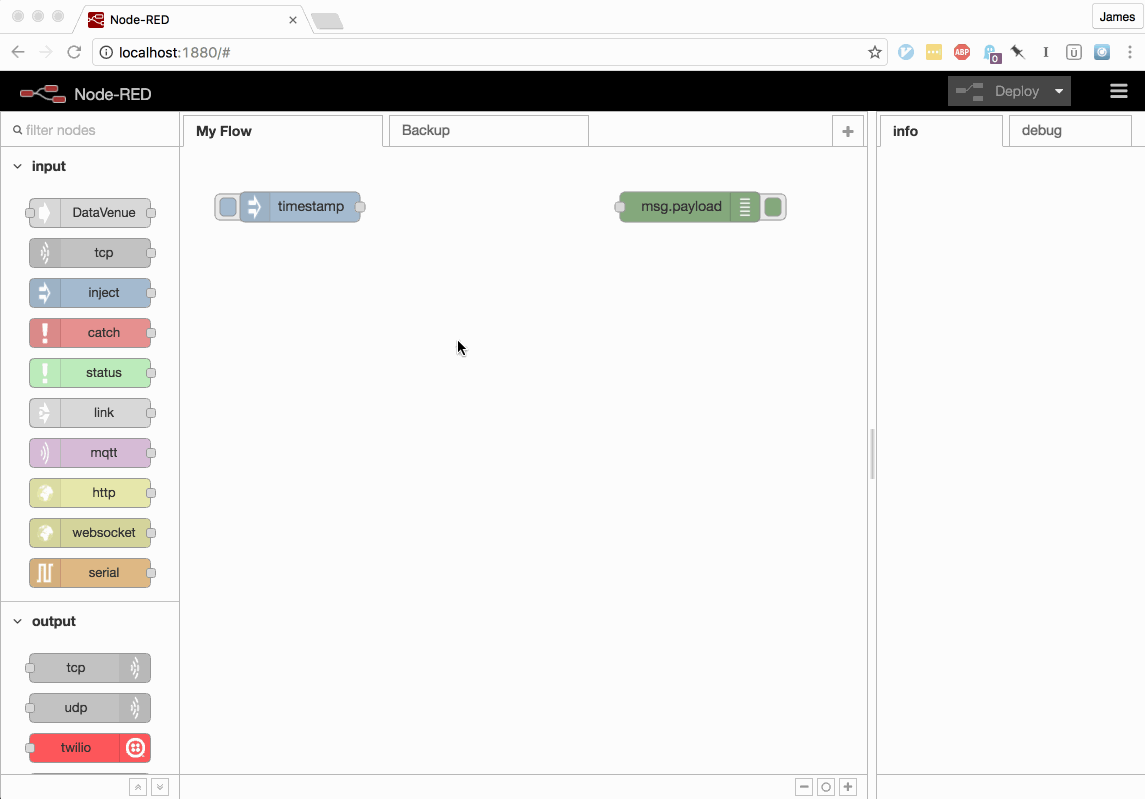
Node-RED nodes for OpenWhisk were initially released earlier this year. The nodes allowed users to manually invoke existing Actions and Triggers. This month, a new version of the package has been released providing a huge improvement in the functionality…
features
Users can now define new Actions using the flow editor UI, providing the source code through the inline node configuration panel.
Users can also modify existing Actions, with the live Action source being previewed in the node editor panel.
Triggers can be created and updated in the same way.
Both nodes allow users to view, define and modify default parameters for both Actions and Triggers.
Deploying the flow will make the modifications to Actions and Triggers live for the configured OpenWhisk platform.
example
This video shows the updated nodes being used to define a new OpenWhisk Action, invoking it in response to a message from an inject node and then making modifications to the source code.
…is the title of my presentation about building serverless applications using OpenWhisk.
Abstract
Servers are killing your productivity. Rather than building better software for your users, you end up constantly distracted by maintaining computers. Wasn’t the “cloud” supposed to fix this? It sounded so promising until we realised it was just renting VMs in someone else’s datacenter. We couldn’t escape “servers”. Until now…
In this session, developers will learn how to build microservices without servers, using modern “serverless” cloud platforms. We’ll look at common challenges (and solutions) to building applications using “serverless” stacks. Exploring emerging “serverless” design patterns will give developers the knowledge to build application architectures using these new platforms.
This session is aimed at software developers experienced in building traditional backend web applications, who want to learn how to build microservices without servers.
If you have questions or issues, raise an issue in the repository or send me a tweet.
Conference Sessions
This talk was first delivered at JDayLviv earlier this month. The session was recorded so the video should surface online soon. I’ll be repeating the talk at VoxxedDays Belgrade and JavaDay Kiev in September and October.
This week, I’ve been helping create and publish official Docker images for the
Node-RED project. Users can start Node-RED instances from these images using the following command.
1
docker run -it -p 1880:1880 nodered/node-red-docker
Reviewing the community’s efforts, we wanted to create official images that
made it simple for users to start Node-RED as Docker containers with minimal
configuration whilst allowing for easy customisation, i.e. adding new nodes.
Node-RED is a Node.js application, published as an NPM module.
The Node.js project publishes official Docker images which we used as our base image.
These images provide an environment with the correct versions of Node.js and
NPM installed.
Rather than manually copying the Node-RED source code into the container image,
we used NPM to install the source code by defining a custom package.json
which includes Node-RED as dependency.
package.json
12345678910111213141516
{"name":"node-red-docker","version":"0.14.5","description":"Docker images for Node-RED","main":"node_modules/node-red/red/red.js","scripts":{"start":"node-red"},..."dependencies":{"node-red":"0.14.5"},"engines":{"node":"4.*.*"}}
Adding this file into the container image and then running NPM install, using
the ADD and RUN commands, will retrieve the correct Node-RED version and build
that into the container image.
Docker images define a default start command to run when the container is
created. Using npm start for this image will parse the start script
listed in the package.json file, which has been set to
node-red.
Exposing the Node-RED user directory within the container as a data volume
means users can mount this on the host system. Nodes installed into this
directory, using NPM on the host system, will automatically be registered when
Node-RED starts.
Within the Dockerfile for the Node-RED image, the /data directory is configured
as the user directory and exported as a data volume.
Users can mount their local user directory into the container with the
following command.
1
docker run -it -p 1880:1880 -v ~/.node-red:/data nodered/node-red-docker
Environment Parameters
Docker supports injecting environment parameter values into running containers,
using command-line options on the host system. This is often used to configure
runtime options without users having to build new container images. Node-RED’s
Docker images support the following environment parameters.
Flows Configuration
User flow configurations are stored in a JSON file under the user directory. This defaults to
flows.json but can be configured using an environment parameter
(FLOWS) passed to the container, as shown below.
1
docker run -it -p 1880:1880 -e FLOWS=my_flows.json nodered/node-red-docker
Node Options
Node.js runtime arguments can be passed to the container using an environment
parameter (NODE_OPTIONS). For example, to fix the heap size used by the Node.js
garbage collector you would use the following command.
1
docker run -it -p 1880:1880 -e NODE_OPTIONS="--max_old_space_size=128" nodered/node-red-docker
Alpine Linux Image
The official Node.js Docker image uses the Debian Jessie base image. This image
provides a full Linux install, which means dependent Docker images can be
hundreds of megabytes in size. Node-RED’s Docker image, using this base image,
is nearly 300 MB.
Alpine Linux is a lightweight Linux distribution, focused on security and
performance. A minimal Docker image based on Alpine Linux is only 5 MB in
size!
Using the alpine-node base
image, which provides an Alpine Linux environment with Node.js & NPM, in our
Dockerfiles reduces the resulting image file to under 50 MB.
Therefore, we’re publishing the Alpine Linux image as a seperate tag (slim), rather
than using this base image throughout our Dockerfiles.
This version should provide an extremely lightweight Node-RED image that works
for most users.
1
docker run -it -p 1880:1880 nodered/node-red-docker:slim
Raspberry Pi Image
Node-RED is an incredibly popular tool for hacking on the Raspberry Pi. Using a
custom Raspberry Pi image, developers can also have a full Docker system
running in the Linux environment on their device.
So, can we use Docker to start Node-RED on the Raspberry Pi?
Due to the platform architecture, ARM rather than x86/x64 by Intel or AMD,
Docker images must be packaged specifically for that platform. The existing
Docker images created for Node-RED will not work.
Using this base image to build a new Raspberry Pi-specific Node-RED image,
published with the rpi tag, means users can now start Node-RED on the Raspberry Pi using Docker.
1
docker run -it -p 1880:1880 nodered/node-red-docker:rpi
OpenWhisk, the open-source serverless
platform, provides the ability to invoke custom
Docker containers as serverless functions.
Developers can create new
Actions,
referencing public images on Dockerhub. OpenWhisk
manages creating and executing containers using these images per invocation
request.
Using this feature, developers can write serverless functions using the
Go language. Compiled Go language binaries are embedded
within custom Docker images and pushed into the platform.
So, how do we start?
This blog post will explain how to get your Go language functions running as
“serverless functions” on OpenWhisk. If you’re impatient to get to the code,
this repository contains the
examples for everything discussed below.
OpenWhisk helps developers create custom Actions using Docker through an SDK…
The SDK provides the source for a custom Docker image, which executes a custom
binary in response to invocation requests. The default SDK copies the
executable file, located at the client/action, into the image during the
build process. Users build the image locally before pushing this to Dockerhub.
Using the command-line utility, users can then create a new Action referencing
this public Docker image. When this Action is invoked, the platform will spin
up a new container from this custom image.
OpenWhisk SDK’s Docker image uses a Node.js
application
to handle the JSON invocation request from the platform and spawns a process to
execute the binary. Invocation parameters are passed as a JSON string through a
command-line argument to the binary. The executable must write the JSON
response to stdout, the handler will return this to the platform.
Containers used to run OpenWhisk Actions must be expose a HTTP API on port 8080
with two paths, /init and /run. The platform sends HTTP POST requests to
these paths to initialise the Action and schedule invocations.
The /init path is used to provide the Action source for languages which
support runtime evaluation. User-provided Docker images do not need to
implement this method, other than returning a non-error HTTP response.
The /run path is called by the platform for each invocation request.
Parameters for the invocation are passed as the value property of the JSON
request body. Any non-empty JSON response will be interpreted as the invocation
result.
Go Actions using the Docker SDK
Using Go binaries with the Docker SDK requires the developer to cross-compile
the source for the platform architecture and copy the binary to the
client/action path.
The Go code must parse the invocation parameters as a JSON string from the
command-line argument. Data written to stdout will be parsed as JSON and
returned as the Action response.
This sample Go source demonstrates using this method to implement a “reverse
string” Action.
packagemainimport"os"import"encoding/json"import"log"typeParamsstruct{Payloadstring`json:"payload"`}typeResultstruct{Reversedstring`json:"reversed"`}// extract invocation parameters, passed as JSON string argument on command-line.funcparams()Params{varparamsParamssource:=os.Args[1]buf:=[]byte(source)iferr:=json.Unmarshal(buf,¶ms);err!=nil{log.Fatal(err)}returnparams}// convert struct back to JSON for responsefuncreturn_result(resultResult){buf,err:=json.Marshal(result)iferr!=nil{log.Fatal(err)}os.Stdout.Write(buf)}funcmain(){input:=params()// reverse the string passed from invocation parameterschars:=[]rune(input.Payload)fori,j:=0,len(chars)-1;i<j;i,j=i+1,j-1{chars[i],chars[j]=chars[j],chars[i]}result:=Result{Reversed:string(chars),}return_result(result)}
Docker SDK Base Image
Building a base image from the OpenWhisk Docker SDK and publishing on Dockerhub
simplifies the process of building a Docker-based Action. Developers can now
use the following image
(jamesthomas/openwhisk_docker_action),
without having to install the SDK locally.
This base image includes the Node.js handler to manage the platform HTTP
requests. An executable file at /blackbox/action will be called for each
invocation. JSON parameters and responses are still passed using command-line
arguments and stdout.
Custom Go Handler
Using the Docker SDK for OpenWhisk relies on a Node.js application to handle
the platform HTTP requests, spawning a process to execute the user binary file.
Implementing the HTTP API, described above, in Go would allow us to remove the
Node.js handler from the image. Compiling the Go Action source with the HTTP
API handler into a single binary and using an Alpine Linux base image will
dramatically reduce the image size.
This should improve execution performance, by removing the Node.js VM process,
and cold start-up time, through having a smaller Docker image.
Using this Go package, jthomas/ow, users can
automate the process of creating Go-based Actions.
1
gogetjthomas/ow
The package provides a method for registering Action callbacks and implements
the HTTP endpoints for handling platform requests.
Invocation parameters are passed using a function parameter, rather than a raw
JSON string. Returned interface values will be automatically serialised to JSON
as the Action response.
Cross-compiling the Action source, bundling this package, creates a single
lightweight binary.
Embedding this file within a Docker image, using a minimal base image, creates
a tiny image (<10MB). Containers from these images only execute a single
process to handle both the HTTP requests and running the Action source.
Pushing the local image to Dockerhub and then using it to create an Action
follows the same instructions above.
Conclusion
Running OpenWhisk Actions from user-provided Docker images allows developers to
execute “serverless functions” using any language. This is a fantastic feature
not currently supported by many of the other serverless providers.
OpenWhisk provides an
SDK letting
users build a local Docker image which executes their Action and handles the
HTTP requests from the platform. Using this with Go-based Actions requires us
to cross-compile our binary for the platform and handle passing JSON through
command-line arguments and stdout.
Re-writing the HTTP handler natively in Go
means the Docker image can contain and execute a single binary for both tasks.
Using this Go package provides an interface for registering Actions and handles
the HTTP requests automatically.
This project contains
examples for the “reverse string” Action using both the Docker SDK and Go-based
handler detailed above.