In this tutorial, I’m going to show you how to use a custom domain for serverless functions exposed as APIs on IBM Cloud. APIs endpoints use a random sub-domain on IBM Cloud by default. Importing your own domains means endpoints can be accessible through custom URLs.
Registering a custom domain with IBM Cloud needs you to complete the following steps…
- Generate SSL/TLS certificates for your domain
- Register domain certificates with IBM Certificate Manager
- Bind a custom domain to Cloud Functions APIs using the IBM Cloud APIs console.
This tutorial assumes you already have actions on IBM Cloud Functions exposed as HTTP APIs using the built-in API service. If you haven’t done that yet, please see the documentation here before you proceed.
The instructions below set up a sub-domain (api.<YOUR_DOMAIN>) to access serverless functions.
Generating SSL/TLS Certificates with Let’s Encrypt
IBM Cloud APIs only supports HTTPS traffic with custom domains. Users needs to upload valid SSL/TLS certificates for those domains to IBM Cloud before being able to use them.
Let’s Encrypt is a Certificate Authority which provides free SSL/TLS certificates for domains. Let’s Encrypt is trusted by all root identify providers. This means certificates generated by this provider will be trusted by all major operating systems, web browsers, and devices.
Using this service, valid certificates can be generated to support custom domains on IBM Cloud.
###domain validation
Let’s Encrypt needs to verify you control the domain before generating certificates.
During the verification process, the user makes an authentication token available through the domain. The service supports numerous methods for exposing the authentication token, including HTTP endpoints, DNS TXT records or TLS SNI.
There is an application (certbot) which automates generating authentication tokens and certificates.
I’m going to use the DNS TXT record as the challenge mechanism. Using this approach, certbot will provide a random authentication token I need to create as the TXT record value under the _acme-challenge.<YOUR_DOMAIN> sub-domain before validation.
using certbot with dns txt validation
- Install certbot into your environment, e.g. using Homebrew.
brew install certbot
- Run certbot in manual mode with the DNS challenge method.
certbot certonly --manual --preferred-challenges=dns -d *.<YOUR_DOMAIN>
I’m generating a wildcard certificate for any sub-domains under <YOUR_DOMAIN>. This allows me to use the same certificate with different sub-domains on IBM Cloud, rather than generating a certificate per sub-domain.
During the validation process, certbot should display the following message with the challenge token.
Please deploy a DNS TXT record under the name
_acme-challenge.<YOUR_DOMAIN> with the following value:

<CHALLENGE_TOKEN>

Before continuing, verify the record is deployed.
- - - - - - - - - - - - - - - - - - - - - - - - - - - - - - - - - - - - - - - -
Press Enter to Continue
setting challenge token
-
Take the challenge token from
certbotand create a new TXT record with this value for the_acme-challenge.<YOUR_DOMAIN>sub-domain. -
Use the
digcommand to verify the TXT record is available.
dig -t txt _acme-challenge.<YOUR_DOMAIN>
The challenge token should be available in the DNS response shown by dig. 👍
;; ANSWER SECTION:
_acme-challenge.<YOUR_DOMAIN>. 3599 IN	TXT	"<CHALLENGE_TOKEN>"
- Press Enter in the terminal session running
certbotwhen the challenge token is available.
retrieving domain certificates
certbot will now retrieve the TXT record for the sub-domain and verify it matches the challenge token. If the domain has been validated, certbot will show the directory containing the newly created certificates.
IMPORTANT NOTES:
 - Congratulations! Your certificate and chain have been saved at:
   /etc/letsencrypt/live/<YOUR_DOMAIN>/fullchain.pem
   Your key file has been saved at:
   /etc/letsencrypt/live/<YOUR_DOMAIN>/privkey.pem
   Your cert will expire on 2019-03-03.
...
certbot creates the following files.
cert.pem- public domain certificateprivkey.pem- private key for domain certificatechain.pem- intermediate domain certificatesfullchain.pem- public and intermediate domain certificates in a single file.
Registering the domain with IBM Cloud will require the public, private and intermediate certificate files.
Registering Custom Domain with IBM Cloud
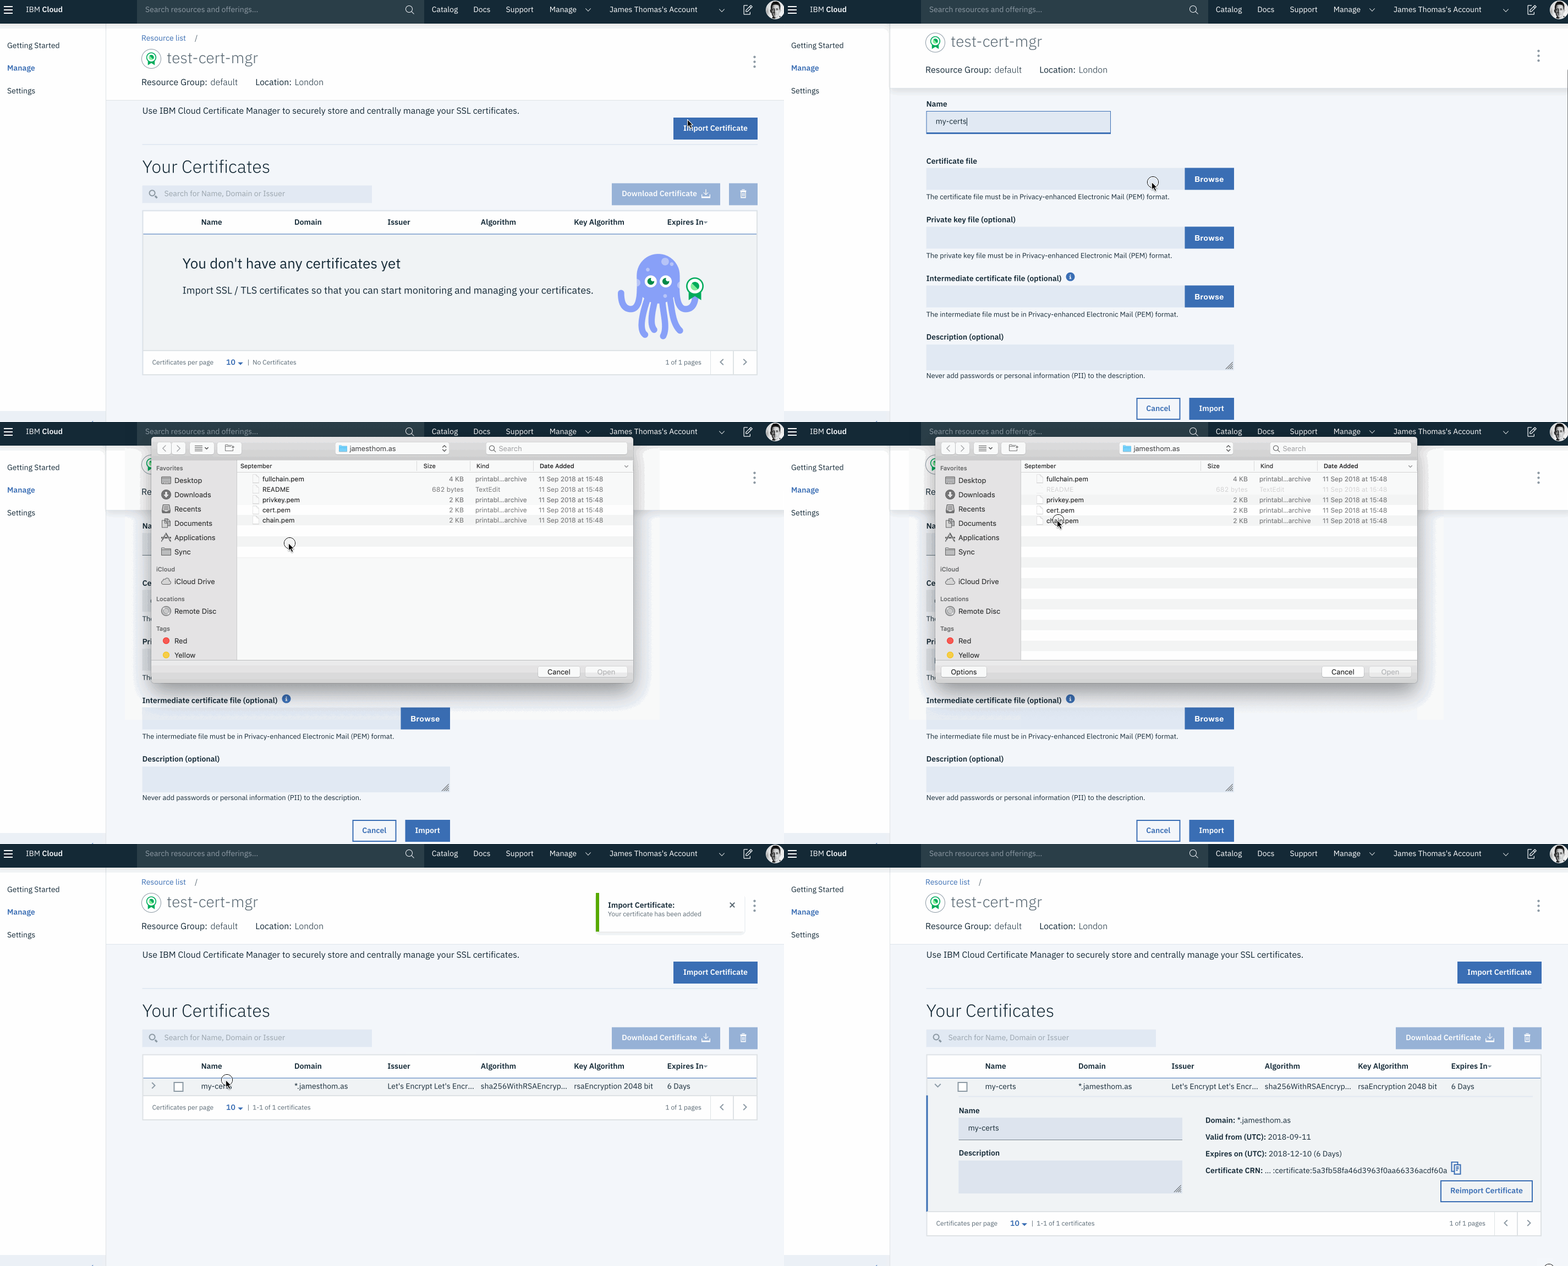
Certificates for custom domains in IBM Cloud are managed by the Certificate Manager service.
- Create a new instance of the service from the IBM Cloud Catalog.
- From the service homepage, click the “Import Certificate” button.
- Fill in the following fields in the import form. Use the generated certificate files in the upload fields.
- Name
- Certificate File (
cert.pem) - Private key file (
privkey.pem) - Intermediate certificate file (
chain.pem)
After importing the certificate, check the certificate properties match the expected values

Binding Domain to IBM Cloud Functions APIs
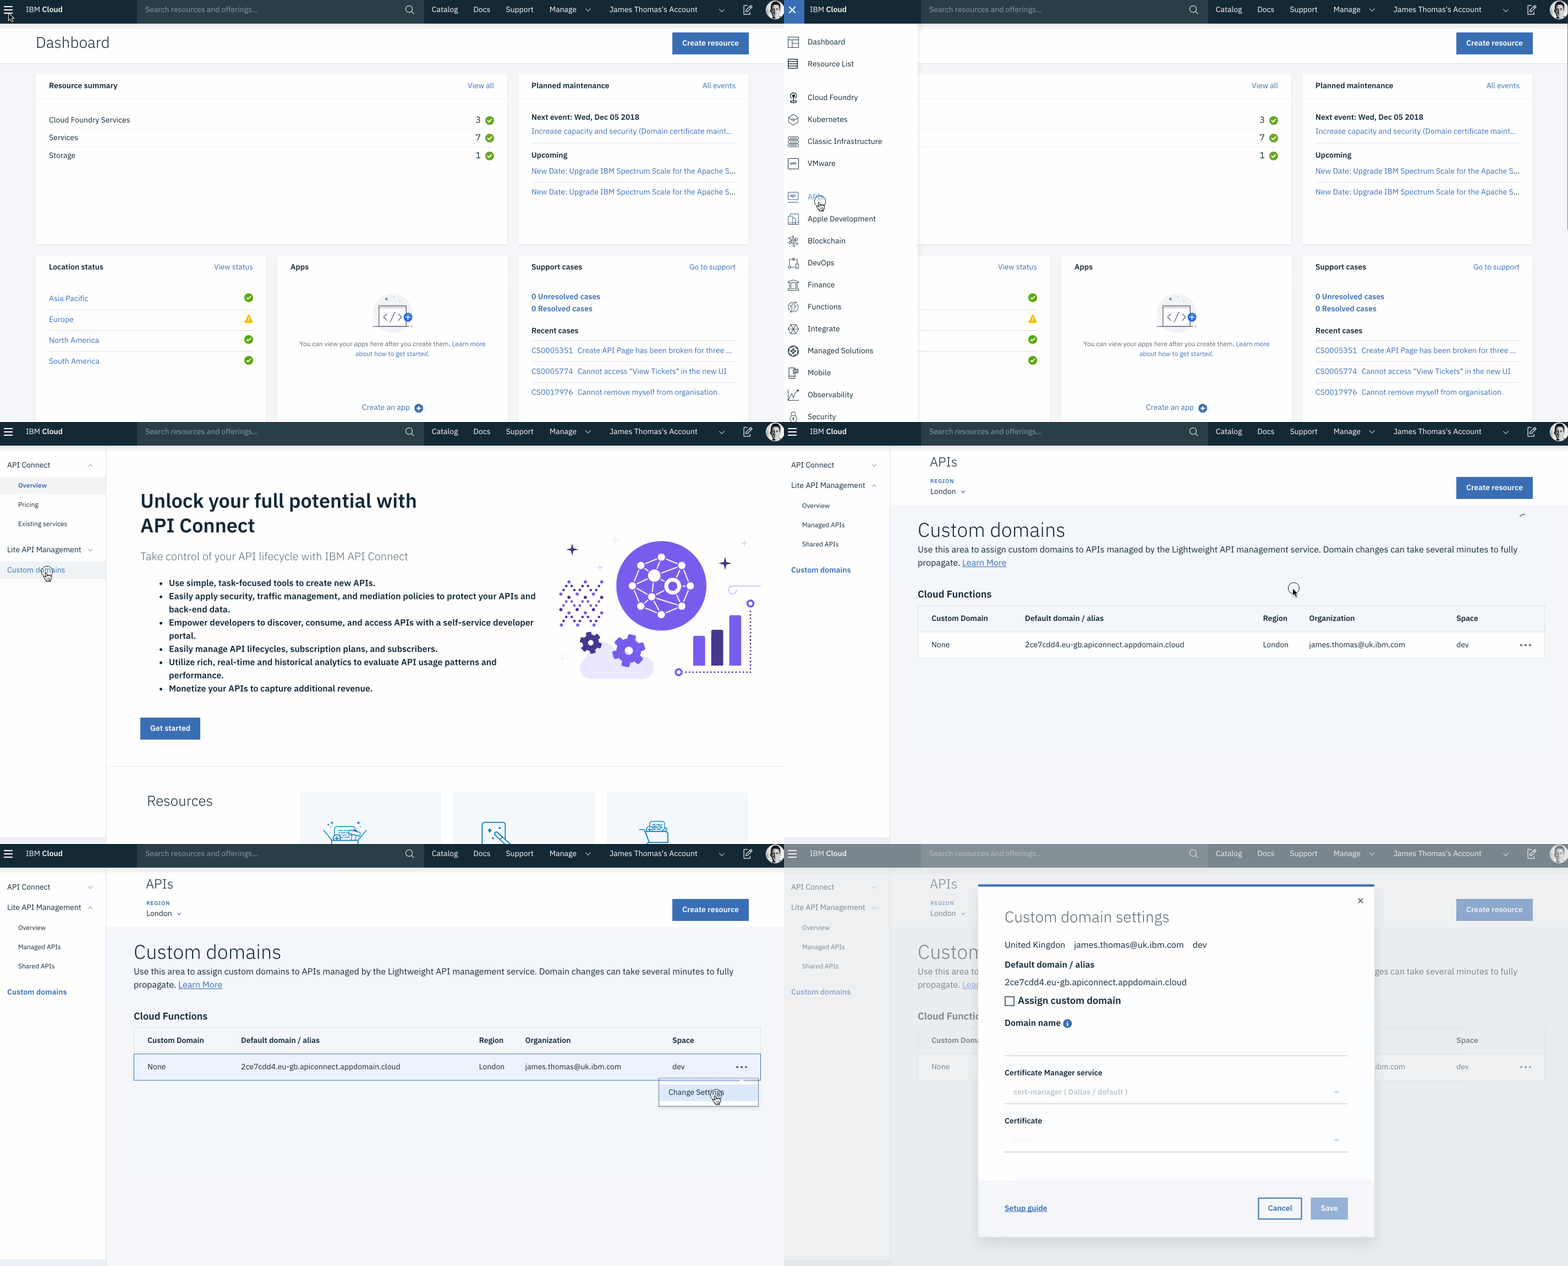
Custom domains for APIs on IBM Cloud are managed through the IBM Cloud APIs console.
- Open the “Custom Domains” section on the IBM Cloud APIs console.
- Check the “Region” selector matches the region chosen for your actions and APIs.
- Click the
···icon on the row where “Organisation” and “Space” values match your APIs. - Click “Change Settings” from the pop-up menu.

domain validation
IBM Cloud now needs to verify you control the custom domain being used.
Another DNS TXT record needs to be created before attempting to bind the domain.
- From the “Custom Domain Settings” menu, make a note of the “Default domain / alias” value. This should be in the format:
<APP_ID>.<REGION>.apiconnect.appdomain.cloud. - Create a new TXT record for the custom sub-domain (
api.<YOUR_DOMAIN>) with the default domain alias as the record value (<APP_ID>.<REGION>.apiconnect.appdomain.cloud). - Use the
digcommand to check the sub-domain TXT record exists and contains the correct value.
dig -t txt api.<YOUR_DOMAIN>
The default domain alias value should be available in the DNS response shown by dig. 👍
;; ANSWER SECTION:
api.<YOUR_DOMAIN>. 3599 IN	TXT	"<APP_ID>.<REGION>.apiconnect.appdomain.cloud"
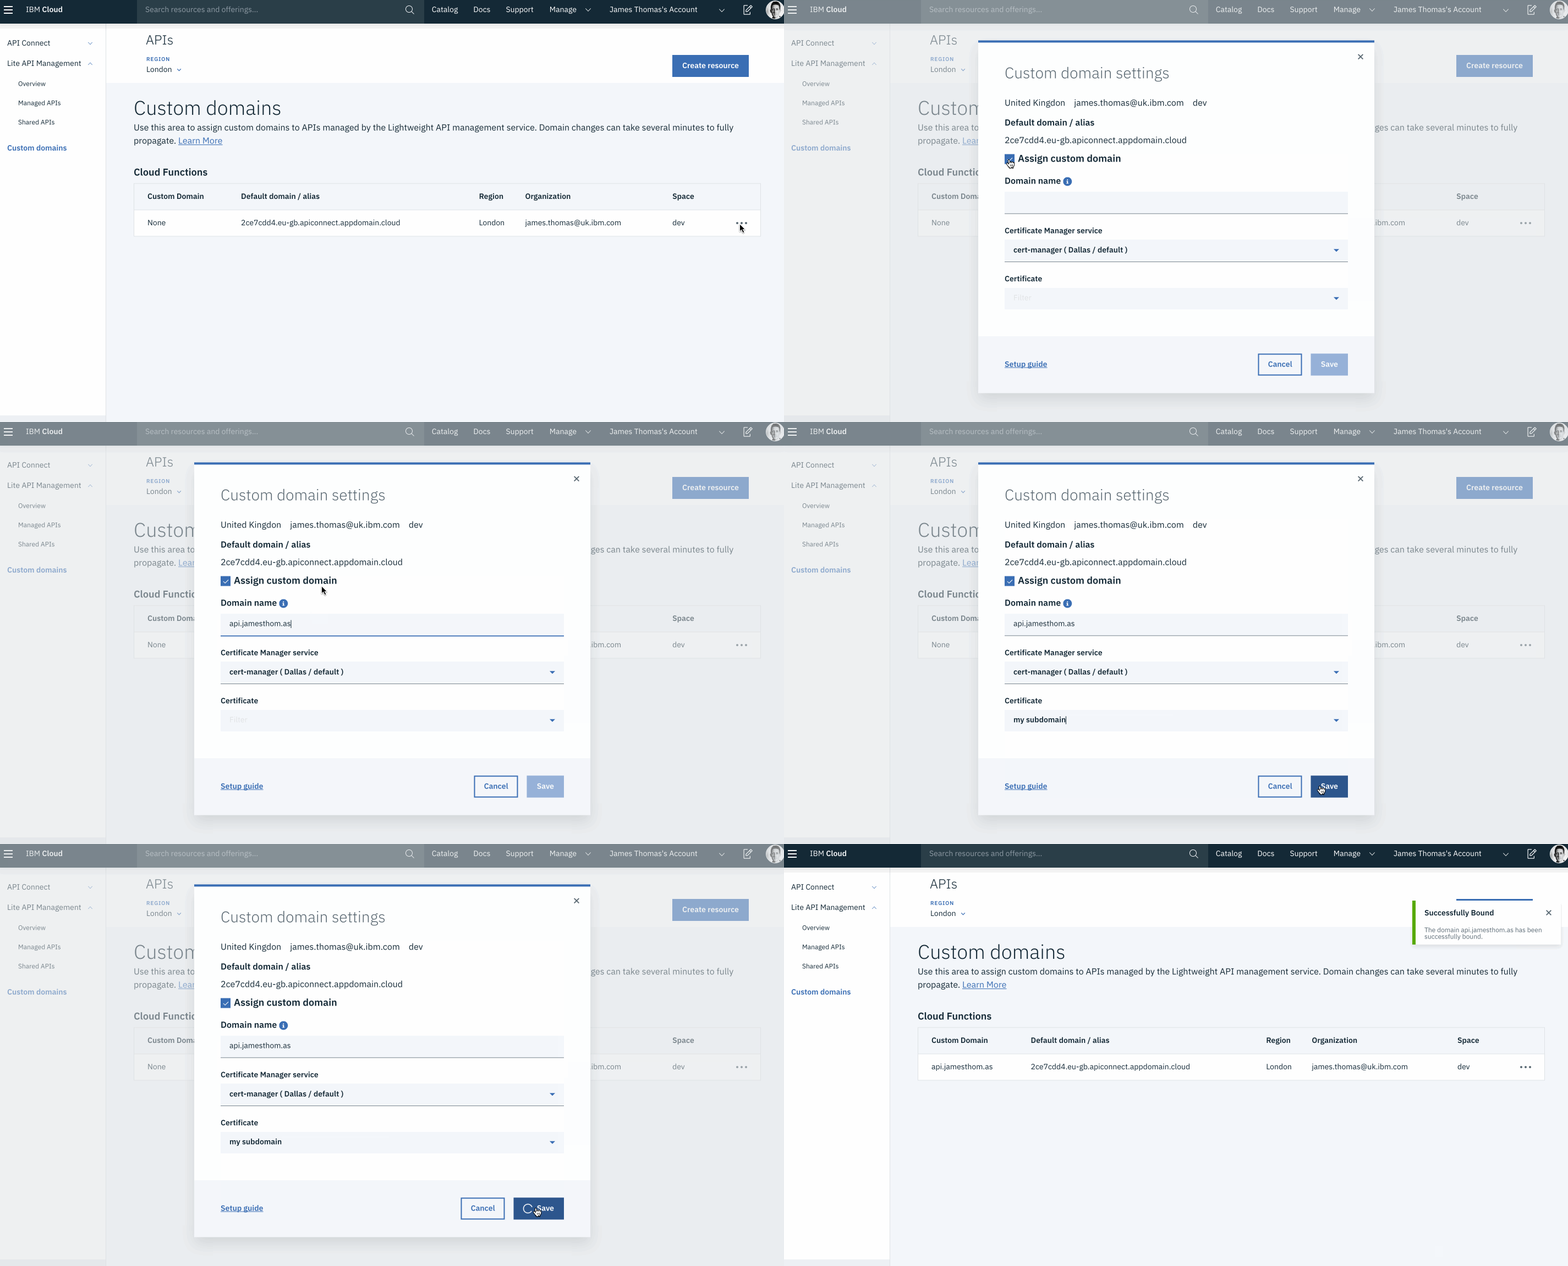
Having created the TXT record, fill in the Custom Domain Settings form.
custom domain settings
- Select the “Assign custom domain” checkbox in the “Custom domain settings” form.
- Fill in the following form fields.
- Domain Name: use the custom sub-domain to bind (
api.<YOUR-DOMAIN>). - Certificate Manager service: select the certificate manger instance.
- Certificate: select the domain certificate from the drop-down menu.
- Domain Name: use the custom sub-domain to bind (
- Click the “Save” button.
Once the domain has been validated, the form will redirect to the custom domains overview. The “Custom Domain” field will now show the sub-domain bound to the correct default domain alias.

add CNAME record
- Remove the existing TXT record for the custom sub-domain (
api.<YOUR-DOMAIN>). - Add a new CNAME record mapping the custom sub-domain (
api.<YOUR-DOMAIN>) to the “Default domain / alias” on IBM Cloud (<APP_ID>.<REGION>.apiconnect.appdomain.cloud). - Use the
digcommand to check the CNAME record is correct.
dig -t CNAME api.<YOUR_DOMAIN>
The default domain alias value should be available in the DNS response shown by dig. 👍
;; ANSWER SECTION:
api.<YOUR_DOMAIN>.	3599	IN	CNAME	<APP_ID>.<REGION>.apiconnect.appdomain.cloud.
Testing It Out
Functions should now be accessible through both the default domain alias and the new custom domain. 👏
- Invoke the default domain alias API URL for the function.
curl https://<APP_ID>.<REGION>.apiconnect.appdomain.cloud/<BASE_PATH>/<SUB_PATH>
Both the BASE_PATH and SUB_PATH values come from the API definitions configured by the user.
- Invoke the custom domain API URL for the function.
curl https://api.<YOUR_DOMAIN>/<BASE_PATH>/<SUB_PATH>
Make sure you use HTTPS protocol in the URL. IBM Cloud does not support HTTP traffic with custom domains.
Both responses for these URLs should the same! Hurrah. 😎
